All toolbar buttons everywhere are functional and will take you to where they are discussed.
View. Using the View toolbar. Saving and Restoring Views. Vpoint and the tripod. The Plan command and Views. Working with the Camera to create your own Views.

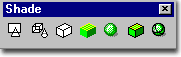
Shade. Using the Shade toolbar. Settings for Shaded work. Working with Transparent Materials and Opaque Materials while in Shaded Mode. Working with Lights in Shaded Mode. Settings that affect the appearance of Shaded objects.
3D Orbit. Using the 3D Orbit toolbar. Creating Perspectives. 3D Orbit Right-Click pop-up menu. Introduction to the old Dview command and its perspective tools.

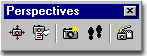
Perspectives. Camera, 3D Orbit and Shade toolbars. Adding Cameras. Working with Cameras. Using 3D Orbit to adjust views. Making .avi movie files in ADT.
Render. Rendering dialogue box. Output in various formats. Speed and Quality. Size of files. Every Rendering option and setting broken down.

Lights. Understanding Lights. Creating Lights. Managing Lights.
![]()
Materials. Understanding Materials. Working with the Materials Editor. Assigning Materials to Layers, Objects and by Color.
![]()
Mapping. Understanding Mapping. Mapping Materials on objects.
![]()
Backgrounds, Atmospheres and Landscape Objects. Understanding the art of illusions. Adding fake backgrounds. Using simple Colors for backgrounds. Adding a background image for Reflective Materials. Adding Fog. Adding and Creating Landscape objects.
![]()
Scenes. Saving all of the work and managing multiple Renderings. Staging work. Understanding the whole process of creating Renderings. Step by Step instructions with a downloadable sample model. Saving Views and Lights as Scenes to Render.
![]()
Reference. External References and their potential role in managing Rendering files. Presentation opportunities with Xref Clipping. Using Xrefs and Reference Names to automatically Attach Materials by Layer. Image References for bringing Renderings back into AutoCAD and Architectural Desktop for mixing Vectors and Raster Images. Image Reference Frames, Clipping, Adjusting and Transparency. Display Order for managing object hierarchy.

Model Setup - Reviewing Architectural Desktop Display Representations for controlling the appearance in 3D Views for Rendering and Exporting. File Linking with Xrefs and associated issues. Managing a Rendering File. Breaking a Rendering all of the way down to exploded objects. Autodesk® Viz 4 and Linking. Viz's File Link Manager. Selecting objects in Viz. Automatic Material Attachments in Viz. Exporting AutoCAD and Architectural Desktop objects to other software file formats.
 |
Graphic Content - Using AutoCAD / Architectural Desktop for raster content. Overview of Prnt Scrn, SaveImg, Publish to Web, Export to .eps, .wmf and .bmp and example of Plot to .eps, jpg and .tif. Basics of using Photoshop for Creating and Editing Bitmap Materials for Rendering.
Output. Printing from AutoCAD and Architectural Desktop; Model Space and Paper Space. Hiding Viewports. Napkin Sketch command. Photoshop and Quality. Web considerations. Ws_FTP_Pro for website file transfer. ACDSee Browser for management and instant slide shows.
![]()
Appendix. Creating a Rendering Template file. Unloading the Render Application and Render Window. Options dialogue box and various Configuration settings for optimum Presentation work; including how to see Light, Materials and Transparency live while working on the Model. Links to other sources for 3D Blocks.
This Architectural Desktop 3 eGuide was designed for those who already know quite a bit about AutoCAD 2002. This eGuide was designed to supplement our on/off-site training program and was designed to complement our other eGuides on Architectural Desktop. Additions, changes and updates will be posted periodically. We will highlight additions, changes and updates with our usual Datum graphic used throughout the ARCHIdigm.com site. Visit the Lounge for more Tips-n-Tricks. AutoCAD® , Architectural DesktopTM and Autodesk® Viz 4 are a registered trademarks of Autodesk, Inc.
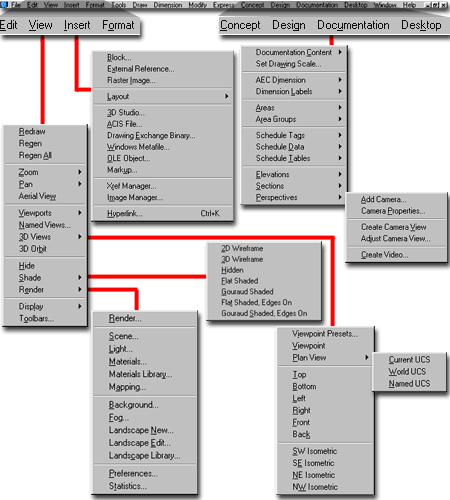
Illustrated to the right are some of the primary pull-down menus used in this guide. Though the Architectural Desktop 3 Presentation Guide discusses the process of Rendering Architectural Desktop objects, most of the concepts come from the AutoCAD side of this product. In other words, Rendering is really a feature of AutoCAD not Architectural Desktop.
With that in mind, this guide will focus on the process of Rendering and what it takes to produce good presentation images regardless of which of these two programs you work with. This is a particularly valid approach since Architectural Desktop still cannot produce all of the design concepts you may wish to present. In the Architectural Desktop 3 Pre-Design Guide the subject of Modeling with Solids and Surfaces is discussed so that the designer has greater flexibility in producing some of the concepts that ADT has no tools for ( terrain, for example ).
For Architectural Desktop users, this guide refers to AEC Objects when there is a specific need to address such objects as they may differ than any other Solid or Surface object in AutoCAD. The primary topic of interest for ADT users regarding Rendering has to do with the complex nature of many AEC Objects whose structure involves Entity Properties and Component indexes. The Components are set by default to use unique Colors but can also be set to use unique Layer Names and both methods of organization are important for the process of managing Material Attachments.
The Architectural Desktop 3 Presentation eGuide represents the 3rd in our series on Architectural Desktop. Though it can be used as is it is highly recommended that you also have access to the Pre-Design and Development eGuides. Throughout this guide you will find links to both of those guides ( particularly the Pre-Design eGuide ). You will not be able to access the other guides without an account.
The View pull-down menu provides access to 90% of the content discussed in this Guide: the Display and Rendering tools. From the Insert pull-down menu, we will look a Xref's and Blocks. From Architectural Desktop's Documentation pull-down menu we will look at the Perspective tools. We will also be looking at the Object Style tools.
| support\acettest.fas | |
| help\acetmain.hlp | These are only the help files so if you don't have them it is not a big deal. There are also two other files: acet.chm and acet.lim that should already be in your ADT 3.0 help folder. You can copy all acet* files to make sure you get all of the help stuff or ignore them. |
| help\acetmain.cnt | |
| help\acetfaq.hlp |
Express Tools - farewell old
friend:
If you did not have the free time in your already busy life, to read Autodesk's boards on
a regular basis, you probably missed out on the announcements that the Express Tools were
being phased out. At the same time Autodesk offered the entire VIP package, Volume 1
- 9, for free download. Even if you were "on-the-ball" for that offer, you
may not have had the foresight to keep a copy of the installation set just for this type
of development. Well, I'd love to offer my personal original copy to you but I don't
think Autodesk would approve. You may, however, find that set somewhere - it was
called "etv1-9.exe". If you have them installed and
running somewhere else, you can manually migrate them by copying the Express folder and a
few other files as listed below. Then, you will have to run the ExpressMenu
command in ADT to load the Express pull-down menu.
Also copy these files from their respective folders to the same folders in ADT 3:
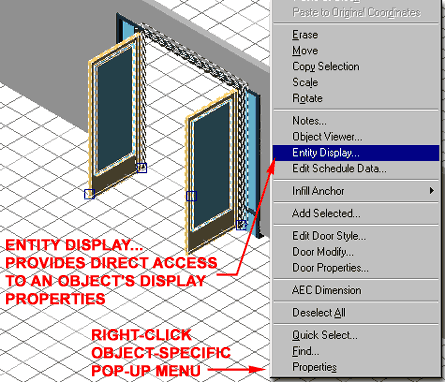
When working with Architectural Desktop Objects for Rendering purposes, having quick access to the Display Properties becomes a very important feature so you can identify and/or modify the object Components for Material Attachment. Illustrated to the right, I show how easy it is to access the Display Properties when the Shortcut Menu option is enabled on the Right-Click Customization dialogue box.
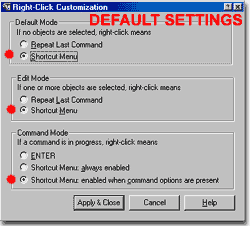 Be sure not to deactivate right- click pop-up menus
on the Options dialogue box because you will certainly be cheating
yourself of access to invaluable right-click features. When working with ADT
objects, the right-click menu becomes even more important; almost acting as a guide
letting you know what some of the options are for any selected item.
Be sure not to deactivate right- click pop-up menus
on the Options dialogue box because you will certainly be cheating
yourself of access to invaluable right-click features. When working with ADT
objects, the right-click menu becomes even more important; almost acting as a guide
letting you know what some of the options are for any selected item.
If you have pop-up menu problems, see OPTIONS, User Preferences tab and Right-Click Customization button.
If you must have some of the old AutoCAD functionality out of your right mouse button, you can set the Default Mode to Repeat Last Command and possibly even the Command Mode to Enter, but do not set the Edit Mode to Repeat Last Command. Always keep Edit Mode set to Shortcut Menu.
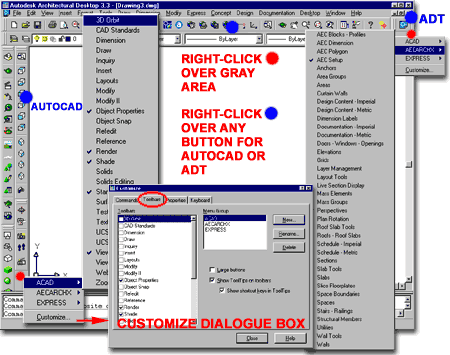
Illustrated to the right, I show some of the primary ways to acquire rapid access to the numerous toolbars that you will probably be using as you prepare your Model for Rendering. Since the Render toolbar is on the AutoCAD side of the program, you will only find it on the AutoCAD pop-up menus.
If you don't have any of Architectural Desktop's toolbars up on the screen, you will either have to use the Customization dialogue box or right-click on any unused "gray" toolbar area under the pull-down menus or on docked menus; as shown in the illustration to the right; use the AECARCHX > fly-out option.
You can also use the Customize dialogue box, introduced in AutoCAD 2000i, to access any toolbar at any time. To access the Customize... menu option, you can Right-click over any AutoCAD button or unused gray area on toolbars. You can also use the View and Tools pull-down menus to achieve the same result.
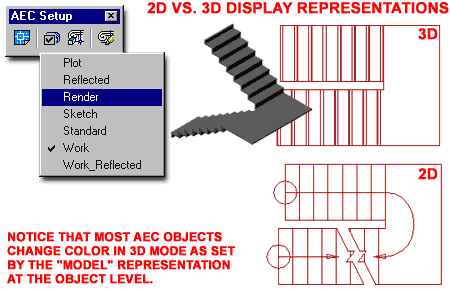
Most of the Aec Objects in Architectural Desktop are controlled by a 3-part display system that provides the means for representing objects, such as doors, in a conventional Plan view from the Top and in a fully articulated 3D view from an isometric vantage point. Though some of the Display Representations change automatically depending upon the View you use to work in, there are times when you will want to change the Display Representation to match the needs of your current task. In this eGuide, the discussion is all about Presentation and most of that will be in 3D so you may find that the "Render" Display Representation or equivalent 3D Display Representation ( if you have a custom one ) will be the best one to use for this portion of the project phase.
In some cases, such as that of using the Mapping tool for controlling how material map across the surface of an object, you may find that it will not read some of the Aec Objects unless the Display Representation is set to Render.
Before you start to generate those amazing Rendering with hours and hours of labor spent to get every tiny detail just right, you should make sure that what you generate actually looks the way it should.
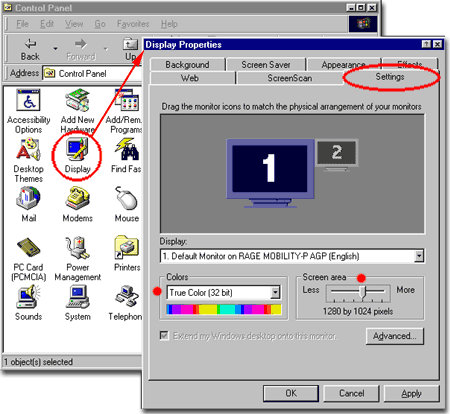
In Rendering, your system display configuration becomes even more important than ever. Rendering output can be at enormous resolutions with True 32bit Color so you should always check to see if you are actually seeing that output should you produce it. Illustrated to the right, I show the Control Panel with the Display Properties dialogue box opened.
On the Settings tab of the Display Properties dialogue box, check your Colors setting and the Screen Area setting for optimum Rendering Work. When Rendering, you should always run the maximum Color setting ( hopefully you system supports 32bit Color ) but as you increase the Screen Area, Colors are often automatically limited. The inverse can also be true; as you increase the Color setting, the Screen Area maximum size is reduced. This occurs because there is a greater load on your system's resources to produce such a vibrant display. While you are testing Renderings on your screen, keep in mind that more Screen Area is equivalent to more pixels which equates to longer Rendering times. This is not desirable at any time but especially not when running numerous tests. Perform tests and decide what provides the best working environment. Personally, I never run a display under 1024x768.
Though this Guide will does not discuss system requirements and configurations beyond this subject, you should also confirm that you have a good monitor, a lot of Ram, a lot of extra hard-disk space and the best Video Card you can justify. The more Ram on both the Video Card and on your system, the better.
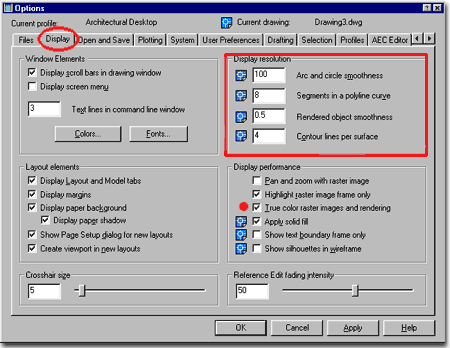
The Options dialogue box, formerly known as Preferences, is an important part of producing high quality Rendering and Presentation work. AecFacetRes for Architectural Desktop objects and FacetRes for Solid Modeling objects are two examples of settings that make a tremendous difference in the way curves surfaces appear when Shaded and Rendered.
All of the settings with icons in front represent current drawing settings and will not be set for all of Architectural Desktop; i.e, they are local and not global settings. If you save these settings in a template file though, you can use them in a more global fashion.
For Rendering and Presentation work there are numerous Display Options that you will want to know about. Most Display Options that improve the appearance of objects on your screen do so at the cost of performance with respect to your computer. This means that you should exercise caution when experimenting with the Display Options discussed in this guide and make note of what changes you make and how to reset the default settings.
To learn more about the Options that affect the work discussed in this Guide, read the Appendix, Part X - Options Configurations
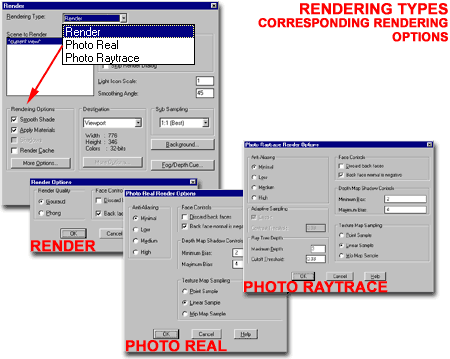
The Render and Render Preferences dialogue boxes offers numerous options and settings that affect the appearance, size, resolution, quality and destination of your Renderings. If these options are not properly understood and set, you may be loosing out on a lot of the hard work that goes into Modeling, Adding Lights and Attaching Materials.
One of the most important options to understand on these dialogue boxes involves the differences between the Rendering Types: Render, Photo Real and Photo Raytrace. Though Photo Raytrace offers the highest quality images, it comes at a price and may not be the Rendering Type you need for all Renderings.
To learn more about the numerous Rendering Options, read Part 5 - Rendering.
| Links | Part 1 - View - the first subject of this Guide discusses how to create, save and manage screen displays and perspective. |
| Part 10 Scenes - A recommended place to start - this part not only discusses the creation and use of Scenes but also has a full overview of the entire Rendering process. | |
|
Part - X - Downloads - to download this and other exercise drawing files. |
This Guide was written to assist you in your Rendering work no matter where you are in the process but it was also written to take you from the completed phase of a Model through to a completed Rendering. Therefore, you can start with Part 1 - View and begin the process of creating your Model while referring back to this guide as your Model evolves.
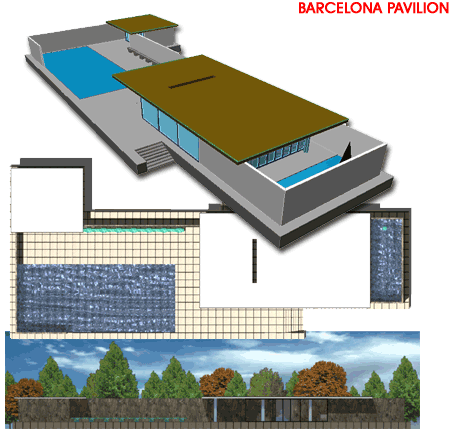
You can also start with a completed Model; which should prove to be a more logical approach. Included with this Guide is a sample Architectural Desktop Model based upon the acclaimed Barcelona Pavilion - illustrated to the right. If you decide to use your own completed Model or the sample Model, you should refer to Part 10 - Scenes before any of the other parts. In Part 10, you will find a complete overview of the whole Rendering process - from Xref'ing a Model to producing a Rendered image.
If you choose to start from scratch, using the "AEC arch (imperial - intl).dwt" or "AEC arch (metric - intl) template file is highly recommended. Many of the sample images and screen captures in this guide are based on these two template files. Though you can use any file you wish it may make the process of learning easier if your ADT objects behave and appear the same as those in this guide.