PART 3
3D ORBITContents:
3D Orbit - Access ---- 3D Orbit ---- 3D Orbit Options ---- 3D Orbit Clipping Planes ---- Dview ---- Customizing and Tricks
| Architectural
Desktop 3 - Presentation Guide PART 3 3D ORBITContents: 3D Orbit - Access ---- 3D Orbit ---- 3D Orbit Options ---- 3D Orbit Clipping Planes ---- Dview ---- Customizing and Tricks |
| 13D Orbit - Access | 1-3 3D ORBIT | ||||||||||
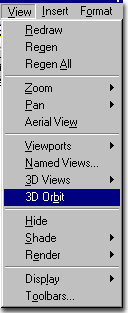
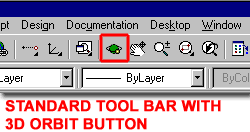
| 3D Orbit toolbar How do I get this toolbar? You can also acquire access to these commands from the View pull-down menu. From the View pull-down menu, pick 3D Orbit. |
 |
||||||||||
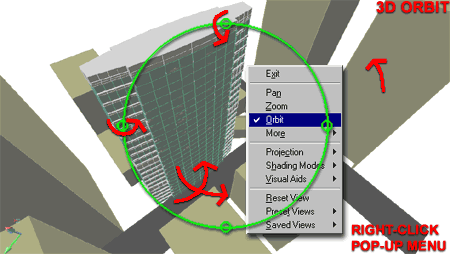
| 3D Orbit pull-down menu Illustrated to the right, is the View pull-down menu showing where to access the 3D Orbit tool. You can also access this tool from the 3D Orbit button on the Standard toolbar - illustrated below, left.
The 3D Orbit tool is actually a tool that has come from Autodesk's 3D Studio and 3D Studio Viz rendering programs and users familiar with those programs will find the 3D Orbit tool a welcome friend. It is actually a Camera tool but Perspective is an option. For Architectural Desktop users, this tool may play less of a role in final presentation renderings than for AutoCAD users who do not have the Perspectives toolbar and the AecCamera object to work with. |
 |
||||||||||
| 23D Orbit | 2-3 3D ORBIT | ||||||||||
3D Orbit tool - Overview
Once the 3D Orbit command has been executed the graphics of your screen will change into the current version of Shademode. If no Shademode setting is current, you will get the 2D Wireframe setting by default. You should also notice that the UCS icon, if turned on, changes to the 3D Shaded version. To avoid having too many objects or to limit specific objects from showing up while using 3D Orbit or the various other options, you can select the objects that you want to see before activating the 3D Orbit command(s). In the center of your screen, you should find the 3D Orbit Arcball with four smaller circles; one at each quadrant. The Arcball breaks the 3D Orbit work up into zones for different tasks. By holding the left ( or pick ) mouse button down and dragging in any of these zones you can affect the camera or viewpoint in ways that allow you to see your object(s) from a full spherical vantage point. Inside the Arcball - holding the left mouse button down and dragging it inside the Arcball provides the greatest amount of freedom to move the camera or viewpoint around you object(s). To use effectively, think in terms of grabbing a corner or piece of your drawing and dragging it up, down, left, right or in any diagonal direction to see above, below, right, left or any other part of the object(s). You can repeat the steps as many times as you like resulting in what appears as full spherical spinning of the object(s). |
Outside the Arcball - holding the left mouse button down and dragging it outside the Arcball provides only one type of camera or viewpoint control: rotation. No matter where you go outside the Arcball, the rotation option is the same and simply allows you to rotate the camera or view so you can reestablish a level horizon. Top and Bottom Arcball Quadrants - holding the left mouse button down and dragging it while over the top or bottom quadrant circles provides you with the ability to rotate the camera or viewpoint through the X-axis of the Target Point. The effect is similar to moving a camera up or down on a tripod while remaining fixed to a specific target. Both Arcball Quadrants produce the same results. Left and Right Arcball Quadrants - holding the left mouse button down and dragging it while over the left or right quadrant circles provides you with the ability to rotate the camera or viewpoint through the Y-axis of the Target Point. The effect is similar to moving a camera left or right on a tripod while remaining fixed to a specific target. Both Arcball Quadrants produce the same results. Right-click - using the right-click on your mouse while the 3D Orbit Arcball is active brings up the 3D Orbit pop-up menu. |
||||||||||
| 3D
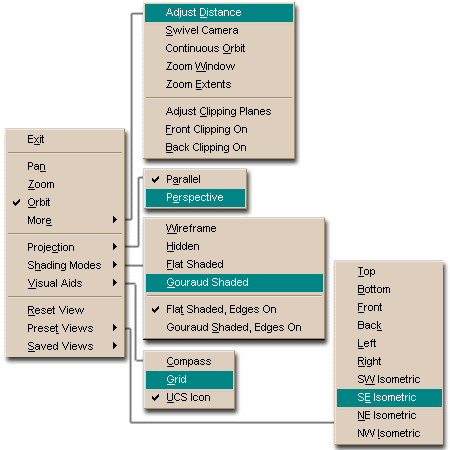
Orbit pop-up menu Illustrated to the right is the 3D Orbit right-click pop-up menu and all of its cascading sub-menus. There are more options available on this pop-up menu than you will find anywhere else so you must become familiar with this menu if you want to master this tool. Of the whole set, the most significant option for presentation work is the Perspective option acquired through the Projection menu item.
|
 |
||||||||||
| 33D Orbit Options | 3-3 3D ORBIT | ||||||||||
Pan
The Pan option for 3D Orbit is not the same as the Pan tool in AutoCAD or Architectural Desktop and thus you cannot use the regular Pan command while in the 3D Orbit command. Since Orbiting is really about Camera work, the Pan command is really like Panning a Camera. This will appear like a regular Pan in Parallel Projection but just like a Camera Pan in Perspective Projection. |
 |
||||||||||
Zoom
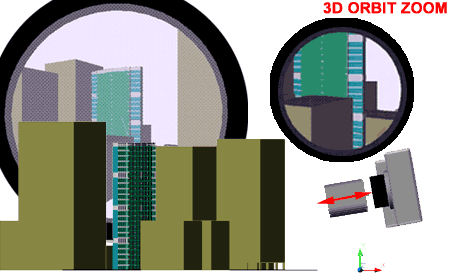
The Zoom option for 3D Orbit is not the same as the Zoom tool in AutoCAD or Architectural Desktop and thus you cannot use the regular Zoom command while in the 3D Orbit command. Since Orbiting is really about Camera work, the Zoom command is really like adjusting the Lens of a Camera. This will appear like a regular Zoom in Parallel Projection but just like a Camera Zoom in Perspective Projection. In Perspective Projection, the Zoom option combined with the Adjust Distance option can be used to produce perspectives equivalent to 35mm and 50mm shots up close or far away from your buildings. Exaggerated perspectives are also possible. |
 |
||||||||||
Continuous
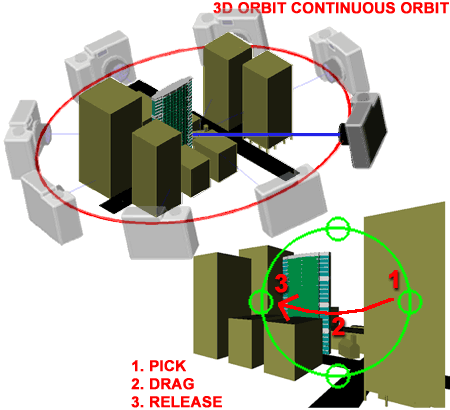
Orbit
The Continuous Orbit option allows you to create an animated spin around the object(s) on your screen. This is achieved by using the right-click mouse button, holding it down and dragging it in the direction you want the spin to occur in. The faster you drag and release the right-click button, the faster the animated spin. This option can be used in both Parallel and Perspective Projections and is thus one of my favorite ways to show and discuss design concepts. |
 |
||||||||||
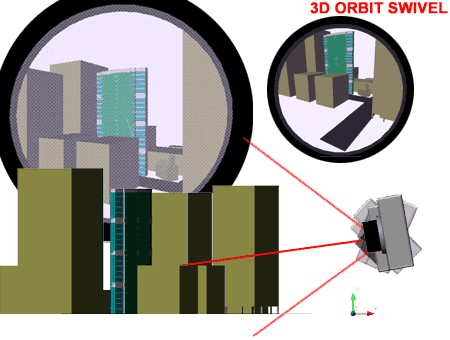
Swivel
Camera
The Swivel option allows you to use the cursor as a Camera's viewfinder to change the target. The effect can be similar to Panning but in this case the Camera's angle is changing while the Camera is remaining fixed. |
 |
||||||||||
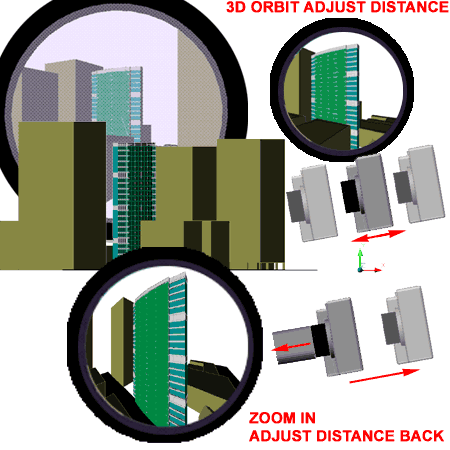
Adjust
Distance
The Adjust Distance option was designed for use in Perspective Projection though it will produce results in Parallel Projection that appear identical to Zooming. When working with the 3D Orbit tool in Perspective Projection, the Zoom option works as the Lens control of a Camera and the Adjust Distance option works as its name states: a way to move the Camera closer or farther away from the target. In Perspective Projection, use the Zoom option to pull out a bit from your object(s) and then use the Adjust Distance option to get closer to the objects. Repeat this step as much as you like to exaggerate the perspective and reverse the steps to normalize the perspective. If your Perspective has gotten out of hand, use the Reset View option to reset the Zoom and Adjust Distance values back. If you have already exited the 3D Orbit tool and now cannot get the Perspective back to normal, exit the 3D Orbit command and use the following command steps: Command:DVIEW |
 |
||||||||||
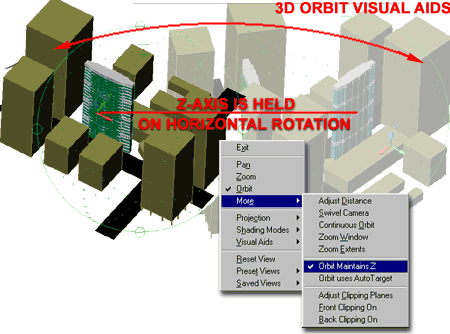
Orbit
Maintains Z
The Orbit Maintains Z option is a feature that Mario Guttman of HOK claims credit for after lots of complaining. This option locks the Z-axis when you rotate the view horizontally. The purpose of this tool is to make it easier to move around objects without flying overhead or falling underneath. I like to think of it as a little bit of gravity. This option is a toggle; either on or off indicated by a checkmark on the cascading menu. |
 |
||||||||||
Orbit
uses AutoTarget
The Orbit uses AutoTarget option locks the target on the objects rather than the screen to help prevent rotations from moving the view completely out and away from the objects. You should check this option if you find that your objects suddenly appear to rotate out of the screen and off to the sides out of view. Another great trick that I have for fixing the targeting problems of the 3D Orbit tool is to use the Camera command from the View toolbar to OSNAP a new Target. In this trick, I don't supply a Camera Position but simply allow the default values to remain. |
|||||||||||
Projection - Parallel and Perspective
The Parallel and Perspective options allow you to switch between isometric-like views with no distortion and perspective views with vanishing points. Perspective Projection is based upon the last settings for the 3D Orbit Zoom and 3D Orbit Adjust Distance options. You can use the 3D Orbit Zoom option to change the Lens ( mm ) setting while using the 3D Orbit Adjust Distance option to bring the camera closer are farther from the objects in your view. The problem with Perspective Projection is that you cannot work in this mode very easily and selecting entities tends to be problematic as well. To avoid problems, switch back to Parallel Projection whenever you want to work on your project. |
 |
||||||||||
Shademodes
The Shademode options allow you to choose any of the regular Shademode setting while in the 3D Orbit command so that you don't have to exit this tool to set Shademode. |
|||||||||||
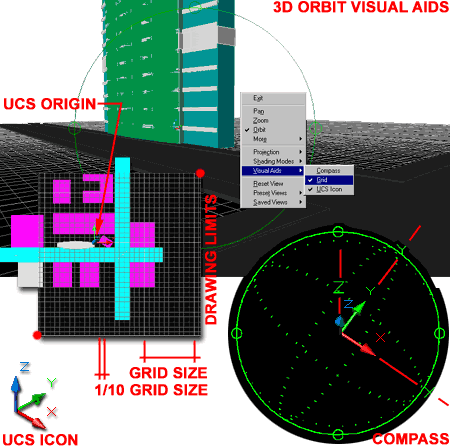
Visual Aids - Compass, Grid and UCS Icon
The Visual Aid tools really only offer one new tool that you may not have seen before: the Compass. The Grid and UCS icon options are just toggles for the Grid and UCS icon that you would normally see while in a shaded mode. The Compass is an odd tool that provides you with a spherical image and X, Y and Z letters to help maintain your orientation. The Compass, once activated, will remain on for all but the 2D Wireframe Shademode, so you may find it as irritating a tool as I do. The Grid toggle is a necessary feature since you cannot access the Grid button or type in the command while in the 3D Orbit command. What many do not know about the Grid though is that you can control the size and location of the Grid. I find that the Grid is a very useful tool in orientating myself and, at times, for presentation. It cannot be printed, but you can capture it with the Print + Scrn button on your keyboard. This puts the whole screen image on the clipboard so you can paste it into a "bitmap friendly" program. The Grid size is set by the Grid command and is automatically divided into increments of 10 so you should think about large grid units. The origin of the grid line can be controlled by setting a USC Origin to a specific point. The overall size of the Grid Plane can be set with the Limits command ( set a lower left corner and then an upper right corner ). The UCS icon toggle is a necessary feature since you cannot access the UcsIcon command to turn it off while in the 3D Orbit command. |
 |
||||||||||
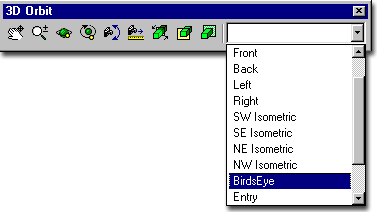
Views - Reset, Preset and Saved
The View tools allow you to access any of the predefined views that come in AutoCAD and Architectural Desktop ( Top, Right, Left, SE Isometric, etc. ) and any Views that you may have Saved by Name from previous work done with the 3D Orbit tool. The Reset option only works while in the current session of the 3D Orbit command so if you Exit with an odd View and want to reset upon return to the 3D Orbit command, this is not possible. On the 3D Orbit toolbar, you can use the Views drop-down list while using the 3D Orbit tool to access all of the Preset and Saved Views. Saving Views while in 3D Orbit is not possible. To save a great shot, Exit the 3D Orbit tool and activate the View dialogue box to create a New View. This works for Parallel and Perspective Projections. |
 |
||||||||||
| 43D Orbit Clipping Planes | 4-3 3D ORBIT | ||||||||||
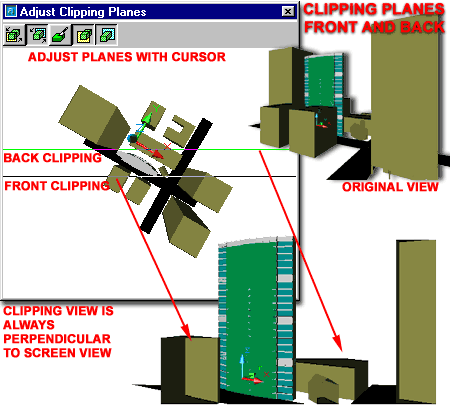
Adjust Clipping Planes Window
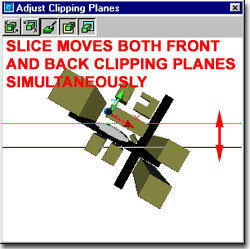
Illustrated to the right and below is the Adjust Clipping Planes Window that you can use to remove geometry from your view; both Parallel and Perspective. Though the tools for clipping are relatively simple, getting a good clip is another matter. The Clipping tool will automatically use a view perpendicular to the current view on your screen so if the current view is not well suited for the angle of the clipping lines, you will either have to adjust the viewing angle or the geometry. In other words, as illustrated to the right, the clipping planes will always cut parallel to the view as view-planes. If you clip a common cube in an isometric view it will be clipped at 45 degrees.
Front and Back Clip on/off - toggles which are also on the 3D Orbit toolbar Slice - locks the Front and Back Clipping Lines so you can move them together as a slice through the geometry.
|
 |
||||||||||
| 5Dview | 5-3 3D ORBIT | ||||||||||
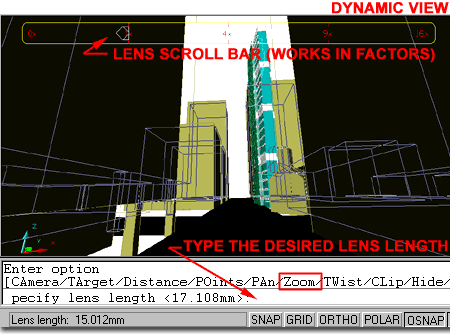
Dynamic View - a relic from the past
The Dview command was AutoCAD's first tool for creating perspectives. It has removed from all menus and toolbars but can still be accessed through the typed "Dview" command. Though it has been put behind the scenes, so to speak, it is in fact a major component of most of the features found in the 3D Orbit tool. There are two significant reasons that I have decided to briefly discuss this command: one has to do with the ability to specify the Lens Length, in millimeters, of the Camera and the other has to do with being a power user. Command:DVIEW Many of the options offered within the Dview command are identical to those available within the 3D Orbit tool and tend to work a lot faster and more gracefully in the 3D Orbit tool. There are neat tricks that you can use from the Dview options, however. The Dview command can be used to turn the Perspective Projection on and off very quickly without having to bring up the 3D Orbit tool. To test this feature, use the 3D Orbit tool to set up a good Perspective shot and then Exit. Activate the Dview command and use the Off option. Activate the Dview command and use the Zoom option to bring the Perspective Projection back. |
 |
||||||||||
| 6Customizing and Tricks | 6-3 3D ORBIT | ||||||||||
© Copyright 2002 ARCHIdigm. All rights reserved.
spell checked on Jan. 20, 2002

 Front and Back Clip adjustment
- use to set which Clipping Line you want to move. These are automatically
selected if you use the adjust cursor to select an existing Front or Back Clipping Line (
Green or Black ).
Front and Back Clip adjustment
- use to set which Clipping Line you want to move. These are automatically
selected if you use the adjust cursor to select an existing Front or Back Clipping Line (
Green or Black ).