PART 4
PERSPECTIVESContents:
Perspectives - Access ---- Adding Cameras ----- Modifying Cameras ---- Camera Display Props ---- Making a Movie ---- Working with 3D Orbit ----Customizing and Tricks
| Architectural
Desktop 3 - Presentation Guide PART 4 PERSPECTIVESContents: Perspectives - Access ---- Adding Cameras ----- Modifying Cameras ---- Camera Display Props ---- Making a Movie ---- Working with 3D Orbit ----Customizing and Tricks |
| 1Perspectives - Access | .1-4 PERSPECTIVES | ||||||||
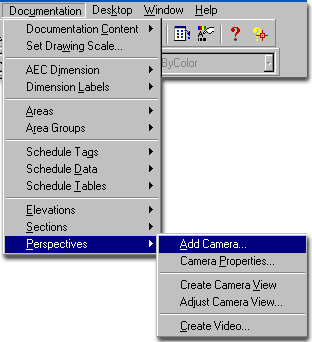
| Perspectives Toolbar How do I get this toolbar? You can also acquire access to these commands from the Documentation pull-down menu. From the Documentation pull-down menu, pick Perspectives > and cascade to their respective command options - see image below, right. |
 |
||||||||
| Perspectives pull-down menu One of the best tools in Autodesk® Viz is the Camera because of how easy it is to manipulate while seeing the results of those manipulations. As discussed in Part 1 and Part 3 of this guide, creating, saving and adjusting perspectives is no where near as easy as this simple task should be in an architectural software program. With the Camera tool in Architectural Desktop, the job of creating, saving and manipulating Perspectives is a lot better than it has been in the past. This Camera tool is actually so close to the one in Viz that it translates perfectly without glitches. The Camera is a physical object that can be SNAPped to points so you can not only place and aim the Camera with exactitude but see the results as well. This makes it far easier to make adjustments and to keep track of several Cameras in a single Rendering file. |
 |
||||||||
| 2Adding Cameras | 2-4 PERSPECTIVES | ||||||||
Add Camera dialogue box
The Add Camera dialogue box, illustrated to the right, offers the option to Name the Camera, Set the Lens size ( Zoom ), set the Lens Height ( Eye Level ) and where to present the resulting perspective view ( Viewport ). The most important task to accomplish while this dialogue box is active, is to place the two points where the camera and its target should be in your Model. Since the Camera on has two points, editing with Grips after placement is an extremely easy task. Name: - default value is okay if you are in a hurry but it helps to name these views when you start having a lot of them. Zoom: - this is the lens on your camera so 20 is equivalent to 20mm; a common lens is 35mm but in the digital medium we often exaggerate. Fish-eyed lenses are not possible at this time but I would love to have that option. Eye level: - this is the height of the center of the lens on the camera. |
Generate View After Add - this is a good thing to check if you want to jump right to the perspective but an annoying thing to have checked if you want to create a bunch of shots or play with the camera position before actually viewing the shot. Viewport Association - this check box will be available if you are working in a Layout with multiple viewports. Checking this box will allow you to set the camera in one viewport but select another viewport for the perspective shot to be generated in. |
||||||||
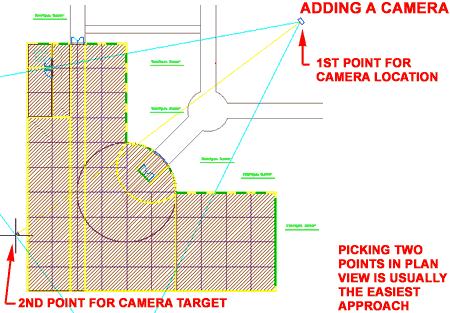
| Add Camera example Though you can add a Camera in any View except Perspective Views, the easiest View to use is the Plan or Top View because you can better gauge where the the location of the Camera and the its Target are relative to other objects. Since the Height of the Camera and the height of the Target is determined by the Eye Level value field, all you really have to think about it the position of the Target. The triangular form that originates from the Camera is called the Field of View ( FOV ) and is derived by the Lens or Zoom value on the Add Camera dialogue box. This triangle represents what will be in the Camera's view. Note: The Camera is UCS sensitive and thus you can Add Cameras from above that look straight down over buildings. Since the Elevation Views, by default, do not display the Camera object, it is easier to Add a top-down Camera in an Isometric View. Just make sure the UCS icon's Y-axis is pointing up. |
 |
||||||||
| Adding
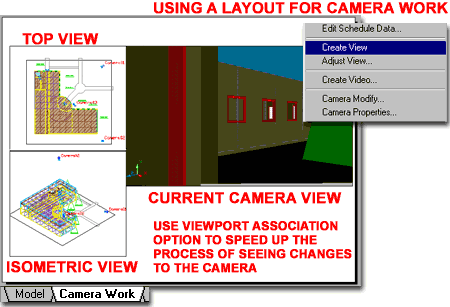
Cameras in Layouts To take advantage of the Viewport Association option on the Add Camera dialogue box, you can set up a Camera Work Layout as illustrated to the right. By using two or more Viewports, you can work with the Camera in one Viewport while seeing the results in another Viewport. This technique is very similar to what can be accomplished in Viz but unlike Viz, Architectural Desktop's Camera will not generate the perspective automatically. To see the latest results of Camera changes, you have to Select the Camera object, right-click and select the Create View option on the object specific pop-up menu ( see image, right ). If the Camera has been Associated with a Viewport, the Create View option will automatically generate the view in the appropriate Viewport. If no Association has been made, you will be requested to Select the Viewport in which to generate the Camera View. |
 |
||||||||
| 3Modifying Cameras | 3-4 PERSPECTIVES | ||||||||
Modify Camera dialogue box
The Modify Camera dialogue box offers very
little to work with, outside of the Zoom
|
 |
||||||||
Camera Properties dialogue box
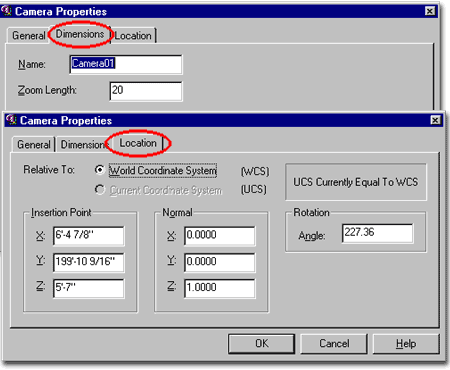
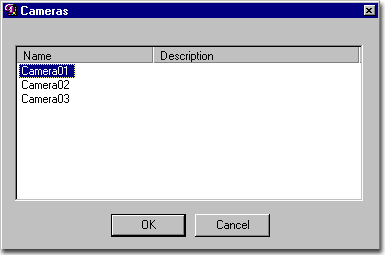
When you are asked to "Select a Camera", you can hit the Enter key and the Cameras list dialogue box will pop up allowing you to select from the named list. On the Dimensions tab of the Camera Properties dialogue box, you can change the name of the current camera and or change the lens. On the Location tab of the Camera Properties dialogue box you can reposition the Cameras location point. I show this information particularly because this is an easy way to change the altitude of a camera; simply change the Z: value. |
 |
||||||||
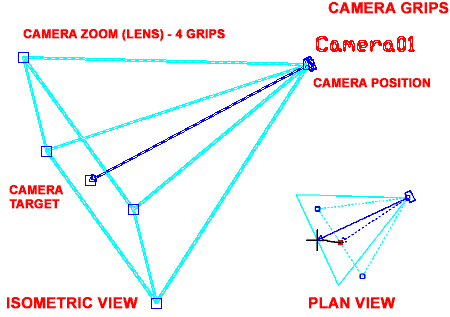
| Modifying Cameras with Grips When you select a Camera object, you should find at least four Grip points available; one for the Camera position, one for the Camera target and up to four for the Camera Zoom. Using the Grip Stretch combination, you can easily adjust where your Camera sits and what it is looking at. By Rotating the UCS icon on the X-axis by 90 degrees, you can adjust the vertical height of the Camera position and the Target position. See also discussion on using the Adjust Camera Position dialogue box. |
 |
||||||||
Create Camera View
You can use this command to select an existing Camera object and automatically generate the Perspective that Camera is set for. You can also use this command to switch between existing cameras, as illustrated to the right. When you are requested to "Select a Camera", you can hit the Enter key and the Cameras list dialogue box will pop up allowing you to select from the named list. |
 |
||||||||
Adjust Camera Position dialogue box
When you are requested to "Select a Camera", you can hit the Enter key and the Cameras list dialogue box will pop up allowing you to select from the named list. The Adjust Camera Position dialogue box is one of the coolest tools in Architectural Desktop. It's like a remote control unit for your current camera and as you pick on the various buttons, your view will change in real-time. You can literally walk a client through a design with this tool. Notice that you can increase the speed of the Camera motions by using the Adjustment Increments settings; like Step length, Angle turn and Zoom jump. Make sure Auto View is checked for best results. |
 |
||||||||
| 4Camera Display Props | 4-4 PERSPECTIVES | ||||||||
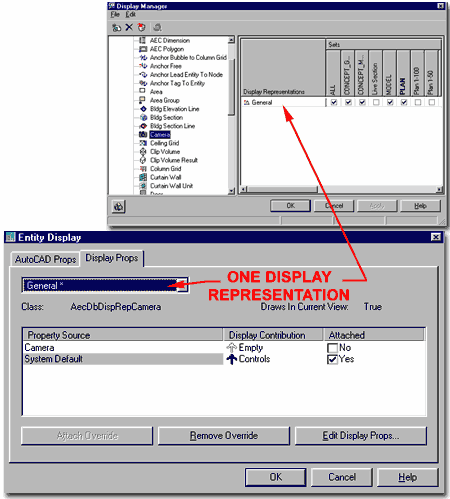
| Display Props tab The Display Props tab on the Entity Display dialogue box provides access to the display characteristics of the components for the Camera object. Since the Camera object has not Styles, you can only access the Display Props through the Display Manager or the Entity Display... menu option.
|
 |
||||||||
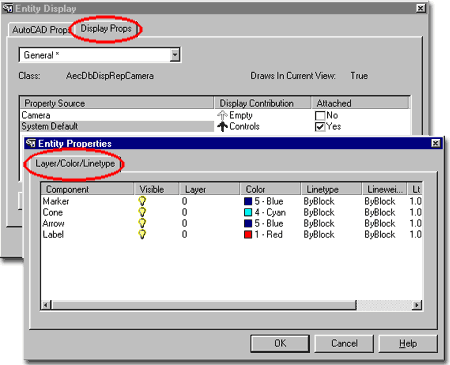
| Entity Properties - Component Layers From the Display Props tab, in the General Representation Set (the only option), you can use the Edit Display Props... button to access the component's Layer/ Color/ Linetype tab. From this point, you can not only turn components on or off but change their layer, color and linetype. This is where, for example, you can change the Arrow color of your Camera object to Yellow or something easier to see on your screen. Unfortunately, there is no tab for Icon size; something that would be really nice to control. The other graphic oddity you might find irritating is that there is no way to lock the Cameras so they display the full graphic for the Target. In other words, when you zoom out and away from Camera objects they automatically shrink and you can only determine their true proportions by Selecting them. Note: |
 |
||||||||
| 5Making a Movie | 5-4 PERSPECTIVES | ||||||||
Designing the Camera Path
The possibility of making movies in Architectural Desktop can be quite exciting, especially if you have never made a movie before. However, if you have made movies before with products like Autodesk Viz or 3D Studio Max, you will probably find this process lacking and crude. The biggest complaint I have with this routine, is the quality of the output. On the Create Video dialogue box, illustrated below right, you will see under the Regen drop-down list that there are four poor choices for output quality ( I have the best one selected ). In other words, you cannot output a Rendered Movie. But let's face it, any movie is better than no movie and clients love animations. To create a Movie, you will need a Path. The Path can either be for the Camera, for the Camera's Target or for both. A Camera can be stationary while following a path, in motion focused on one point or in motion while focused on another path. One of the easiest Movies to configure is one where you use the same object as a Path for the Camera and its Target. Illustrated to the right, I show a couple of scenarios for Movies involving more sophisticated Paths. With Circular Paths, the Camera always travels in a counterclockwise fashion ( even with Polygons ). If two concentric circles are used, as illustrated, the Camera will simply align with the inner circle and travel a path radiating from the shared center; this is basically identical to having a Point for a Target. To change the way the Camera follows the circular Target, you can break the inner circle and to control the Camera's starting point, you can break the outer circle. Then, use OSNAP's to Select these Paths based upon the Endpoints created by breaking the circular paths. Spline and Pline Paths can also be configured as discussed for circular paths. Illustrated to the right, I have set up an inner Target Path to keep the Camera focused on the building as it travels along the outer Camera Path. By staggering the beginning points of the Camera Path and the Target Path, a direction and angle is set so the Camera looks forward through the entire movie. If this type of configuration is not achieved, the Camera tends to create odd results like flipping around or changing viewing direction during the movie. In these types of Path configurations, you the Dry Run option on the Create Video dialogue box. Set the current display to Top View so you can see the Camera relative to the Paths. This will allow you to judge how the Paths are being followed and where changes may be necessary. |
In both cases, the height of the Paths is important; i.e., the Z-axis value. You will probably want your paths to be around eye-level when making movies. If you are not too familiar with 3D work, you can use the Properties command to change the Z-value of any object.
|
||||||||
Create Video dialogue box
From the Design pull-down menu, select Generate Perspectives > and cascade over to Create Video... or use the Create Video button. For existing Cameras, you can select one, right-click and use the Create Video... menu option as well. If you haven't set a path yet in your drawing, you will be prompted for a Path name when you use the Pick Path < button for the first time. Camera Path Target Path Pick Point < - use this option to force the Camera to always look at the same point as it moves along its Path. This can be a useful option for exterior movies and creates an effect similar to spinning a building around with the 3D Orbit tool. Regen - a drop-down list offering five types of output: None, Hide, Shade - 255 Color, Shade - 256 Edge and Shade - Filled. Personally, I like Shade - 255 Color the best because it is the closest to a rendering. Unfortunately, none of these options allow for Materials and Textures as discussed in Part 2 - Shade - Shademodes with Rendering |
Frames
Options |
||||||||
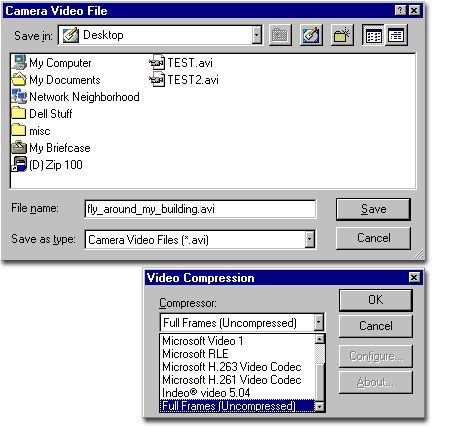
| Saving a Movie in .avi format and Compressing it. When you hit the okay button on the Create Video dialogue box, illustrated above, you will be prompted for the file name and location - unless you requested a "Dry Run". There is only one type of output so there is no decision to be made about the type of file; just the name. AVI files are the most common movie files so most people can read them - from Mac to PC. After choosing a name and location, you will be requested to choose a Video Compression method. If you have absolutely no idea of what to do here, use the Full Frames (Uncompressed) method illustrated below right. Compression methods are designed to help make enormous .avi files a little more acceptable for storage or transferring to other systems. One goal for a lot of architects is to communicate with a client about a conceptual design so an .avi file may need to be sent via e-mail or posted to a project website. Choosing the right or best Compression method can be a bit tricky. Each method uses different solutions and some offer the option to set Configuration parameters to help fine-tune the process. Cinepak Codec by Radius offers the ability to turn the movie into a black-n-white movie, for example. A safe choice is a Microsoft method simply because most people have some form of a Microsoft Media Player. Microsoft Video 1 is an older method so if you suspect your audience has an older system, that may be a good choice. Otherwise, I use the Cinepak Codec by Radius method and make some trials to see how compressed the quality can be without looking too bad. Keep in mind that the size, in pixels, of the movie has a lot to do with final file size and quality. |
 |
||||||||
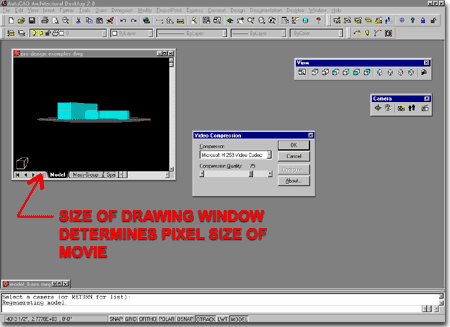
| Controlling the pixel proportions of a Movie Currently in Architectural Desktop there is no dialogue based option to control the output proportions so the pixel ratio and size is based on the current screen settings of your drawing file. If you want to change this ratio and proportion, you can resize the drawing window before outputting your movie. A smaller window will create a smaller file. |
 |
||||||||
| 6Working with 3D Orbit | 6-4 PERSPECTIVES | ||||||||
3D Orbit from an
AecCamera View
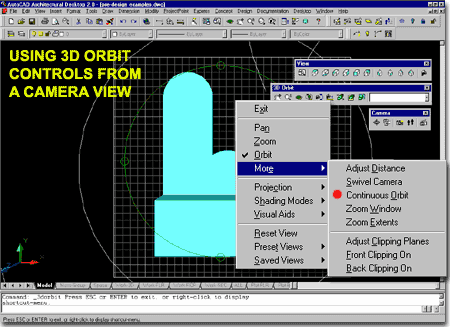
Though the new 3D Orbit tool works with the concept of Cameras, it does not work with ADT Cameras; i.e., it does not modify them. However, you can use the 3D Orbit tool from an ADT Camera View and go off on a new direction. If you create a new shot that you want to keep, then use the View command in AutoCAD to save it. Above we looked at how to make .avi movies, but if you simply desire an animated run around your design, you should try the Continuous Orbit option on the More > section of the 3D Orbit right-click pop-up menu - see red dot on illustration to the right. To use this feature, simply pick on one side of the screen (left or right), hold down the pick button on your mouse and glide the cursor to the opposite side of the screen. The speed at which you glide your cursor determines how fast your model will spin. Use the right-click on your mouse to Exit. |
 |
||||||||
| 7Customizing and Tricks | 7-4 PERSPECTIVES | ||||||||
© Copyright 2002 ARCHIdigm. All rights reserved.
spell checked on Jan. 20, 2002