PART 14
OUTPUTContents:
Output - Overview ---- Printing Options ---- Photoshop ---- Web ---- ACDsee for Slide Shows
| Architectural
Desktop 3 - Presentation Guide PART 14 OUTPUTContents: Output - Overview ---- Printing Options ---- Photoshop ---- Web ---- ACDsee for Slide Shows |
| 1Output - Overview | 1-14 OUTPUT | ||||||||||
| Printing, Plotting, Web, e-mail, brochures, maps, cards, etc. Now that you are able to produce mind blowing raster images, the question inevitably arises about the final step; what do you do with Renderings? In this guide we have looked at bringing raster or bitmap images into AutoCAD and Architectural Desktop by Image Reference and as a Material Attached to a 3D object. Under Graphic Content, Part 13, we looked briefly at the Publish to Web tool which serves as an interesting way for getting Rendered Images on a website with little to no knowledge of web page code. For information on how to Render out to a File, see Part 5 - Rendering, Section 4 - Rendering Destination. |
Once you have a raster image file you should find that you have something that is far more flexible than a vector file because there are so many software applications that deal with graphics; and most of them read a multitude of different file types so there is no need to worry about translation ( on a side note, it is a sad state of affairs when a raster image is more transportable than a vector file that has no resolution or scale issues ). This means that you can take most Rendered images and put them into almost every software product on the market today; from Word, Excel, PowerPoint, FrontPage, Flash, Photoshop, Illustrator, Premier, Go Live, Corel Draw, Quark Express to most of the other CAD programs as well. Below we will look at some of the options for presenting those great Renderings to a broader audience than yourself. If you keep a realistic focus on the end result of the Rendering and Presentation work then you should not face too many problems. Developing a sense of what is a realistic outcome is very beneficial to maximize the time and work invested. |
||||||||||
| 2Printing Options | 2-14 OUTPUT | ||||||||||
Printing and Plotting from AutoCAD and Architectural Desktop
Printing and Plotting Presentation work directly from Architectural Desktop can actually be one of the better ways to deal with the printing of raster images; even if you are only producing image boards. By using the Image Reference tool, you can import any of the Renderings you have created with Architectural Desktop or other Rendering software such as Viz. If you wish to mix both Rendered Images and Vector lines from the actual Architectural Desktop model, it is rather easy when using Viewports as illustrated to the right. If you have a Model image as opposed to a Plan View and you wish to print that Viewport with Hidden lines, you can use the Hide Plot menu option from the object-specific pop-up menu. Hiding Lines for objects in Viewports - select the Viewport Frame, right-click on your mouse and use the Hide Plot > menu option to set this to Yes. When plotting, do not use the Hide Plot option on the Plot dialogue box since this will only hide the Layout space including Fonts and Plines resulting in unfilled objects. Hiding Lines for object in Model Space - when printing 3D objects from the Model Space environment, use the Hide objects checkbox on the Layout Settings tab of the Page Setup or Plot dialog box ( see image, lower right ). |
 Note: Shaded Views are not printable from within
Architectural Desktop but |
||||||||||
Printer and Plotter Properties
Before plotting images from AutoCAD or Architectural Desktop, consider the medium you are printing to and confirm that the .pc3 file has been set to the same medium. In other words, getting great renderings on paper often means using great paper such as Coated Gloss or even Water Color Paper, but if the .pc3 has not been set for this medium type, you may not be getting the results you should. You may also want to look over the Custom Properties on the Plotter Configuration Editor and check for such setting as Color Control and Light-to-Dark controls for improved printing results. Typically, images tend to look lighter on screen than on paper because of the light used to present images on your screen; so you may have to offset this darkening effect by lightening the images or lightening the printing. |
 |
||||||||||
Napkin Sketch Productivity and Presentation
Extension
Illustrated to the right is the Napkin Sketch
dialog box that can be used to create a hand drawn line look for 2D and 3D views. The use of the Napkin tool is not limited by the View or Display Representation so if you use it in Plan View, for example, it will also produce a sketched look in 3D Views. Note: just because you may expect to plot a drawing at a certain scale does not mean you must use that scale on the Intended Plot Scale list; i.e., use it as another control for the sketch effect. |
 |
||||||||||
| 3Photoshop | 3-14 OUTPUT | ||||||||||
Printing Resolution in Photoshop
Photoshop offers an amazing assortment of sophisticated tools to control the look and quality of raster work so this is usually the best tool to use after creating presentation work in AutoCAD or Architectural Desktop. When images are opened in Photoshop, they are usually assigned a default resolution of 72 pixels per inch which is pretty good for the web but rather poor for general printing. This will explain why images rendered at resolutions of 3000 x 3000 pixels or so will appear enormous when opened in photoshop and viewed at 100% magnification. To get higher quality prints from Photoshop, you will need to increase the resolution in pixels per inch while maintaining the original pixel data. In other words, you cannot simply change the pixels per inch and expect new pixels to be added where they were never accounted for. In order to maintain the original pixel data while increasing the resolution, you must reset either the Document Size or Pixel Dimensions to their original values. The result of this change will reduce the image dimensions to a much smaller size than when it was first opened in Photoshop but the quality will be much more refined. Though you can use a formula for calculating the best quallity output for your printer, you should expect that 150 pixels per inch and up will produce rather impressive results. |
|
||||||||||
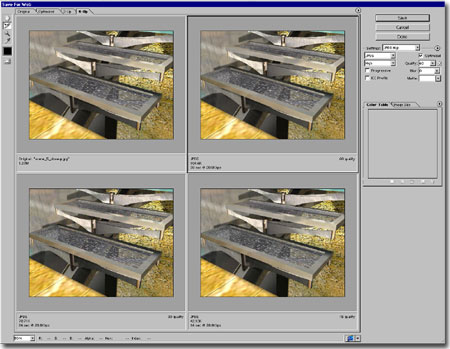
Photoshop for the Web
Photoshop 5.0 and up comes with an amazing tool called Saved for Web... that you can access from the File pull-down menu. With this tool, you can view the quality of your image as you make adjustments before saving it to a file. In addition to previewing the quality, you can read an estimate of how long the file will take to view over an internet connection. Using this tool allows you to create the best looking image while compressing its size down to the bear minimum and this is of huge importance when creating webpages In the illustration to the right I show how you can compare four versions of the same image to help determine which method provides the best look and the smallest file size. . |
|
||||||||||
| 4Web | 4-14 OUTPUT | ||||||||||
To the Web
The task of getting AutoCAD and Architectural Desktop work on a webpage is fairly simple in principle but the options are incredibly diverse, ranging from the Publish to Web Wizard to such web publishing programs as Microsoft's Front Page, Adobe's Go Live and Macromedia's Dream Weaver. Whatever path you take, the basics are the same and they involve some form of raster image that is small enough in file size and pixel size to make for a pleasant viewing experience on the recipient's screen. Through .html there are three raster image formats that are native; readable on all browsers on all operating systems: .jpg, .gif and .png. With the use of other software, such as Flash, far more formats can be used but they may not always be received by those who are viewing the work. In the case of Flash files, for example, many current browsers are a release behind by default and only have a plug-in for the last release of Flash. This means that in many cases viewers would have to download and install a more current plug-in in order to view the work successfully. With older browsers, the Flash plug-in may not even be present. The size of the recipient's screen and the resolution setting they have is often a significant factor in determining how to present the images in web format. It is all too easy to base everything on your own settings only to discover that others are not able to see the work you spent on formatting the work. |
Generally speaking, you can count on most clients using 15 - 17 inch monitors with a resolution setting of 800x600 pixels or greater. We at ARCHIdigm shoot for the CAD user crowd and build everything for 1024x768 pixel resolution. To present graphic images on the web for others to view, you can basically just copy the .gif, .jpg or .png to a website or FTP folder and give the full path to anyone you want to see it. However, it is often a lot nicer to use an .html file for formatting purposes so the image may be centered, on a colored background and annotated with a title or other information. This page you are currently reading is an example of how an .html page can be used to illustrate images and text. All of the images you see on this page come in through a linking system similar to AutoCAD's Xref system but the text, cells and colors are all written in .html code for your browser to interpret. If you click the right button on your mouse and select the View Source option on the pop-up menu, you will see all of the .html code used to format this page. You should also see all of the links to the various images. |
||||||||||
More Coming |
|||||||||||
| Ws_FTP_Pro
for file management on remote Webservers WS_FTP Pro is one of the best file management tools for working with Websites and FTP sites because it works almost exactly like Explorer. Illustrated to the right I show the "Classic" interface which has two panes for file transfer; one shows your machine and the other shows the network or remote server where you want to transfer your files to. |
 |
||||||||||
| 5ACDsee for Slide Shows | 5-14 OUTPUT | ||||||||||
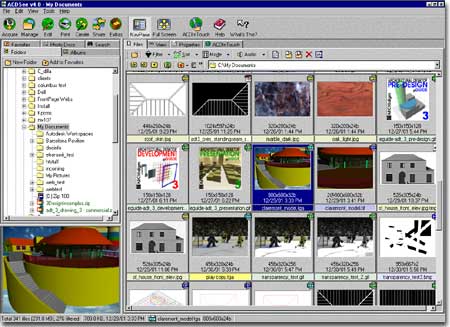
| ACDsee
for image management and presentation Though Windows 2000 and XP have built-in image browsing capabilities, they are not as sophisticated and as versatile as some of the image viewing and management software applications available on the market. One of the best tools for image viewing and management is ACDsee by ACD Systems, Ltd. - www.acdsystems.com. Illustrated below right I show all of the tools available via the pull-down menus and the list proves to be rather extensive making this product one of the best on the market. In many respects it can produce the results many use Photoshop to achieve; such as minor editing, cropping, printing and file format converting.
|
 |
||||||||||
| ACDsee Tools
|
 |
||||||||||
| 6Customizing and Tricks | 6-14 OUTPUT | ||||||||||
© Copyright 2002 ARCHIdigm. All rights reserved.
 you can use the
  By setting an Intended Plot Scale and a Tight,
Loose or Messy Line Format, this tool
will read the current objects and create a Block of these objects with a new line look.
The resultant product, which can take a while to produce, is a block of all the
objects in the selection set where a copy of the objects have been redrawn with
LWPolylines ( Light Weight Polylines ).
By setting an Intended Plot Scale and a Tight,
Loose or Messy Line Format, this tool
will read the current objects and create a Block of these objects with a new line look.
The resultant product, which can take a while to produce, is a block of all the
objects in the selection set where a copy of the objects have been redrawn with
LWPolylines ( Light Weight Polylines ).
 One of the best features within ACDsee for
presentations is it's Slide Show tool that can be used to display any
raster images in succession simply by highlighting them from anywhere on your computer.
Once a collection of images has been consolidated into a Slide Show, you can set
the frame rate between each slide, pause, continue, view full screen size, add effects,
add comments and save the slide show arrangement for recall later on. You can also
manually control the presentation of images by using the Space bar to cycle through any
collection or folder of images.
One of the best features within ACDsee for
presentations is it's Slide Show tool that can be used to display any
raster images in succession simply by highlighting them from anywhere on your computer.
Once a collection of images has been consolidated into a Slide Show, you can set
the frame rate between each slide, pause, continue, view full screen size, add effects,
add comments and save the slide show arrangement for recall later on. You can also
manually control the presentation of images by using the Space bar to cycle through any
collection or folder of images.