PART 13
Graphic ContentContents:
Graphics and CAD ---- AutoCAD / Architectural Desktop for Raster Content ---- Recursive Rendering ---- Photoshop for Materials ---- Customizing and Tricks
| Architectural
Desktop 3 - Presentation Guide PART 13 Graphic ContentContents: Graphics and CAD ---- AutoCAD / Architectural Desktop for Raster Content ---- Recursive Rendering ---- Photoshop for Materials ---- Customizing and Tricks |
| 1Graphics and CAD | 1-13 Graphic Content | ||||||||||||||||||||||||||||||||||||||||||||||||||||
| The World of Raster Images If you are already a regular user of Photoshop or a similar raster image editor, you are ahead of many CAD users who have not strayed from the world of Vector files. The two worlds have been merging for some time now. Most of the top notch designers that I regularly communicate with agree that the new age of design software is not happening so much in the individual products as it is in the merger of existing products; i.e., that innovation is occurring at the user level by combining capabilities of a multitude of software programs.
|
Once
you venture into the realm of 3D Renderings, it is almost impossible to Below we will look at a few aspects of what you can do with native Vector and Raster programs to produce better Renderings and better Presentation work. |
||||||||||||||||||||||||||||||||||||||||||||||||||||
| 2AutoCAD / Architectural Desktop for Raster Content | 2-13 Graphic Content | ||||||||||||||||||||||||||||||||||||||||||||||||||||
| Raster Filetypes from AutoCAD and Architectural Desktop AutoCAD and Architectural Desktop can produce an amazing variety of Raster content in a variety of formats, from .bmp to .avi. In this day and age where there are so many software solutions for so many specialties it can be perplexing to figure out what to do when you need to produce something. In many cases financial constraints and the time required to learn something new make the decisions easy. Personally, I have used AutoCAD for so many different graphic jobs that it's a bit embarrassing now that I look back but AutoCAD was my first experience with computer software and it became more second nature than a pencil. AutoCAD and Architectural Desktop can still be used to create very good raster content and it's simply a matter of knowing what these programs can do, how they do it and assessing if it is the best path to a solution. If you do not have access to Photoshop nor experience with bitmap editing software, you may have to do as much with AutoCAD and Architectural Desktop as you can. |
Here is a list of many different ways you can create raster content with AutoCAD and/or Architectural Desktop:
I may have missed an odd form of output to raster format but the primary group is listed and it can be expanded with such fantastic options as .pdf ( Adobe's portable document format ) which you can plot to if you have downloaded the latest PDF Reader or if you have Acrobat. |
||||||||||||||||||||||||||||||||||||||||||||||||||||
Print
Screen
The use of the Prnt Scrn button on the keyboard is one of the oldest tricks in Windows though many CAD users still don't know about it since they have never needed to worry about raster images. When you hit the Prnt Scrn button on your keyboard, the entire screen area is captured and stored on the Windows Clipboard. In the past, the Clipboard application was installed by default but most people don't use it anymore and thus the application is no longer installed by default. There really is no need to have it as an application since its primary function is to serve as a cache for transferring items from one application to another. Though you may not know it, you use the Clipboard every time you do a Cut and Paste procedure and that is why you can copy AutoCAD or Architectural Objects and Paste them into Word, for example. I find that many of the Shademodes produce an image that is actually good enough for client presentations since they can be quite simple and almost cartoon like. Unfortunately, there is no way to output or save Shaded Views so this is a case where the Prnt Scrn can come as a handy tool. Once you have captured your screen, you will need to Paste that image into some program that can receive it. I prefer to Paste these screen captures into Photoshop where I can Crop them and make other minor modifications so they look more presentable. I also use this trick to create rapid presentation images for client websites since Photoshop has fantastic tools for saving to web formats. TIP: If using the Prnt Scrn in Model Space, set the AutoCAD background Color to White before doing Prnt Scrn so you don't have a large area of black printed. See Options dialog, Display tab, Colors... button and "Model tab background". |
 |
||||||||||||||||||||||||||||||||||||||||||||||||||||
Save
Image
The SaveImg command brings up the Save Image dialogue box, illustrated to the right and is one of the easiest and fastest ways to get a clean raster image out of AutoCAD or Architectural Desktop. The two primary limitations with this tool are that it is limited to your screen for resolution and it cannot save shaded views. If you use Save Image while shademode has been set to something like Gouraud, the file will come out as a 2D Wireframe. Amazingly though, this tool can be used to save Rendered Scenes in any Viewport. The Same Image dialogue box offers three raster file formats: .bmp, .tga and .tif. Both the .tga and .tif formats offer the option to use Compression which is a good idea if you intend to make a lot of files but a bit unnecessary if you intend to use Photoshop to completely change the image and the format. The Portion of screen area allows you to pick two points or type them in as coordinates to define an area of the screen to save. The Reset button will simply revert to the default full-screen coordinates. The OK button will take you to the Save File dialogue box where you can specify a name and location for the image. In the illustration to the lower right, I show that the Save Image tool can be used in a Layout and will do a fairly nice job of capturing viewports, Xrefs, Blocks, Image Ref's and so on. Since the quality will be limited by screen resolution, 1024x768, 1280x1024, etc., the image is nowhere near the quality produced by plotting to a raster format - see discussion below. |
 |
||||||||||||||||||||||||||||||||||||||||||||||||||||
Publish
to Web
The Publish to Web tool is probably the most complicated option in this section for generating raster content but it also does quite a bit more than create a single file for editing in Photoshop or Referencing back into AutoCAD or Architectural Desktop. The .jpg or .png files that the Publish to Web tool produces can easily be used for editing in Photoshop or Referencing back into your drawing. Simply look for the folder where the webpage has been saved and view all of the .jpg or .png files there for an image you may want to use. If you have limited Webpage skills but want to create a presentation website for a client, you can create any type of sheet you want and have the Publish to Web tool add it to the list. This means that you can create a sheet with one or more Rendered images and have that "published to the web". Raster images come out surprisingly well in .dwf format and with the ability to Zoom in on them offers something usually only seen with Macromedia's Flash .swf files. |
 |
||||||||||||||||||||||||||||||||||||||||||||||||||||
Export, WmfOut and BmpOut
The Export dialogue box offers several vector formats that can be incredibly useful when dealing with other vector based programs but the raster list is fairly short and includes, .wmf, .eps and .bmp. You can also create .wmf's and .bmp's directly without using the Export dialogue box. To access these two options, simply type WmfOut or BmpOut on the command line to create either of these two file formats. |
The .eps file created through the Export dialogue box is limited to the screen and thus offers a very limited quality. A better solution is to use a Raster Plotter configuration specifically set to create .eps files. Using .bmp's and .wmf's in a day and age where we can so easily work with higher quality image file formats makes it difficult to argue for these older formats. Personally, I never use .bmp's unless the file looses nothing by being a .bmp; something like a bitonal bumpmap, for example. I also find very little use for .wmf's unless they serve a unique purpose in transferring graphics between programs, especially Microsoft products. |
||||||||||||||||||||||||||||||||||||||||||||||||||||
Plotting to .JPG format
At times while you are developing your Rendering project, you may find the need to quickly generate graphic imagery to be used in the Rendering. One of the surprising solutions to this need comes from right inside AutoCAD and Architectural Desktop. By plotting something as simple as text, you can create signage in a few minutes and use it as a transparency Material on your Model. The fundamental aspect of this technique is to create really clean and crisp bitmaps; usually involving some trial and error work. For simple decals that do not need to be as crisp and clean as possible, yet great looking, you can simply use the PublishToWebJPG.pc3 plotter configuration that comes with AutoCAD and Architectural Desktop. This file type is specifically used for Web content but can also be used in Renderings. The size of this file type is small due to a reduction in colors and resolution so if you want something for an enormous close-up Rendering, use another format. |
 |
||||||||||||||||||||||||||||||||||||||||||||||||||||
| Plotting to .JPG format - Resolution Size Illustrated to the right, on the Plot Settings tab of the Plot dialogue box, I show that you can choose from among a huge variety of Resolutions for the .jpg file. Again, this is a mater of trial and error research but you can also use the intended final Rendering resolution as a gauge. If you are going to create a few small renderings at a resolution of 1280x1024, you probably don't need a resolution higher than that for a small sign in that Rendering.
|
 |
||||||||||||||||||||||||||||||||||||||||||||||||||||
Plotting to .TIF format
Illustrated to the right is another way to create a bitmap image in AutoCAD / Architectural Desktop for use as a Material for Rendering. To produce high quality bitmap images of regular non-3D work, you can use a PostScript or Tiff plotter configuration, as illustrated to the right. Plotting to a .tif or .eps format allows you to get amazing quality allowing for output of just about everything you can think of. Illustrated to the right I show a Layout with Viewports of floor plans, two Raster Images, Text, Mtext, and an Xref'd Titleblock with Attributes. Once this layout has been plotted to a raster file, you can use it as a bitmap in a Material. |
 |
||||||||||||||||||||||||||||||||||||||||||||||||||||
| Plotting to .TIF format - example Illustrated to the right I show the result of using the bitmap image created above as a Material. As a base, I used a 3D Face below the actual Architectural Desktop Model that is in the bitmap image. By calculating the scale correctly, I have matched the Material image of the floor plan and titleblock up with the actual model. Though this illustration may seem odd, it can be quite useful in creating illustratrative plans with site work and/or other existing conditions. You can now scan hand drawn images and use them as base information in a 3D Rendering. You can create anything you want in AutoCAD and Architectural Desktop and use it as a Material. You can even model something and render it so that you can use it as a Material on another 3D object. The possibilities are endless. |
 |
||||||||||||||||||||||||||||||||||||||||||||||||||||
| 3Recursive Rendering | 2-3 SHADE | ||||||||||||||||||||||||||||||||||||||||||||||||||||
Rendering
in Stages
On complex Rendering jobs you may find it impractical to Model and Render everything in one step because of the file size and the Rendering time. In cases like this, the answer may be to break the work up in stages and reuse one Rendering as a Material in a new one - I like to call this process recursive Rendering. In an interior space, for example, you may have two or more rooms that have such a large amount of detail that Rendering for each room alone, takes hours. To save time, you can Render distant rooms separately without any of the foreground geometry and then use those image files as Materials in the back of the primary room to be Rendered. In order to get the perspective perfect, you will have to use the exact same View with the same position and perspective settings for all the distant rooms. In an exterior space, for example, you may have many buildings that each have so much detail that it takes hours to Render each building alone. To save time, you can Render a perfect elevation of each side of each building and then use these images as Materials Mapped to the sides of basic 3D boxes. |
I am in the process of looking for good graphic examples to illustrate these techniques and will not only post them soon but also elaborate on the whole process. |
||||||||||||||||||||||||||||||||||||||||||||||||||||
| 4Photoshop for Materials | 2-4 SHADE | ||||||||||||||||||||||||||||||||||||||||||||||||||||
Photoshop
for Bump
In the world of architectural materials, a lot of the appearance can be simulated with a simple bump map that leaves an impression in the material so that it looks 3-dimensional. Illustrated to the right, in Photoshop, I show the process of creating a simple bitmap image that can be used as a bump map and even as a Color/Pattern Attribute if desired.
The greater the Bitmap blend for this Bump Map Attribute, the deeper the look of the recession and the stronger the look of its shadow.
|
 In Bump Maps, dark areas define the material plane and light spots define high spots. An all white bitmap with dark spots will create dents or recesses ( low spots ) while an all black bitmap with white spots will create points or ridges ( high spots ). |
||||||||||||||||||||||||||||||||||||||||||||||||||||
Photoshop for Color / Texture
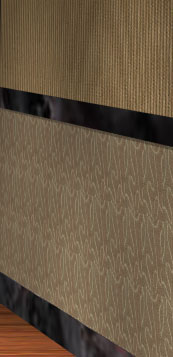
When photorealism is really needed, you can use a digital camera or scanner to capture a piece of the real world as a sample to use in your Renderings.
On Sample "A", right, the linear patter was easy to Crop for repetition because all I had to worry about was the light and dark stripes. One one side I left a full dark stripe and on the other a full light stripe. The height did not matter and I actually did not need as much of a sample as illustrated but I like to work with larger pieces.
|
 On Sample "B", right, the curvy wild pattern was impossible to Crop for repetition because the sample I was given was not of the full pattern. Though I could probably have invested a lot of time to create a pattern base upon what I had, I decided to do a simple square crop of a portion that I liked and see how it would turn out. The final shots were not close enough to reveal the mismatched seams so I was able to save time. Once you have the samples ready for use, save them in a format that matches the quality you need in the final rendering. For these samples, saving them as .tif files is probably the best but you can use other formats that consume less memory. Once you have created the bitmap images for use on your 3D Model, create a New Material and use your bitmap image as a Color/Texture Attribute -> read Bitmap as Color/Pattern Attribute for how to use bitmaps as Color/Patterns. |
||||||||||||||||||||||||||||||||||||||||||||||||||||
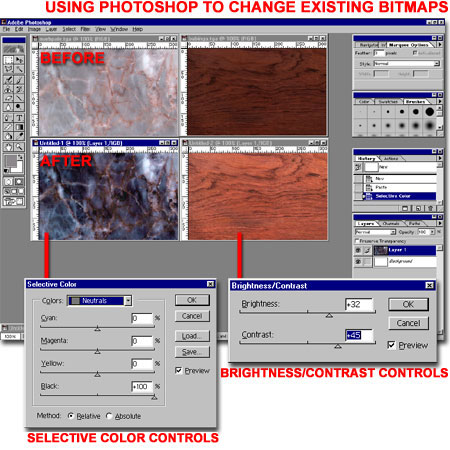
Photoshop for Editing Existing Bitmaps
At times in the Material creation process you may find that an existing Material or bitmap used in an existing Material Library file is close to what you want but not quite there. In cases like that, you can simply Adjust the existing bitmap to better meet your specific needs. Illustrated to the right, I show just a couple of examples of how you can use the Image Adjust tools in Photoshop to change existing bitmap images. One of the easiest to use and understand is the Brightness/Contrast dialogue box which can be used to quickly lighten or darken an existing bitmap. This can be very useful on bitmaps that come out far too dark in your Renderings. Making a Material a little brighter is often far less work than trying to add more light to a Rendering Scene. Another Image Adjusting tool that is fairly easy to understand and use is the Selective Color dialogue box which allows you to choose specific color ranges to work with; one at a time. For any selected color, you can use the Cyan, Magenta, Yellow and Black controls to add or reduce the amount of pigment of each in the chosen color; thus changing the color to another color or tint. This can be very useful on bitmaps that don't have the right tint or shade of color(s) that you desire. |
 Note: |
||||||||||||||||||||||||||||||||||||||||||||||||||||
| 5Customizing and Tricks | 2-5 SHADE | ||||||||||||||||||||||||||||||||||||||||||||||||||||
| Raster File Formats Illustrated to the right is a list of the major file types that AutoCAD or Architectural Desktop is capable of producing. What Format to use and When to use it The only thing I am really certain about in the world of raster file formats is that few agree about the "right" format. Unlike those of us who have grown up on vectors, graphics people have had a lot more to worry about since images don't travel well. Vectors on the other hand, have no resolution problems so they travel quite well unless software companies do their best to make it difficult ( i.e, as a means to maintain a proprietary file formats ). This means that choosing a raster file format can be a bit arbitrary but there are some solid mathematical rationalizations that you can use to determine the best one for your job. One key element to consider is the recipient. .eps, .tif, and .jpg are good for cross platform exchange. Desktop publishers often use Macintosh systems and prefer to receive .eps files. .gif, .jpg, and .png are all good file formats for web use. .gif and .png support transparency. .png is slowly replacing .gif .jpg offers the best in terms of color and is thus the standard for photographs and renderings. .dwf is great for web use but only if viewers have the Whip plug-in and thus can often prove to be a headache. .tif and .tga are great file formats for generalized raster work carrying as much color and resolution as possible allowing for conversion to other formats. When Rendering, I recommend always using a high quality file format with optimum color depth and resolution. Usually it's a matter of time rather than size. Then, use a program like Photoshop to convert it to whatever other file format you may need. You will get better results by using a professional raster editor than by using the native program to produce an inferior file format. The reason this is true is that a raster editor offers controls for how changes are made and thus you can gauge such things as clarity and color reduction. |
|
||||||||||||||||||||||||||||||||||||||||||||||||||||
© Copyright 2002 ARCHIdigm. All rights reserved.
spell checked on Jan. 24, 2002
 In the past few years I have observed that more
and more work is leaving CAD software and moving over to Photoshop, Illustrator, Corel
Draw and a host of other raster based software programs. The developers of these
graphics programs have responded by adding support for vector files and refer to them as
"resolution independent graphics". Some products like Flash and
Illustrator can work with both raster and vector files seamlessly. This also
suggests that the very term "CAD" is becoming archaic as a term used to indicate
vector based design software. Currently, we really have three types of Computer
Aided Design software: Fully Vector Based with Raster support, Fully Raster based with
Vector support and those that are Vector based with full Raster support. And on the
horizon we now see a new generation of design software that is Object Based; loaded with
Reactors that produce both raster and vector output depending upon the needs of the user.
In the past few years I have observed that more
and more work is leaving CAD software and moving over to Photoshop, Illustrator, Corel
Draw and a host of other raster based software programs. The developers of these
graphics programs have responded by adding support for vector files and refer to them as
"resolution independent graphics". Some products like Flash and
Illustrator can work with both raster and vector files seamlessly. This also
suggests that the very term "CAD" is becoming archaic as a term used to indicate
vector based design software. Currently, we really have three types of Computer
Aided Design software: Fully Vector Based with Raster support, Fully Raster based with
Vector support and those that are Vector based with full Raster support. And on the
horizon we now see a new generation of design software that is Object Based; loaded with
Reactors that produce both raster and vector output depending upon the needs of the user.
 When you Plot to this file format, you will generally want to use a
Window or the Display for the Plot Area at a Scale of "Scaled to Fit". By
using the Window Plot Area, you can control the cropping so that you can match that
against the 3D object that you will be Attaching this bitmap to. If accuracy is
really important, you can use a rectangle on a No Plot Layer as an OSNAP guide for the
Window. Then, make sure to draw a 3D Face or similar object with exactly the same
aspect ration ( X and Y proportions ).
When you Plot to this file format, you will generally want to use a
Window or the Display for the Plot Area at a Scale of "Scaled to Fit". By
using the Window Plot Area, you can control the cropping so that you can match that
against the 3D object that you will be Attaching this bitmap to. If accuracy is
really important, you can use a rectangle on a No Plot Layer as an OSNAP guide for the
Window. Then, make sure to draw a 3D Face or similar object with exactly the same
aspect ration ( X and Y proportions ). The concept is quite simple; all you need to do is create the look how light and
shadow would look on the object that you are attempting to create. In the case of
siding, for example, the boards are plat but with an impression at the seams. To
create that impression, draw a gray shade as wide as needed relative to the boards.
Since this image will be repeated in a pattern it can be a very small piece, even one
pixel wide but it should be proportionally correct in height to make the mapping process
easier to gauge. In the illustration to the right, in Photoshop, I created an image
36 pixels long by 10 pixels high to simulate a common board measurement in inches. I
can use that ratio in the Adjust Bitmap Placement dialogue box to set a ration that works
for my Walls.
The concept is quite simple; all you need to do is create the look how light and
shadow would look on the object that you are attempting to create. In the case of
siding, for example, the boards are plat but with an impression at the seams. To
create that impression, draw a gray shade as wide as needed relative to the boards.
Since this image will be repeated in a pattern it can be a very small piece, even one
pixel wide but it should be proportionally correct in height to make the mapping process
easier to gauge. In the illustration to the right, in Photoshop, I created an image
36 pixels long by 10 pixels high to simulate a common board measurement in inches. I
can use that ratio in the Adjust Bitmap Placement dialogue box to set a ration that works
for my Walls. Illustrated to the right are two wall treatment samples that I once had to use on
a project where a high level of accuracy and realism was required. I was provided
with two standard 4 inch samples that I scanned and cropped in Photoshop, as illustrated
to the right. When you need to use a sample in repetitive patterns, you must do your
best to make the seams disappear and the only way to achieve this is to crop in such a way
that you cannot see the seams.
Illustrated to the right are two wall treatment samples that I once had to use on
a project where a high level of accuracy and realism was required. I was provided
with two standard 4 inch samples that I scanned and cropped in Photoshop, as illustrated
to the right. When you need to use a sample in repetitive patterns, you must do your
best to make the seams disappear and the only way to achieve this is to crop in such a way
that you cannot see the seams.