PART 11
REFERENCEContents:
Reference - Access ---- External References and Model Files ---- Image References and Renderings ---- Display Order ---- Customizing and Tricks
| Architectural
Desktop 3 - Presentation Guide PART 11 REFERENCEContents: Reference - Access ---- External References and Model Files ---- Image References and Renderings ---- Display Order ---- Customizing and Tricks |
| 1Reference - Access | 1-11 REFERENCE | ||||||||||
| Reference toolbar How do I get this toolbar? You can also acquire access to these commands from the Insert pull-down menu. From the Insert pull-down menu, pick External Reference... or Xref Manager... for drawing files and Raster Image... or Image Manager... for raster image files. |
 |
||||||||||
| Reference pull-down menu Illustrated to the right, is the Insert pull-down menu which provides access to the Xref and Image Manager dialogue boxes. You can also use the External Reference or Raster Image... options to access the Select File portion of the Xref or Image Ref. process. Both of these options will lead back to the Xref or Image Managers. Below we will take a look at how Xref's can be used with Architectural Desktop Models and how Rendered Images can be used back in drawing files for drawings that mix Vectors with Raster Images. |
|
||||||||||
| 2External References and Model files | 2-11 REFERENCE | ||||||||||
Xref Attachment and Model Assembly
Though Architectural Desktop has limited support for Xref's and may not be the best solution for your particular Modeling and Rendering needs, using Xref's in the Rendering and Presentation phase of a job cycle can be highly advantageous. With Rendering Template Files you can produce presentation quality Renderings almost immediately after assembling the Xref's. Using multiple copies of the same Xref'd Rendering drawing, you can manage multiple Rendering conditions to produce very different images such as Sections, Elevations, Interiors, with surrounding structures and versions with different materials. |
|
||||||||||
Xref
Name Changes
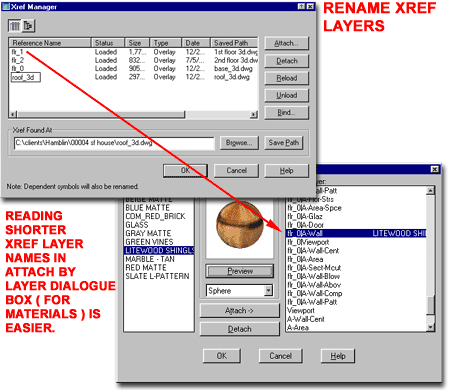
Xref's can be Renamed in the Xref Manager by picking twice on the Reference Name ( wait for i-beam cursor and frame around name ). By keeping the names of the various files that make up your Rendering drawing short and simple, you can make the process of reading the Layer Names easier on the Attach by Layer dialogue box ( illustrated lower right ). In addition to assisting in the process of Attaching Materials by Layer, you can also use this technique to "swap" out Xref files. This means that if you have one project full of Materials Attached by Layer to a set of Xref's you can substitute a new set of Xref files and they will adopt all of the same Materials as long as the Layer Names are the same. The first part of this process is managed by using the same Reference Name ( something like "flr_1" ) and the second part involves how Architectural Desktop has named the object Layers. If two projects share the same Layer Standard and Layer Keys then this process will produce amazing results in seconds. |
 |
||||||||||
Xref
File Swapping
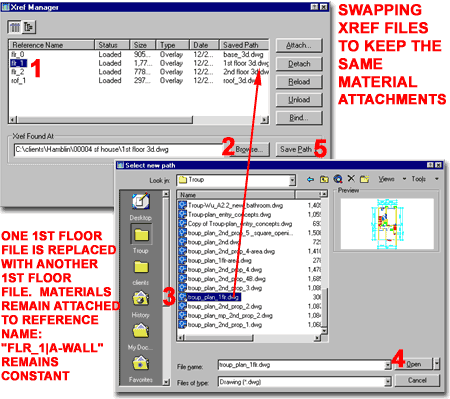
One of the best features of Xref's that you can take advantage of for Renderings involves swapping files in the Xref Manager. As discussed above, you can change the name of an Xref in the Xref Manager to something simple and generic ( like "flr_1" ). Once an Xref file has been Attached, you can always ( 1 ) highlight this file in the Xref Manager and use the ( 2 ) Browse... button to select another ( 3 ) file to ( 4 ) Open and use under the Reference Name. To keep this newly Selected file Attached, use the ( 5 ) Save Path button unless the Rendering file and the source files are all in the same folder or on a Project Search Path. The reason this trick is important for productivity is that the Materials will remain Attached and you will not have to go through the trouble of re-attaching Materials unless you need different or new Materials. If a Layer belonging to a Renamed Xref ( flr_1 ), for example, had a stucco wall Material Attached by Layer ( flr_1|A-Wall ) then the new drawing will receive this same Material as long as it has a Layer Named A-Wall. |
 |
||||||||||
Xref
Clipping
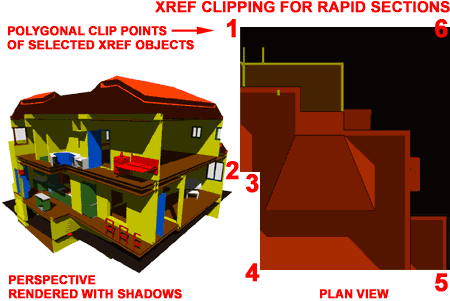
Xref's offer a fantastic feature for study and presentation Renderings that allows for quickly cutting right through any Xref's - as illustrated to the right. The Xclip tool can also be use to remove objects that may be in the way of a great perspective shot or simply objects that you do not wish to have in a Rendering. To Clip an Xref or multiple Xref's, simply use the Xclip command and select the Xref(s) that you wish to Clip. Follow the command line options to specify how you want to define the clipping boundary ( New Boundary > ) and the process will be complete. To turn Off an Xclip, you can use the Off option on the Xclip command line or you can use the Delete to remove it. Command: XCLIP |
 Note: |
||||||||||
Xref
Clip Frame
External Reference Clip Frames can be turned On and Off with the XclipFrame variable and it affects all Xref's in a drawing so you cannot have some frames on while others are off. If you desire a frame around an image, as a border for example, you will need to draw a Rectangle or Polyline by OSNAPing to the Frame before turning Off the Frame. This variable is turned Off by default in most template drawings. |
|||||||||||
Xref
Binding
Xref's can be Bound to a Rendering file so that they are no longer linked to the original source files. This can be an advantageous option when you want to freeze the development of the Rendering file so no new changes come in through the links. It can also be advantageous when it becomes necessary to access the individual objects for Material Attachment or Mapping. The Bind... button on the Xref Manager dialogue box provides two options for the Bind type: Bind and Insert. The Bind option leaves all current Xref Layer Names intact with a slight modification to the reference name -layer name separator ( reference name | layer name becomes reference name 0$0 layer name). The Insert option merges all current Xref Layer Names with existing Layer Names or adds new Layer Names and the reference name - layer name separator is removed. This is usually the best option unless you want a long list of unique Layer Names for every Xref Bound. Xref's that have been Bound, are converted to Blocks and can be Exploded to access every unique and individual object. |
|
||||||||||
| 3Image References and Renderings | 3-11 REFERENCE | ||||||||||
Image Attachment and
Construction Documents
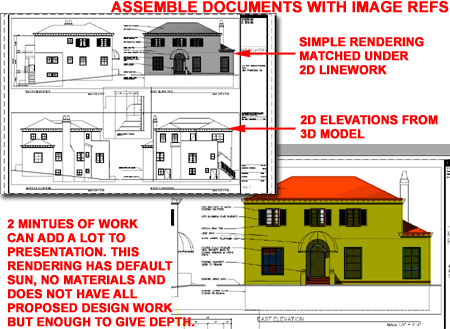
Once you are able to produce Renderings the possibilities of implementation is as wide as you can imagine with the tools available to you. Illustrated to the right is an example of a simple mix of traditional 2D Linework with a Rendered version of the same elevation. In this example, very little knowledge of Rendering was required because no Materials were used. The objective was to produce shadows and some shading on the surfaces for a softer and more appealing look to the elevation. With some Photoshop editing, the basic colors could be manipulated in numerous ways to produce a more hand-rendered look; Filter tools like Add Noise, Brush Strokes and Graphic Pen. The final construction document can be printed in 256 shades of gray or the image itself can be changed to 256 shades of gray. |
 |
||||||||||
Image Attachment and Presentation Boards
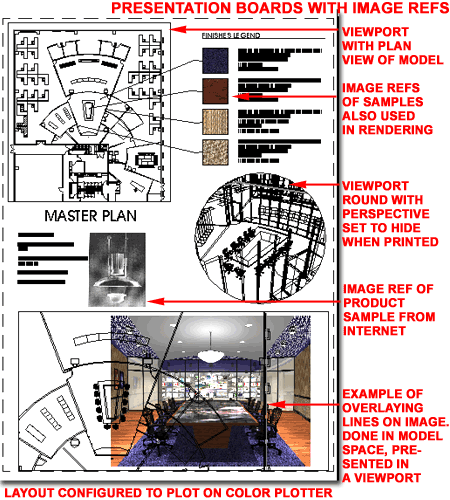
The Image Reference Manager can become just as useful and powerful as the External Reference Manager and the savvy designer will utilize both to the fullest in order to create the most dynamic and creative presentations. Illustrated to the right is an example of how Images and Vector drawings can be mixed in AutoCAD and Architectural Desktop to create the types of presentation boards usually assembled by graphic designers with Photoshop, Illustrator, Quark Xpress and other similar graphic programs. Though there are significant limitations to creating presentation work in a Vector program, there are also opportunities. One of the most rewarding aspects of creating the presentation material in the CAD program used to create the Renderings, is that it is far easier to keep the floor plans, elevations and other linework up to date in the design process. By working in AutoCAD and Architectural Desktop, you can use Image Refs and Xref's to allow for rapid updating of information. As with Xref's, the Image Refs point to a source raster file and thus whenever that file is changed, so to the image on the presentation drawing. |
 |
||||||||||
Image
Manager
The Image Manager is exactly the same as the Xref Manager with the exception of the Detail... button which provide a preview image and some image data about resolution and size that may prove to be quite useful. This means that everything you already know about Xref's and Xref management will guide you through learning about Image References.
Detach - use this button to remove a selected Image from the current drawing file. Erasing or Deleting an Image will not Detach it from the current drawing and you will still need to use the Detach button. Reload - this button will reload the selected image and bring in any updated changes to the image just as with Xref's. Unload - this button will remove the Image from memory and basically turn off the image content. This will also free up the image for editing and saving in a Raster program if you are working on both programs at the same time. You can think of this as an On/Off switch. Details... - use this button to see a preview of the selected image and to see data on the resolution, location and size of the raster image. Browse... - use this button to relocate a lost image that may have been moved from one Path to another or to keep the current Image Name the same while swapping the actual image out for another image. Save Path - use this button to freeze the current location of the image so that no other images of the same name will be use and so that the image will be found automatically the next time you open the current drawing. Saving Paths is usually necessary with all Reference files if the source of the reference and the current drawing file do not reside in the same folder. |
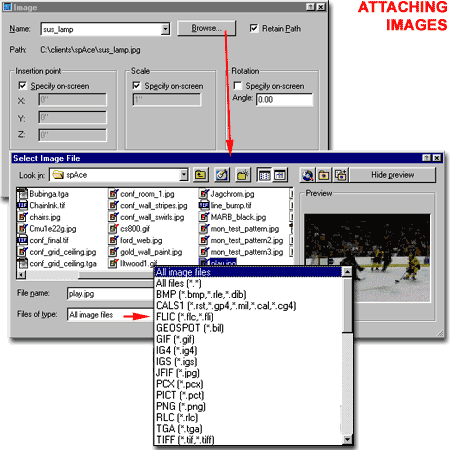 On the Image dialogue box, illustrated above, you can use the Browse... button to access the Select Image File dialogue box where you can search for all sorts of raster images on your local machine or the office network ( see image for list of raster file types ). Once an Image has been selected for use, you can specify the Insertion, Scale and Rotation values on the Image dialogue box or choose to specify these values on screen. For best printing results, do not scale the image but place it in a layout and keep it as close as possible to a ration of one-to-one. If a larger image is required, you may need to use a larger resolution for the Rendering or make adjustments in a raster editing program. |
||||||||||
Image
Frames
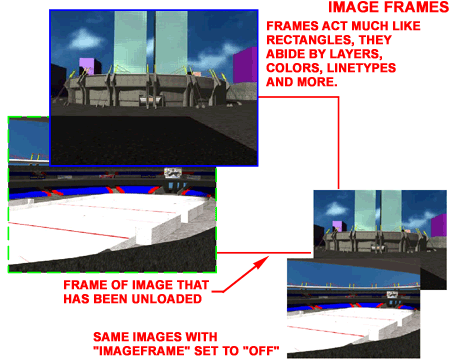
The frame around an Image is the most significant aspect of an image for AutoCAD and Architectural Desktop. Since both CAD programs are Vector based, Images are really a foreign type of object and thus the frame becomes the vector representation of the image. When you want to Move, Copy, Rotate, Stretch, Erase or otherwise edit an Image, you must Select the Image by the Frame. If the Frame has been turned off, there is no way to edit it. Image Frames can be turned On and Off with the ImageFrame variable and it affects all images in a drawing so you cannot have some frames on while others are off. If you desire a frame around an image, as a border for example, you will need to draw a Rectangle or Polyline by OSNAPing to the Frame before turning Off the Frame. |
 |
||||||||||
Image
Clipping
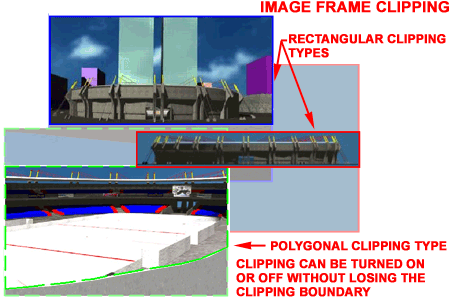
Clipping Images is much like Clipping Xref's and offers a fantastic option for redefining the edge of an Image to display just the information you desire. You can think of the clipping frame as an edge that the image is being Trimmed to. Once a Clipping Boundary has been created by either the Rectangular or Polygonal method, you can use Grips to Stretch and reshape the Clipping frame around the Image. The ImageClip tool also offers the ability to turn the Clipping Boundary On or Off in case you need to see all of the Image at any time. To remove a Clipping Boundary, you use the Delete option on the ImageClip command line. Command: IMAGECLIP |
 |
||||||||||
Image
Adjust
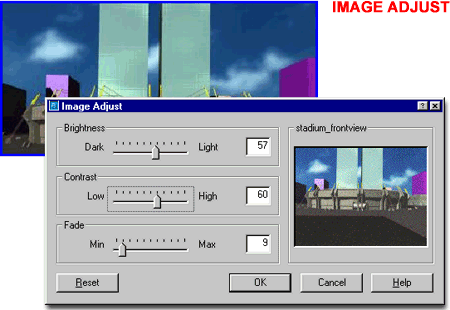
The Image Adjust dialogue box provides three basic image controls: Brightness, Contrast and Fade. |
 |
||||||||||
Image
Quality
The Image Quality variable is probably one of those options that you will never actually use but if you find that you are struggling with your images and your drawing file due to size and system memory/display limitations, you can try using the Draft setting. This setting affects all images and cannot be set for specific images. I never use this option. |
Command: IMAGEQUALITY |
||||||||||
Image
Transparency
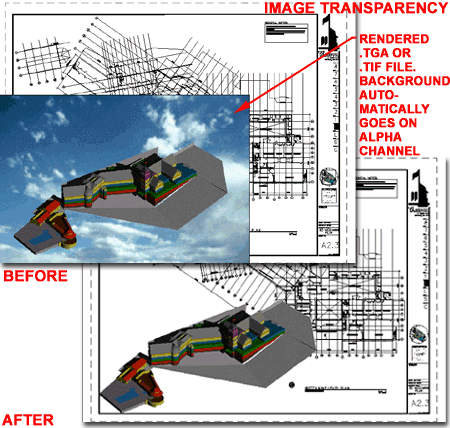
The Image Transparency variable is a fantastic option allowing for better merging of images and linework in AutoCAD and Architectural Desktop but not all images are capable of transparency. Bitonal images are capable of transparency by default. This is due to the fact that they only use two colors where white is assumed to be the color for transparency. This is thus a fantastic option for all sorts of black and white scanned images such as old construction documents, pen and ink drawings and maps. Web based images such as .jpg, .gif and .pgn are all capable of transparency if they have been set so that a specific color will be transparent. High Quality images such as .tga and .tif are only capable of transparency if they were saved with an Alpha Channel that defines the areas to be transparent. Since Alpha Channels are not necessarily based upon colors but user defined areas, this can offer a far more sophisticated level of transparency and thus more potential when mixing images with linework. When Rendering in AutoCAD or Architectural Desktop, the Background ( default, image or other ) automatically becomes assigned to an alpha channel when the files type is a .tga or .tif - see illustration to the right. Command: TRANSPARENCY |
 |
||||||||||
| 4Display Order | 4-11 REFERENCE | ||||||||||
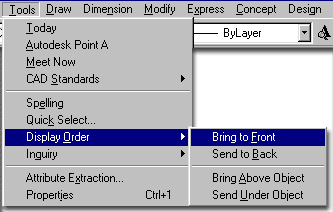
| Display Order pull-down menu Illustrated to the right, is the Tools pull-down menu which provides access to the Display Order cascading menu with four options for organizing the display hierarchy of objects in AutoCAD and Architectural Desktop. The four command options, Bring to Front, Send to Back, Bring Above Object and Send Under Object provide the means to stack the display of objects in any order you may want. With sophisticated hierarchies, involving a large number of objects, the trick to organization requires establishing a Bottom ( Send to Back ) and working objects up. |
 |
||||||||||
Overlapping Images and Linework
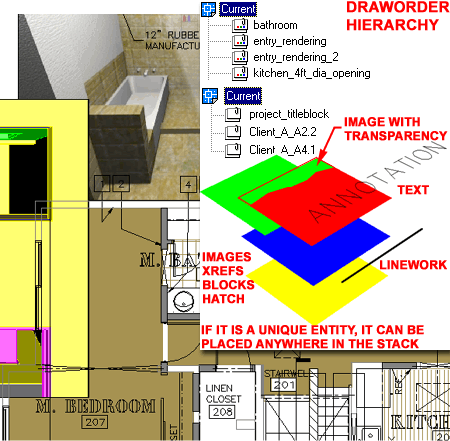
The Draworder command allows hierarchical stacking of objects much the same way as Photoshop manages hierarchy by layers. Rendered images can, for example, be placed above linework, below linework or somewhere in between depending on the structure of the drawing file. Illustrated to the right, I show a portion of a proposed floor plan with an Xref of the floor finishes ( brown ), and two Image References. The floor finishes plan has been placed under the floor plan. The images have been placed under the floor plan but above the Xref of the floor finishes plan. This illustrates a little bit of what can be achieved when mixing Image Refs, Xref's, Architectural Desktop objects, Hatch Patterns, Annotation and so forth. Images with Transparency turned On can be placed above other images masking them except in the areas of transparency. Linework can be placed anywhere in the stack as can dimensions, text, hatch patterns and anything else that exists as a unique entity. This also means that blocks, for example, act as a single entity and you cannot control the display order within the single entity. |
 |
||||||||||
| Display Order and Xref's One of the most disappointing aspects of the Display Order system is that it does not travel with Xref's. No matter how you set the display order of objects in a drawing, when it is Inserted as an Xref, it will revert back to the creation order. I have tried many different tricks, including working with the Sortents variable, but have yet to come up with a simple fix. The only trick that I have to offer that produces consistent results involves resorting the creation order. One way to bring objects to the top of the stack in the creation hierarchy, which is different from the display hierarchy, is to use the Copy command from the Edit pull-down menu and then the Paste command from the same pull-down menu. If you use the same base points for the Copy as the Paste, you insure that the objects remain in the exact location(s) used to create them. Unfortunately this trick is only useful to bring a few objects to the top, like text over a Solid Hatches, and does not help in maintaining a sophisticated Display Order. |
If you need a sophisticated Display Order and you must work with Xref's, I recommend using more Xref's to solve the problem. What I mean by this, is that you can break a project up into more individual files that can then be Xref'd together and stacked as unique objects. I have done this a lot with large illustrative project work and it has worked very well. I will even create a single drawing that only contains labels, for example, so these labels can be brought in as Xref's and then put on top of the stack among many other Xref's. Once I even created two drawings for labels where one was used as a drop-shadow effect...but that's another story. |
||||||||||
| 5Customizing and Tricks | 5-11 REFERENCE | ||||||||||
Photoshop and Alpha Channels
When you Render a Model in AutoCAD and Architectural Desktop to either a .tif or .tga file format, the Background ( whatever it may be ), automatically is assigned to the Alpha Channel as illustrated to the right in Photoshop. When Images are Image Ref'd back into AutoCAD or Architectural Desktop the black area on the Alpha Channel ( which is the Background ) can be set as Transparent. Knowing that the Alpha Channel exists and that black areas can be set as transparent should provide you with some opportunities that you may not have know existed. You can now, for example, open areas in any image file for transparency and use an image just like a mask over anything else you may have in your drawing. In Photoshop you can create and use more than one Alpha Channel but their purpose is primarily for saving masks and not for use in AutoCAD or Architectural Desktop. Note: |
|
||||||||||
© Copyright 2002 ARCHIdigm. All rights reserved.
spell checked on Jan. 24, 2002