| 1Mapping - Access |
1-8 MAPPING |
 Render
toolbar Render
toolbar
How do I get
this toolbar?
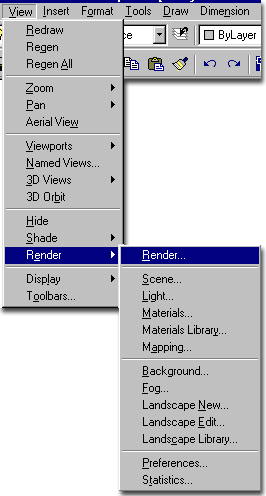
You can also acquire access to these commands from the View pull-down
menu. From the View pull-down menu, pick Render >
and cascade to Mapping... |
 |
| Render pull-down menu Illustrated to the right, I show the
Render pull-down menu which consists of all the same tools as those found
on the Render toolbar. In this Part we will be discussing the difficult
process of wrapping textured materials around 3D objects when the controls for Bitmap
Placement in the Materials Editor do not produce the results you seek.
Since not all surfaces are
the same, materials cannot be wrapped around them in the same way and when 3D objects have
many surfaces for one material, the wrapping or mapping can become a serious problem.
The Mapping tool was designed to provide assistance in dealing with tough geometry
but there are times when the only solution is to separate all the faces so they can
receive materials independently. Before you go to such tedious extremes, try working
with this tool.
This
tool is not for Xref'd Models.
|
 |
| 2Mapping dialogue box |
2-8 MAPPING |
Mapping dialogue box options broken down
| Menu |
View> Render>
Render... |
| |
 |
| Keyboard |
Render |
The Mapping dialogue box, illustrated to
the right, is an object based tool that allows unique control over how Materials
are placed, oriented and scaled. This means that you can use one Material for
several different objects and still have control over how the Material is Attached
to individual objects. In the case of a Column and a Door,
for example, a Material with Wood Grain needs to be
"mapped" in a Cylindrical fashion for the Column but in a Planar
fashion for the Door; with the Mapping dialogue box, you can do just that without changing
the Material.
Be aware that not all ADT objects allow Mapping ( Walls,
for example ) and there are numerous examples of how Mapping cannot solve all of your
needs. One of the worst problems you will undoubtedly face has to do with Roofs
and Slabs where the Material will simply wrap around Soffits and Fascias.
There is nothing you can do to change the Mapping of individual faces of one
homogenous object but if you can use other objects for Soffits and Fascias,
then you can at least use different Materials on them. Mapping, however, always
affects the entire object and Roof
Slabs with Fascias, for example, are mapped as one object.
Ultimately, you may find that your beautify Model has to be
Exploded
in order to separate the components for individual Mapping. Of course this is the
last thing you may want to do and should be weighed carefully against the losses. I
like to think of this stage as the point where the Model leaves the
Project and simply becomes Art.
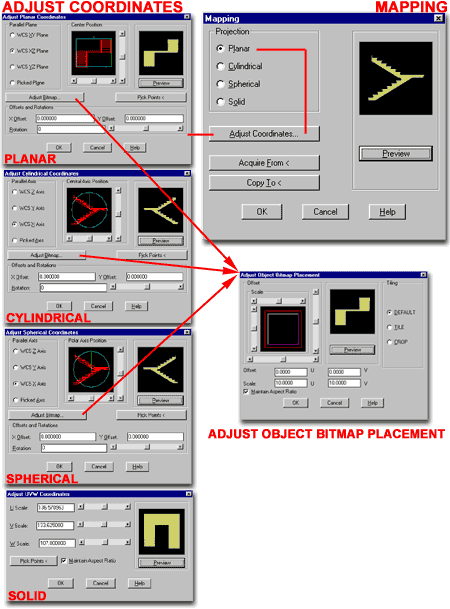
The Process of working with the Mapping tool involves the
following steps:
1. Select an object(s)
requiring Mapping adjustments.
2. Choose an appropriate Mapping Projection
for the object(s) selected ( Planar, Cylindrical, Spherical
or Solid ).
3. Use the Adjust
Coordinates... button to access the Adjust [Projection Type] Coordinates
dialogue box where you can set the direction, rotation
and offset of the Material with respect to the selected object(s).
4. Use the Adjust Bitmap button on
the Adjust [Projection Type] Coordinates dialogue box
(not available for Solid Projection ) to fine tune Scaling and Tiling
of Material with respect to the selected object(s)
|
|
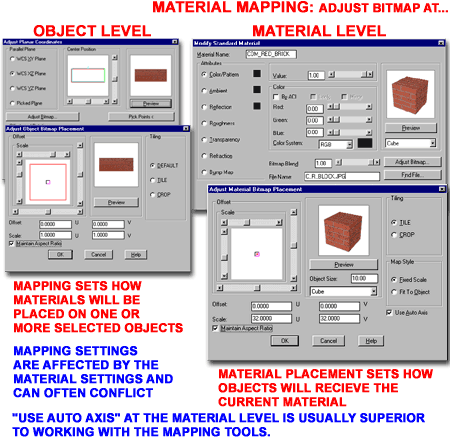
| Mapping
Concepts Mapping
actually occurs at two levels in AutoCAD and Architectural Desktop: at
the Material Level and at the Object Level.
Illustrated to the right I show the two similar dialogue
boxes that affect the bitmap images you may be attempting to map correctly. On the Material
dialogue box, you can use the Adjust Bitmap... button to work
with the Adjust Material Bitmap Placement dialogue box and for the
the top three Mapping Projections, you can use the Adjust
Bitmap... button to work with the Adjust Object Bitmap Placement
dialogue box.
For most of the work you may do with Architectural Desktop,
the "Use Auto Axis" checkbox on the Adjust Material
Bitmap Placement dialogue box should take care of most of the Projection
problems; but in those cases ( as discussed below ) where you experience problems,
working with the Mapping tools may be the only alternative. To avoid problems and
confusion, simply keep in mind that Material settings affect Material Attachment for all
cases, even when the Mapping tools have been used on objects. And, the Mapping tools
take their queue from the Material settings so if something like "Use Auto Axis"
has been set on the Material, the Mapping tools cannot override that behavior.
At times it is best to create a duplicate of a Material
that will be used for objects that have Mapping Coordinates. This Material will have
"Use Auto Axis" turned off and may have a Scale
of 1.00. It may also have Tile and Fixed Scale set
as well to keep the Material as close to a default setting as possible; thus allowing the
Mapping tools to take control for the specific object(s) selected.
|
 |
| 3Adjust Planar Mapping Coordinates |
3-8 MAPPING |
Mapping dialogue box - Planar
| Menu |
View> Render>
Mapping... |
|
|
| Keyboard |
SetUV |
 Illustrated to the right is the Mapping dialogue box
which is used to adjust how materials are mapped to individual objects. Though the
concept is very similar to the Adjust Material
Bitmap Placement concept, this tool allows you to make unique adjustments for each
individual object. Illustrated to the right is the Mapping dialogue box
which is used to adjust how materials are mapped to individual objects. Though the
concept is very similar to the Adjust Material
Bitmap Placement concept, this tool allows you to make unique adjustments for each
individual object.
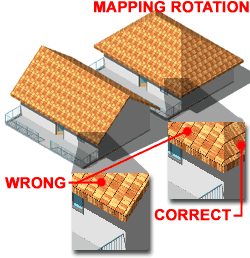
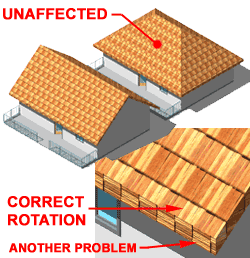
Illustrated to the left is an example of how the same
bitmap Material Rendered incorrectly on one Roof and correctly on another. If we
were to make an adjustment at the Material Level ( via the Adjust Material Bitmap
Placement ), we would change both cases and still have a problem. Instead, we can
use the Mapping tool to work with the Roof object that has the biggest problem and simply
rotate the material to match the direction of that particular roof.
|

Be aware that this only works when you have
access to the individual objects. It does not work on an Xref'd Model.
|
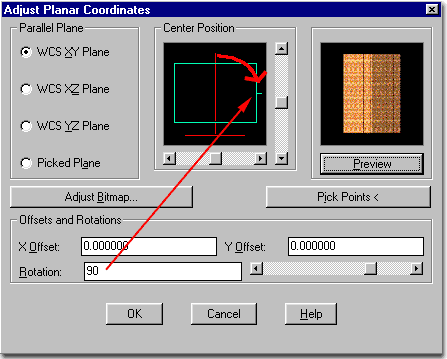
| Adjust Planar Coordinates dialogue
box
On the Adjust Planar Coordinates dialogue box, illustrated right, you
can control the direction relative to the World Coordinate Plane, the Offset
and the Rotation of the Material as it is Mapped to the selected
object(s).
 In many cases, you can fix Mapping problems by simply adjusting the World
Coordinate System ( WCS ) to another Plane. Though Auto Axis
on the Adjust
Material Bitmap Placement dialogue should Map Materials correctly to all
surfaces, you may find that a Material appears to have been Mapped from one Plane and is
"bleeding" across another Plane. You can use the various Parallel
Plane options to adjust the Mapping Plane direction. I have found that this
is more of a problem with organic shapes such as boat hulls than with Walls, Doors,
Windows and Roofs. In many cases, you can fix Mapping problems by simply adjusting the World
Coordinate System ( WCS ) to another Plane. Though Auto Axis
on the Adjust
Material Bitmap Placement dialogue should Map Materials correctly to all
surfaces, you may find that a Material appears to have been Mapped from one Plane and is
"bleeding" across another Plane. You can use the various Parallel
Plane options to adjust the Mapping Plane direction. I have found that this
is more of a problem with organic shapes such as boat hulls than with Walls, Doors,
Windows and Roofs.
The Picked Plane option allows you to use
a 3-point OSNAP method to define the Mapping Plane which can be very useful where the
object is not aligned to any of the rectilinear XYZ coordinates; i.e., when the object is
not in alignment with the WCS. To define the plane, use the Pick Points <
button.
|
 Adjust Bitmap -
use this button to access the Adjust
Object Bitmap Placement dialogue box which is almost identical to the Adjust
Material Bitmap Placement dialogue box accessed through the Modify Materials dialogue box.
Pick Points - using
this button automatically sets the Picked Plane radio button under Parallel Plane.
Once selected, 3 points will be required to define a plane in space for the mapping.
X and Y Offsets - use these
value fields or the Center Position slider bars to move the bitmap image
relative the the object. This is very useful if, for example, you want a particular
pattern or image to align with the geometry at a very specific point.
Rotation - use the Rotation
number field or slider bar to set a Mapping angle that best matches the selected
object. Illustrated to the left I show how I have used this option to fix a Shingle
Roof Material Mapping problem; a simple Rotation of 90 degrees solved the problem.
|
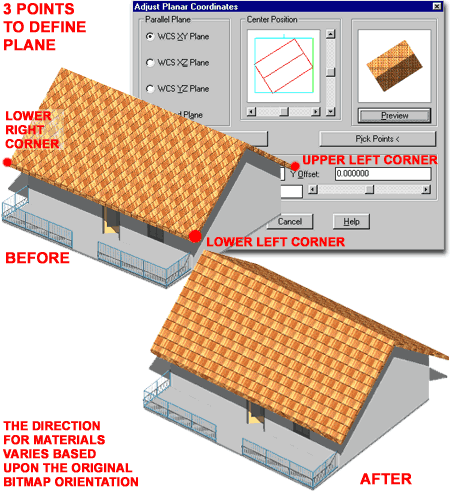
| Adjust Planar Coordinates - Pick Points 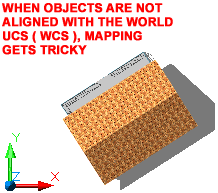 The Pick Points <
button on the Adjust Planar Coordinates dialogue box offers another way
to Rotate Material Mapping. By selecting three points in space ( OSNAP ) a mapping
plane is defined for the current object. The Pick Points <
button on the Adjust Planar Coordinates dialogue box offers another way
to Rotate Material Mapping. By selecting three points in space ( OSNAP ) a mapping
plane is defined for the current object.
In the case of a Roof object, illustrated to the right, the
three points must not only orient the Material but define a logical plane of mapping for
both Roof sides since they form a single object. If these objects were Roof Slabs,
then the Mapping could be applied uniquely to both at the exact angle or pitch but since
this is not the case the material has to mapped flat across both sides ( like draping a
large cloth over the roof ).
Establishing the Lower Left Corner is much
like establishing an origin but knowing which direction to use for the Lower
Right and Upper Left Corners is often a matter of trial and
error because you may not know the original bitmap orientation.
|
 |
| 4Adjust Cylindrical Mapping Coordinates |
4-8 MAPPING |
| Adjust Cylindrical Coordinates dialogue box
On the Adjust Cylindrical Coordinates dialogue box,
illustrated right, you can control the direction relative to the World Coordinate
Plane, the Offset and the Rotation of the
Material as it is Mapped to the selected object(s).
When using Cylindrical Mapping, it is best to uncheck
"Use Auto Axis" on the Material's Adjust Bitmap
Placement. Because Cylindrical Mapping wraps the material completely around a
cylindrical object, the Material is less likely to need large Scalar Values on the
Material level. In other words, the settings you may use for Planar Mapping usually
do not work for Cylindrical Mapping.
 In the illustration to the left, for example, a Planar Mapping of
the example material requires a scale of 350 for X and Y while only 4 for X and Y when
used as Cylindrical Mapping. In the illustration to the left, for example, a Planar Mapping of
the example material requires a scale of 350 for X and Y while only 4 for X and Y when
used as Cylindrical Mapping.
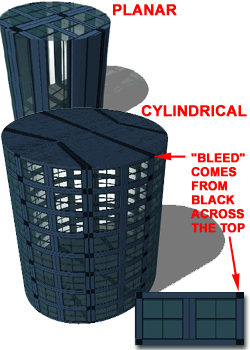
If the bitmap image has a complex edge a the top and bottom
you may experience bleeding across the top and bottom surfaces, as illustrated to the
right. To avoid this problem, add a simple single color across the top and bottom on
the bitmap image. I typically add another 3D object and use it to cover up my
messes.
The Rotation angle can be used to position
a desired portion of the image where you would like it or place the bitmap seam behind the
camera view if it becomes noticeable.
|
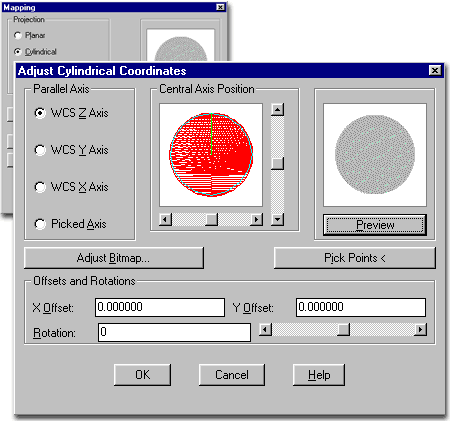 |
| Adjust Cylindrical Coordinates - Pick Points The Pick Points < button on the Adjust
Cylindrical Coordinates dialogue box offers another way to Rotate Material
Mapping. By selecting two points in space ( OSNAP ) a mapping axis is defined for
the current cylindrical object. The third point is merely for the direction of the
seam. The three points requested are the Bottom, Top and Direction for the Seam. By
being able to define the Top and Bottom, you can correctly map for cylinders that are
rotated at any imaginable angle that does not conform to the WCS.
|
|
| 5Adjust Spherical Mapping Coordinates |
5-8 MAPPING |
| Adjust Spherical Coordinates dialogue box
On the Adjust Spherical Coordinates dialogue box,
illustrated right, you can control the World Coordinate Plane, Offset
and Rotation of the Material as it is Mapped to the selected object(s).
When using Spherical Mapping, it is best to uncheck
"Use Auto Axis" on the Material's Adjust Bitmap Placement
dialogue box. Because Spherical Mapping wraps the material completely around a
spherical object, the Material is less likely to need large Scalar Values on the Material
level. In other words, the settings you may use for Planar Mapping usually do not
work for Spherical Mapping.
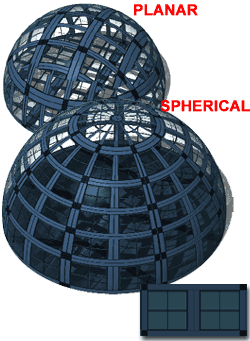 a
good solution for a dome skylight a
good solution for a dome skylight
|
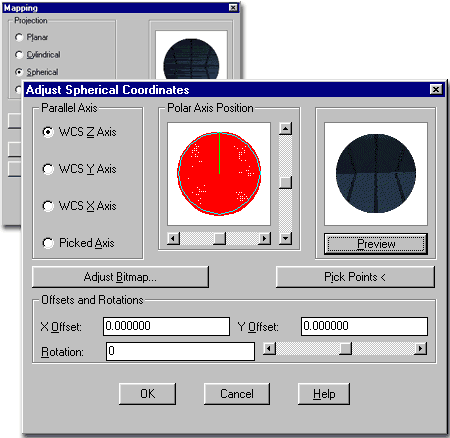 |
| Adjust Spherical Coordinates - Pick Points The Pick Points < button on the Adjust
Spherical Coordinates dialogue box offers another way to Rotate Material Mapping.
By selecting two points in space ( OSNAP ) a mapping circle is defined for the
current spherical object. The third point is merely for the direction of the seam.
The three points requested are the Center, Radius and Direction for the Seam. By
being able to define the Center and Radius, you can orient a bitmap on a Sphere at any
angle you prefer. This is important because rotating the object does not change the way
the map is positioned.
|
|
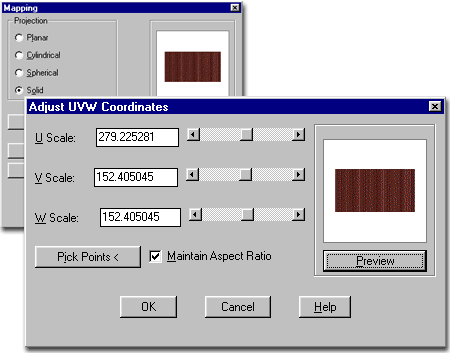
| 6Adjust Solid Mapping Coordinates |
6-8 MAPPING |
Adjust Solid Coordinates dialogue box
| Menu |
View> Render>
Mapping... |
|
|
| Keyboard |
SetUV |
On the Adjust Cylindrical Coordinates dialogue box,
illustrated right, you can control the World Coordinate Plane, Offset
and Rotation of the Material as it is Mapped to the selected object(s).
 When using Solid
Mapping, it is best to uncheck the "Use Auto Axis"
option on the Material's Adjust Bitmap Placement dialogue box. Solid Mapping
attempts to do just the opposite of Auto Axis by applying the Material to one face only of
a 3D Object. Since Solid Mapping also attempts to fit the Material to the surface,
using Scale to Fit at the Material level can often make Planar and Solid
appear the same. When using Solid
Mapping, it is best to uncheck the "Use Auto Axis"
option on the Material's Adjust Bitmap Placement dialogue box. Solid Mapping
attempts to do just the opposite of Auto Axis by applying the Material to one face only of
a 3D Object. Since Solid Mapping also attempts to fit the Material to the surface,
using Scale to Fit at the Material level can often make Planar and Solid
appear the same.
|
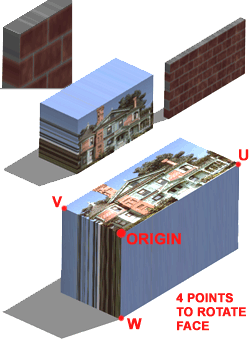
 Illustrated to the left are a couple of examples
of what you can achieve with Solid Mapping. In the case of a Brick Wall, this form
of mapping can be advantageous since the edges will "bleed" back providing the
appearance of a "Solid" map.
Solid Mapping provides no option for Adjust
Bitmap because the Scale and Orientation is
determined by the UVW Scales and/or the four points you can specify with
through the Pick Points button ( See illustration ).
|
| 7Adjust Object Bitmap Placement |
7-8 MAPPING |
| Adjust Object Bitmap Placement dialogue box
One of the first things that needs to be understood about
the Adjust Object Bitmap Placement dialogue box is its connection to the Adjust Material Bitmap
Placement dialogue box.
In the illustration to the right, I show how A1 on the Adjust Material Bitmap Placement dialogue box
affects A2 on the
Adjust Object Bitmap Placement dialogue box. The interesting, and
confusing, aspect of this correlation is that it is based upon the last Material Created
or Edited and not necessarily the Material that is Attached to the current object ( if any
is Attached ). If you need a different size for the Object Size frame ( red ) on the
Adjust Object Bitmap Placement dialogue box you will need to access a Material in the
Materials Library that has a different value for the Object Size ( A1 ). It's a bit silly but explains the odd scalar graphics you
may observe in the Offset pane.
What is far more important to know is illustrated by B1 on the Adjust Material Bitmap Placement dialogue box
and its affect upon the Scale Value, B2X, on the Adjust
Object Bitmap Placement dialogue box. When you adjust the Scale
on the Object Level, the value you specify is multiplied
by the Scale Value of the Material at the Material Level ( Hence the
"x" in B2x ). Be very careful about this correlation; it can really cause
some frustration.
For the Offset Value on the Adjust
Object Bitmap Placement dialogue box, it too is affected by the equivalent value
field on the Adjust Material Bitmap Placement dialogue box but only
results in offsetting an offset; i.e., no multiplication.
|
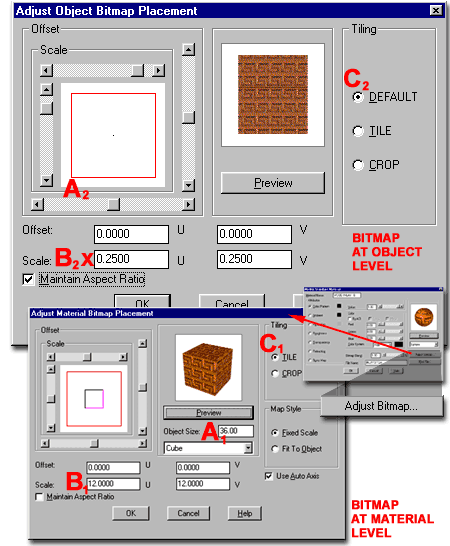 The Tiling options on the Adjust
Object Bitmap Placement dialogue box, C2, are also tied to the Tiling setting on the Adjust
Material Bitmap Placement dialogue box, C1, in such a way that Default is determined by
the Material Setting; you can override the Material's setting and use either Tile
or Crop.
Now that we have cleared all of that
information up we can look at why you use this dialogue box. The use of the Adjust
Object Bitmap Placement dialogue box provides the opportunity to use the same
Material from the current Materials Library on numerous objects at different
Scales, Offsets and with different Tiling
settings. It is primarily for controlling the Scale at the object level.
|
| 8Customizing and Tricks |
8-8 MAPPING |
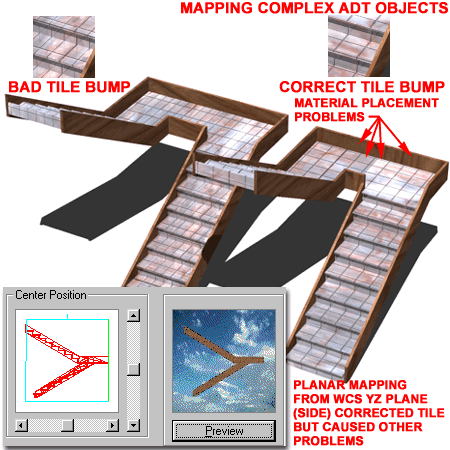
| Mapping Complex Objects in Architectural Desktop Generally speaking, using the Mapping tool on Architectural Desktop
objects is not a good idea. Using the "Use Auto Axis"
option at the Material Level produces better results because it
automatically detects changes in surface direction and attempts to apply the materials
accordingly. None of the Mapping Projection options are capable of accomplishing
this task but in desperate situations you can combine the two. In other words, use
the "Use Auto Axis" in conjunction with a Mapping Projection.
Illustrated to the right I show a pair of similar Stair
objects, where the one on the left has no Mapping Projections
attached but the one on the right has a Planar YZ Plane
Projection. In a desperate moment, I searched for a way to avoid exploding
the AecObject ( the worst possible solution ) while getting a Bump Map Attribute to read
correctly on the Marble Material. In the Stair with no Mapping, the "Use Auto
Axis" was unable to project the grid pattern in a square fashion and created an
elongated or rectangular result. By using trial and error solutions on the Stair, I
was able to produce a compromised result: the tile suited my needs but the other materials
have errors. Fortunately, the client was more in tune with the tile than the other
materials.
The point of this example is to reiterate how Mapping
causes poor result on most, if not all, of Architectural Desktop's complex objects ( those
with multiple components and surfaces ). However, we must also be realistic about
achieving desired results in the least destructive fashion; and keeping objects in tact is
a high priority if you expect changes to occur on the project.
|
 |