PART 1
VIEWContents:
View - Access ---- Named Views ---- Vpoints ---- Camera ---- Customizing and Tricks
| Architectural
Desktop 3 - Presentation Guide PART 1 VIEWContents: View - Access ---- Named Views ---- Vpoints ---- Camera ---- Customizing and Tricks |
| 1View - Access | .1-1 VIEW | ||||||||||||
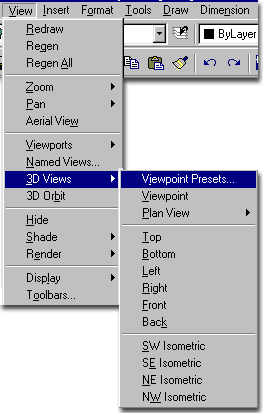
| View toolbar How do I get this toolbar? You can also acquire access to these commands from the View pull-down menu. From the View pull-down menu, pick 3D Views > and cascade to a desired tool. |
 |
||||||||||||
| View pull-down menu Illustrated to the right, is the View pull-down menu showing the 3D Views > cascading menu. The top three options, Viewpoint Presets..., Viewpoint and Plan View > are not available on the View toolbar. The View toolbar has the Named Views... tool and a unique Camera tool that is not on the pull-down menu. In addition to the pull-down menu and toolbar buttons, you can type "V" or "View" to access the Named Views dialogue box and you can type "-View" to access the non-dialogue based options. I particularly like to use the "-View" options when I am saving views because it can be done very quickly without calling up the dialogue box. Named Views are also significant in Rendering because they can be associated with Lights through the Scenes dialogue box. Scenes can then be accessed inside the Render dialogue box for final production output. Command Line Example: |
 |
||||||||||||
| 2Named Views | 2-1 VIEW | ||||||||||||
View dialogue box
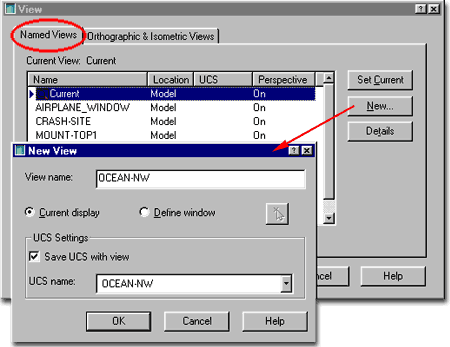
On the Named Views tab of the View dialogue box, illustrated to the right, you can use the New... button to Save the Current display. This is an incredibly valuable tool in AutoCAD and Architectural Desktop and is a key component of working with Scenes for Rendering.
On the New View dialogue box, you can Name your View by simply typing in a name.
Define Window - allows you to use the Window selection button to refine the Zoom Window of the View to save. This produces odd results if used on perspectives and is best used with the plan or isometric views. |
 UCS Settings |
||||||||||||
View dialogue box - Orthographic & Isometric Views
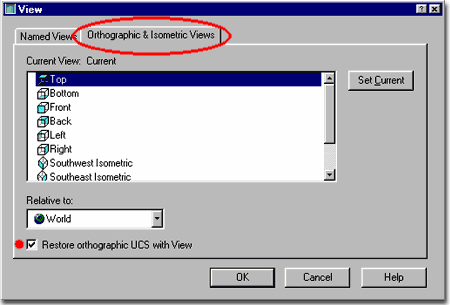
On the Orthographic & Isometric Views tab of the View dialogue box, illustrated to the right, you should find the same six plan views and four isometric views that are on the View toolbar. In addition to being able to pick and Set Current these various views, you can change the way these Views relate to your model by assigning a Saved UCS on the Relative to: drop-down list. Relating to a Saved UCS can produce some really odd Views and may not be a desirable option. The way to understand what happens here is to imagine a UCS at 45 degrees off World on the Z-axis; Save this UCS, set it Relative to: and then Set Current Top View and the result will be a View rotated 45 degrees. One of the most useful features on this tab is the Restore orthographic UCS with View checkbox. When you uncheck this check box, the icons and equivalent toolbar icons on the View toolbar will no longer change the UCS icon automatically when used. I often prefer to leave my UCS icon as set and thus uncheck this option so the UCS icon is not changed when I switch views. You can also turn this setting on and off with the typed "UcsOrtho" variable. |
 |
||||||||||||
Orthographic & Isometric Views
The View toolbar has six Elevation Views called Orthographic Views and four Angled Views called Isometric Views. With this set, you can quickly View a Model from the primary directions and not only look for design problems but correct them. When you use the Orthographic View buttons, you should notice that the UCS icon will always be aligned with your View and Screen. This means that when you select any of these views, the UCS icon command is activated and set to match the View. This can be of great benefit since you can now work in the current View as if X and Y are the same as they were in Plan ( or Top ) View. This can also prove to be confusing however, if you change the View to an Isometric View and attempt to draw as if you are still in Top View. |
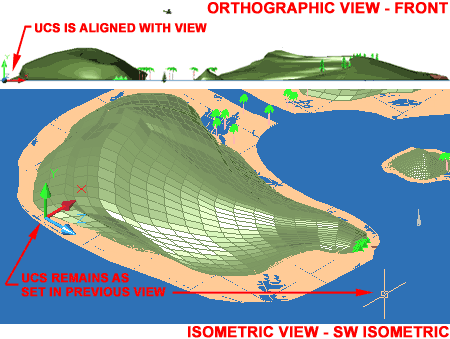 When you use the Isometric View buttons, the UCS icon is not changed from the last position or setting. If you go from a Front Elevation View, for example, and then to a SE Isometric View, the UCS icon will remain in alignment with the Front Elevation View. This means that if you want to draw Walls, you will either have to use the Top View button and then come back to the SE Isometric View or use the UCS command to restore the UCS icon to World. |
||||||||||||
| 3Viewpoints | 3-1 VIEW | ||||||||||||
Viewpoint
Presets...
The Viewpoint Presets dialogue box, illustrated to the right, is very useful tool for getting exterior views all around a project. The left sun-dial like image represents a top view (Plan) of your drawing while the right arc shaped image represents a cross-section of your drawing. Though you can type numbers in the From: X Axis and XY Plane fields, it's a lot easier to pick on the images near the Angles you seek. Then, to refine the Angles, you can change the numbers in the From fields. Set to Plan View - this button resets any changes on the Viewpoint Presets dialogue box back to Top World View: From X Axis = 270 and XY Plane = 90 Set Viewing Angles Relative to UCS - setting this radio button is just like using the Relative to UCS option on the View dialogue box. If you use this radio button and you have a unique Current UCS, the Angles you set on this dialogue box will be relative to how the UCS icon orients X, Y and Z. |
|
||||||||||||
Viewpoint
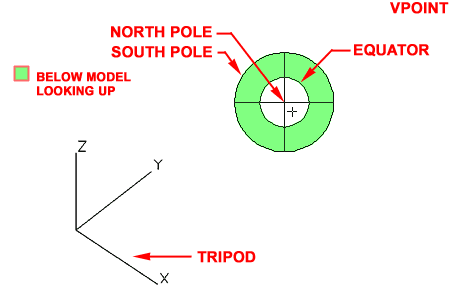
The Vpoint tool is the predecessor to the Viewpoint Presets dialogue box discussed above and both are the predecessors to the 3D Orbit tool introduced in AutoCAD 2000 and Architectural Desktop 2.0. The Vpoint tool is really more of an archaic historical reference than anything practical; especially when compared to the 3D Orbit tool. However, I used this tool an awful lot and have a fond recollection of trying to figure out the whole North Pole, South Pole and Equator icon. I always found the Tripod an easier object to comprehend but both icons work together. Flat Globe - the round Vpoint icon represents a Globe as a flat object where the outer ring is the South Pole and the center is the North Pole. This means that the best shots are usually those taken between the North Pole and the Equator; all other shots are from below and look up into models. Tripod - this Vpoint icon is just like the UCS icon and thus if you keep the Z-axis point up and out towards the screen, you are likely to get results that you will like. |
 |
||||||||||||
Plan
View
The Plan command is almost self-explanatory by the very term "plan". Its true power is best observed when combined with the UCS tools to align the screen with the current UCS. Current UCS - aligns your working screen with the current UCS orientation such that the X-axis of the current UCS becomes the lower horizontal portion of the screen while the Y-axis become the vertical portion. World UCS - always resets the working screen to the World UCS position. This is the default position AutoCAD and Architectural Desktop use as the origin. Named UCS - aligns your working screen with any Named UCSs such that the X-axis of the current UCS becomes the lower horizontal portion of the screen while the Y-axis become the vertical portion. |
|
||||||||||||
| 4Camera | 4-1 VIEW | ||||||||||||
Camera
tool
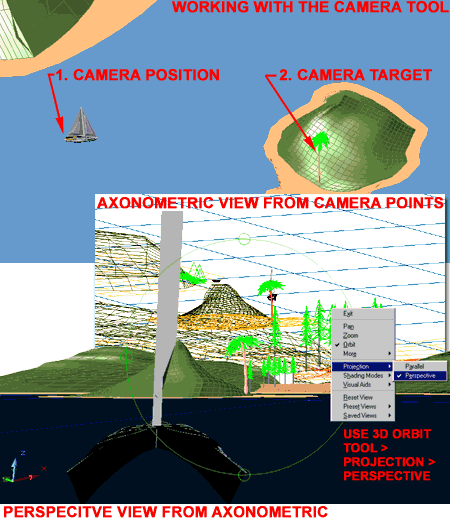
The Camera tool provides the ability to create any view you want based on two points in space. This tool pales dramatically when compared to the AEC Camera tool available in Architectural Desktop but when combined with the 3D Orbit tool, can be quite useful. It is particularly useful for those who do not have Architectural Desktop. Once the Camera command has been activated, you are prompted to pick a Camera Position on the screen or by typing in the X,Y and Z coordinates. Once the Camera Position has been accepted, you will be prompted to pick a Target for the Camera to look at. I find that it is best to use OSNAP Endpoint or Intersection to specify these points for the Camera. As soon as the Target has been accepted, the Axonometric View will be generated. You can work in this view as you would in any of the predefined Views ( Top, Left, SE Isometric, etc ). If you want a Perspective View from the Camera tool, you will need to activate the 3D Orbit tool immediately following the Anonometric View. On the 3D Orbit tool, you can use the right-click pop-up menu to access the Projection cascading menu where you will find the Perspective option. As soon as you have set the Perspective option on, the View will be a Perspective based upon the two points specified for the Camera. By using Zoom and Adjust distance while in the 3D Orbit tool, you can change the lens and the position of the Camera. To learn more about the 3D Orbit tool, read Part 3 - 3D Orbit |
 |
||||||||||||
| 5Customizing and Tricks | 5-1 VIEW | ||||||||||||
| General
Tips Use the Camera tool to Reset the Target of the 3D Orbit tool. This is a great trick when you are struggling with the 3D Orbit tool and find that your model seems to flip completely out of the viewing area making it impossible to adjust the view. To do this, simply execute the Camera command and skip the request for a Camera Position ( hit <Enter> ) but OSNAP to a point on your Model for the Camera Target. Once you have provided a new Target, you will find that the 3D Orbit tool behaves much better the next time you use it. Use the same View Names in every Model. If you develop a Rendering Studio Template File as discussed in the Appendix, you can also add Saved View Names that always bring about the same orientations. This is particularly useful for generalized perspectives like a bird's eye view.
|
© Copyright 2002 ARCHIdigm. All rights reserved.
spell checked on Jan. 20, 2002