PART 9
BACKGROUNDS, FOG and LANDSCAPE OBJECTSContents:
Background, Fog and Landscape - Access ---- Background, Fog and Landscapes - Overview ---- Backgrounds ---- Fog ---- Landscape Objects ---- Customizing and Tricks
| Architectural
Desktop 3 - Presentation Guide PART 9 BACKGROUNDS, FOG and LANDSCAPE OBJECTSContents: Background, Fog and Landscape - Access ---- Background, Fog and Landscapes - Overview ---- Backgrounds ---- Fog ---- Landscape Objects ---- Customizing and Tricks |
| 1Background, Fog and Landscape - Access | 1-9 BACKGROUNDS, FOG and LANDSCAPE OBJECTS | |||||||||||||||||||
|
 |
|||||||||||||||||||
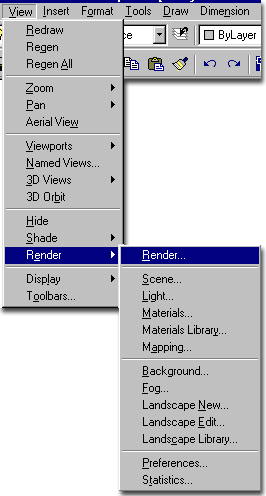
| Render pull-down menu Illustrated to the right, I show the Render pull-down menu which consists of all the same tools as those found on the Render toolbar. In this Part we will be discussing three tools for adding simple environmental effects to your Renderings. These effects include Background colors and images, Fog and Landscape "image-objects". Backgrounds are one of the easiest ways to add graphic atmosphere to a Rendering and you can use Backgrounds to affect Materials that have a Reflective Attribute value. Backgrounds will also help to lighten Renderings that appear dark. Fog is the closet to an actual atmosphere control and can be used to create a the illusion of actual Fog or as a tool to fade back areas with little to no detail. Landscape objects are the most complicated in this discussion but offer one of the most exciting and fast ways to drop clip-art objects into a Rendering to assist in adding "real-life" elements such as Cars, Trees and People to 3D architectural geometry. In this discussion, you will also learn how to make your own Landscape objects to take even greater advantage of this simple trick to make Renderings look more realistic. |
 |
|||||||||||||||||||
| 2Background, Fog and Landscapes - Overview | 2-9 BACKGROUNDS, FOG and LANDSCAPE OBJECTS | |||||||||||||||||||
Background
- Overview
Using the Background dialogue box should prove to be one of the easiest things you can do to dramatically affect a Rendering. Through this dialogue box, you can set the background to render as a simple monotone color, a custom gradient color, a custom bitmap image or a working screen merger. In addition to controlling how the background looks in renderings, you can also add a reflection background with the Environment option so that reflective materials reflect exactly what you want; even if it's something completely different than what is in the current drawing. |
|
|||||||||||||||||||
Fog
- Overview
Using the Fog dialogue box may prove to be more complicated than the Background dialogue box but its function is rather simple: it allows you to add a volumetric gradation based upon a chosen color, intensity percentages and distance percentages. the Fog dialogue box also provides the option to affect the Background which will allow you to turn a sunny sky gray.
|
 |
|||||||||||||||||||
Landscape objects - Overview
Using the Landscape New dialogue box should prove to be one of the most amusing tasks you can perform to affect a Rendering. The only really bad thing about the this feature is the limited library that comes with AutoCAD and Architectural Desktop. Fortunately, AutoCAD and Architectural Desktop come with a Landscape Library equipped with the ability to Add your own Landscape "image-objects". Landscape "image-objects" are a composite of two images ( one for the image and one for the transparency around the image ) mapped to a 3D triangular face and are basically the Rendering equivalent of cut-n-paste images. |
 |
|||||||||||||||||||
| 3Backgrounds | 3-9 BACKGROUNDS, FOG and LANDSCAPE OBJECTS | |||||||||||||||||||
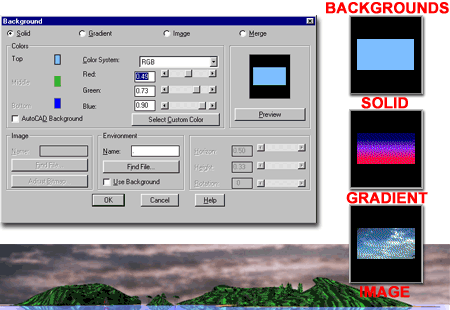
Background
- Solid
On the Background dialogue box, illustrated to the right, you can use the Solid radio button to set a monotone color as your Rendering Background. Colors Color System - use this drop-down list to choose between RGB ( Red, Green and Blue ) or HLS ( Hue, Lightness and Saturation ). Once you have selected either of these two Color System methods, you can adjust the current Color by a set of matching controls. For Solid Colors it seems most logical to simply use the Select Custom Color button. Select Custom Color - use this button to access the Color dialogue box where you can choose a color from among the numerous True Colors. AutoCAD Background - uncheck this checkbox to use the settings available check to have your Rendering use the current screen background color as the Rendering Background Color. This is the default when starting new Renderings. Environment - see discussion below. Tip: Blue-Screening - if you plan to use Photoshop to add background scenery or other effects, use a uniquely contrasting color that will be easy to select with the Magic Wand or Color Filter. To avoid having this color show up in reflections, use the Environment option to set another bitmap image for reflections. |
 |
|||||||||||||||||||
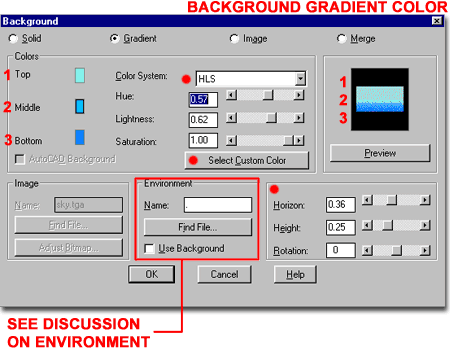
Background
- Gradient
On the Background dialogue box, illustrated to the right, you can use the Gradient radio button to set a three-part range of colors as your Rendering Background. Colors Color System - use this drop-down list to choose between RGB ( Red, Green and Blue ) or HLS ( Hue, Lightness and Saturation ). Once you have selected either of these two Color System methods, you can adjust the current Color by a set of matching controls. For Solid Colors it seems most logical to simply use the Select Custom Color button. Select Custom Color - use this button to access the Color dialogue box where you can choose a color from among the numerous True Colors. AutoCAD Background - uncheck this checkbox to use the settings available check to have your Rendering use the current screen background color as the Rendering Background Color. This is the default when starting new Renderings. Environment - see discussion below. |
 |
|||||||||||||||||||
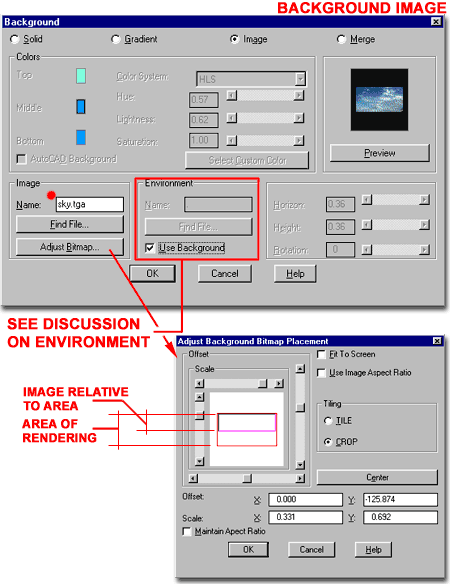
Background
- Image
On the Background dialogue box, illustrated to the right, you can use the Image radio button to set a bitmap image as your Rendering Background. You can use this technique to add a photo-realistic sky behind and above your buildings. Image Adjust Bitmap - use this button to access the Adjust Background Bitmap Placement dialogue box, also illustrated to the right. Environment - see discussion below. Illustrated to the right, I show that I have chosen to use the Use Background option because I want my reflective Materials to reflect the sky.tga bitmap so that the Rendering looks cohesive. Adjust Background Bitmap Placement dialogue box Use Image Aspect Ratio - uncheck this checkbox to allow for Scaling that literally stretches the bitmap background image. Tile and Crop - these two radio buttons are the same as those found on the Material Mapping dialogue box. Using Crop is a good way to prevent a Tile effect but may leave a good portion of the background empty. Offset - use these X and Y value boxes or their equivalent scroll bars to move a bitmap image around in the background. This is a great option when attempting to position a sun, for example, with specific geometry in a Rendering. The only way to get it right, is to use trial and error Renderings until the location meets your needs. Scale - use these X and Y value boxes or their equivalent scroll bars to size a bitmap image relative to the Rendering Area ( see red frame ). |
Adjustment
Caution: |
|||||||||||||||||||
Background
- Merge
On the Background dialogue box, you can use the Merge radio button to produce Renderings that actually display all linework ( not just 3D objects ) in the working screen. This will only work, however, for Renderings produced on the screen using the Viewport Destination option on the Render dialogue box. Environment - see discussion below. |
||||||||||||||||||||
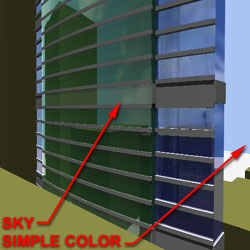
Background - Environment
The Environment option that is available for all of the Background types, offers the ability to control a component of what Reflective Materials reflect. These are Materials that use the Mirror Attribute option and not a bitmap image for their reflective Color. By setting a bitmap image file and path in the Name text field ( use the Find File... button ), this image can be used exclusively for objects with Materials that have a Reflective Attribute Value. By using this feature, you can add more "life" to some objects while keeping a simple Background.
|
No Environment - if you choose to have no Environment options set, objects with a Reflective Attribute Value will reflect AutoCAD's / Architectural Desktop's screen background color. However, some materials that have a Reflective Attribute Value use their own bitmap image and thus will reflect this image no matter what is set for the Environment ( this is the case with all of the Chrome Materials in the default Materials Library ). |
|||||||||||||||||||
| 4Fog | 4-9 BACKGROUNDS, FOG and LANDSCAPE OBJECTS | |||||||||||||||||||
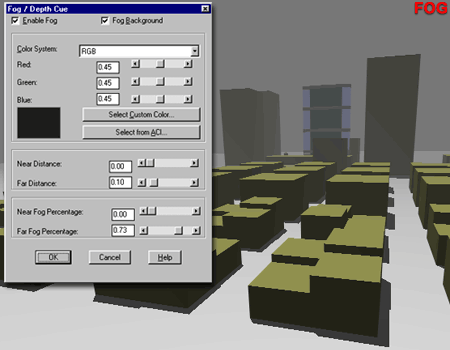
Fog
dialogue box
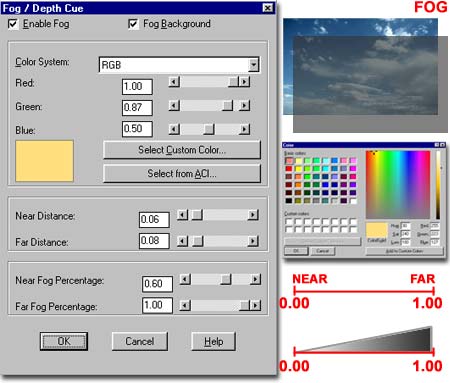
On the Fog dialogue box, illustrated to the right, you can Enable Fog for the 3D Geometry and the Background image, set Fog Colors, control Fog placement and Fog falloff percentages.
|
 |
|||||||||||||||||||
| Fog Distance and Percentage In the graph illustrated to the right, I have attempted to show how the four components of Fog work together. In many cases, and I highly recommend starting at this point, simply using the Far Distance and Percentage values are ideal. The Near values control a point from the Camera or view out to the Far Distance value ( which must be at least 0.01 for Near to work at all ). Distance is a measurement taken from the camera or viewers position to the target or back clipping plane. The camera's position is always set to zero while the horizon is at 1.00 or 100% of the distance. This means that when you specify a distance percentage, you are referring to how far you want to be from the camera relative to the total distance between the camera and the horizon ( target ). In other words, 0.10 is closer than 0.90. Near Distance - use this value field to set the point at which you want the Near Fog Percentage to End. You can, for example, have the Near Fog Percentage set to 0.20 ( 20% ) at a distance of 0.10 ( 10% ) from the camera. This will start a gradient value between 0% and 20% from the lens of the Camera to a point 20% ( or 1/5 of the distance out to the target ). Far Distance - use this value field to set the point at which you want the Far Fog Percentage to Start. The Fog will start at this point and continue to the target where it will have a gradient value set by the Far Fog Percentage value. |
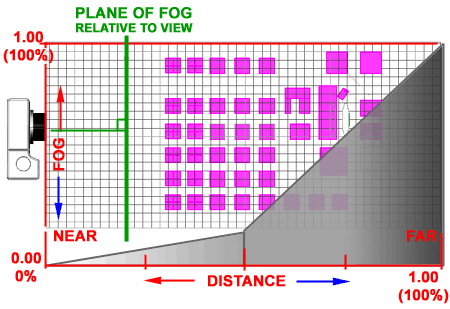 Near Fog Percentage - use this value to set how dense or dark you want the gradient to be at the distance set by the Near Distance. Far Fog Percentage - use this value to set how dense or dark you want the gradient to be at the target ( the farthest point out on the horizon ). Note: |
|||||||||||||||||||
| 5Landscape Objects | 5-9 BACKGROUNDS, FOG and LANDSCAPE OBJECTS | |||||||||||||||||||
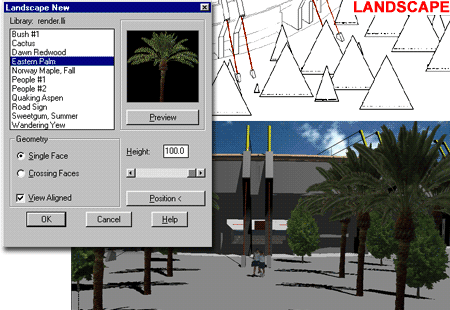
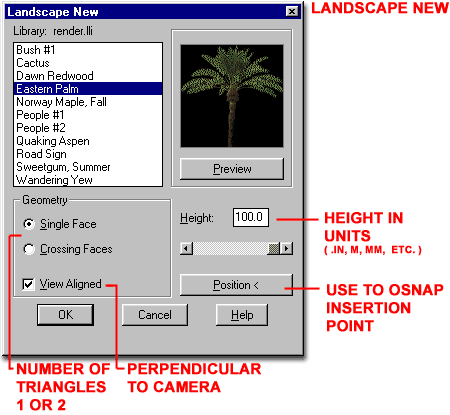
Landscape New dialogue box
On the Landscape New dialogue box, illustrated to the right, you can select from among the eleven "image-objects" that come with AutoCAD and Architectural Desktop. This sample library has a variety of objects that demonstrate how useful this form of adding clip-art can be to make Renderings a bit more realistic.
When you Position a New Landscape object, the physical appearance in your Model will be a triangular face that is oriented by the UCS. This face can be Copied, Scaled and Edited with the Landscape Edit dialogue box.
|
|
|||||||||||||||||||
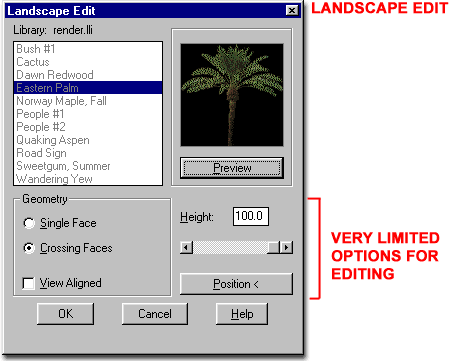
Landscape Edit dialogue box
On the Landscape Edit dialogue box, illustrated to the right, you have a very limited number of options. You can change the Geometry, View Alignment, Height and Position but you cannot change the Landscape type. Height cannot be change beyond the Value of 100 Units so that offers a bit of a limited option as well; especially when you are working with trees like Palms and Redwoods. To make a Landscape object taller or shorter, simply use the Scale command. Landscape objects come with an insertion point that you can OSNAP to for better accuracy in Editing. To acquire this insertion point, use the Center OSNAP. |
 |
|||||||||||||||||||
Landscape Library dialogue box
On the Landscape Library dialogue box, illustrated to the right, you can access other Landscape Libraries, Create new Libraries, Modify, Delete and Create New Landscape objects.
Default Geometry Name - this will be the Landscape Library name |
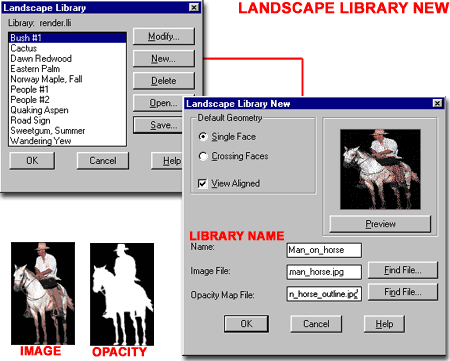
Image File - use the Find File... button to locate the actual bitmap image that you want seen in your Rendering. Opacity Map File - use the Find File... button to locate the copy of the actual image where the image area is white and the transparent area is black. |
|||||||||||||||||||
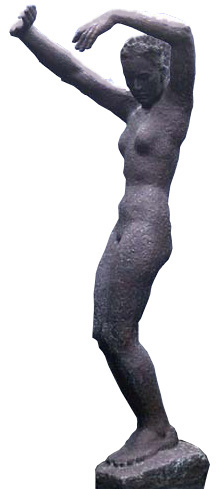
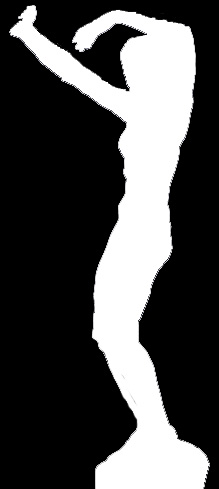
| Landscape Library - New Object Illustrated to the right are two .jpg images that can be used to create a New... Landscape Library object based upon the discussion above. Right-Click over each image and use the Save As... option to save these two images to a project folder on your machine.
Once you have saved these images to your machine, use the Landscape Library dialogue box and create a New... Landscape object for the current Library based upon these two images.
|
|
|||||||||||||||||||
| 6Customizing and Tricks | 6-9 BACKGROUNDS, FOG and LANDSCAPE OBJECTS | |||||||||||||||||||
© Copyright 2002 ARCHIdigm. All rights reserved.
spell checked on Jan. 24, 2002
 Use Background - use this checkbox to deactivate
the use of any bitmap image for the Environment. If a Background image is currently
used, and the Material on an object has a Reflective Attribute Value, it will reflect the
Background as well as other Objects, Materials and Landscaping. Uncheck this
checkbox to use a bitmap image for the Environment.
Use Background - use this checkbox to deactivate
the use of any bitmap image for the Environment. If a Background image is currently
used, and the Material on an object has a Reflective Attribute Value, it will reflect the
Background as well as other Objects, Materials and Landscaping. Uncheck this
checkbox to use a bitmap image for the Environment.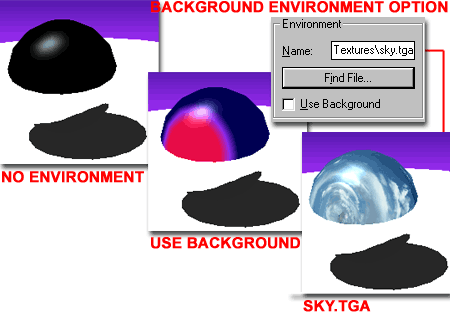
 Fog is basically a gradient across the distance between the Camera
and the Target which can be used to create the illusion of an atmosphere. This means
that Fog does not have to be Gray but can be other colors as well. Of course the
gradient will always appear as a haze of some sort but it can be quite useful. On
projects where there should be a lot of background information, you can use the Far
Distance and Far Fog Percentage to fade the horizon off to a
shade of gray.
Fog is basically a gradient across the distance between the Camera
and the Target which can be used to create the illusion of an atmosphere. This means
that Fog does not have to be Gray but can be other colors as well. Of course the
gradient will always appear as a haze of some sort but it can be quite useful. On
projects where there should be a lot of background information, you can use the Far
Distance and Far Fog Percentage to fade the horizon off to a
shade of gray.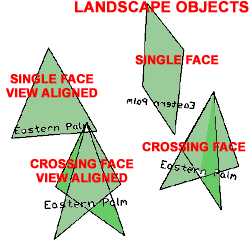 The process is based on
that discussed in Part 7 - Materials ( see
The process is based on
that discussed in Part 7 - Materials ( see 

 To create a New... Landscape
object to the current Landscape Library, you will need two bitmap images as illustrated to
the right. For the actually Image File you want in your Rendering,
you will need to clear out all areas that you want to be transparent around this
image. For the Opacity Map File you will need an exact copy of the
primary image file where all of the imagery is white. This file will act as the mask
where all of the black areas will be transparent.
To create a New... Landscape
object to the current Landscape Library, you will need two bitmap images as illustrated to
the right. For the actually Image File you want in your Rendering,
you will need to clear out all areas that you want to be transparent around this
image. For the Opacity Map File you will need an exact copy of the
primary image file where all of the imagery is white. This file will act as the mask
where all of the black areas will be transparent.