| 1Walls - Access |
1-3 WALLS |
Walls Toolbar
How do I get this toolbar?
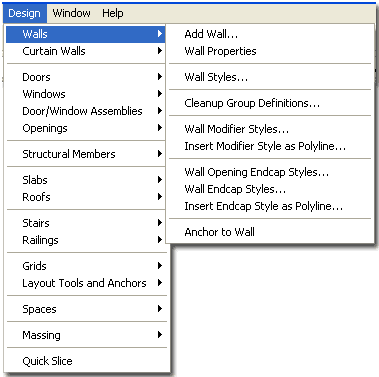
You can also acquire access to these commands from the Alternate Design pull-down
menu. From the Design pull-down menu, pick Walls
> and cascade to the Wall commands. This toolbar is an optional tool and
is not needed to use this guide but may help. |
 |
Wall Tools Toolbar
For Editing Walls, there are many tools to select from and you may find them a
little more difficult to find in ADT 4 than in the previous two releases. This is
because a lot of these editing tools are now available via right-click object-specific
pop-up menus or through the Properties Palettes. Illustrated to the right is the
Wall Tools toolbar that provides access to the tools discussed in Part 4 of this guide. |
 |
| Walls pull-down Menu and Tool Palette
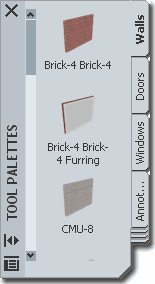 Walls can
be added to a drawing through several techniques including the alternate pull-down menu
illustrated to the right. In ADT 4 the primary tool for adding walls is the Tool
Palette which automatically loads Wall Styles as they are dragged in from the
Palette so this makes the task of loading styles less tedious. However, the default Walls
Tool Palette only contains a fraction of the Wall Styles that come with ADT Walls can
be added to a drawing through several techniques including the alternate pull-down menu
illustrated to the right. In ADT 4 the primary tool for adding walls is the Tool
Palette which automatically loads Wall Styles as they are dragged in from the
Palette so this makes the task of loading styles less tedious. However, the default Walls
Tool Palette only contains a fraction of the Wall Styles that come with ADT
On the command line, you can type "Wall"
when you want access to many of the Wall options. For direct access to an option within
the Wall command-line menu, you can type the primary command plus the option you want
direct access to. For example, if you want to Add a Wall, you can type "WallAdd"
or if you want to Modify a Wall, you can type "WallProps" or
"-WallModify"
Below is the command line read-out for "Wall":
Command: WALL
Wall [Add/ COnvert/ Properties/ Styles/ CLeanupgroups/ Dimension/ Interference/ Reverse]: |
 |
| 2Importing Wall Styles |
2-3 WALLS |
| Opening a Wall Style template file in Style Manager
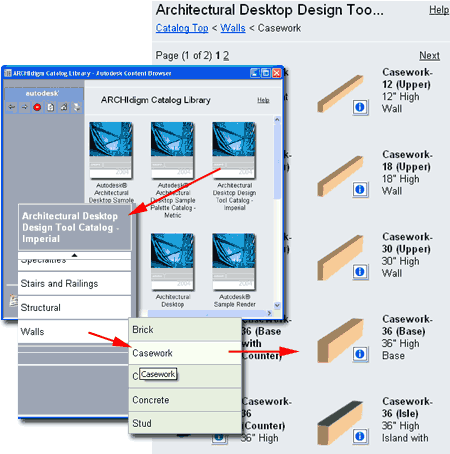
 ADT comes with a rather extensive library of Wall
Styles but you would never know this by looking at the default Walls Tool Palette.
Though you can use the Content Browser to add more styles to your Walls Tool Palette, you
might as well learn where these styles come from. ADT comes with a rather extensive library of Wall
Styles but you would never know this by looking at the default Walls Tool Palette.
Though you can use the Content Browser to add more styles to your Walls Tool Palette, you
might as well learn where these styles come from.
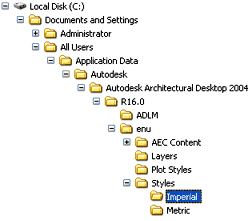
For local installations of ADT, you are likely to find the Imperial
or Metric Wall Styles in the Styles Folder
as illustrated to the left. The full path to this location may vary but typically it
is as illustrated. On a Network based installation of ADT, these Wall Styles should
be on a captured drive (like "G:\offices standards") or similar location with a
folder name that indicates Styles. Consult your CAD or IT manager if you cannot
locate the Styles Folder. |
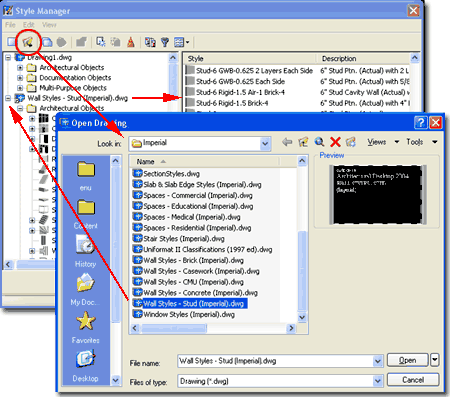 Illustrated
above, I show how you use the Style Manager, filtered for Wall
Styles, to Open one of the Wall Style files from ADT's Styles
folder. The process is much like Opening a drawing for editing.
You should find several Wall Style drawing
files; including one for Brick, Casework, CMU,
Concrete and Studs. Later, we'll discuss creating
a custom files with the Wall Styles you use regularly so you can increase your
productivity. |
| Copying Wall Styles in the Style
Manager
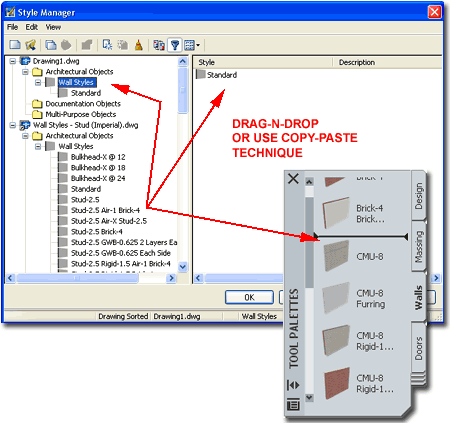
Once you have a Wall Style template file Open
in the Style Manager Window, simply select
the Wall Style(s) you want and drag-n-drop them on top
of the current drawing file folder - as illustrated to the right.
In some cases, the list of Styles is so long that it takes
too much time to scroll back up so you can use the left-click option and
select Copy from the pop-up menu; then pick on the
current drawing folder, pick in the right-hand
pane, right-click on your mouse and use the Paste option.
This technique is the same as that used in Microsoft's Explorer.
If you want to add one or more of the Wall Styles to your Tool
Palettes, you can also drag-n-drop directly onto it as illustrated to the right.
Those familiar with AutoCAD techniques, will also find that
cut-n-paste works great for copying a Wall Style from one drawing to another.
Inserting a file, such as one of the Wall Style template files also works to get every
single Wall Style in one quick action. If you want to use the insert trick, just
hit the <Esc> key when prompted for an insertion point; i.e., you don't actually
have to insert anything, just the action brings in all of the data. |
 |
| 3Adding Walls |
3-3 WALLS |
| Add Walls - Properties
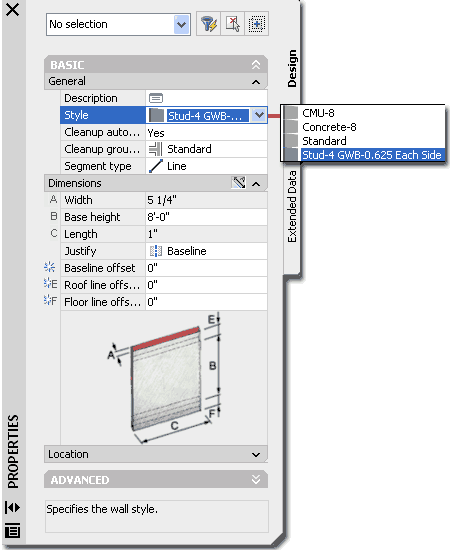
Palette
In
the illustration to the right, I show that I have imported the "CMU-8",
"Concrete-8" and "Stud-4 GWB-0.625 Each Side"
Wall Styles from the Wall Styles Template files
and am now selecting one for use on the Style drop-down list of
the Wall Properties Palette.
Description
- use this note field to add text based notes about the Wall if you find that it
will help others. You could, for example, explain that the wall was site verified to
1/2" accuracy.
Style
- drop-down list for selecting any Wall Styles that are present in the current
drawing file. Use the Style
Manager or Wall Palette to create or load others.
Cleanup
automatically - drop-down list for changing the default cleanup setting - usually
you want walls to cleanup with other walls but this is a nice quick option for an
override. The better solution would be to use a Cleanup Group.
Cleanup
group - drop-down list for setting a unique Clean-up Group used to prevent Walls
from behaviors defined by their Style settings; e.g., two walls passing over each other
without cleaning up. Use Cleanup
Group Definitions on the Style Manager to create others.
Segment
type - drop-down list offering the option for straight or curved Wall
segments. See below for Curved Wall Segment.
A
- Width - set width of wall. If gray, then the Wall Style has been set to a fixed
Width.
B
- Base height - the total finished ( plate ) height you want your wall.
C
- Length - this value field will display the length as drawn on screen and
is not available for input when drawing walls but is available for input when modifying
walls.
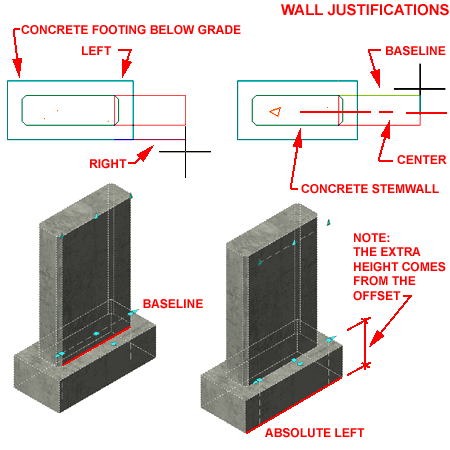
Justify
- how you want your Wall to be drawn with respect to your cursor as you draw it.
This also affects how other objects relate to a Wall. Left, Right and Center
override the default justification, Baseline, which is determined within
the Wall Style specifications. On complex multifaceted Wall Styles, you may want to
use a Baseline at a specific location; above grade on a foundation stemwall, for example.
Generally, you should Justify based on the Baseline and change the Wall Style if
the Baseline setting isn't what you expect or need. For simple Walls with only one
component, it may be okay to use Right or Left but if you ever intend to change the style
such Justifications can come back to haunt you. If you only use one component walls
( two lines ) then don't worry about it. |
 Baseline
offset - this odd option allows you to set an offset distance away from the
justification so when you draw your Wall in Plan, it will be drawn a distance away from
where you are actually picking. This may be a useful option when tracing structural
gridlines or similar linework where you need your Walls to be certain distance away from
the linework.
E
- Roof line offset from base height - this value field provides a means to extend
a Wall Height above its predefined Base height (Plate). Generally this value field
is filled in at a later point in a project where the RoofLine tool is used to extend Walls up
to Roofs ( particularly at gable ends ).
F
- Floor line offset from baseline - this value field, similar to the Roof line
offset, provides a means to extend a Wall base below the predefined Baseline value (
usually zero ). Generally this value field is filled in at a later point in a
project where you are able to relate your Walls to foundation Walls, Site Contours or
other obstructions. The tool for adjusting this value field at a later point is the FloorLine tool. This value field
can also be used for special Wall Styles such as spread footings where the footing needs
to be set below the base of the stem wall - see image below. |
| Wall Justifications
When you draw Wall Objects, you will find that the Wall
Properties Palettes will remain active on the screen. As you draw, you have the
freedom to change values on the Properties Palette without losing the object you are
currently working with. That is, for example, you can start a Wall and change its
Justification without having to start over. You can even change Wall Styles as you
draw a series of contiguous Walls.
There are 4 Justification values and 3 of
them are quite easy to understand but Baseline may need some clarification.
Illustrated to the right, I show two Justifications for the same CMU concrete footing Wall
Style. I am using this Wall Style because not all Walls will react to the Baseline
Justification in the same way. The Foundation Styles, with footings that are wider
than the stemwall, will usually justify for Right and Left based upon the footing rather
than the stemwall; so, this is where Baseline Justification comes in - to let you Justify
on any part of a Wall Style that was designed as the zero ( 0
) point.
Illustrated to the right I show how the Right,
Left and Center Justifications are all based on the
extents of a Wall Style's Width. Baseline, however, can be designed by the person
who creates the Wall Style to allow for a unique justification point that might be more
beneficial when adding it to a plan. In the example Foundation Wall Style, right,
the Baseline was set to be on the exterior side of the stemwall. When drawing this
particular Wall Style, the Baseline appears to be offset from the true base of the footing
because its Property has been set that way on the Floor line offset value field ( see
Properties Palette image above ). |
 |
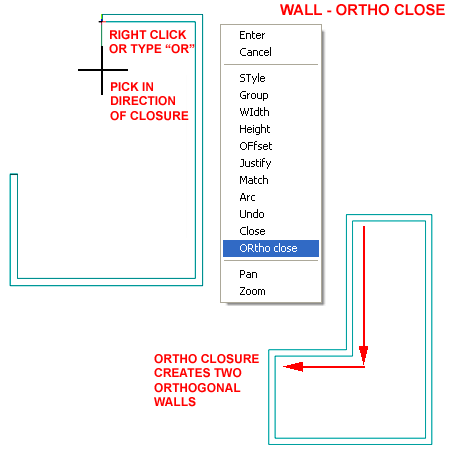
| Wall Closing When drawing Wall Objects, you should find that there are two
options on the command line for Closing: Close and ORtho close. These option will
appear once you have drawn two consecutive Wall segments. You will also find these
two options for closing on the right-click pop-up menu as illustrated to the right.
Close will simply take the current
position and draw a Wall to the first point of a Wall series.
Ortho Close is a little more sophisticated
than Close because it actually creates two Walls as illustrated to the right. If you don't have Ortho Mode on when you pick the Closure Direction,
that wall segment will be non-orthogonal, but the 2nd segment will be perpendicular to its
origin - which should be the very first Wall Added in a series. |
 |
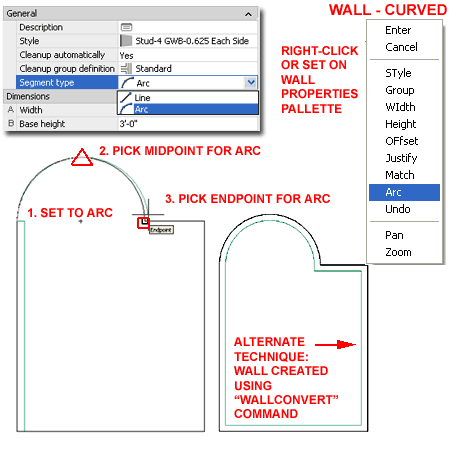
| Wall Segment - Curved The Arc option for Segment
type on the Wall Properties Palette can be enigmatic if you don't realize that it
allows you to pick two points along the curve path. Illustrated to the left, I show
what happens when you attempt to follow a common perimeter curve. After setting the
Arc option, pick somewhere along he midpoint of the desired curve and then pick at the
endpoint of the desired curve.
The Arc option can also be activated by using the
right-click pop-up menu while drawing a Wall Object - see illustration far right.
I find that creating Curved Wall segments with this option
is best if I already have a 2D Arc or Circle to Osnap to. If you don't have anything
to Osnap to when drawing the Curved Wall segment, you can use Grips to adjust it later.
Another option is to use the WallConvert
tool and select a Pline perimeter or Arc that represents what you want your wall to look
like. |
 |
| 4Wall Properties |
4-3 WALLS |
Wall Properties - General
| Alt. Menu |
Design> Walls>
Wall Properties |
 |
 |
| Keyboard |
WallModify |
| Mouse |
Double-pick on
Object or Select Object, left-click, select Properties |
| Links |
Add Walls - Properties Palette |
When Modifying Wall Objects, you should find that you get
most of the same options as when you created the Wall(s). In addition to the basic
list of options you should also find many other options that are only available when
Modifying Walls. Some of these options reflect the results of other modification
tools and In-place Editing work.
|
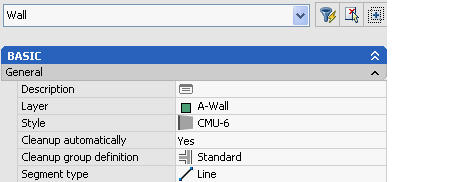
See Add Walls -
Properties Palette for definitions of the General options listed to the right.
Note:
At the top of the Properties Palette you should find a Selection Type drop-down list which
indicates the type of object you have selected. If you select too many objects at
one time, you can use this drop-down list to isolate the individual object types. |
| Wall
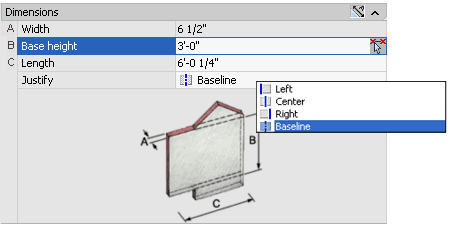
Properties - Dimensions Under the Dimensions
section of the Wall Properties Palette, you can change basic Width,
Base height, Length and Justification
values. If you find that any of these value fields are gray then the value has been
set as fixed at the Wall Style level and can only be changed through the Wall Styles
dialog box.
Note:
Changing Justifications on Walls can have detrimental effects on your work since such
changes usually move the Wall Objects from their existing position to their new
Justification; i.e., the Wall Objects do not stay in place while acquiring a new
Justification, they move to this new point. |
 |
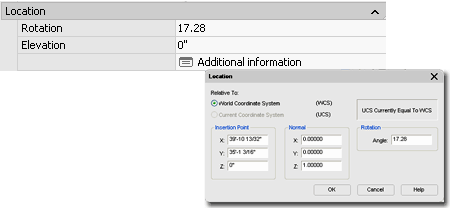
| Wall Properties - Location Under the Location section of the Wall Properties
Palette, you can change Rotation and Elevation
values or work with the Location dialog to alter the Insertion
Point, Normal and Rotation angle relative to
the World or a unique UCS rotation.
Basically these are all values that you are more likely to
adjust live on the object by working with Grips in Plan, Elevation or Isometric Views.
This section simply provides another way to alter these values or to set them back
to something more logical if editing errors occurred while using Grip Editing techniques. |
 |
| Wall Properties
- Cleanups tab
Wall Cleanup is a term used to describe the removal of
lines where Walls intersect and is based on a radial measure from the end of a Wall.
This radial measure, called "Cleanup Radius", is centered on an edge
referred to as the "Graphline". The Graphline is typically turned Off but
can be activated with the Diagnostic Display Configuration. By default, the
Graphline displays as a Blue Dashed line but by modifying the Graph Display Representation
for Wall Objects, this appearance can be modified.
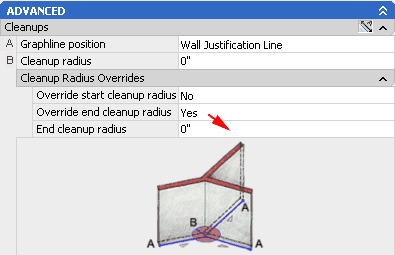
A - Graphline Position - the Graphline is
set to the "Wall Justification Line" by default but it can be
changed to "Wall Center Line" where it may be useful for
creating Areas or similar objects. Moving the Graphline position also moves the
center of the cleanup circle and can thus be used to assist tricky Wall Intersections.
B - Cleanup Radius - the value for this
option is set to zero by default and tends to work for most normal Wall Intersections
where the Graphlines connect without trouble. When drawing Walls, the Autosnap
New Wall Baselines value on the Aec Object Settings tab of the Options
dialog assists in bringing the Baselines together to make the zero Cleanup Radius
function. In cases where Baselines don't meet correctly, increasing the Cleanup
Radius allows the Baseline to extend farther to connect with another Wall's Baseline.
This setting affects both ends of a Wall Object.
|
 Cleanup
Radius Overrides
Override start cleanup radius - this drop-down list offers a "Yes"
or "No" option. By choosing the "Yes"
option, you will expand the field to allow for a cleanup radius setting for this
particular end. Use this option when you only want to affect one end and not the
other.
Override end cleanup radius - see comments
above. Note:
To see the Graphline and Cleanup Radius of all Wall Objects, use the Diagnostic
Display Configuration or "AecWallGraphDisplayToggle" command. |
| Wall Properties - Style
Overrides
Wall Endcaps are stored in the
Style Manager and affect the free ends of Wall Objects. For Walls with
multiple components, complex Endcap Styles can be designed and "indexed" to
match the components of the Wall Object. You can also use the Override Wall Endcaps tool to
add unique Endcaps.
Starting endcap - the default setting for
this option is "*BYSTYLE*" which means that the Wall Style controls the Endcap
setting. "Standard" is another choice available for all Walls this is simply a
straight line cut. You may find that if you look at many of your Wall Styles, they
actually use "Standard" as their default endcap style ( at the Wall Style Level
and not here ). To create custom Endcap Styles, use the WallEndCapStyle
command or Select a Wall Object, right-click and use the Endcaps cascading menu to create
one in-place.
Ending endcap - see comments above.
|
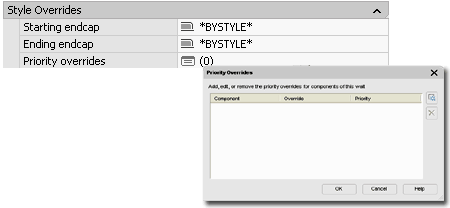 Wall Priorities affect how the components
within a Wall Style clean up when they meet or cross each other. The Priority is
based on a rating system between 0 - 2147483647; where 0 has the highest priority.
These Priority Overrides only allow for end Position Priority Overrides
(conditions at or near the end of a Wall) but you can also work with Priorities on a Wall Style via the Style
Manager to set full length Priority settings. These are good for quickly getting two
Walls of the same Style to not cleanup in a "T" type intersection. |
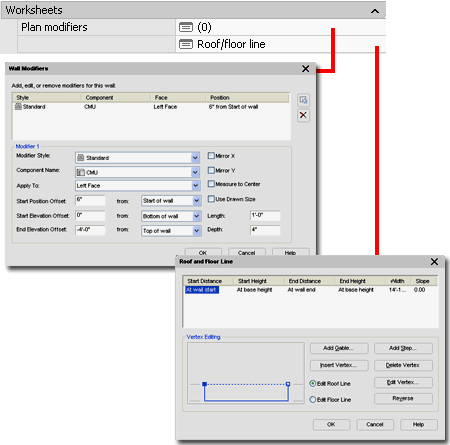
| Wall Properties - Worksheets Under the Worksheets Category you should find the Plan
Modifiers and Roof/floor line Worksheets . In addition to
these two Worksheets, you may find more categories depending upon the modifications that
have been made to the Wall Object ( see the 3D Modifiers discussion below ). In some
cases you can have multiples of the same Worksheets, such as Plan Modifiers and those will
be indicated by a number adjacent to the Worksheet icon. For the Roof/floor line
Worksheet, you can only have one.
In some ways you might think of these Worksheets as storage
devices for changes made through other means and thus you may choose to avoid working
directly with the Worksheets. In Part 4 - Wall Tools, I will cover numerous methods
of editing/modifying Wall Objects with and without dialog boxes. |
 |
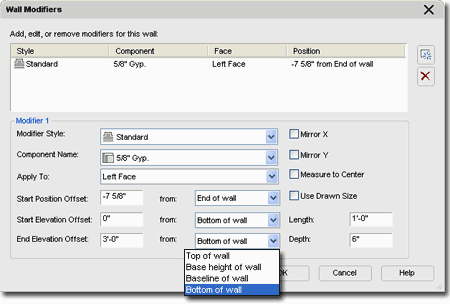
| Wall
Properties - Wall Modifiers
Wall Modifiers are used to create
protrusions, niches, pilasters, and all sorts of other Wall Object irregularities that are
not defined by the Wall Style. By using the Wall Modifiers dialog, you can create
Modifiers using two methods: with the Standard Style or with a a custom Wall Modifier Style.
Wall Modifiers, including the Standard Style, are defined by simple shapes that are
Applied To Components to create surFACE alterations. The various settings on the
Wall Modifiers dialog can be used to control the Position, Length, Depth and side of the
Modifier Style.
If you have already used a Wall Modifier tool on the
selected Wall Object, you will see it's properties listed here. You can use this tab
to make a unique adjustment to a Wall Modifier Style for one Wall Object but it is better
to work with the Wall Modifier Style in the Style Manager if you want to change all cases
of a Wall Modifier in your drawing.
For a more in-depth explanation of this topic, see Wall Modifiers - Modify. |
 |
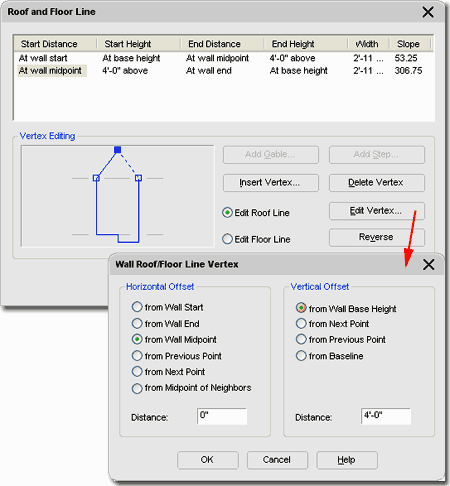
Wall Properties - Roof and Floor Line
| Links |
Roof Line - a faster and easier way to alter the
top of a wall. |
| |
Floor Line - a faster and easier way to alter
the bottom of a wall. |
On the Roof/Floor Line tab of the Wall
Properties dialog box, illustrated to the right, are the tools to reshape walls
outside of the standard rectangular shape. This tool can only be used to alter
the elevation shape of walls.
Add Gable... creates a new vertex point
along the top of the Wall when the Edit Roof Line radio button has been
checked.
Insert Vertex... creates a new vertex
point along the top or bottom of a Wall.
Add Step... creates two new vertex points
to form a perpendicular step when the Edit Floor Line radio button has
been checked. This option only works once on a Wall and cannot be used if the base
of the Wall vertex points have already been modified.
Delete Vertex - removes any but the
primary four corner points. To Delete a Vertex, the vertex has to be highlighted in
the preview picture or selected from the data field.
Edit Vertex... provides the means for
adjusting the horizontal and vertical position of a vertex relative to numerous other
points on the Wall (see illustration, left). By using a Horizontal and a Vertical
set of values relative to known points of reference on the Wall Object, you can specify
exactly where a new or existing point should be positioned. Wall Base Height is the
actual height as set when drawing the wall, Baseline is the actual bottom of the
wall as it was set when drawing it. You can make a Wall go above or below its preset
base or height by using positive or negative values relative to these heights.
Reverse - provides the means for flipping
or mirroring the Roof Line or Floor Line vertex configuration. This does not flip
the wall but only the settings on this dialog box.
|
 |
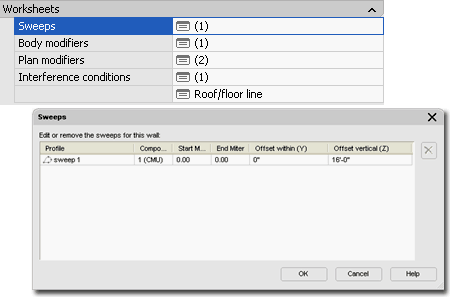
| Wall
Properties - 3d Modifiers
Among the Worksheets discussed above, there are others that
will appear under this category when those Wall Modifier tools have been used to alter a
Wall. These Worksheets basically act as storage bins for advanced Wall
Modifiers. You cannot Add these modifiers here but you can Remove
or change Interference, Sweep and Body
Modifiers once they have been introduced to a Wall Object with their
respective tools - see Links table above. |
 |
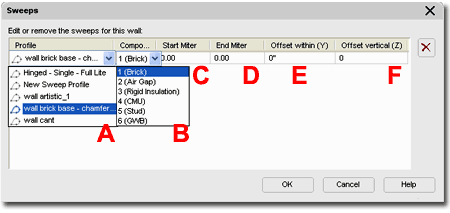
| Wall Properties - Sweeps
The Sweeps Worksheet, illustrated to the right, provides
the options for changing the Sweep Profile, the affected Wall Component,
Start and End Miter Angles,
Horizontal Offset (Y), Vertical Offset
(Z) and Deletion.
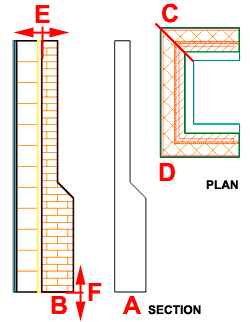 In order to assign or attach a Profile as a Wall Sweep, you must first use
the WallSweep command. Once a Sweep has been attached to a Wall Object, this
Worksheet will appear as a Property. In order to assign or attach a Profile as a Wall Sweep, you must first use
the WallSweep command. Once a Sweep has been attached to a Wall Object, this
Worksheet will appear as a Property.
Part
4 - Wall Tools discusses this subject in greater detail. |
 |
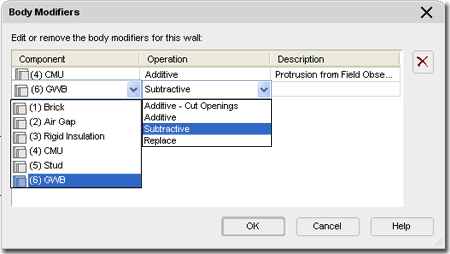
| Wall Properties - Body Modifiers
The Body Modifiers Worksheet, illustrated
to the right, provides the options for basic Component reasignment,
primary mathematical Operation and a general Description. In
addition to these options, you can use the Delete button to remove any Body Modifiers on
the list.
In order to have any Body Modifiers listed on this
Worksheet, they must first be added to a Wall Object with the WallBody command. A
Wall Body is basically a reaction between a 3D object and a Wall where one of the four
Operations can be used to affect any of the Components within a Wall. This is how,
for example, you might thicken a portion of Gyp. Board along a Wall remove a portion of
Brick to form a niche. It is an all purpose tool so how you employ it will be up to
your creative thinking. |
 |
| 5Converting Objects to Walls |
5-3 WALLS |
Convert to Walls
| Menu |
N.A. |
 |
 |
| Keyboard |
WallConvert |
| Mouse |
Select Wall Style in
Palette, right-click, Apply Tool Properties to > Linework |
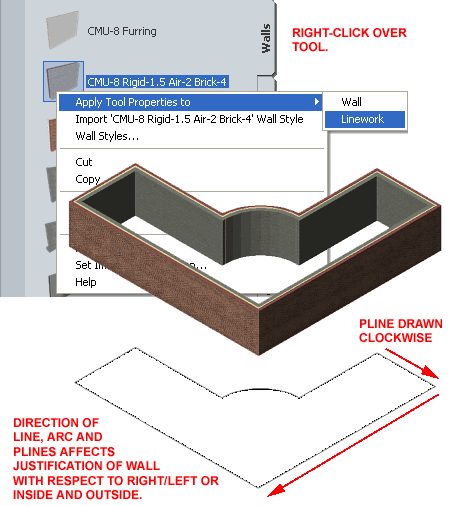
For some, one of the best ways to get started with a
project is to go from simple 2D linework sketches and then build up from there. In
the illustration to the right I show how a simple 2D Pline perimeter of a proposed
building has been converted into a complex 3D Wall object by using the WallConvert
tool. Note that I have indicated the direction in which the Pline was drawn since
this will impact the resultant wall(s) with respect to right/left or inside and outside.
If you have trouble with this factor, you can always use the WallReverse
( also illustrated as an arrow marker when editing using Grips ) tool to flip your walls.
The WallConvert tool will allow you to
convert Lines, Arcs, Circles and Plines. You can Convert these objects either by
typing the WallConvert command on the command line or by right-clicking on the Wall Style
on a Palette. When using the Palette technique, cascade from Apply Tool
Properties to > over to Linework as illustrated to the right. When using the WallConvert command technique, you will find
that the Wall Properties Palette pops up and the process of converting is similar to
Adding a new wall.
Converting regular AutoCAD objects to Walls is relatively
easy as long as you don't attempt to convert an entire drawing. This was one of my
first strategies in hopes that I could take a 2D R14 project and quickly convert it to
ADT. The problem is that this routine reads every object that it converts as the
centerline or baseline of a new wall so if you use the classic double lines in an older
AutoCAD drawing, you will get double walls everywhere; one for each side. As a
result, I find that it is better to just trace over an Xref of an older file than to
attempt a full conversion. |
 |
Convert Body to Wall
| Menu |
N.A. |
| |
N.A. |
| Keyboard |
WallBodyConvert |
| Mouse |
Select object, right-click, Convert
to Wall |
| Links |
Pre-Design eGuide - for information on
Modeling |
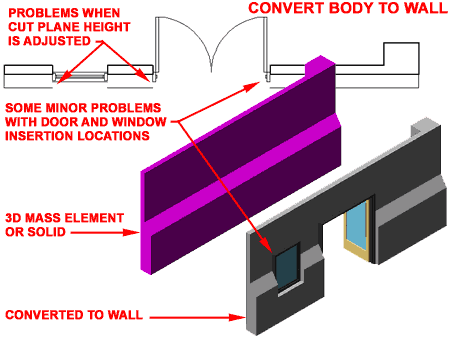
The Convert Body to Walls tool allows you
to convert 3D objects ( like Mass Elements and AutoCAD Solids ) into pseudo-Walls.
The reason I call them pseudo-Walls is that they do not behave like typical Walls and thus
you may not find this conversion of much value.
When you create a Wall this way, you are basically create a
normal wall where the object being converted is read as a Wall Body Modifier. You
can use the Wall Properties Palette to see this effect and if you Remove
the Body Modifier,
you will find that a normal wall will be left in place of the converted object. Wall
Body Modifiers are fairly static with respect to editing so you will not find that you can
stretch these Walls like normal Walls and that may prove quite frustrating. In
addition to this problem, you may find that Doors and Windows have Anchor problems when
placed within these converted Walls requiring manual adjustments of the Anchors.
|
 Note:
When queried to establish a Baseline for your converted wall, use points
that can be considered as a baseline justification; i.e., select two points along a length
that is usually along one exterior side of the object being converted into a wall. |
| 6Wall Priorities and
Cleanup Groups |
6-3 WALLS |
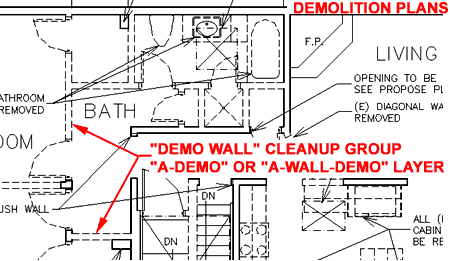
| Eventually you will
find yourself caught with a Wall condition where two or more have to meet or cross in a
very unique way. By default, ADT's walls pretty much behave in the same way when
they meet other walls; usually a clean "T" intersection. To create
something different, you will need to understand how Wall Priority works and how Cleanup
Group Definitions work. Illustrated to the right is
an example of where I use Cleanup Groups the most on a common residential remodel project.
By having a unique Cleanup Group Definition and a unique Layer for
Demo work, I simply take an existing Wall, drag-n-drop it on to the Demo
Layer and Assign it a new Cleanup Group. Using this technique, the Demo Wall will no
longer cleanup with other existing or proposed walls. For demolished segments within
(e) Walls, I simply Add a New Wall already assigned to the Demo Cleanup Group. For
Layering, you can use Layer Key
Overrides or simply drag-n-drop your Wall onto the correct layer after creation.
|
 |
| Wall Cleanup Group Definitions
 Cleanup Group Definitions employ
a logic that is rather easy to understand: Walls that are associated with one
Cleanup Group Definition will ignore Walls associated with another Cleanup Group
Definition. It's that simple! Cleanup Group Definitions employ
a logic that is rather easy to understand: Walls that are associated with one
Cleanup Group Definition will ignore Walls associated with another Cleanup Group
Definition. It's that simple!
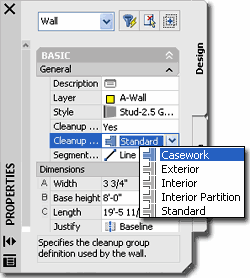
To start, you have to create a Wall Cleanup Definition in
the Style Manager. Create a New
Cleanup Group Definition and Name it anything you want.
Now, use the Add Walls Properties Palette, illustrated
to the right, and use the Cleanup group definition
pull-down menu to see your Cleanup Group Definition Style. New
Cleanup Group Definition and Name it anything you want.
Now, use the Add Walls Properties Palette, illustrated
to the right, and use the Cleanup group definition
pull-down menu to see your Cleanup Group Definition Style.
For other features related to Wall Cleanup Group
Definitions, see the Design Rules tab illustrated to the right. You can access this
tab by editing a Wall Cleanup Group Definition Style in the Style Manager.
|
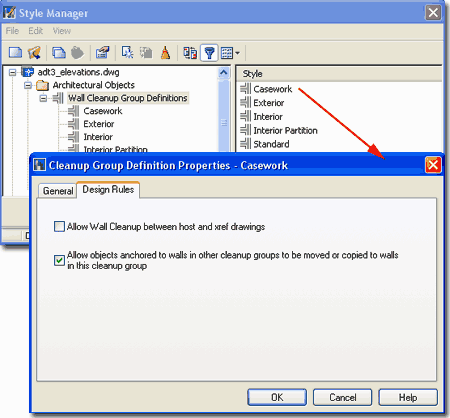
Cleanup Group Definition Properties Dialog
Allow Wall Cleanup between host and xref drawings - use this checkbox to
allow Walls that use the same Wall Cleanup Group Definition to cleanup up between Xref's.
See also comments below.
Allow objects anchored to walls in other cleanup groups to
be moved or copied to walls in this cleanup group - use this checkbox to allow
for copying and moving of objects like Doors and Windows between Walls that belong to
different Cleanup Groups. This is an option that should probably be on in most cases
since it really confuses users when it is not set ( as was the case in ADT 3 - 3.3 where
this was not an option at all ). |
| Wall
Cleanup Group Definitions Through Xref's If
the Cleanup Group Definition has been set to Cleanup through Xref's via the Design Rules
tab ( see image above, right ), Wall objects using the same Cleanup Group Definition will
actually cleanup through Xref's.
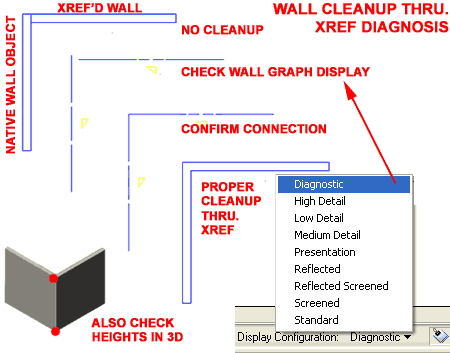
Illustrated to the right I show a couple of the issues that
may prevent Wall Cleanup through Xref's even when you have done everything else correctly.
If you have two or more Wall Objects meeting across Xref's
where some are native and some are coming through as Xref'd Walls, they may not cleanup
because their Wall Graph Lines don't meet. With the default ADT template files,
there is a Display Configuration called Diagnostic, that you can toggle to see the Graph
Lines. By adjusting your Wall Objects to meet properly you should find the cleanup
through Xref's very successful.
There are numerous ways to get the wall graph lines to meet
properly and you should read up on this topic below but two good ones are using the Grips
to adjust the Wall or use a Wall Cleanup Radius Override.
If this does not fix your cleanup problems, check for other
odd connections such as the Z-axis Heights. |
 |
| Wall Priorities
Wall Priorities can get a little complicated because you
can have different priorities within a single Wall object. Think about a Footing
and Stemwall or a unique Cavity wall with layers of building materials/structure.
For each of your single Wall components, you can prioritize how they should cleanup when
encountering other wall components.
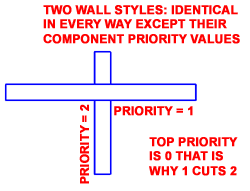 Let's look at a simple but common wall condition where you want one
wall, of exactly the same construction, to be shown as passing over or through the first
wall. Basically, this means that one will have higher priority than the other. Let's look at a simple but common wall condition where you want one
wall, of exactly the same construction, to be shown as passing over or through the first
wall. Basically, this means that one will have higher priority than the other.
If you use the Standard Wall Style in ADT, you can follow
this example. First, I will just draw a Standard Wall. Make sure that you
don't play with the Cleanup Group Definitions on this example.
Now, I want to create another Standard Wall that crosses
over the first one. Well, you can't do it with the same Standard Wall Style because
no single Wall Style can have different priorities; its one priority (or priority set, if
you count components) per Wall Style. What you can do, is make a copy of the Wall
Style and simply change the name; like "Standard (2)".
|
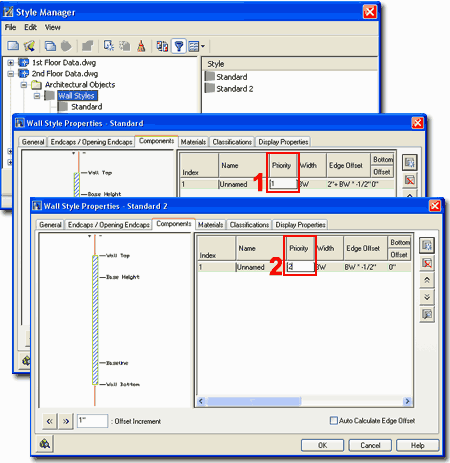 Once you have copied your Wall Style, Edit...
it and pick on the Components tab. On the Components tab of the
Wall Style Properties dialogue box, you should see a text box for Priority
(see red dot on illustration, right). All you have to do is change that number by
one digit, up or down depending on how you want it to behave. If you make the number
bigger, it will be cut by the other wall. If you make the number small (closer to
zero), it will cut the other wall. On the Priority scale, zero has highest priority. |
| Wall Priorities - Multiple Components 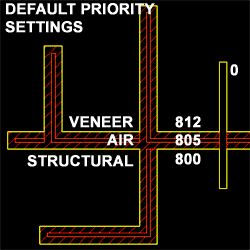 Illustrated to the
right and left are the default Priority settings for ADT's Brick-4 Air-2 Brick-4 Wall
Style: 812, 805 and 800 respectively.
This wall was designed to have a structural side or simply one with a higher
priority so that when they cross, one side will run straight through. In this
design, there is also an Air Gap with a priority in the middle so that the structural side
cuts through it but the non-structural side does not. Illustrated to the
right and left are the default Priority settings for ADT's Brick-4 Air-2 Brick-4 Wall
Style: 812, 805 and 800 respectively.
This wall was designed to have a structural side or simply one with a higher
priority so that when they cross, one side will run straight through. In this
design, there is also an Air Gap with a priority in the middle so that the structural side
cuts through it but the non-structural side does not.
In the illustration to the left, I also show what a
Standard Wall Style, with Priority 0, does as it crosses this Brick Style. Notice
that since 0 is at the top of the Priority Stack, it cuts right across the brick wall.
If you were to change your mind about the Brick Wall Style
and wanted to both sides to have an equal level of display, structure, non-structure or
Priority, you can simply make the two Wall Style Components hold the same Priority
values. In this example, I show what happens when you change the Brick Veneer to a
Priority of 800 - to match that of the Brick Veneer (Structural).
In the illustration to the left, I also show what 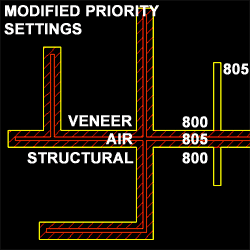 happens when you change the Priority of a Standard Wall Style to match that of
the Air Gap within the Brick Style. happens when you change the Priority of a Standard Wall Style to match that of
the Air Gap within the Brick Style. |
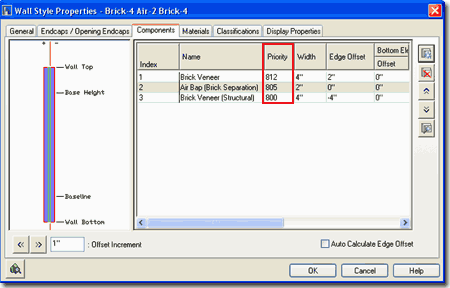 To set
or change a Priority value, you simply select the Wall's index
number on the Components tab of a Wall Style Properties dialogue box and type in
a number in the Priority field.
Priority values can range between 0 and
2147483647, so you have plenty of breathing room. Working with higher numbers can be
an effective methodology when weighed against all of the other Wall Style types; you may
want to leave room in the range of 0 - 200 or so for structural Wall Styles that must cut
through all other Wall work.
|
| Wall
Priorities - Standard Component Numbers
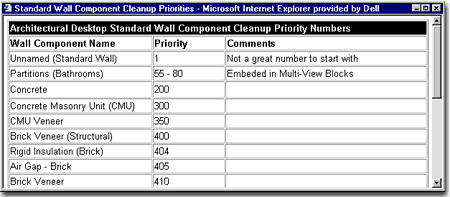
The Priority Numbers for Wall Style Components listed in
this separate Window, were collected by actually looking at each Wall Style and may
therefore be different from other published versions of this list.
The good thing about the list is that there is a fairly
decent amount of space between the numbers so you can create your own Wall Style
Components and work in these ranges.
|
 |
| 7Wall Style Properties |
7-3 WALLS |
| Wall Style- Design from Scratch or Edit an
Existing Style
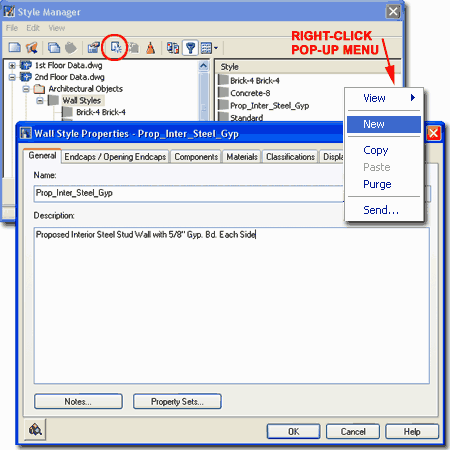
To create a Wall Style from
scratch, use the Style Manager and go to Wall Styles or type
"WallStyle" on the command line. Once in the Style
Manager, use the right-pane to do most of your work. You can right-click in the
right pane or use the New icon to create a New Wall Style. A good trick for creating
a New Wall Style is to Copy an existing Style and Pasting it; then Rename it.
The General tab of the Wall Style
Properties dialogue box provides a Name field, a Description
field, the ability to attach Notes or documents and the ability to attach
Property Sets. You can use the Notes... button to add comments
about the Wall Style or you can Add... links to any file type as reference information
related to the Wall Style. You can use the Property Sets... button to access the
Edit Property Set Data dialog. You will not be able to use the Add property sets
button to add data to your Wall Style unless you have a Property Set Definition Style
specifically set to Apply To Wall Styles or Wall Objects. If you do add data, it can
be used to designate information for tags and schedules; information like wall type,
construction type, materials and/or fire rating - read Part 18 - Schedules for more information on
this topic.
| Running through some basic steps - 1: Illustrated to the right I show the first step in creating your
own custom Wall Style. On the General tab you can Name
the Wall Style and Add a Description. Autodesk started a convention
of using an "X" in the Wall Style Name to imply that the Width is variable; you
may wish to continue this practice if you have mixed Wall Style types ( fixed and
non-fixed ). In this exercise, no Notes or Property Sets are added. |
|
 |
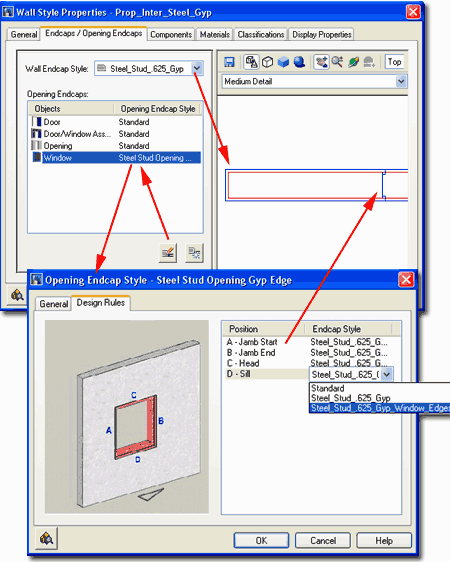
| Wall Style- Endcaps / Opening Endcaps tab
On the Endcaps / Opening Endcaps tab of
the Wall Style Properties dialog box, you can specify unique Endcaps for
either or both of the free ends of this Wall Style and/or the ends that occur when
Openings are created in this Wall Style. In essence, this tool offers the option to
control how a Wall should look at termination and opening points.
Wall Endcap Style - use this drop-down
list to select any existing Wall Endcap Styles that are currently available in the active
drawing file. "Standard" is simply a straight line that cuts a Wall like a
saw might. For this reason, the "Standard" Wall Endcap Style is not a good
choice when components, such as Gyp. Board, are used because the Gyp. Board will not be
wrapped around the ends or at openings. To have the option to select other Wall
Endcap Styles, you must first create one using the WallEndCapStyle
command and one or more open Pline shapes.
Opening Endcaps - by working with each of
the objects listed under this category, you can set unique Opening Endcap Styles for each
of the four objects listed: Door, Door/Window Assembly, Opening and Window. Each of
these objects actually anchor to Walls and cut them. For each object, you can
control four different Endcap Styles as illustrated on the Design Rules tab of the Opening
Endcap Style dialog box to the right. This means that if you have a unique Sill
condition, for example, on a Window you can set a unique Endcap Style for just that
"Position" while using different Endcap Styles for the other three sides of the
Window Opening.
Note:
In theory, all of this fancy Endcap Style functionality is wonderful but in practice it
can be a nightmare to create and manage so my suggestion is to dabble lightly before
getting wild. Though I have spent much time on creating custom Endcaps for Wall ends
and clean Openings, I have yet to worry much about Windows and Doors because this level of
detail is rarely seen unless used for details.
| Running through some basic steps - 2: On the Endcaps / Opening Endcaps tab for your
custom Wall Style, we will keep it simple for now by leaving all of the Endcap
Styles as "Standard". Later, should the
need occur, you can return and add something more sophisticated like the the unique Window
Opening Endcap Style illustrated to the right. More information on Endcaps Styles is
provided in Part 4 - Wall Tools. |
|
 |
| Wall Style- Components tab When designing your own custom Wall Styles, the Components
tab is the place where it all really happens. In simple terms, this is the place
where you define the rectangles that make up your Wall system; each rectangle, in plan
view, representing framing, applications, insulation, air, protection and so on. A
basic wall, for example, can be represented by one rectangle with a certain Width. A
more complex wall might have a rectangle for the framing members and two adjacent
rectangles, on each side, representing gypsum board.
Index - an automatically generated
sequential number, starting with 1, for each component Added to a Wall Style. The
order of the components is not important but structuring a Wall from inside to outside (or
left to right) can make it easier to follow.
Add / Remove - buttons used to Add a
component or remove it.
Name - a literal name for the component to
make it easier for the designer to understand.
Priority - a rating for cleanup; 0 is the
top of the stack. Though you can find lots of examples by reverse-engineering the
Wall Styles that come with ADT, the issue you will have to address is how to use numbers
that work with other Wall Styles and create correct results on the component level.
Width - use the pick button
in this cell to activate the Width Settings bar - see illustration to the right. The
Width is either a simple physical value that represents how thick the component is or a
more complex formula designed to work in conjunction with the Base Width as set or as
input by the user at the time of drawing this Wall Style. Using all fixed values is
the easiest Wall Style to create but the least flexible at the time of use. Using
the "BW" (Base Width) option allows for variable Widths by the user at the time
of creation but then you will need to use Edge Offset values to compensate for variable
Widths. In most cases, Wall Styles will have one variable Width Structural or
Framing component with fixed value applications but if you need to vary the application as
the Width changes, you can create a formula whereby the Width is a factor or sum based on
a relationship to the "BW".
| Running through some basic steps - 3: On the Components tab for your custom Wall Style,
we can create a Fixed Width or Variable Width Component configuration by using actual
dimensions or by using the "BW" (Base Width) variable.
Illustrated to the right I show how to configure components
for both a Fixed Width and Variable Width Stud Wall faced by 5/8"
Gyp. Board on each side. As you can probably see, creating a Fixed Width Wall Style
is rather easy as long as you recognized that zero is your Baseline and that you build
components based on that position in space. In both examples, illustrated to the
right, I treat the component Widths as positive numbers and use a negative Edge Offset for
the negative side of the Wall ( hence the -5/8" Edge Offset with a 5/8" Width
back to the zero point on the Wall).
For the Variable Width Wall, I show that I
have declared the Stud Component as the Variable while the Gyp. Board Components remain
fixed at 5/8" Wide. In order to allow this Wall to grow and still put the Gyp.
Board Component in the right position, the Edge Offset on the positive side is set to
match the Width: "BW".
The Priority settings are somewhat
arbitrary but it is best to make the Stud Component lower ( higher in Priority ) than the
Gyp. Board so the Stud will cut through the exterior Components. If you wish to
match the Wall Style Priorities that come with ADT, you may wish to use 1200 for the Gyp.
Board and 500 for the Stud.
Note: There are many ways to produce
the same results so don't get caught thinking that these two examples represent the only
or event the "right" way to create your Wall Styles. |
|
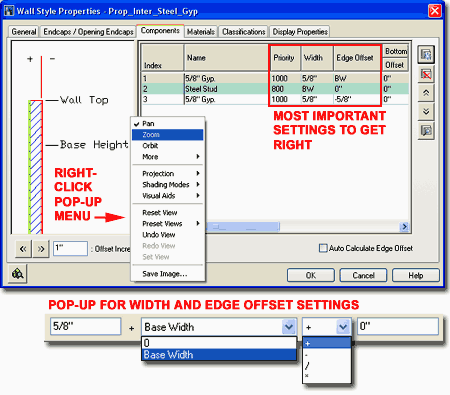 Edge Offset - use the pick button in this cell to activate
the Edge Offset Settings bar - see illustration to the right. The Edge Offset
is simply a control for positioning the components relative to each other. This
value can either be a simple positive or negative distance relative to a zero point in the
wall section or it can be quite complicated if a formula has also been used for the Width
(see comments above). In the illustration to the upper right, I show that if you use
a zero point (Baseline), setting appropriate Edge Offset values for other components is
just a matter of relating to the zero position and the widths of the individual
components. If a Wall Frame use BW for its Width, you will want you Gyp. Board to be
placed outside this BW value so the offset would be that BW value. If you cannot use
a zero baseline but must use a centerline or some other position, the Edge Offsets will
need to use formulas that relate to this primary position.
Top Elevation Offset - a
value field for controlling where the top-plate (or other component) of a Wall Style
should be relative to Wall Top, Base Height, Baseline
or Wall Bottom.
Bottom Elevation Offset - a
value field for controlling where the sill-plate (or other component) of a Wall Style
should be relative to Wall Top, Base Height, Baseline
or Wall Bottom.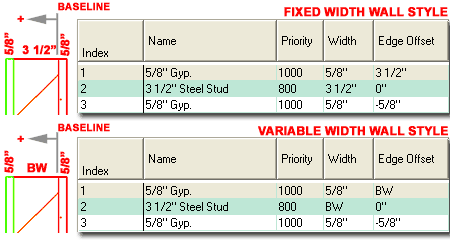 |
| Wall Style - Materials tab
For more advanced presentations involving
everything from Hatch Patterns in Plan construction documents to Textured Brick in
Perspective renderings, you use the options on the Materials tab.
It should be noted that if this topic is too advanced for you or if 3D presentation
effects are not of significant value for you, you are not forced to use the Materials to
get basic Hatch Patterns on Walls in Plan; you will, however, need to use Materials for
Hatch Patterns on Walls in Elevation (across the vertical face).
On the Materials tab of the Wall
Style Properties dialog box, you should find each Component
listed under the Components tab. For Materials, the default is
"Standard" which defers the Color to the settings under the
Display Properties tab ( like the pervious releases of ADT ). Any other Material
that you may find on the Material Definition drop-down lists, have either been created by
you or came into your file as a result of using other ADT objects from the ADT Content
Library. Though you may assign any Material to any Component, not all Materials
Properties are configured equally and thus produce different results.
Modifying a Material Definition is okay as long as the
modifications don't alter how that Material is applied to other objects.
Creating a New Material Definition can be done here or by
using the Style Manager and then returning to this point. I
recommend using the "MaterialDefine" command to create
Materials if you only need to copy an existing one, rename it and make minor modifications
so it works differently for your own custom Wall Styles. If you create a new
Material Definition Style via the Wall Style Properties route ( illustrated here ), you
have to create your Material Definition Style from scratch.
Illustrated to the right I show that I have decided to
create a New Material Definition for the 5/8"Gyp. Wall
Component and have named it "Gyp. Board". By using the Edit
Material button, I show that I have accessed the Material Definition
Properties dialog box where all of the Display Properties are listed for
Materials in my current drawing. Files started with the ADT Template Files will have
more Display Representations than drawings started from scratch but
basically, Material Styles only have one real Display Representation ( General ) while all
others are just duplicates with unique settings.
| Running through some basic steps - 4: On the Materials tab, for your custom Wall Style,
you could spend a lot of time creating a Material Definition Style but in this simple
example I suggest that you either leave the Material settings as "Standard" or
Import a Wall Style from the ADT Library that contains similar components and then return
to this list to assign those imported Material Definitions. |
|
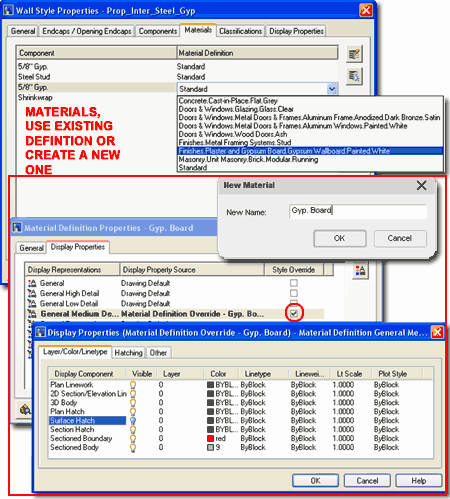 On the Display Properties tab of
the New Material Definition ( Gyp. Board ), I show that I have activated
a Style Override for the General Medium Detail Display
Representation. By activating the Style Override, I have
also activated the Display Properties dialog box as it applies to this
Material for the General Medium Detail Display Representation only. On this dialog
box, I show that I have highlighted the Surface Hatch Display Component
on the Layer/Color/Linetype tab and if I turn this Component on and Set a
Hatch Pattern on the Hatching tab, I will see this
Pattern on my Wall in 3D Views whenever the General Medium Detail Display Representation
is used.
If all of that is confusing, don't worry,
there is a far more in-depth breakdown of this whole topic in Part 1 - AEC SETUP
-DISPLAY.
Note:
Be sure the read the section on the Display
Properties tab to learn about another place the Materials are activated or
deactivated for display. |
| Wall Style-
Classifications tab
Depending on your future objectives with your Wall Styles,
you can use Classifications to assist in simple tasks such as display
controls ( like an ON/OFF toggle for Demolition Walls ) or for more complicated tasks such
as Schedules and BOM's.
On the Classifications tab of the Wall
Style Properties dialog box, you may find that there are no options and that you
simply cannot use this feature. None of the ADT Template Files come with Classification
Definition Styles so you must first create one in order to use it under the
Classifications tab of the Wall Style Properties dialog or any other Object Style
Properties dialog, for that matter.
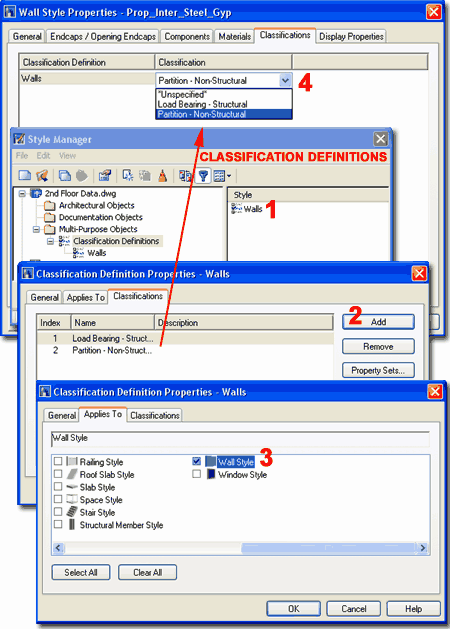
Illustrated to the right I show that I used the Style
Manager to create a New Classification Definition Style that I
named "Walls" ( you can also type "ClassificationDefinition"
or use the Format pull-down ). Once you have created a Classification
Definition Style, you must Edit it and Add Classifications
on the Classifications tab of the Classification Definition
Properties dialog box ( see image right ). In the illustration to the right
I show that I have Added two example Classifications that I named "Load
Bearing - Structural" and "Partition - Non-Structural"
as examples. You could just as easily create Classifications such as
"Proposed", "Existing" and "Demolish". The names are
the true Classifications so you will want to give some thought to these names and how they
will play a role in the bigger picture of your Project Management. This will, of
course, not be obvious until you have explored this topic further and studied how it can
be applied to Display Control and Schedules.
To isolate or allocate the Classifications that I created
on the Classifications tab on the Classification Definition Properties dialog box, I show
that I used the Applies To tab and selected the one object that I might
want this Classification available for. You can, of course, Apply To more or all
objects but you must set the Apply To to objects that you intend to use these
Classifications for or they will not show up on the Object Style Properties dialog box.
In the last step, once the Classification Definition Style
has been configured, you should find that it will now be available on the Classifications
tab of the Wall Style Properties dialog box.
If all of that is confusing, don't worry, there is a far
more in-depth breakdown of this whole topic in Part
1 - AEC SETUP -DISPLAY.
| Running through some basic steps - 5: On the Classifications tab, for your custom Wall
Style, you could spend a little time creating a Classification Definition Style but in
this simple example I suggest that simply bypass this option until a later time when it
may be necessary to add this to your custom Wall Style. |
|
 |
| Wall Style- Display Properties tab
The Display Properties tab, the last one,
on the Wall Style Properties dialog box provides access to all of the
settings that affect how your Wall Style will look with respect to Component Linework and
Hatching. Working with Display Properties can get very complicated so breaking the
logic down by only working with one change at a time is usually the best approach.
For Wall Styles, the Default Display Representations include: Graph,
Model, Plan, Plan High
Detail, Plan Low Detail,
Reflected and Sketch but you will find more in the ADT
Template files. For each of the default Display Representations, there are
different Display Properties and Display options depending upon what their function is;
for the Plan Representation of Wall you should find numerous Display
Components listed on the Layer/Color/Linetype tab but for the Sketch
Display Representation, you will only find three. Knowing which Display
Representation is actually being used in your Display Configuration(s) is fundamental to
choosing the right one or multiples to modify.
 Illustrated to the right I show that I have chosen to modify the Plan
Display Representation of my example Wall Style. I have attached a Style
Override because I want my Wall Style to have unique Colors, Lineweights,
Hatching and so on that are very different from the default settings applied to most other
Wall Styles. Though many may argue that using Style Overrides is problematic, I
don't limit myself to that fear and find that Style Overrides are absolutely necessary to
create the types of presentation results that my office needs. The drawback to using
Style Overrides is that you limit the option for rapid Display Change of All Wall Styles
in a single swoop but as long as you know that there are Style Overrides on most of your
Wall Styles, you simply have to run through the list in the Style Manager. Illustrated to the right I show that I have chosen to modify the Plan
Display Representation of my example Wall Style. I have attached a Style
Override because I want my Wall Style to have unique Colors, Lineweights,
Hatching and so on that are very different from the default settings applied to most other
Wall Styles. Though many may argue that using Style Overrides is problematic, I
don't limit myself to that fear and find that Style Overrides are absolutely necessary to
create the types of presentation results that my office needs. The drawback to using
Style Overrides is that you limit the option for rapid Display Change of All Wall Styles
in a single swoop but as long as you know that there are Style Overrides on most of your
Wall Styles, you simply have to run through the list in the Style Manager.
Once the Style Override has been checked, the Display
Properties dialog box will appear as illustrated to the right. You can also
use the Properties button on the Display Properties tab of the Wall Style
Properties dialog box to activate this dialog. Because I chose to modify the Plan
Display Representation, my list of Display Components is fairly extensive. If you
use a Style Override you will only see your Display Components but if you modify the
default Display Representation, you will see a much larger list of generic Display
Component names.
| Running through some basic steps - 6: On the Display Properties tab for you custom Wall
Style, you can spend a bit of time working on all of the different Display
Representations. The best approach on a first run at this is to focus on one or two
Display Representations and test the results before moving on through the whole list.
Of the list of Display Representations for a Wall Style, Plan
is probably the most important. If you double-click on Plan, you will see the
default Display Properties for the current drawing. You may chose to make changes
here that affect all Wall Styles or Attach a Style Override on the Display Properties tab
so you can set highly unique Display Properties for this Wall Style on
the Layer/Color/Linetype tab.
For best results on your fist Wall Style, just use the
Default Display Properties. Upon further exploration, try Attaching a Style Override
to create unique Color, Linetype, Lineweight or other settings that will only affect this
Wall Style. Illustrated above left, I show an example of some rather unique settings
for a custom Wall Style. |
|
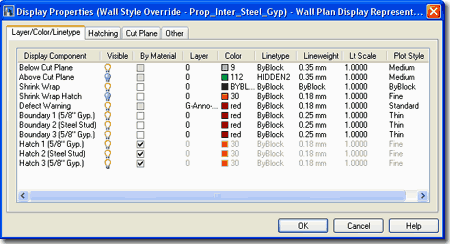
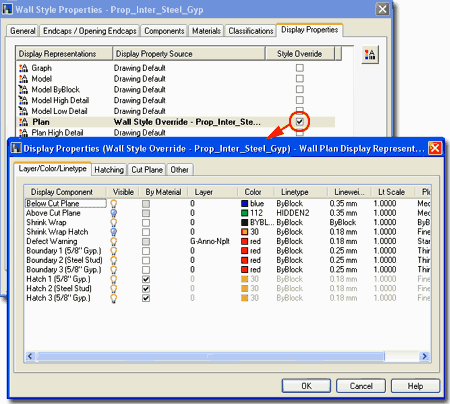 On the Layer/Color/Linetype tab of the Display
Properties dialog box, you can control the Visibility, By
Material, Layer, Color, Linetype,
Lineweight, Lt Scale and Plot Style for
each Display Component of your Wall Style. There are so many possible options here
that you could almost write a whole book on just this topic alone but essentially what you
will need to do is decide on how you want to control your Wall Style Display Components so
you always get the type of output that you want with the least amount of effort on your
part. For example, when Display Components don't use Layer = 0, Color = ByBlock,
Linetype = ByBlock, Lt Scale = 1 and so on, they are fixed no matter what Layer you put
them on or how you alter those other Properties other than by using this dialog box.
You can create individual Layer Names with the Layer Manager and actually assign each
Display Component to a Layer so you would end up with a solution that was more
"AutoCAD friendly" but you could also be a bit smarter about how you apply these
settings to automatically do work for you. In the case of lines above or below, for
example, you may have a practice of always using certain dashed linetypes and certain
Colors, Lineweights and so on so why not preset that information here to avoid having to
worry about it later.
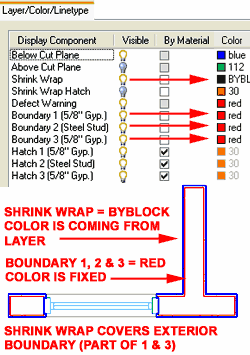
In the illustration to the left I show one
example of how you might want to set the Display Components for a simple Stud Wall with
Gyp. Board on both sides. For the Shrink Wrap Display Component (
the most extreme outer lines on a Wall Style as cut in Plan View ) I show that I have
turned the Visibility On and set the Color to ByBlock.
I have not use the By Material option since I want this Display Component to be
controlled by whatever I set on the "A-Wall" or equivalent Layer.
For the internal Display Components, I show that I have set them all to use the Color Red
because in our office we think of this Color as a light lineweight that is less important
than most other Colors. As you can see in the example of this Wall Style, the Shrink
Wrap is Blue as set by the "A-Wall" Layer while the internal Components are Red
but cannot be changed through any other means than this dialog box ( for this Display
Representation, that is ).
Overall, if you have a good grasp of how to
work with basic AutoCAD Layer Properties, you should not find these Display Properties too
difficult to master. If you use the "By Material" checkbox, you are
deferring the remaining settings over to the Material as set on the Materials tab of the
Wall Style Properties dialog box. Likewise, if you want to use or see a Material
Definition Style on your Wall Style, you must use the 'By Material" checkbox here. |
| 8Wall Object Display Properties |
8-3 WALLS |
| Accessing Wall Object Display Properties
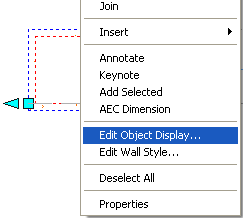 There are two ways that you can access the Object Display Properties
of most ADT objects; one way is by the Object's Style Properties ( discussed above ) and
the other way is by picking an Object, right-clicking and selecting Edit Object
Display... off the object-specific pop-up menu. There are two ways that you can access the Object Display Properties
of most ADT objects; one way is by the Object's Style Properties ( discussed above ) and
the other way is by picking an Object, right-clicking and selecting Edit Object
Display... off the object-specific pop-up menu.
When you use the Edit Object Display...
path to get to the Object Display dialog box, you should notice that the number of tabs
and total list of options is far less than what you would find on the Object Style
Properties dialog and that is because you are isolated to the Display Properties.
Not only that, but if you apply any Overrides here, they will Override the Object Style to
become the most isolated Display Controls that you can create: one for just the Object(s)
selected.
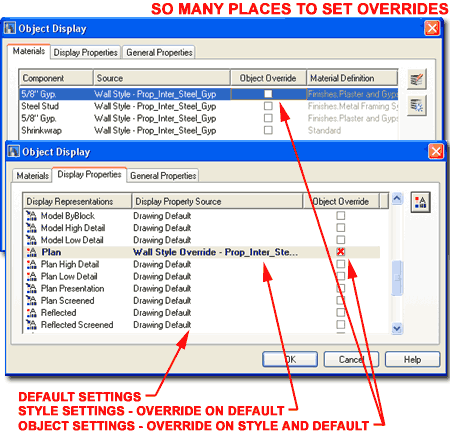
Illustrated to the right I show how you can decipher the
verbiage on the Object Display dialog box tabs. "Drawing
Default" means that the Object Style has no Overrides and
that you can modify the Display Properties directly in the Display Manager. "Wall
Style Override - ..." indicates that the Object Style has an Override
that you can only modify through the Object Style Properties dialog box. If you
check the Object Override on this last setting, you will, essentially be Overriding and
Override. Attaching Overrides at the Individual Object Level is an extreme act but
can be rather useful in frustrating situations where you don't have the time to create a
whole new Object Style just to create a simple effect. Though I cannot remember the
last time I did this with a Wall Object, I am guilty of doing this with Door Objects on a
regular basis just to get Thresholds turned On. The concept is that you just want
this one object to have a different appearance but the price is that you can only change
it through this very same path of dialog boxes. I equate this technique to the
technique used by some really bad AutoCAD drafters that set everything on an
object-by-object basis via the Properties toolbar; you know, Color by Color instead of
"By Layer" or "By Block". Just imagine what those folks will do
to a drawing once they find this option - wow, don't give me any of their drawings. |
 |
| Wall Object Display
Properties - Layer/ Color/ Linetype
 To
many, this is where the "light goes on" in their minds about how ADT's Objects
can behave the way they do with respect to graphics. Most of the rules you ever
learned about AutoCAD's Layer techniques should apply here. If you assign a unique
color to any Component within a Wall, don't expect to change its color with the Layer
Manager. To
many, this is where the "light goes on" in their minds about how ADT's Objects
can behave the way they do with respect to graphics. Most of the rules you ever
learned about AutoCAD's Layer techniques should apply here. If you assign a unique
color to any Component within a Wall, don't expect to change its color with the Layer
Manager.
The more you can manage with ByBlock or Bylayer will
provide the greatest flexibility down the road in a project, but working with Styles makes
it fairly easy to change these settings throughout a drawing. The larger problems
come when you are working with Xref's where access to Styles is limited to Objects that
are actually in the current file and thus you cannot change Xref's Object Styles - a real
drawback and something to experiment with before you go too far with custom settings.
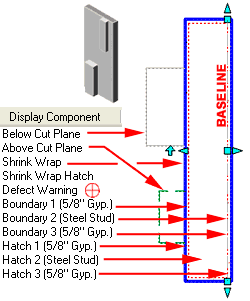
Many of the Wall Components are easy to figure out but
here's a quick overview:
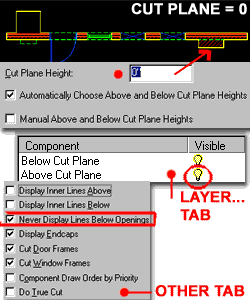
Below and Above Cut Plane
- lines controlled by Visibility and settings on the Cut Plane tab.
Shrink Wrap - an
outer wrap around a wall for emphasis and the point at which the Cut Plane is set.
Shrink Wrap Hatch - if on and a Hatch
pattern is set on the Hatching tab, will apply a pattern from outer edge to outer edge of
a Wall Style.
Defect Warning - the "dreaded circle
of death" on walls that have problems; usually cleanup problems. Turning
Visibility of this symbol off does not solve the defect problem.
Boundary - the actual double lines that
define the components of a wall. These are organized by automatically generated Index
numbers ( 1, 2, 3... )
Hatch - hatch patterns between the
matching boundaries with the same Index number; see Hatching tab for
patterns.
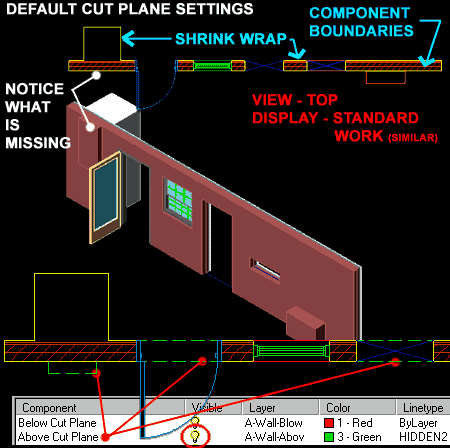
Illustrated to the right, I show how ADT displays a Wall
with Doors, Windows, Openings and Modifiers from Top and Isometric based on the Standard
or Medium Detail Display Configurations. I have purposely
positioned objects above and below the standard Cut Plane Height to show
what ADT will and will not display by default. Notice that one Modifier, above the
default ( 3'-6" ) Cut Plane, is not shown in plan view at all, while the other, below
the default Cut Plane, is shown lighter than the rest of the Shrink Wrapped Wall.
It is almost possible to get a Wall Object to display in
any way you might draw by traditional 2D drafting techniques. One of the simplest
tricks is to use the Layer/ Color/
Linetype tab to turn on or off the Below Cut
Plane and Above Cut Plane Components - see illustration right
bottom. In the illustration to the right, I show how turning on Above Cut
Plane affects the default Wall Display in plan view; in addition, I changed the
color and the linetype to make it clear that the lines represent objects above. |
 |
 |
Wall Object Display Properties - Hatching
| Links |
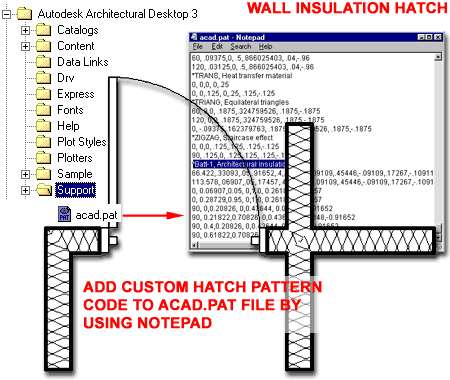
Wall Hatch - Insulation - for how
to add Batt Insulation with a traditional look using a custom hatch patter. |
| TIP |
If you find that certain
Hatch Patterns stop in long walls, you may need to change the MaxHatch system setting, try
typing the following statement (verbatim) on the command line and regen afterwards: (setenv
"MaxHatch" "1000000"). To check the current setting,
type (getenv "MaxHatch"). The range is
between 100 - 10000000 with 10000 as the default. Higher values will affect
performance. |
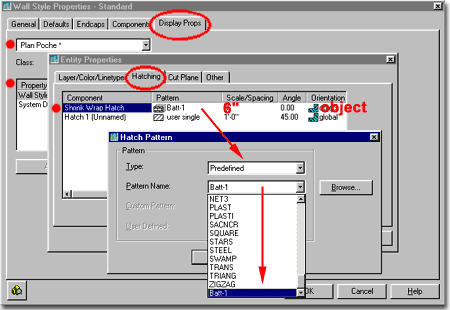
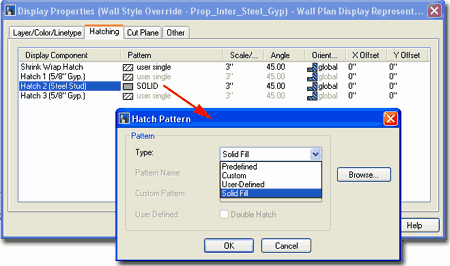
 The Hatching tab provides the access to choosing Hatch Patterns
and control their behavior but it does not turn them On or Off and it does not provide the
means to control the Color and other Properties that you might want to work with.
These settings must be set under the Layer/Color/Linetyp tab. The Hatching tab provides the access to choosing Hatch Patterns
and control their behavior but it does not turn them On or Off and it does not provide the
means to control the Color and other Properties that you might want to work with.
These settings must be set under the Layer/Color/Linetyp tab.
To set a Hatch Pattern, pick on the pattern picture in the
Pattern column and use the Hatch Pattern dialog box, as illustrated, to select patterns in
much the same fashion as using AutoCAD's Hatch command. Notice that there is a
unique version of the Solid Fill available directly on the Type drop-down list. Be
sure to use this version of the Solid Fill if you want a Solid Pattern. The other
one, offered via the Predefined option and Hatch Pattern Palette causes a variety of
problems when used in Wall Objects.
|
 If you are unable to set a Pattern, confirm that the
Display Component is free to receive a Pattern by checking the "By Material"
status on the Layer/Color/Linetype tab. In other words, if "By Material"
is checked for the Component you want to set a Pattern for then you will not be able to do
that since the Pattern comes via the Material Definition Display Properties instead.
Notice that you have Scale, Angle
and a unique Orientation option for how the pattern follows an object (
Global Angle or based on Object direction ).
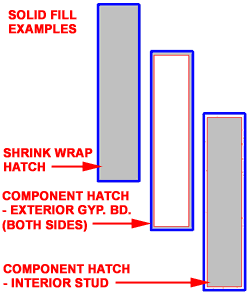
Setting a pattern for Shrink Wrap
and turning it on on the Layer / Color / Linetype tab will put a pattern from edge to edge
of you wall; right over any internal components. This is sometime a cool technique
to set Wall Poches with the Solid pattern. |
| Wall Object Display Properties - Cut
Plane
The Cut Plane tab of the Object
Display Properties dialog box holds a lot of power to control what is and what is
not displayed in plan view. Usually, I find that not enough is displayed by default
but you can also use these settings to remove information that is above or below a
particular Cut Plane.
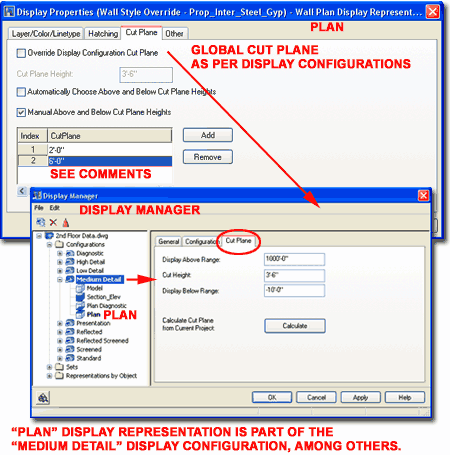
 Override
Display Configuration Cut Plane - generally this checkbox is unchecked and should
remain as such unless you need to alter this centralized setting. In essence,
checking this box creates an Override on the Global Cut Plane as defined by the current
Display Configuration. Keep in mind that you can work with the Cut Plane tab at the
Object Level and at the Object Style Level but if you did need to alter the Cut Plane
Height due to an unusual Wall Condition, this it probably the more logical level to do it
at ( the Object Level that is ) because the Override would only be for the selected object
and not a whole Style. I have done this on many occasions to get the proper display
of items above and below. Override
Display Configuration Cut Plane - generally this checkbox is unchecked and should
remain as such unless you need to alter this centralized setting. In essence,
checking this box creates an Override on the Global Cut Plane as defined by the current
Display Configuration. Keep in mind that you can work with the Cut Plane tab at the
Object Level and at the Object Style Level but if you did need to alter the Cut Plane
Height due to an unusual Wall Condition, this it probably the more logical level to do it
at ( the Object Level that is ) because the Override would only be for the selected object
and not a whole Style. I have done this on many occasions to get the proper display
of items above and below.
Cut Plane Height - the z-axis value on a
Wall Object where you want your primary cut to be made and where Shrink Wrap will wrap around. Setting
Cut Plane Height to zero ( 0") can be a very effective solution for problems - see
illustration left.
Automatically Choose Above and Below Cut Plane
Heights - a check box that allows ADT to set the limits for what gets displayed
as objects above and objects below the actual Cut Plane Height. I think, but am not
certain about this, that if you check this box the Above and Below values are just from
the Cut Plane Height to either the Top or Bottom of the Wall. Remember that ADT has
the Above Cut Plane and Below Cut Plane Components that you can turn on or off.
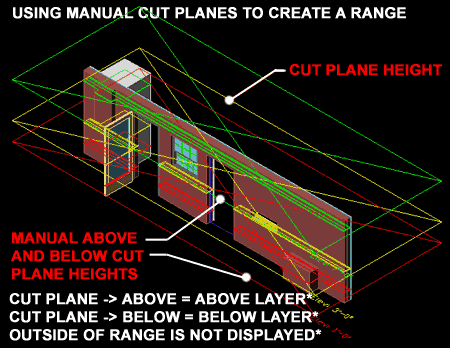
Manual Above and Below Cut Plane Heights -
a check box that allows you to Add your own secondary Cut Plane Heights to create a range
for what is considered Above and Below. You can, for example, choose to have only
objects between the Cut Plane Height and an Added Above or Below Cut Plane Height display
as Above or Below; it's like a filter that allows you to include or exclude z-axis
information on a Wall Object. For best results,
set a Cut Plane Height and deactivate
Automatically Choose Above and Below Cut Plane Heights.
Note:
Remember that you can control the Visibility of Display Components for Above and Below on
the Layer/Color/Linetype tab of the Display Properties dialog. You
can also control Above and Below display on the Other tab - see below. |
 |
 |
| Wall Object Display Properties - Other
The Other tab of the Object
Display Properties dialog box provides checkbox based ( On/Off ) controls for
other settings that users might want to toggle.
Display Inner Lines Above / Below - use
these checkboxes to activate the display of Component Lines within complex Wall Styles.
By default, the Above and Below display will only show the outer lines of a Wall
but if you check either of these options you will get every single Component line to
display. When using be sure to have the Above Cut Plane and Below Cut Plane Display
Components turned on ( the matching set, that is ) on the Layer/Color/Linetype tab.
Also, if you have limited the Cut Plane Above and Below range, you may not see any lines
Above or Below.
Hide Lines Below Openings at Cut Plane -
use this checkbox to remove lines below Openings like Doors and Windows if you don't want
lines to display there even though you have the Below Cut Plane Display Component turned
on. The only time this has presented itself as a problem to me was when I had a Door
in a Wall that with a Threshold height above the baseline. I wanted Lines Display
Below all other Openings but I did not want them below the Door. To remedy this
situation, I kept the Below Cut Plane Display Component On but used this checkbox to
remove the linework below the Door.
Hide Lines Below Openings Above Cut Plane
- use this checkbox to get Openings, like Windows for example, that have an unusually high
Head height to actually appear as if they have cut the Wall; i.e., remove the lines below
them. Because Objects, like Windows, have their own Cut Plane settings ( like
Respect Cut Plane of Container Object when Anchored ) you may have to alter the Display
Properties of the Objects to get them to Display (see Door and Window Display
Properties).
|
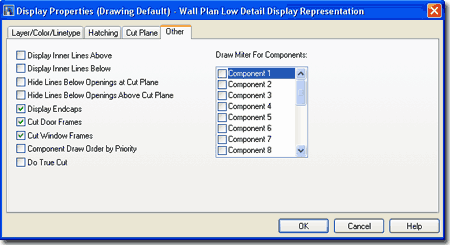 Display Endaps - use this checkbox to
display unique Endcaps on Walls or cuts in Walls. This is a highly recommended
option to have checked.
Cut Door / Cut Window Frames - use these checkbox
options to force Walls to cut to the actual Opening size and not the Frame
Size. If Doors and Window Frames are used, you will see the linework
inside the Wall. Though not very practical for Windows, this does
offer a work-around option for
AEC Dimensions on Doors. Component Draw Order by Priority - use this checkbox to controls
what comes to the surface by the Priority settings used to control Cleanups; in other
words, maybe you want brick with a priority of 200 to show its color above the adjacent
insulation with a priority of 300.
Do True Cut - use this
checkbox to display cuts and Openings in Walls as if they are truly three-dimensional
cuts; i.e., display all component lines.
Draw Miter For Components -
use this checkbox to draw a diagonal line where Wall Components meet. |
| Wall Object Display
Properties - Other Display Representations With thirteen or so Default Display Representations for just the Wall Objects in
ADT ( per default template that is ), it is basically impossible for me to cover all of
the options associated with each one of these. For the most part, many are
permutations or pointers to the Plan or Model Display Representations so those will offer
the same settings or options as the parent but Graph, Reflected and Sketch are unique
Display Representations that have their own settings and options.
Illustrated to the right I show an amazing surprise hidden
within the Sketch Display Representation: a Center Line Component. If you turn this
Display Component On ( it's Off by default ) and set a unique color for it, it will show
all Wall Centerlines regardless of their Baseline or Components. This Center Line is
always representative of the true center so it can be very useful for Osnaps during
construction or to assist in such matters as Area Calculations.
Note:
The Sketch Display Representation is used within the Diagnostic Display Configuration that
comes in ADT's Template Files. To use this while the Walls are in normal display,
add this Display Representation to another Display Set, like Plan Low Detail - just find
the Wall object under the Representation by Object folder in the Display Manager Window,
look for the Sketch Display Representation and check it for Plan Low Detail. Now,
when you set your viewport to Low Detail, the Center Line information will show. |
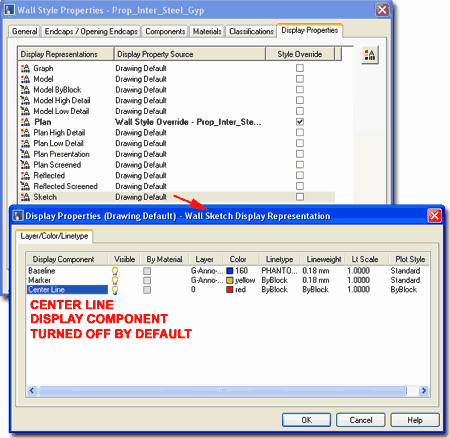 |
| 9Wall Problems |
9-3 WALLS |
| Defect Marker and Cleanup issues
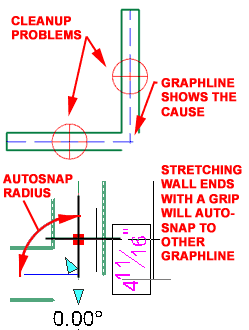 Usually the biggest problem with Wall Objects is
dealing with the question of why the "dreaded circle of death" ( Defect Maker Ø) shows up. There are numerous causes for wall
defects but the most common one has to do with Cleanup Settings and there is a lot you
can do to deal with cleanup issues. Usually the biggest problem with Wall Objects is
dealing with the question of why the "dreaded circle of death" ( Defect Maker Ø) shows up. There are numerous causes for wall
defects but the most common one has to do with Cleanup Settings and there is a lot you
can do to deal with cleanup issues.
When you draw with ADT's Wall Objects, they generally
Cleanup perfectly as you place them in a contiguous manner but problems tend to arise when
you add new walls among existing walls or when you begin to edit them with the common
Move, Rotate, Mirror, Stretch and similar AutoCAD editing commands.
If you assume that the cause of any cleanup issues is not
due to bad Wall Style Component Priority issues then the usual culprit has to do with the Graphlines.
Mathematically speaking, Walls are just Vector Paths much line Lines and Plines so despite
all of the fantastic graphic elements, the key to the Wall is the Vector or Graphline that
controls its position, direction, length and cleanup among other things. In most
problematic cases, as long as you get the Graphlines to meet, the Walls will Cleanup
properly. You can see the Graphline of all Wall Objects by using the "Diagnostic"
Display Configuration ( personally, I prefer to use the "AecWallGraphDisplayToggle"
command). To bring the Graphlines together, you
can use a multitude of commands like Fillet, Extend, Trim and one of the best, Grips.
When using Grips, you will find that Walls often jump to find other Graphlines and
this feature is set on the AEC Object Settings tab of the Options
dialog box ( see image, right ). |
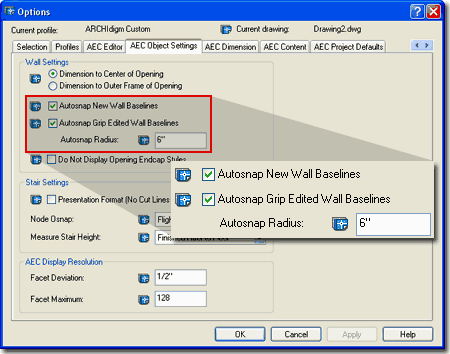 Autosnap New Wall Baselines - this checkbox option
uses the Autosnap Radius value as a guide when drawing new Walls that come near other Wall
Graphlines. So, as long as you get with the Autosnap radius of another Graphline,
pow; the Wall magically join and hopefully cleanup correctly.
Autosnap Grip Edited Wall Baselines
- this checkbox uses the Autosnap Radius value as a guide when Grip Stretching Wall Ends
near other Wall Graphlines. This produces the jumping effect that you may have
noticed when using Grips on Walls and is simply one of the best ways to work on cleanup
problems.
Autosnap Radius - this
setting controls the how Autosnap New Wall Baselines and Autosnap Grip Edited Wall
Baselines work. The greater the Radius the sooner Walls will jump to other
Graphlines but too large a value can be a problem and the default seems to be a pretty
good one. |
| Crossing Walls and Cleanup issues 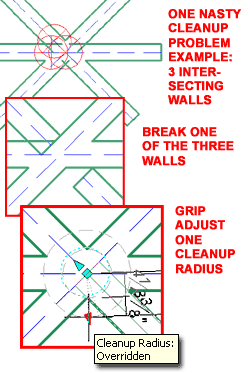 When Walls cross in ADT the Cleanup Radius Settings don't apply since there are
no Wall Ends for the Cleanup to work from. Because of this factor, you may have to
employ a little creative ingenuity into solving Cleanup problems where Walls cross.
Illustrated to the left I show a classic example that I like to demonstrate in
class. Draw three Walls that cross each other at or close to the same point in
space. This action typically produces several Wall Errors. Though there are
other tools, by using what we now know about Cleanup Radii, all you have to do is break
one of the three Walls at the intersection so you can employ a Cleanup Radius Override to
solve the problem. It may not be a completely ideal solution but it works and you
may have to use similar tricks on other problems you encounter. When Walls cross in ADT the Cleanup Radius Settings don't apply since there are
no Wall Ends for the Cleanup to work from. Because of this factor, you may have to
employ a little creative ingenuity into solving Cleanup problems where Walls cross.
Illustrated to the left I show a classic example that I like to demonstrate in
class. Draw three Walls that cross each other at or close to the same point in
space. This action typically produces several Wall Errors. Though there are
other tools, by using what we now know about Cleanup Radii, all you have to do is break
one of the three Walls at the intersection so you can employ a Cleanup Radius Override to
solve the problem. It may not be a completely ideal solution but it works and you
may have to use similar tricks on other problems you encounter.
Notice that I show that you can find the
Cleanup Radius marker and adjust it in-place. To find this icon, you must first
activate the Graphline Display, Select
one Wall Object and hold the cursor still over one of the angular arrow-like marker icons
until you see the little heads-up display illustrated to the left. By Grip
Stretching this icon, you effectively apply a Cleanup Radius Override that can be adjusted
or removed via the Wall Properties Palette.
Note:
To activate the Wall Graphline Display use the "AecWallGraphDisplayToggle"
command or the Diagnostic Display Representation. |
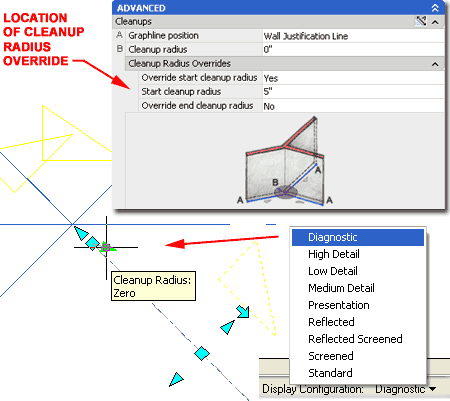 |
Problems
with the way your Walls look?
| Links |
Cleanup Issues - see comments above. |
| Links |
Layer/Color/Linetype
- Tab and see if you are getting the results that you expect. |
| |
Hatching - Tab and see if
a hatch pattern is set and if the scale is appropriate for your viewing scale. See
also the MaxHatch setting. |
| |
Cut Plane - Tab and look
at the Height to see if it is too high or too low for the results you seek. You may need to request lines for components
above and/or below the cut plane. |
| |
Other - Tab and look there
are any unusual checked or unchecked boxes - compare with a default wall or see image
above. |
| |
|
| |
|
Isolating the source of any Wall problem
can prove to be a very tricky and time consuming matter. In some cases, it is just
as fast or even quicker to simply redraw the Wall or Walls that exhibit anomalies.
If the problem is severe and the source must be isolated in order to remedy the problem, I
find it best to use various rules of categorization and elimination.
One of the first steps I take to find the
source of a Wall problem is to test the graphic control system first by not only changing
to several different Display
Configurations, but by changing the Views
to Plan, Isometric and Elevation.
While testing these display system changes, I look for obvious user mistakes like
inconsistent Heights, wrong Z-axis positions and other
placement problems like Justification,
Direction and Graphline positions.
|
Depending upon the nature of the problem,
I might also look at common culprits like Layers, Standard
Properties and poor choices in Wall Styles ( like "Standard" ).
When I have ruled out the simple candidates for problems, I look
deeper by checking the Wall Properties. With the Properties Palette
you can quickly go down the list of settings to look for unusual things like a
"No" for Cleanup automatically,
Elevation Height
not set to zero, Graphline position not set to Wall
Justification Line, Cleanup radius
set to something other than zero and/or with Overrides, unusual Endcap Styles or Wall Modifiers under the
Worksheets section. Any or all of these can cause an assortment of interesting
problems so check them carefully, especially if you didn't draw the Wall(s).
The next place I check is
the Wall Style Properties dialog box.
On this dialog, I review each tab and look for strange settings. Even if you don't
know what all of the setting do you can compare them with another Wall Style that works
correctly. On the Display
Properties tab you can spend an entire day looking for problems because of
all the Display Representations but one way to narrow things down in this
area is to make sure to have the Display Configuration set that has the problem; then,
when you visit this tab on the Wall Style Properties dialog, you will see which Display
Representation is currently being used ( thus narrowing down the field of candidates
). In this area, look for Style Overrides. If you suspect that there is a
Display Properties problem but you don't see an Override, don't rule that option
out. Check the Object Display Properties
and look for an Override on the current Object; this is an Object Display
Override as opposed to an Object Style Override - easy to do and hard to find. |
| 10Walls
- Customizing and Tricks |
10-3 WALLS |
| AutoCAD commands that work on Walls
At first you may think of Wall Objects as unique objects
that need to dealt with quite differently than normal AutoCAD objects, but many of
AutoCAD's commands do work on Walls. With Wall Objects, you need to consider their
three dimensional characteristics and their pre-programmed behavioral reactions ( reactors
). With the commands Extend and Trim, for example,
the Walls are Extending and Trimming to the Graphlines of other Walls and not necessarily
the outer edges. In fact, none of the basic AutoCAD objects Extend or Trim to Wall
components but only to the Graphline ( a very frustrating factor, I must say ).
Since Walls are 3-D objects, it is best to work with them
in Plan View with their 2-D Display Representation ( "Plan" ) to avoid the
notorious 3-D Osnap that many users complained about in the early days of 3-D Modeling in
AutoCAD. If you do need to work on Walls in an Isometric or other Model Display
Representation, avoid Osnapping unless you have specific and exact points to Osnap to.
It is always best to match the current Display Configuration to the current View;
i.e., use a Model Display Representation when working in 3-D ( when they are mismatched
you will find it difficult to select objects and to Osnap to points that you think are
really there).
Move, Copy, Rotate,
Stretch, Mirror, Array and Offset work just as you would expect based on use with
regular Lines, Plines, Circles and so forth. Commands like Lengthen
and Match Properties either don't work at all because they don't
recognize the object type or don't work quite the way you wished for. Match
Properties, for example, does not match one Wall's Style or Object Properties
with others; it only matches basic Properties such as Color, Linetype, Layer and so forth.
|
Offset
- you can use this command on Walls exactly as you would on lines. The
difference has to do with the fact that you are Offsetting double or more lines and thus
the distance should be thought of as a "center-to-center" distance to avoid any
dimensional problems.
Trim - to Trim Walls you may
often find that they won't behave as regular AutoCAD objects. Two tricks that I have
found that help are to make sure you select an edge to Trim to ( like another Wall ) and
that this other object actually cuts across the Path of the Wall you want to Trim.
Extend - see comments on
Trim. This command has the same behavioral issues as Trim when it comes to Walls.
I have found on both commands, that using Grips to pull another Wall object across
the physical path, just for the editing session often works faster than trying to create
other solutions. You can also simply draw a temporary line but with both commands,
the main problems arise around this "object in the path" issue.
Fillet
- works on Walls much like with regular Lines. You can set a Radius to
create Curved Fillets between Wall that already intersect or Wall that don't. A
favorite trick among many is to use Fillet with a Radius of zero to force Walls to
Intersect and Cleanup properly. For best results, pay attention to the Graphline
position.
Chamfer
- see comments for Fillet. Note:
Use some basic Diesel code, you can actually create a Wall Match Prop's command that works
much like you would prefer. See the command line sequence for "-WallModify"
and notice the option to Match. See also ARCHIdigm's custom
PowerSTRIP for ADT with this button already added. |
| Walls for Casework
You may not have noticed, but in the Styles folder you
should find one for Casework called "Wall Styles - Casework (imperial).dwg"
or "Wall Styles - Casework (Metric).dwg". Loading any or
all of these unique Wall Styles will allow you to draw such non-wall things as
Countertops, Upper and Lower cabinetry, Islands, Bars and other similar casework.
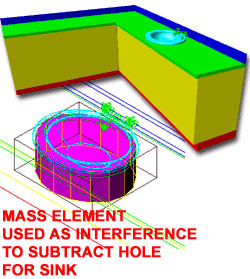 A typical Kitchen or Bathroom Countertop is nothing more
than a Wall Style with two or more components ( one for the top and one for the back
splash ) that have dimensional settings on the Components tab of the Wall Style
Properties dialogue box, that represent a countertop. A typical Kitchen or Bathroom Countertop is nothing more
than a Wall Style with two or more components ( one for the top and one for the back
splash ) that have dimensional settings on the Components tab of the Wall Style
Properties dialogue box, that represent a countertop.
By reverse engineering one of ADT's basic casework Wall Styles, you
will soon be on your way to creating your own designs. One of the problems that is
not solved for you in any of the ADT Wall Styles, however, is how to deal with Sinks and
Lavatories. Illustrated below, left, I show one of my solutions.
|

I create a simple Mass Element in the
shape of my Sink and use it as a Wall Interference Condition and Subtract
it. By Turning Off the A-Mass Layer, you don't have to see this
object. When you want to Move the sink, just turn on the A-Mass Layer and move both
the Mass Element and the Sink at the same time.
For more information and guidance on how to create your own
Kitchen Counter Wall Style, read "Liquid
Cabinets in Architectural DesktopTM |
| Wall Hatch - Insulation
Unfortunately, ADT does not come with a useful solution for
Insulation in Wall objects. Though you can use AutoCAD's Insulation Linetype, it may
prove to be more trouble than it's worth.
The best solution is to find or write a Batt Insulation
Hatch pattern and then add it to the default ACAD.PAT file for use in Wall Objects.
Below is the Hatch Pattern, written in hexadecimal code, for an insulation pattern that I
picked up years ago from some unknown source. It isn't as round as many would prefer
but it works fairly well and sure beats having no insulation at all.
To use, find the ACAD.PAT file in the Support Directory of
your ADT program and use Notepad to Edit it. Copy the Code to the right and Paste it
in at the end of the existing code, as illustrated to the right. Save the file as
acad.pat. |
 *Batt-1, Architectural Insulation
66.422,.33093,.05,.91652,.4,.17267,-.09109,.45446,-.09109,.17267,-.10911
113.578,.06907,.05,.17457,.4,.17267,-.09109,.45446,-.09109,.17267,-.10911
0, 0.06907,0.05, 0,1.0, 0.26186,-0.17457
0, 0.28729,0.95, 0,1.0, 0.26186,-0.17457
90, 0,0.20826, 0,0.43644, 0.08348,-0.91652
90, 0.21822,0.70826, 0,0.43644, 0.08348,-0.91652
90, 0.4,0.20826, 0,0.43644, 0.08348,-0.91652
90, 0.61822,0.70826, 0,0.43644, 0.08348,-0.91652 |
| To use the Custom
Hatch pattern discussed above in ADT, Edit a Wall Style and add the pattern as you would
add any other poche pattern. Batt-1 should
now be an option at the bottom of the Predefined Hatch Pattern Type.
You will probably have to adjust the Scale/Spacing value to match
the width of your Wall object and my personal preference is to use an Orientation
of Object instead of Global. |
 |
| |
|


 Walls can
be added to a drawing through several techniques including the alternate pull-down menu
illustrated to the right. In ADT 4 the primary tool for adding walls is the Tool
Palette which automatically loads Wall Styles as they are dragged in from the
Palette so this makes the task of loading styles less tedious. However, the default Walls
Tool Palette only contains a fraction of the Wall Styles that come with ADT
 ADT comes with a rather extensive library of Wall
Styles but you would never know this by looking at the default Walls Tool Palette.
Though you can use the Content Browser to add more styles to your Walls Tool Palette, you
might as well learn where these styles come from.


 In order to assign or attach a Profile as a Wall Sweep, you must first use
the WallSweep command. Once a Sweep has been attached to a Wall Object, this
Worksheet will appear as a Property.


 Cleanup Group Definitions employ
a logic that is rather easy to understand: Walls that are associated with one
Cleanup Group Definition will ignore Walls associated with another Cleanup Group
Definition. It's that simple!
  New
Cleanup Group Definition and Name it anything you want.
Now, use the Add Walls Properties Palette, illustrated
to the right, and use the Cleanup group definition
pull-down menu to see your Cleanup Group Definition Style.

 Let's look at a simple but common wall condition where you want one
wall, of exactly the same construction, to be shown as passing over or through the first
wall. Basically, this means that one will have higher priority than the other.
 Illustrated to the
right and left are the default Priority settings for ADT's Brick-4 Air-2 Brick-4 Wall
Style: 812, 805 and 800 respectively.
This wall was designed to have a structural side or simply one with a higher
priority so that when they cross, one side will run straight through. In this
design, there is also an Air Gap with a priority in the middle so that the structural side
cuts through it but the non-structural side does not.
  happens when you change the Priority of a Standard Wall Style to match that of
the Air Gap within the Brick Style.


 Illustrated to the right I show that I have chosen to modify the Plan
Display Representation of my example Wall Style. I have attached a Style
Override because I want my Wall Style to have unique Colors, Lineweights,
Hatching and so on that are very different from the default settings applied to most other
Wall Styles. Though many may argue that using Style Overrides is problematic, I
don't limit myself to that fear and find that Style Overrides are absolutely necessary to
create the types of presentation results that my office needs. The drawback to using
Style Overrides is that you limit the option for rapid Display Change of All Wall Styles
in a single swoop but as long as you know that there are Style Overrides on most of your
Wall Styles, you simply have to run through the list in the Style Manager.
 There are two ways that you can access the Object Display Properties
of most ADT objects; one way is by the Object's Style Properties ( discussed above ) and
the other way is by picking an Object, right-clicking and selecting Edit Object
Display... off the object-specific pop-up menu.
 To
many, this is where the "light goes on" in their minds about how ADT's Objects
can behave the way they do with respect to graphics. Most of the rules you ever
learned about AutoCAD's Layer techniques should apply here. If you assign a unique
color to any Component within a Wall, don't expect to change its color with the Layer
Manager.

 The Hatching tab provides the access to choosing Hatch Patterns
and control their behavior but it does not turn them On or Off and it does not provide the
means to control the Color and other Properties that you might want to work with.
These settings must be set under the Layer/Color/Linetyp tab.
 Override
Display Configuration Cut Plane - generally this checkbox is unchecked and should
remain as such unless you need to alter this centralized setting. In essence,
checking this box creates an Override on the Global Cut Plane as defined by the current
Display Configuration. Keep in mind that you can work with the Cut Plane tab at the
Object Level and at the Object Style Level but if you did need to alter the Cut Plane
Height due to an unusual Wall Condition, this it probably the more logical level to do it
at ( the Object Level that is ) because the Override would only be for the selected object
and not a whole Style. I have done this on many occasions to get the proper display
of items above and below.


 Usually the biggest problem with Wall Objects is
dealing with the question of why the "dreaded circle of death" ( Defect Maker Ø) shows up. There are numerous causes for wall
defects but the most common one has to do with
 When Walls cross in ADT the Cleanup Radius Settings don't apply since there are
no Wall Ends for the Cleanup to work from. Because of this factor, you may have to
employ a little creative ingenuity into solving Cleanup problems where Walls cross.
Illustrated to the left I show a classic example that I like to demonstrate in
class. Draw three Walls that cross each other at or close to the same point in
space. This action typically produces several Wall Errors. Though there are
other tools, by using what we now know about Cleanup Radii, all you have to do is break
one of the three Walls at the intersection so you can employ a Cleanup Radius Override to
solve the problem. It may not be a completely ideal solution but it works and you
may have to use similar tricks on other problems you encounter.
 A typical Kitchen or Bathroom Countertop is nothing more
than a Wall Style with two or more components ( one for the top and one for the back
splash ) that have dimensional settings on the