Layer
Management Toolbar
How do I get this toolbar?
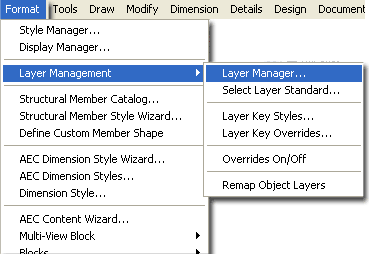
You can also acquire access to these commands from the Desktop pull-down menu. From
the Desktop pull-down menu, pick Layer Management >
and cascade to the Layer Management commands.

To access the Layer Manager, you can also type LayerManager on the command line. Type AecDwgLayerSetup to get Select Layer Standard...
The other commands can also be typed but the length of the commands becomes a bit tedious to type. To find out what the typed versions of these commands are, read the status bar while hovering your cursor over a command.
| Menu | Desktop>Drawing Setup... ( Layer Tab ) |
 |
|
| Keyboard | AECDWGLAYERSETUP or AECDWGSETUP |
I picked this button out of sequence to make the material easier to follow. Architectural Desktop utilizes its own Layer Manager to manage AEC objects and how those objects behave with respect to the layers they are "keyed" to. There are two primary parts to the Layer Manager: the Layer Standard and the Layer Keys.
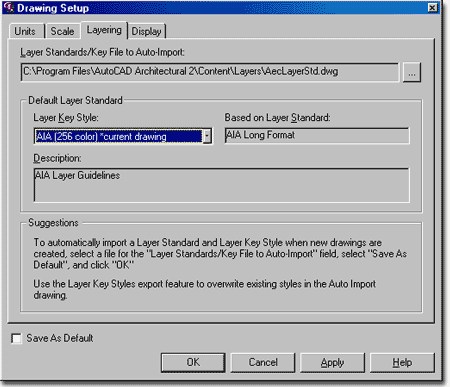
The Layer Standard and the Layer Keys are assigned to your drawing on the Drawing Setup dialogue box illustrated to the right. The Layer Standards/Key File to Auto-Import: text box specifies which drawing file contains the Keys that affect how your objects get organized with respect to layers. Since the Layer Key Styles are stored as data in a drawing file and not some other data format, you need to specify the drawing file first. The default set of Layer Standards reside in ADT's Layer folder under Contents.
From the Layer Key Style: drop-down list you can choose from among several industry layering standards including Building Standard (BS1192), American Institute of Architects (AIA), German DIN 276 and more depending on how you installed ADT. You can also choose to have ADT ignore these standards and keys by choosing <Current Layer>, which will put every object on the current layer. A better solution if you don't want to use any of these standards, is to choose Standard, which will key the ADT objects to layers by their object name; e.g., Door, Wall, Wind, etc.
Much of this Guide and Exercises will be based on the default AIA Long Format Layer Standard and Layer Key Style.
Note:
Isn't it interesting that this information comes form a drawing file. This is how
most of the information ADT uses is stored; in .dwg files; from Door Styles to Layer Keys.
And, guess what, this is how you will save your personal ADT customized settings:
in drawing files. As any savvy AutoCAD user soon discovered, there really is no
difference between a template file and a drawing file (other than three extension
characters - .dwg vs. .dwt ); now, this is more true than ever.
| Menu | Desktop>Layer Management>Layer Manager... |
 |
|
| Keyboard | LAYERMANAGER |
The Layer Manager, though capable of numerous tasks, provides access to two primary tools used within ADT to control AEC object Layer behavior: Layer Standards and Layer Keys
![]() The first button
on the Layer Manager toolbar, left, is for the current drawing's Layer Standard;
a set of rules by which the names of layers are controlled; e.g., A-WALL.
The first button
on the Layer Manager toolbar, left, is for the current drawing's Layer Standard;
a set of rules by which the names of layers are controlled; e.g., A-WALL.
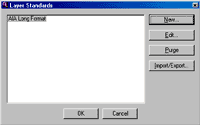
If you pick on this button, you will get the Layer Standards dialogue box shown below. From this dialogue box you can create your own office standard, edit an existing standard, import and export other standards.
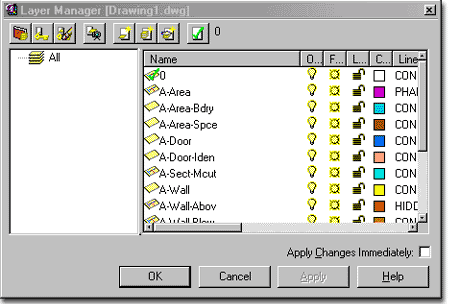
 On the Layer Standard
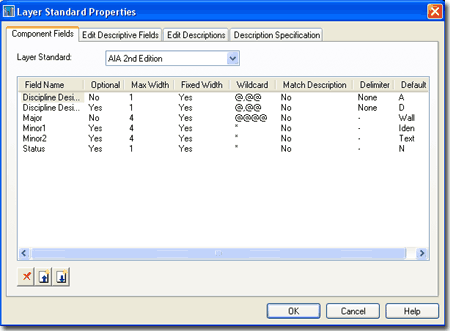
Properties dialogue box, shown right, you will find numerous tabs and drop-down
lists to help you define your office standard.
By default, Architectural Desktop will use the AIA Long Format; even when you start a drawing from scratch. This can be changed to any of the choices discussed above by choosing another Layer Key Style and then checking the Save as Default check box on the Layer tab of the Drawing Setup dialogue box.
The Layer Standard Properties dialogue box for the AIA Long Format is illustrated to the right. The Component Fields tab, also illustrated to the right, shows the basic concept behind what a Layer Standard does: provides the structure or rules for how naming of layers must abide.
For a more detailed journey through the process of creating your own layer standard, see -> Layer Manager
| Menu | Desktop>Layer Management>Layer Key Styles... |
 |
|
| Keyboard | LAYERKEYSTYLE |
![]() You can also access the Style Manager from the second button
on the left of the Layer Manager.
Though this is the Style Manager, notice that it has been "filtered"
for Layer Key Styles: a databases of layer names, colors,
linetypes, lineweights, etc., directly tied to ADT's AEC objects (like WALLS). These Layer Keys are bound by the rules set by
the Layer Standard, so if your Layer Standard requires all layers to begin with a single
letter then that is how the Keying must be organized.
You can also access the Style Manager from the second button
on the left of the Layer Manager.
Though this is the Style Manager, notice that it has been "filtered"
for Layer Key Styles: a databases of layer names, colors,
linetypes, lineweights, etc., directly tied to ADT's AEC objects (like WALLS). These Layer Keys are bound by the rules set by
the Layer Standard, so if your Layer Standard requires all layers to begin with a single
letter then that is how the Keying must be organized.
You can create Layer Keys that don't follow the Layer Standard but that would be for rather unusual cases and not the normal condition.
The default set of Layer Keys cannot be deleted; i.e., the existing set of AEC objects must have keyed layers to function. You can, however, modify these layers according to your own Layer Standard, color choices, linetypes, etc. And, you can create new Layer Keys for your own AEC objects, such as blocks, multiview blocks and even custom command sequences. You can also create and use separate sets of Layer Keys within a single drawing; e.g., you could use a Shell or Exterior Wall Layer Key set for the shell of your building and switch to another Layer Key set for Interior objects.
You chose your Layer Standard and Layer Keys on the Desktop pull-down menu >>Drawing Setup…>>Layering tab (see above).
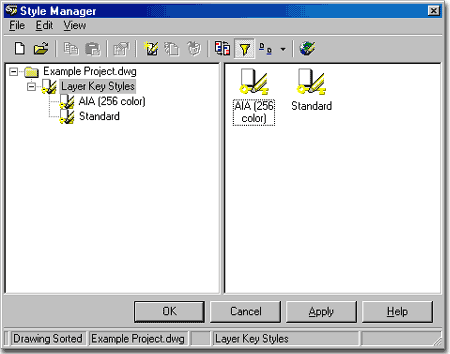
Since the Style Manager is a Window, you can use Window based techniques to work with graphic objects; try right-clicking on your mouse for access to options. To copy a Layer Key Style, try holding down the Ctrl key while dragging and dropping a Layer Key Style icon in the right pane ( look for the familiar plus sign in the lower left of the icon ).
![]() << Double click an icon.
<< Double click an icon.
If you are one of the fortunate who have already been using a layer standard based on the
BS1192 or AIA Long Format then the conversion should be relatively painless. In some
cases, all you have to do is edit the odd color choices that come with this default Layer
Key Style so your plotting will not be disrupted.
Rather than editing one of the default Layer Key Styles ( like the AIA (256 color) ), I suggest using the Copy... option on the Style Manager window, illustrated above right, to edit and save a copy of this default style. This will allow you to play around and make mistakes without loosing one that actually works. Once you have named and modified your own Layer Key Style, you can make it current on the Layering tab of the Drawing Setup dialogue box - discussed above.
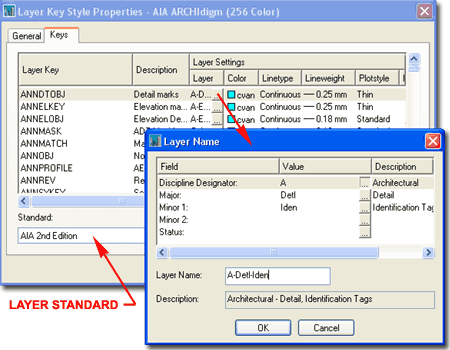
For more on working with the Layer Key Style Properties see this article in ARCHIdigm's Lounge - Architectural Desktop Layer Manager and Keys
| Menu | Desktop>Layer Management>Layer Key Overrides... |
 |
|
| Keyboard | LAYERKEYOVERRIDE |
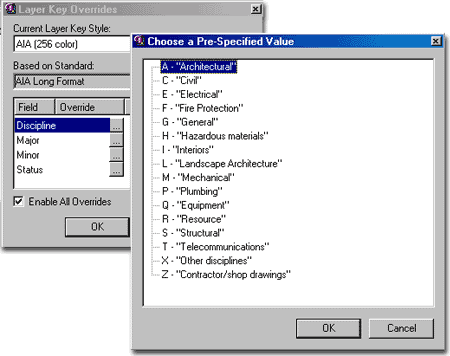
![]() You can also
access Layer Key Overrides by the third button, from left, on the Layer Manager. Layer Key Overrides
provides the ability to temporarily define a new layer key for the current objects you
wish to draw. In other words, let's say you
are drawing walls and the key for them is A-WALL, but now you want to draw interior walls. The Layer Key Style is not designed to see the
difference between interior or exterior walls, all it sees is the AEC object type defined
as WALL. In order for you to get your
interior walls to reside on another layer, say A-WALL-INTR, you can use the Layer Key
Overrides to define a new current layer based on the current drawing's Layer Standard. Once you have defined this new override, any AEC
object you draw will reside on this layer (or permutation of this layer) - so be careful
because you could end up with plumbing on this layer too.
You can also
access Layer Key Overrides by the third button, from left, on the Layer Manager. Layer Key Overrides
provides the ability to temporarily define a new layer key for the current objects you
wish to draw. In other words, let's say you
are drawing walls and the key for them is A-WALL, but now you want to draw interior walls. The Layer Key Style is not designed to see the
difference between interior or exterior walls, all it sees is the AEC object type defined
as WALL. In order for you to get your
interior walls to reside on another layer, say A-WALL-INTR, you can use the Layer Key
Overrides to define a new current layer based on the current drawing's Layer Standard. Once you have defined this new override, any AEC
object you draw will reside on this layer (or permutation of this layer) - so be careful
because you could end up with plumbing on this layer too.
Another example of when to use a Layer Key Override is when you are designing multiple floors on the same drawing (not something I recommend, but…). Let's say you have drawn all of your first floor and now you want all of the same layers for the objects you are going to begin drawing on the 2nd floor. If you use the Layer Key Overrides and specify that you want all layers to begin with the number 2, all of the objects will land on their "keyed" layers prefaced by the number 2; i.e., 2-WALL or if you have another Layer Standard, it might be 2-A-WALL or A-WALL-2.
Layer Key Override On/Off Switch
| Menu | Desktop>Layer Management >Overrides On/Off |
 |
|
| Keyboard | none |
This command simply turns On
or Off any active Layer Key Overrides that you may have set. This toggle is only available on the Layer Manager toolbar via the
Layer Key Overrides button; look for the Enable All Overrides check box in the lower right
corner on the Layer Key Overrides dialogue box.
What to do when you are just drawing regular non-ADT
objects:
Since ADT has a limited number of object types, it can't possibly cover all of the
conditions that exist in the "real" world. At times you will have to rely
on the traditional method for drafting in AutoCAD. Unfortunately, there are no
native tools that allow for Layer Automation based on what your lines are representing;
i.e., walls above, property-line, etc. Though LISP or other routines can be
developed to automate such problems, the basic solution is to use the Layer Manager's
Create Layer button. This will allow you to create a layer that must be based on the
Layer Standard so it would be difficult to make a mistake in naming convention. If
you know the exact name, you can also just use the regular Layer Properties Manager
dialogue box.
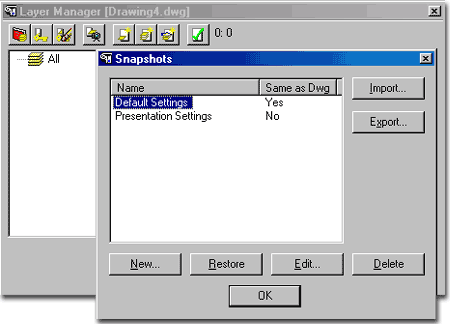
![]() Snapshots, the fourth button from left on the Layer Manager
toolbar, are similar to AutoCAD's Layer States or the Express Tools' Layer Manager.
Snapshots offer a unique option that you will not find on these other layer tools; the
ability to edit a Snapshot after it has been captured.
Snapshots, the fourth button from left on the Layer Manager
toolbar, are similar to AutoCAD's Layer States or the Express Tools' Layer Manager.
Snapshots offer a unique option that you will not find on these other layer tools; the
ability to edit a Snapshot after it has been captured.
Snapshots taken at one point in a drawing will only contain layers at that time and may not restore properly at a later time when numerous changes in layers may have occurred.
The Edit... button opens the Snapshot Edit dialogue box which looks much like the Layer Manager dialogue box, but offers very limited selection capabilities; i.e. you cannot use Ctrl or Shift to select layers.
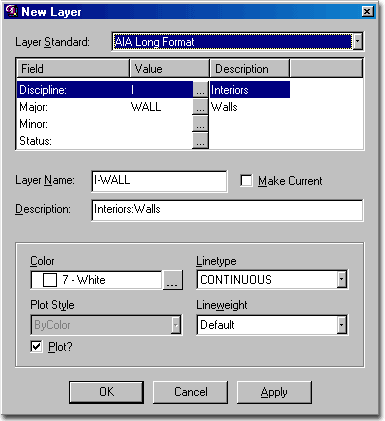
![]() The fifth button, from left on the Layer Manager toolbar, is for creating New
Layers by the rules of the current Layer Standard. This is not a new Layer
Key, but simply a new layer for the current drawing. You could create this layer
with the regular AutoCAD Layer Properties Manager and get the same results. This
dialogue box simply makes it easier to make new layers that conform to the standards set
in an office.
The fifth button, from left on the Layer Manager toolbar, is for creating New
Layers by the rules of the current Layer Standard. This is not a new Layer
Key, but simply a new layer for the current drawing. You could create this layer
with the regular AutoCAD Layer Properties Manager and get the same results. This
dialogue box simply makes it easier to make new layers that conform to the standards set
in an office.
If you are looking for information on the other buttons on the Layer Manager, I will try to cover them in the future. I am leaving them for now because I believe they are pretty easy to understand and use.
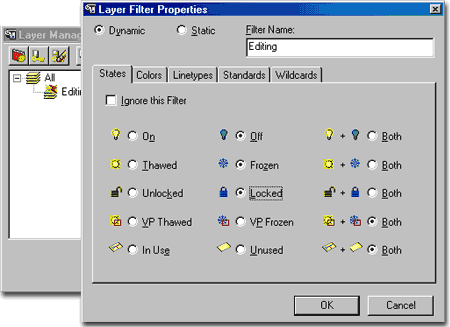
![]() The Filter button, sixth from
left on the Layer Manager toolbar, opens
the Layer Filters Properties dialogue box, illustrated to the
right. Though organized a bit differently and with a few more options, these filters
are much like the standard AutoCAD Layer Filters.
The Filter button, sixth from
left on the Layer Manager toolbar, opens
the Layer Filters Properties dialogue box, illustrated to the
right. Though organized a bit differently and with a few more options, these filters
are much like the standard AutoCAD Layer Filters.
Dynamic - allows the named filter to incorporate any new layers created after the filter was saved.
Static - will not filter any layers created after the filter was saved.
![]() The Layer Manager Groups button, seventh from left
on the Layer Manager toolbar, creates a Group Icon in the left pane much
like Explorer creates a new folder. You can type in a name or rename it by picking
on it twice or by selecting it and using the right-click pop-up menu to select Rename.
The Layer Manager Groups button, seventh from left
on the Layer Manager toolbar, creates a Group Icon in the left pane much
like Explorer creates a new folder. You can type in a name or rename it by picking
on it twice or by selecting it and using the right-click pop-up menu to select Rename.
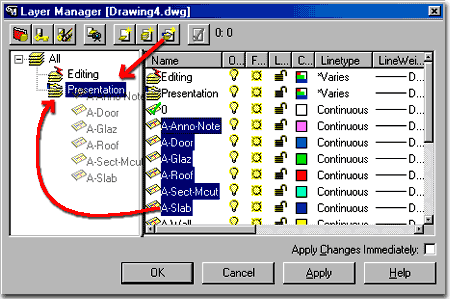
To put a set of layers within a Group, select them from the All list and drag-n-drop them from the right pane over to the left pan - as illustrated. This does not move the layers but just copies a reference of them and how you want them set.
Lets say, for example that you find yourself constantly turning on and off a specific set of layers and want a faster way to do it; this is one solution. You can create a Layer Group, drag-n-drop the layers you may want on and off and now use the Group to quickly select the whole set. To work with a Group, pick on the Group icon/name and right-click on your mouse to use such options as the Visibility controls - see below right.
![]() The Layer Manager Current
button, eighth from left on the Layer Manager toolbar, is as simple as they come; select a
layer and pick on this button. You can also select a layer, right-click on your
mouse and select Make Current.
The Layer Manager Current
button, eighth from left on the Layer Manager toolbar, is as simple as they come; select a
layer and pick on this button. You can also select a layer, right-click on your
mouse and select Make Current.
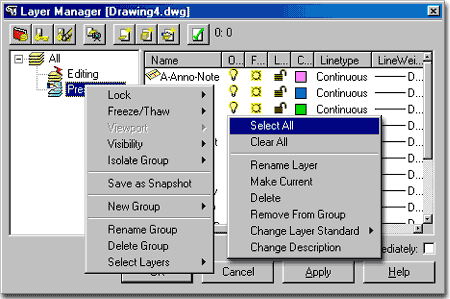
Illustrated to the right, are the two right-click pop-up menus you will see when right-clicking in the left pane and the right pane. Not all options will be available when you right-click because some options only affect Groups for example.
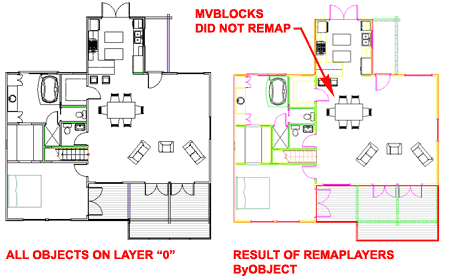
This tool helps fix blunders or Layer Key changes, like different company standards. Unfortunately it doesn't work on everything but for those objects that it does work on, it's a major time saver. To test this command, take a bunch of your ADT objects, like Walls, Doors, Windows, Roofs, etc. and assign them all to one or more odd Layers; like layer 0, for example. Select Remap Object Layers, pick all of the off-layer ADT objects, and type "O" ( for byObject ) on the command line. You now see all or most of your off-layer objects jump to the appropriate layers as assigned by the current Layer Standard and Layer Keys.
Command: _AecRemapLayers
Select objects to re-layer: <Select your objects>
Select objects to re-layer:
Enter a Layer Key or [?/byObject]:O
Command:.
Typing in a Layer Key name - will work on all objects but also places (keys) all selected objects on a single layer.
? - provides you with a list of Layer Keys currently available so you can type one in.
byObject - maps selected objects to current keys.
