 Architectural Desktop 3 - Kitchen Cabinets eKIT
INSTRUCTIONS
OVERVIEWContents:
Greetings ---- Getting Started ---- Using this KIT ---- Reporting Problems
| Architectural Desktop 3 - Kitchen Cabinets eKIT INSTRUCTIONS OVERVIEWContents: Greetings ---- Getting Started ---- Using this KIT ---- Reporting Problems |
| 1Greetings | .1-1 INSTRUCTIONS | ||||||||||||||||||||||||||||||||||||||||||||
| Introduction Thank you for purchasing ARCHIdigm's Kitchen Cabinets eKit. We hope it proves beneficial both in productivity and presentation. If you find that we have overlooked a major kitchen element or wish to make a recommendation for improving this kit, please feel free to contact us. We are also happy to receive contributions of Styles and objects if you have them and we will certainly credit you and/or your organization for the contribution(s). Kitchen Cabinets 4 eKit for Architectural Desktop 2004 is now Available. Kitchen Cabinets eKit for Architectural Desktop 3 - 3.3 is now included with Kitchen Cabinets 4 eKit. |
 |
||||||||||||||||||||||||||||||||||||||||||||
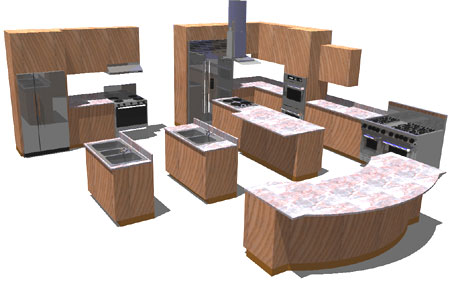
| Overview The Kitchen Cabinets eKit comes from our personal efforts to maximize the 3D output of ADT while working at the rate of traditional 2D AutoCAD drafting. What we focused on was the process of getting linework in 2D Construction Documents that are equivalent to simple Line and Pline outlines but with the added benefit of getting good Elevations, Perspectives and 3D Renderings. By using this formula, we compromised here and there to maximize the return on using these Styles and you may find that some solutions are not ideal for your needs; e.g., actual cabinet layouts with doors and drawers. ADT already offers solutions for drop-in cabinets that have drawers and doors but since these objects are Blocks, they force the user to consider dimensions at a point in time that may be far too early to make such decisions. In the case of custom cabinetry, the drop-in solutions don't work so using Wall Styles has proven to be the ideal solution, for now, in our office and we hope this technique proves to work for you and your office as well. There are two primary object solutions in this kit: Styles and Multi-view Blocks. For the cabinets, we have designed Wall Styles that offer a multitude of sizes and features such as variable lengths, heights, back splashes and upper cabinets. For cabinets and countertops that are extremely custom, you can utilize Wall Modifiers to convert Pline outlines into the new shape you desire ( see cab base - body button ). For unique cabinet ends, you can utilize Wall Endcaps that also use Pline outlines ( see cab base - endcap button).. Though we intended to focus on the cabinets in this kit, we have also added Multi-view blocks that have either been designed in our office to match popular products like Wolf, Sub-zero and Viking or are modified versions of those that come by default with ADT. For other ADT Blocks, Subscribers can visit the Content area of the OSMOSIS website to download other offerings. |
 |
||||||||||||||||||||||||||||||||||||||||||||
| 2Getting Started | 2-1 INSTRUCTIONS | ||||||||||||||||||||||||||||||||||||||||||||
Download Files
Included with this KIT you will also find a Rendering Folder containing a sample Rendering Template File and sample Materials that are designed to demonstrate how easy and how quick it is to create great looking renderings with little to no additional work. Put the Rendering Template File anywhere you can gain quick access to it and copy the material files to the "Textures" folder under Architectural Desktop 3.3 Once you have added the Kitchens Folder to your ADT Content Folder, you should find that the DesignCenter will now see a new Content Folder - as illustrated to the right. From the Kitchens Folder, you can now drag-n-drop as with any other ADT content items. In the Base Cabinets Folder you should find various Cabinet Styles that can be activated by drag-n-drop or double-click. We have also included Tools to Modify the Ends and Edges of some of the Cabinets. If you do not wish to Add the Cabinets based upon our default values, simply drag-n-drop a Cabinet Style into your drawing, hit Esc and use the WallAdd command to draw the Cabinet with your own settings. Use the WallModify command to make changes to any of the Cabinets. Use WallStyle to access the Cabinet Styles. |
|
||||||||||||||||||||||||||||||||||||||||||||
| 3Using the Kit | 3-1 INSTRUCTIONS | ||||||||||||||||||||||||||||||||||||||||||||
Cabinet
Styles
This Kit was designed to be used through the DesignCenter in ADT but since it is basically comprised of Wall Styles and Multi-View Blocks, you can employ any means you see fit to use this KIT. Illustrated to the right is an example of how the Cabinet Styles appear, once loaded into a drawing file, in the Wall Style Manager Window. In many cases, we tend to copy Cabinets from one design into another because they have unique settings that we don't want to bother repeating. The Copy/Paste method of importing ADT Styles is valid. You can also use the Import feature of the Style Manager to access other drawing files.
|
|
||||||||||||||||||||||||||||||||||||||||||||
Adding Cabinets
Since these Kitchen Cabinets are actually Wall Styles, you can use the Add Walls dialog box to place them in your drawing. All of the cabinet styles in this Kit come with a set of pre-configured values such as a Cleanup Group, Width, Height and Justification but any style that has the prefix "X" in the Style Name will allow for variations of these settings.
|
 |
||||||||||||||||||||||||||||||||||||||||||||
| Adding Upper Cabinets Upper Cabinets are added in much the same way as the base cabinets; by tracing along the inside back wall as illustrated below right. With Upper Cabinets, each style represents a different preset base height but all are adjustable in full height and width. This means that if you select the "kitchen_upper_cab_60_x" style, the cabinet will be 60" above the finished floor or 24" above a typical 36" countertop. By default the Upper Cabinets have been set to display with "Hidden2" Linetype in Plan View.
|
 |
||||||||||||||||||||||||||||||||||||||||||||
Adding Sinks
By default ADT uses Multi-View Blocks for Sinks and Faucets so we have not changed anything about that technique. Instead, we modified a few of the default ADT MvBlocks to perform more like what we felt they should and added a new feature that will allow you to subtract the sink holes from our Cabinets. The sinks in this Kit automatically come in at 36" A.F.F. but do not automatically subtract the holes from the base cabinets. To Subtract a Sink Hole from a base cabinet, simply execute the "WallInterference" command and "Add", Select the Cabinet, Select the Sink and then use the Subtract option. To view the results of this "subtraction" make sure to Turn Off the "Defpoints" layer because we used that layer to create a sink hole Mass.
|
 |
||||||||||||||||||||||||||||||||||||||||||||
| Adding Custom Range
Hoods A couple of the Range Hoods come with an extra Multi-View Block for the Chimney so you can run it all of the way up to any ceiling height. The default height of the chimney is set to 1" so use the "z" scale value field in the Multi-view Block dialog box to set the height you need; e.g., 36 for 36" of height.
|
 |
||||||||||||||||||||||||||||||||||||||||||||
| Adding Doors and Drawers
- the Bonus Styles
The process of Adding Doors and Drawers is identical to that of Adding Doors to any Wall object. Once the Door has been Anchored to the Cabinet, you can Move it and Modify its Width and Height as you see fit. If the Door Anchors to the correct outer face of the cabinet you are fortunate but in most cases, the Door will Anchor to the Center or an extreme outer position. To remedy an improperly Anchored Door, Select the Door, right-click on your mouse and Select the Door Properties menu option. On the Door Properties dialog, illustrated to the right, look for the Anchor tab. Using the Position Within (Y) options, you can adjust any of these Door Styles to sit exactly where you want them relative to the Cabinets they are Anchored to. Unfortunately there is no single setting that fixes all of the various Door and Cabinet combinations so you will need to use trial an error to get it right. For the Lower Cabinets, setting the Doors to "Right Edge of Curve Width" and "Front" often does the trick but Drawers and Upper Cabinet Doors require other little adjustments with the Distance Value. The good news is that once you have one Anchored and Positioned correctly, you can copy it along the Cabinet without having to tinker with these Anchor settings. In the DesignCenter, illustrated to the left, you should find various upper and lower Doors. With each type you should also find that you get the Single Hinged Style allowing you to change the default Double Hinged Doors after placement. When mixing odd sizes, simply use the Door Modify dialog to change the Width or Height to match your needs. |
 |
||||||||||||||||||||||||||||||||||||||||||||
Custom Modifications
- EndCaps
All of our Cabinet Styles come with Standard Endcaps that cut the Cabinets Square with no overhangs but you can apply some of our custom Endcap Styles or create and Apply your own Profiled Endcap Styles. To Apply one of our pre-defined Endcap Styles, simply use the cabinet endcap icon in the DesignCenter, Select a Cabinet, Select a point on the end to change and Select a matching Endcap Style. Though you can apply non-matching Endcap Styles to Cabinets, the results are often undesirable.
|
 |
||||||||||||||||||||||||||||||||||||||||||||
Custom Modifications
- Body Modifiers
All of our Cabinet Styles come with Standard Edges but you can use a Pline shape to change any of the Cabinet Components by using the WallModierConvert command to Add your Pline to a specific Cabinet. Illustrated to the right is an example of how a simple Pline Arc was drawn directly on top of the Plan View of a Cabinet and then used as a "top" Component Modifier to create a curved cabinet top. If you wish to modify more than one component, simply draw Pline shapes for each of the components, taking into account the Offset distance you may wish to maintain and then Add these one at a time for each corresponding Component ( base, cab or top ). |
 |
||||||||||||||||||||||||||||||||||||||||||||
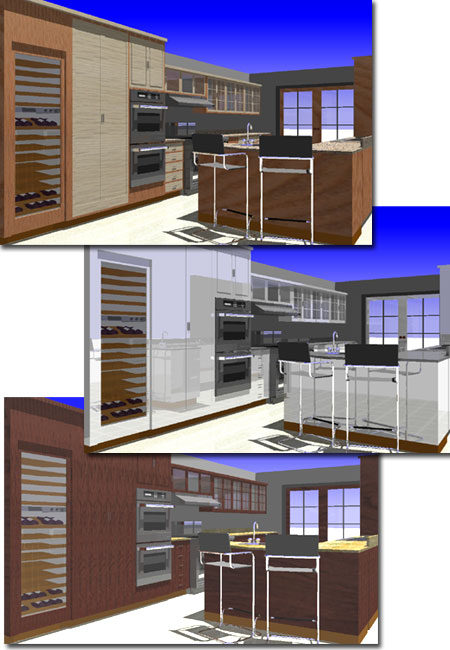
Rendering
A Rendering Template File has been included with this KIT and all you have to do is Xref your Kitchen Design into this Template file to get instant results. In this Rendering Template File, materials have already been configure to automatically map to the color assignments we set for the various objects and styles within this kit so sinks will automatically render as aluminum and cabinets will automatically render as a generic wood. The great thing about the rendering template file system is that you can modify it, save it with a unique name and use it to generate a kitchen rendering that uses completely different colors and materials; i.e, in one rendering you could have marble countertops but in another you could have ceramic tile countertops. Note:
|
 |
||||||||||||||||||||||||||||||||||||||||||||
Materials
For all of the objects and styles in the this Kit, we have assigned default color values that were designed to work together with a default material map. The system we have employed here is actually part of a larger color system that we have been working on for a couple of years now. You can see the evolving color chart as it applies to ADT by looking for the "Aec Object Style Colors" chart on the Cover Page for the ADT Development eGuide and the ADT Presentation eGuide. Illustrated to the right I show what the Materials dialog box will look like when you work in one of our Rendering Template Files. The list of "DEF_*" materials indicate the default materials we have assigned to the Colors within the Multi-View Blocks and Object Styles that come with this Kit. You should find that there are more materials than we have used because we are continually adding materials in an effort to create a complete package that will cover everything from Foundations to Skies. You can use any of these materials to replace those that we have assigned by default and create completely different rendering results. Illustrated to the right I show the four basic steps required to change a default material mapping. 1) Find the Color Number assigned to the Multi-View object or Object Style Component and highlight it under the "Select ACI" column. 2) Use the Detach button to remove the default mapping assignment. 3) Find another Material in the "Select a Material" column and highlight it. 4) Use the Attach -> button to map the new material to the current Color. When you Render your scene again, you should see a new material in place of the previous one. If you wish to use a material that is not in the Default list, you can use the Materials Library... button on the Materials dialog box to Find and Import a material from AutoCAD's Texture Folder. |
 |
||||||||||||||||||||||||||||||||||||||||||||
| 4Reporting Problems | 4-1 INSTRUCTIONS | ||||||||||||||||||||||||||||||||||||||||||||
| BUY | Purchase the latest Kitchen Cabinets eKit to acquire this version as well. Newest version includes all older versions. | ||||||||||||||||||||||||||||||||||||||||||||
| Your
Job This Kit was developed first to serve our personal drafting, design and presentation needs and secondly to be an equally valuable asset in your toolkit for ADT work. This means that though we have done our best to remove all the bugs, there are likely to be some odd things that we just never encountered or thought about. If you find a bug or would like to recommend an improvement, please feel free to inform us at the following e-mail address: |
|||||||||||||||||||||||||||||||||||||||||||||
© Copyright 2003 - 2004 ARCHIdigm. All rights reserved.
spell checked on Feb. 20, 2003
 The basic typical kitchen cabinet, "kitchen_base_cab_x"
has been designed so you can change the Width to any value that you may need and still get
a typical base cabinet result. If you change the Height of this cabinet, you will
control the height of the back splash which has been set, by default, to 4" above the
countertop. If you increase the height to above 3'-4" (40") the backsplash
will grow to that height. If you decrease the Height value to below 3'-4" the
backsplash will shrink and ultimately disappear. Should you reduce the Height to
below the fixed countertop height of 36", the countertop will disappear. The
Justification, Baseline, has been set to allow you to trace, in plan view, along the
inside wall; i.e., at the back of the cabinets.
The basic typical kitchen cabinet, "kitchen_base_cab_x"
has been designed so you can change the Width to any value that you may need and still get
a typical base cabinet result. If you change the Height of this cabinet, you will
control the height of the back splash which has been set, by default, to 4" above the
countertop. If you increase the height to above 3'-4" (40") the backsplash
will grow to that height. If you decrease the Height value to below 3'-4" the
backsplash will shrink and ultimately disappear. Should you reduce the Height to
below the fixed countertop height of 36", the countertop will disappear. The
Justification, Baseline, has been set to allow you to trace, in plan view, along the
inside wall; i.e., at the back of the cabinets. Though we don't make a habit of using these Cabinet Styles for the
final Construction Documents, there are times when a few Doors and Drawers would really
help the presentation or even interior elevations so we came up with a set of Door Styles
that can do the trick. The problem with using Doors in Wide Wall Styles is that they
usually don't Anchor to the exact outer edge location that you would want for a cabinet so
you will need to do a little extra work to use these styles effectively. We
therefore consider these Styles more of a Bonus feature than a true reliable and
easy-to-use solution. In other words, of you want a simple fast and easy solution
for Doors and Drawers, this isn't it.
Though we don't make a habit of using these Cabinet Styles for the
final Construction Documents, there are times when a few Doors and Drawers would really
help the presentation or even interior elevations so we came up with a set of Door Styles
that can do the trick. The problem with using Doors in Wide Wall Styles is that they
usually don't Anchor to the exact outer edge location that you would want for a cabinet so
you will need to do a little extra work to use these styles effectively. We
therefore consider these Styles more of a Bonus feature than a true reliable and
easy-to-use solution. In other words, of you want a simple fast and easy solution
for Doors and Drawers, this isn't it. correct but you still don't see materials, you
may not have the default Material Library that comes with AutoCAD and Architectural
Desktop. You will need to get them from your Installation CD. The default
materials reside in a folder named "Textures" and this folder should be under
the AutoCAD or Architectural Desktop's location ( under Program Files on your computer ).
correct but you still don't see materials, you
may not have the default Material Library that comes with AutoCAD and Architectural
Desktop. You will need to get them from your Installation CD. The default
materials reside in a folder named "Textures" and this folder should be under
the AutoCAD or Architectural Desktop's location ( under Program Files on your computer ).