PART 4
WALL TOOLSContents:
Wall Tools Access ---- Wall Modifiers ---- Wall Endcaps ---- Wall Helpers ---- General Working Tools
|
PART 4 WALL TOOLSContents: Wall Tools Access ---- Wall Modifiers ---- Wall Endcaps ---- Wall Helpers ---- General Working Tools |
| 1Wall Tools Access | 1-4 WALL TOOLS | ||||||||||||||
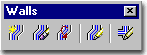
| Wall Tools Toolbar How do I get this toolbar? You can also acquire access to some of these commands from the Alternate Design pull-down menu. From the Design pull-down menu, pick Walls > and cascade to the Wall commands. This toolbar is an optional tool and is not needed to use this guide but may help. |
 |
||||||||||||||
Walls Toolbar |
 |
||||||||||||||
Wall Tools Pop-up Menu
On the command line, you can type "WallProps" or "-WallModify" to access the basic set of editing options for Wall Objects but you can also type in command names for the list of Modification Tools discussed here; such as "WallModifierAdd", "RoofLine", "FloorLine", "WallJoin" and so forth. When using the right-click pop-up menu on Wall Objects, you may notice that the cascading menus offer more or less options depending upon the modifications that have already been done to the selected Wall Object. In most cases, the extra option offered after a modification has been made is the "Edit In Place" tool that will allow you to make changes to the modification as it resides within the Wall. This can save time since you can skip such tasks as Profile creation and redefinition every time you need to make changes in the design. You can see the total command line list in the ADT 2004 User Guide from the Help pull-down menu. In both sources, you will need to go to the command list at the conclusion of the chapter covering a specific tool. A good solution for improving speed is to create ADT based Aliases; use the Express Tools Alias Editor. Below is the command line read-out for "-WallModify": Command: -WALLMODIFY |
 |
||||||||||||||
| 2Wall Modifiers | 2-4 WALL TOOLS | ||||||||||||||
Add Wall Modifier
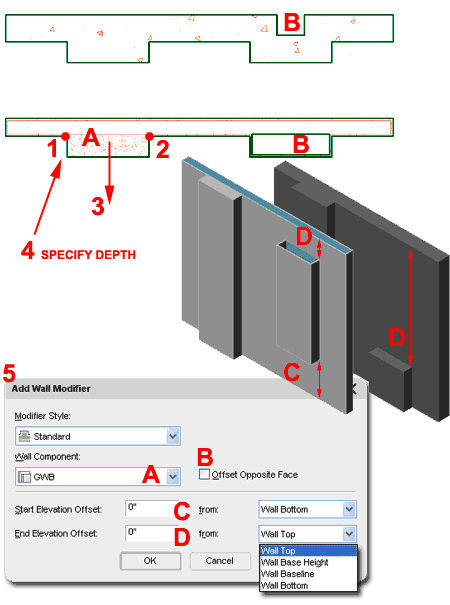
Wall Modifiers define protrusions, intrusions, niches, fluctuations, variations and other wall anomalies by defining points on the Wall, based on mathematical numbers or by use of Wall Modifier Styles. There are several ways to create and modify Wall Modifiers and the choice of which technique you may decide to employ may vary according to the particular design problem or general user preference. Illustrated to the right I show two Wall Styles with basic Modifiers and the results they have on these Styles. It should be noted that in many cases with Wall Styles that have Components such as Gyp. Board, a Modifier may well produce illogical design results such as super wider Gypsum Board (see item marked 'A'). In such cases, two modifiers may be needed: one for the studs and one for the Gypsum Board. The best way to use the Add Wall Modifier command, is in plan view. The first task is to pick a Wall Object. Then, pick two points ( 1 and 2 ) that define where on the wall you want a modifier, pick on the side ( 3 ) of the wall you want the modifier on, specify the Depth ( 4 ) of the Modifier and use the Add Wall Modifier dialog (automatically pops up) box ( 5 ) to define the remaining options for a wall modifier. On the Add Wall Modifier dialogue box, lower right, you can select a Modifier Style, select a Component Name, Offset Opposite Face of the wall and make vertical ( Z-axis ) constraints (see image, right). For general Wall Modifiers added in the manner described here, the Standard Modifier Style is typically a suitable option for the Style as long as no one redefines it. For the Wall Component ( A ), you may need to specify which component you want to affect. In the case of multiple components, you may have to run through these steps with proper offsets in order to product accurate results. The Offset Opposite Face ( B ) checkbox can be used to affect the opposite side in single Component Wall Styles or create cavities in multiple Component Wall Styles. The Start and End Elevation Offset values can be used to control the Vertical position of a Wall Modifier relative to the four "from" positions. You may also use negative values to achieve such results as " -24" from Wall Top" so when the Wall is adjusted in Height, the Modifier will always stop 24" from the Top. |
 |
||||||||||||||
Wall Modifiers - Modify
To access the Wall Modifiers dialog, use the Properties Palette, illustrated to the left, and look under the Worksheets category for Plan modifiers. Note: when looking for Worksheets, make sure that you do not have more than one Wall Object selected since you will not see any Worksheets if two or more Wall Objects have been selected. On the Wall Modifiers dialog, you can remove existing Modifiers, Add new ones or simply modify the dimensions of any that are listed there. Note: |

|
||||||||||||||
Remove Wall Modifier
|
This simple to use command queries you to select a Wall Modifier, provides you with the option to keep the Modifier shape as a Polyline and then removes the Wall Modifier. Keeping the Modifier shape as a Polyline is a good idea if it is something you might want to use but if you already have it defined as a Wall Modifier Style, then you probably won't need it. |
||||||||||||||
Convert Polyline to Wall Modifier
For many AutoCAD users who have plenty of experience drawing things with Lines and Plines, the option to draw Wall Modifiers with Plines is basically an innate skill and may thus be your best solution for this type of work.
On the Add Wall Modifier dialog box illustrated to the right, you do not need to make any changes unless you decide that the Wall Component is incorrect or that you wish to alter the Vertical dimensions of the Wall Modifier. These settings are identical to those found on the Wall Modifiers dialog discussed above. Note: |
|
||||||||||||||
Wall Modifier Styles
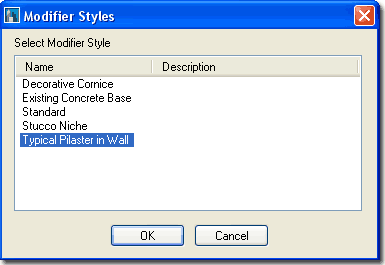
Under the Wall Modifier Styles category in the Style Manager Window, illustrated to the right, you can Create New Modifier Style Names, Modify Existing Names and Shapes or Create entirely New Names and Shapes. To create a New Wall Modifier Style Name, simply right-click on your mouse in the right pane of the Style Manager Window and use the New pop-up menu option. Once you have typed in a Name for your new Wall Modifier Style Name, you can use this Name wherever you are prompted for a Wall Modifier Style Name but you can go a step further and define the Shape as well.
Existing Wall Modifier Style shapes can be redefined at any time in a project by using the Set From... option and thus you have a tool similar to that of redefining existing Block Names.
|
 |
||||||||||||||
Insert Wall Modifier Style as Polyline
One way to make changes to an existing Wall Style Modifiers is to use the Insert Wall Modifier Style as Polyline to get the original Polyline shape back. After inserting this Polyline, you can use common AutoCAD commands, such as Stretch, to make changes to it. Then, use the Set From... option of the Styles Manager to update the Wall Style Modifier - discussed above. |
 |
||||||||||||||
| 3Wall Endcaps | 3-4 WALL TOOLS | ||||||||||||||
Overriding Wall Endcap Styles
Wall Endcaps are basically Wall Modifiers
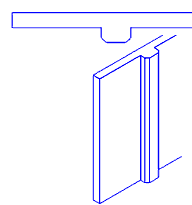
for Wall Ends and just like Wall Modifiers, Wall Endcaps are based on Wall Endcap Most Walls will employ a simple "Standard" Endcap Style which is just a straight line but a good number of the special Wall Styles that come with ADT have unique Endcap Styles that will be inserted into your drawing when you use them from the Palette or other means. In order to use the Override Wall Endcap Style command, you will need another Wall Endcap Style than that which is already assigned to the current Wall Style or Object. Below we will look at how you can create your own Wall Endcap Styles. In the illustration to the left I show how two non-closed Polylines are required to produce a common footing for a retaining wall scenario. By drawing a Polyline with edges, notated by "a", you can define how far one Wall Component of a multi-component Wall Style will protrude beyond another Wall Component. Note: |
When you apply a Wall Endcap Override, be aware that this is just like all other Overrides in ADT and may prove to be less of a desirable solution than originally anticipated. Illustrated above I show that though you may select a unique Wall Endcap Style from the Select an Endcap Style dialog, it will not be obvious under the Wall Style Properties dialog since it is an Override. In other words, sometimes it is far better to create a new Wall Style with custom Endcaps than to Override an existing one. |
||||||||||||||
Wall Endcap Styles
One of the easiest ways to create a custom
Wall Endcap Style is to draw the non-closed Polyline shape right on top
of the Wall Below is the command line sequence for creating a more complex Wall Endcap Style as illustrated to the right and above left. Command: WALLENDCAP Style Manager Window Select a Polyline: < pick
on Polyline for endcap one > |
If you use the Set From < button on an existing Endcap Style, the change will be reflected automatically on all Wall Styles that use that Endcap Style. You can read more about Wall Endcap Styles on ARCHIdigm's ADT Tips + Tricks list. |
||||||||||||||
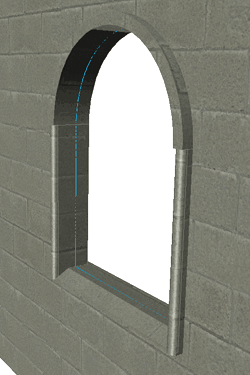
Wall Opening Endcap Styles
In ADT 4 a new Wall Endcap Style was
introduced for Openings formed by Windows, Doors, Window Assemblies and Openings.
For such openings, a designer may wish to control the Sill, Head and Jambs uniquely and
thus you will find an extremely convoluted To Create a Wall Opening Endcap Style, you must first draw the non-closed Polyline(s) as if you are creating a regular Wall Endcap Style. Once you have drawn the appropriate linework, use the WallEndCap command to create a New Wall Endcap Style. After creating the Wall Endcap Style, use the OpeningEndCapStyle command to activate the Style Manger for Wall Opening Endcaps Styles. Create a New Wall Opening Endcap Style Name and then double-click on it to activate the Opening Endcap Style dialog box where you should find a Design Rules tab as illustrated to the right. Under the Design Rules tab, you can set four different Wall Endcap Styles uniquely for each of the four Wall Opening Positions: Jamb Start, Jamb End, Head and Sill. Therefore, a Wall Opening Endcap Style is actually not an Endcap style at all but actually a container for Wall Endcap Styles.
|
|
||||||||||||||
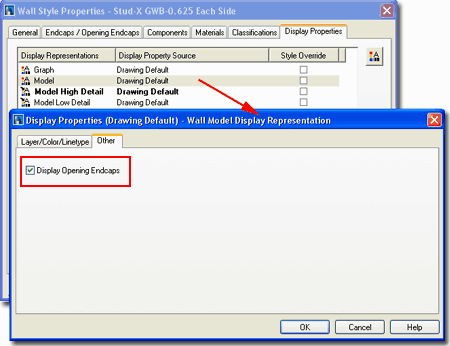
Wall Opening Endcap Styles -
Display in Model
Illustrated to the right I show where you can activate the Display of Wall Opening Endcap Styles for the Model Display Representation. These are unchecked by default in the ADT Template files that come with the program but it seems to me that if you actually go through all of the trouble to design custom Wall Opening Endcap Styles, that you would most certainly want them in your 3D Views.
|
 |
||||||||||||||
Insert
Wall Endcap Styles as Polylines
One way to make changes to an existing Wall Style Endcap is to use the Insert Wall Endcap Style as Polyline to get the original Polyline shape(s) back. After inserting this Polyline, you can use common AutoCAD commands, such as Stretch, to make changes to it. Then, use the Set From... option of the Styles Manager to update the Wall Style Endcap - discussed above. |
|||||||||||||||
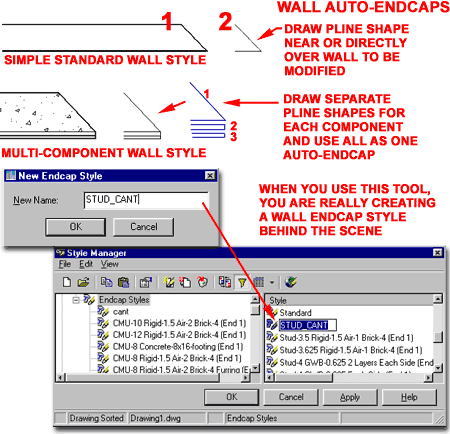
Wall Auto-Endcap
The Wall Auto-Endcap tool provides a great quick-fix solution for drawing how you want the endcap of a Wall and then use it with the least amount of interference and dialog box options. This tool simply adds one or more selected Plines to the Style Manager based upon the Wall Endcap Style Name you specify and then provides a means for adding it to the current Wall or Wall Style. Generally you will want to use this tool as an Override option in cases where the Wall Style is fine for most cases except the currently being addressed. If you have numerous cases of a unique Wall Endcap Style, you may need to create a separate Wall Style with the Endcap already set. I tend to be more lazy and just copy the Wall object around after using the Override option ( see command line sequence, below ). Command Sequence: |
|
||||||||||||||
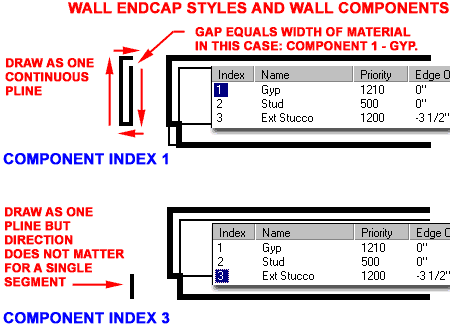
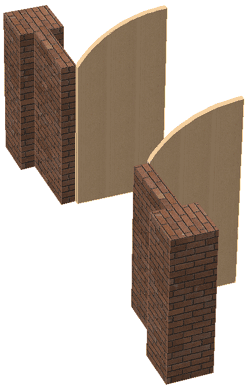
| Wall Endcap
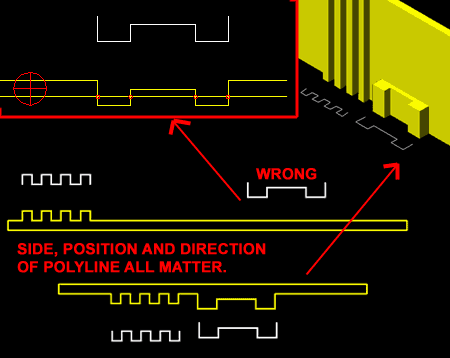
Styles - Comprehending Multiple Components, Direction and Invisibility Illustrated to the right are a couple of examples of how Plines can be used to create Wall Endcap results. The Wall Style in this scenario has Gyp. Board on one side and Stucco on the other so the trick becomes that of controlling how the two materials wrap around on the end of a terminated wall. The Wall Style in this scenario has three components:Gyp., Stud and Stucco. Since the two components on the exterior are what need to be wrapped around the Stud, those are the components that need to be worked on and not the necessary the Stud portion. In this case, the Stud portion will simply terminate squarely into the adjusted endcap of either exterior component so it will not need a Pline. Notice that for the Pline that defines the wrap, the direction in which it is drawn reflects on how it is applied to the Wall Style Component. |
 |
||||||||||||||
| Wall Endcap
Style for two Component Indexes - Another Result Illustrated to the right is an adjustment to the results of the Wall Endcap Style created above. For the Stucco, the Straight Pline was replaced with a "U" shape that will bring the Stucco out to the same depth as that of the Gyp. Board. |
 |
||||||||||||||
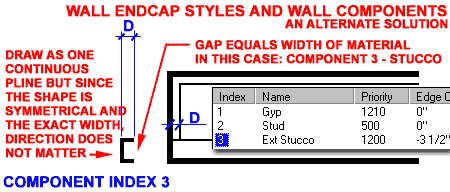
| Wall Endcap
Style - Direction and Invisibility Illustrated to the right I show how the direction of the non-closed Polyline affects the Endcap results once applied to a Wall Style. At times you may need to redraw your Endcap in order to produce the desired results. Also illustrated to the right is a neat trick involving the use of Width on the Polyline used as a Wall Endcap Style. In some multi-component Wall Styles, you may not want a particular edge to appear so you can assign that portion of the Pline a slight amount of Width to create an invisible edge in the Wall Endcap Style. For other scenarios, such as cut-lines or the simple need to indicate that the wall continues beyond the current position, you can create a simple single Pline with a bit of Width and assign it as a custom Wall Endcap. |
 |
||||||||||||||
| 4Wall Helpers | 4-4 WALL TOOLS | ||||||||||||||
Merge Walls
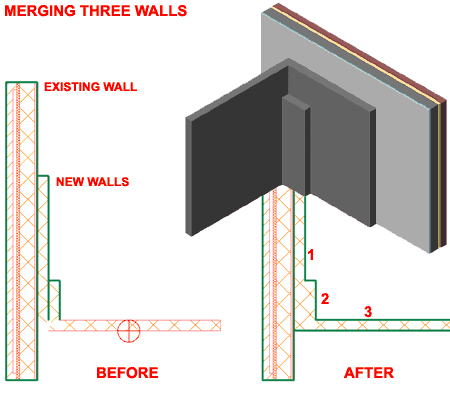
The Merge Wall command is one of the best Wall Tools when you just want a hammer to fix your problems with strange cleanup conditions - as illustrated in the before and after shots to the right. Chances are that with time and painstaking attention to detail, you could avoid using this tool by going through all of the various control settings for Walls, like Cleanup Groups, Priorities, Styles, etc., but if you don't have the time this tool really works well. In the illustration to the right, I show three Stud Walls of the same Style and the consequent Defect Marker ( a.k.a. Red Circle of Death ) caused by Cleanup problems. By using the Merge Wall tool to merge all three Walls together, the Defect Marker disappears and the product looks much like something that could be drawn as a 2D line in seconds. When you execute this command, notice that you are prompted to Add or Remove and then asked to Select a Wall. Though it does not appear to matter which Wall Object you pick first in a Merge action, I like to think of the first Wall as the Source to which other Walls will be merged and I developed this method of thinking from previous releases of ADT so that might help you if weird stuff should begin to happen. Notice that the Merge tool comes with a Remove and removeAll option to undo this action should it prove to cause more problems than it solves. Note: |
 |
||||||||||||||
Wall
Cleanup T and L
The option to Apply a 'T' or 'L' Cleanup condition on Walls is somewhat redundant since you can achieve similar results with the Extend Command and the Fillet Command respectively. I have yet to find a situation where I have needed to use either of these two tools since I rely heavily on Grips, Extend, Trim and Fillet so you may find that you don't use these either. |
One characteristic that does make these tools different from Extend and Fillet is that they have been designed to allow for multiple selections first and then the boundary or source. This means that you can, for example, create a "T" intersection of many Walls into one source Wall without having to use the Fence option during Extend. |
||||||||||||||
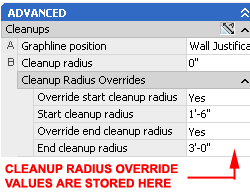
Override Cleanup Radius
When you increase the Cleanup Radius at the end of a Wall Object, you expand the reach of the Baseline so that it is more likely to find the Baseline of another Wall Object. In some cases this can be rather advantageous but on most cases this can actually be a cause of more problems than solutions and that is why the default value is set to zero. |
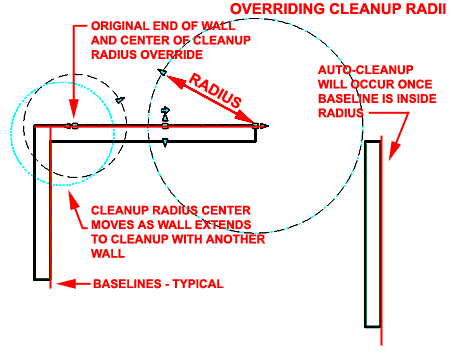 Illustrated above I show an example of how one Cleanup Radius Override was expanded large enough to connect with another Wall Object and an example of how another Cleanup Radius Override is not large enough to connect with the Baseline of the adjacent Wall Object. Though the examples are not indicative of the best place to use Cleanup Overrides, they do demonstrate how they work. It is my personal opinion that the best way to work with Cleanup Overrides is to first activate the Wall Graph Toggle so that you can see the Wall Baselines and all Cleanup Radius Circles - see comments below on this Toggle. To use the WallApplyCleanupRadiusOverride command, select a Wall, pick near the end you want to modify and type in a new Cleanup Radius Value. All Cleanup Radius Override Values are stored on the Properties Palette and you can access, modify and even set them on this Palette under the Cleanup Radius Overrides category - as illustrated above, left. |
||||||||||||||
Toggle Wall Graph Display
As discussed above, Cleanup Radius Overrides can be set on the Properties Palette and on by using the WallApplyCleanupRadiusOverride command but there is an even easier and faster way to work with them. By using the WallGraphDisplayToggle command to turn the Wall Graph On or Off, you can quickly see any Cleanup Radius Overrides. In addition to seeing existing Cleanup Radius Overrides, you can also Adjust them for any Wall simply by locating the Cleanup Radius Override Grip and Stretching it out. Illustrated to the right I show a common Wall condition where the angle of one Wall prevents the Baselines from connecting properly. By activating the Wall Graph mode, the Cleanup Radius Override Grip should be visible and available for a quick adjustment much like Grip Stretching a regular Line. The arrow icon for the Cleanup Radius Override is typically at a 45 degree angle. When you Select this Grip, you should also find a Dimension Field on the screen that will allow you to type a value right on the screen - see illustration upper right. To activate the value field ( see the number 12 to the right), simply start typing a number and it should appear within this box automatically. Once a reasonable radius has been specified as an Override, the cleanup for the example wall condition to the right, should appear as illustrated in Step 4. Be aware that you can set the Cleanup Overrides too large so you may need to adjust backwards to produce the desired result. You will need to use the WallGraphDisplayToggle command to turn the Wall Graph Display Off when done. |
 |
||||||||||||||
Roof
Line
Though the tool offers five options to work with you will most likely be using the Auto project and Project options the most. The difference between the two projection types has to do with the type of object they were designed to read: Project reads Polylines and Auto project reads other AEC Objects. Illustrated to the right I show a few common scenarios where you may find this tool rather useful. When working with Roofs and Roof Slabs, the Auto project option makes the process of extending Walls up to Roofs a breeze You may find some problems using this tool with Walls that span multiple Roofs at different heights and slopes. In cases such as this, you may need to employ crafty tricky to make the technology produce the results you seek; like breaking the Walls under different Roofs. Also illustrated to the right I show a common subscriber inquiry about getting Walls to match the rise and run of Stairs. Though different design conditions may prove to be problematic, the trick I have found for best results is to make sure the Wall is always under the entire Stair Object and is always within the ends of the Stair. In other words, the Wall starts at the back of the first Riser and ends at a point no greater than the outer edge of the last riser. Sometimes you have to think mathematically about the limits of the software tool. The last example image to the right depicts the power of using Polylines to shape the top of a Wall Object. For work like this, you must draw the Polyline in Elevation ( like Front ) View and for best results, extend the edges of the Polyline beyond the edges of the Wall Object. To Project to Polylines, use the Project option rather than the Auto project option. Changes made to Walls using the RoofLine command are stored on the Roof and Floor Line dialog accessed via the Properties Palette under the Worksheets category. |
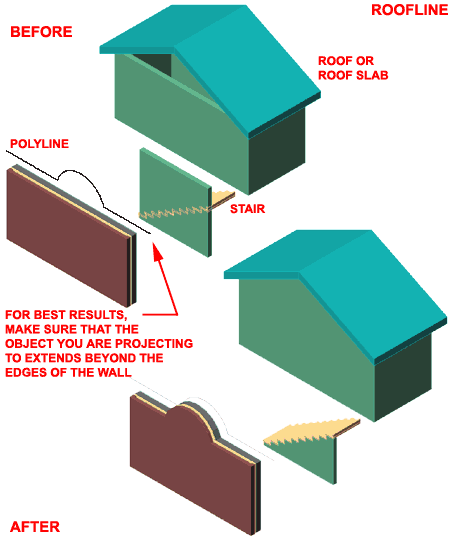 Offset - select a Wall object, hit <enter> and specify a positive increase in height or a negative reduction in height. Initial set height of plate on Wall cannot be reduced with this technique however this option under the FloorLine command can be used to do this. Project - select a Wall object, hit <enter> and select a Polyline object in the Wall's vertical path ( as illustrated to the right ). This method offers some great quick solutions for sloping or undulating walls. Generate Polyline - select a Wall object, hit <enter> to see a Polyline created from the top justification side. Auto project - select a Wall object, hit <enter> and select another ADT object such as a Roof object ( as illustrated to the right ). Reset - resets the Wall(s) back to their original plate height. Command: _AecRoofLine |
||||||||||||||
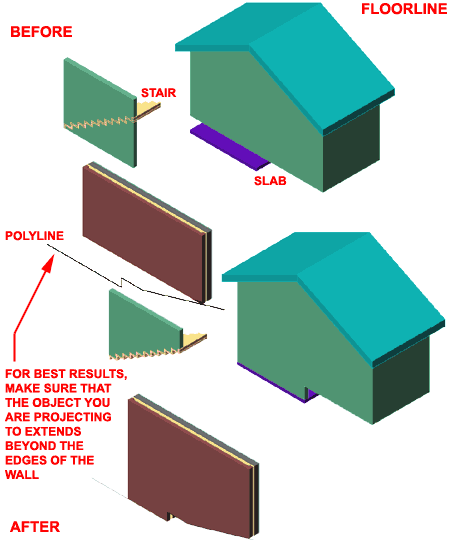
Floor Line
The FloorLine Command is simply the bottom half of the RoofLine Command and is thus equally powerful and useful. Since architects generally keep floor slabs level you probably will not be using this tool as much as the RoofLine but all of the same options are available. In the illustration to the right I show a few common scenarios where you might find this tool rather useful. As with the RoofLine tool, you can use the Project and Auto project options to project Walls to Polylines or other AEC Objects respectively - read comments above under Roof Line. When working with stepped floor levels on sloped grades, you may find that Auto projecting to Slabs does not produce the results that you would prefer - as illustrated to the right where the Wall is only reading one Slab and will not read multiple slabs. For this type of work, I find that using a Polyline to create a step effect is far more dependable and expedient in terms of producing the desired results. Command: _AecFloorLine Changes made to Walls using the FloorLine command are stored on the Roof and Floor Line dialog accessed via the Properties Palette under the Worksheets category. |
 |
||||||||||||||
Interference Condition
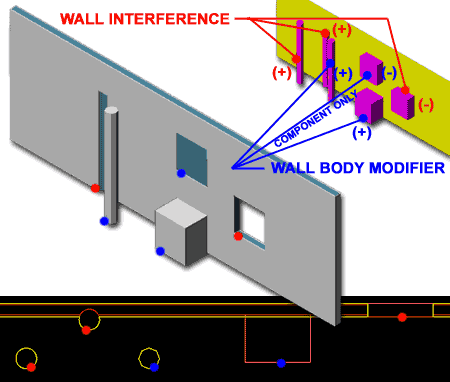
A Wall Interference can be as simple as a protrusion or niche in a wall object or as complicated as an entire fireplace Mass. Wall Interference Conditions provide solutions to all those unusual formations on walls that don't fall into a normal wall category or are too tedious to bother creating with Wall Modifiers. In Section 7 - Wall Modifiers, above, we looked at various ways of introducing protrusions or modifications to the surface of a Wall object. By using other 3D Objects in ADT, like a Column object for example, as an Interference Condition, we can achieve the same results not only in a shorter amount of time, but with more flexibility. The drawback, however, is that this technique uses another object to achieve these results and thus we will always have to track that extra object as well as the wall it impacts. With Wall Anchors, we can improve on this concept, but I suggest using Wall Modifiers first if you can avoid Interference Conditions. Illustrated to the right I show two Column objects as Wall Interference Conditions; one has been set to Shrinkwrap in Additive form and the other has been set to Shrinkwrap in Subtractive form. I also show how a Mass Element can be used as a Wall Interference Condition as well. Once an object has been used for a Wall Interference Condition, you can move or adjust that object at will and the changes will reflect in the portions that connect with the wall(s) it was connected with. |
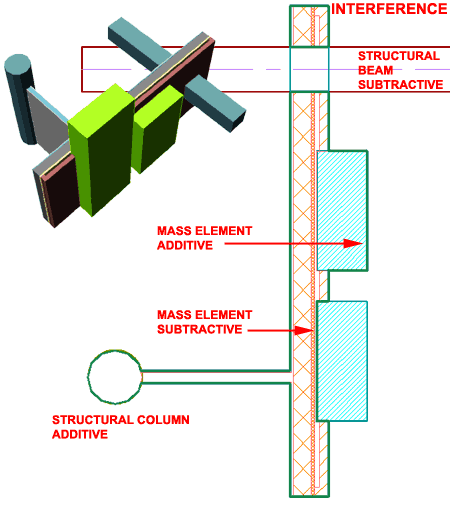 The brownish line that shows up where Walls meet Interference Conditions that have been shrinkwrapped as additive, is on the A-Wall-Comp Layer by default. It is also controlled by the Wall's Display Property Component called Boundary 1. |
||||||||||||||
Wall Sweep Dialog
Wall Sweeps offer designers the option for customizing a
Wall Object in Profile or Section instead of in Plan or through dialog boxes. In
theory this is one of the most logical and ideal options but in Architectural Desktop you
may find this tool more problematic than rewarding. To be fair, however, this tool
has been improving with each release and may eventually become one of the best ways to Wall Sweeps are basically extrusions that follow a particular component. As such, they require a Profile shape that you can create with a Closed Polyline or that the tool will create for you automatically. In either case, you must understand the process of working with Profiles in order to really understand this tool. Illustrated to the right I show the Add Wall Sweeps dialog that you can activate simply by selecting a Wall Object, right-clicking and selecting the Sweeps > Add pop-up menu option. Wall Sweeps can only be applied to one Wall Component at a time and sometimes it can be tricky to figure out which Component is on the insider or the outside of your wall ( trial and error may be your solution or you could rename the Wall Components ). If you have already created a Profile Definition, you can select it on the Profile Definition drop-down list. If you don't have a Profile Definition and what you wish to do is fairly simple, you can use the Start from Scratch... option which will automatically go to the Edit in Place mode. Once you have completed your modifications to the Wall Component Profile under the Edit in Place mode and Save your Edits, the shape will automatically be captured and Saved as a Profile Definition. In the illustration to the left I show what the Edit in Place mode looks like when used on a Wall that already has a custom Profile Definition Attached and what you can do to a simple Wall Object without any custom Profiles ( far left ). Wall Component - you must select one component to attach the Profile to and you can only affect one Component at a time but you are allowed to attach separate Profiles to each Component by returning to this tool for each one. |
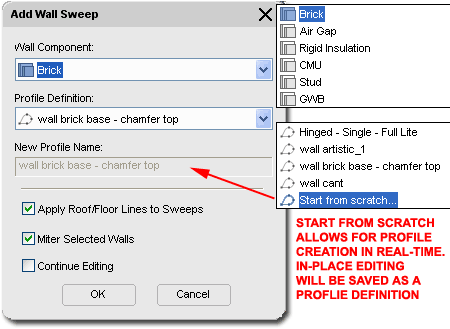 Profile Definition - use this drop-down list to select a custom Profile created from a Closed Polyline or use the Start from scratch... option to allow for automatic Edit in Place mode which will Save changes to the New Profile Name specified. New Profile Name - only available when using the Start from scratch... option under the Profile Definition drop-down. The name provided here will be stored under the Profile Definition Styles Window ( ProfileDefine ). Apply Roof/Floor Lines to Sweeps - use this option to keep the normal behavior of the Wall Object for the Component with the Sweep attachment. In my tests with this option I found that it delivered less than expected and the help for this tool suggests that it simply meets "existing" Roof and/or Floor Lines but does not elaborate on the specifics. I found that it seems to work fine with reduce Wall Roof and/or Floor Lines but does not adjust to extended Roof and/or Floor Lines as expected. Run your own tests before going too far only to find disappointment and more work. Miter Selected Walls - use this option to automatically Miter multiple Walls selected as part of this operation. Mitering can also be done at a later time using the WallSweepMiterAngles command. Continue Editing - use this option if you have selected a custom Profile Definition but wish to have the Edit in Place mode activate automatically after hitting the OK button. To modify or remove, use the Properties Palette and go to the Worksheets category - looks for Sweeps. |
||||||||||||||
Wall Sweep Profile
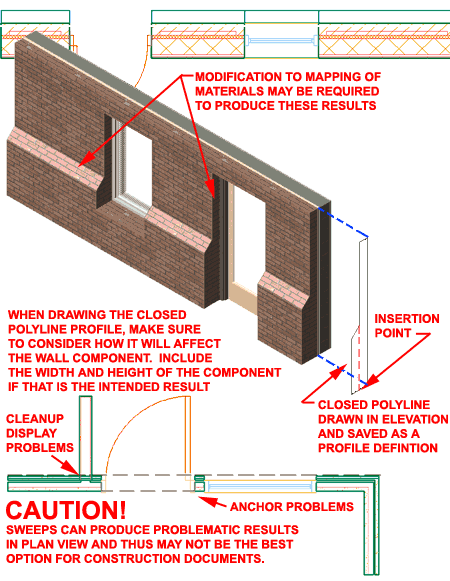
Drawing the Profile of a Wall for custom and unique design conditions is one of the most logical ways a designer can work. By drawing a Closed Polyline Shape for a Wall Profile, you can save it as a Profile Definition and then Apply this object to any Wall Component using the Add Wall Sweep dialog - as illustrated above. Illustrated to the right I show a simple canted edge profile on the exterior side of a Wall Object. Since you cannot define curves or sloped edges within a Wall Style, using a Wall Sweep is arguably your best alternative ( though other work-around solutions could be employed with the tools discussed above ). When you draw your Wall Component Profile, be sure to consider the results that you are seeking before proceeding because you may not get what you expect. If you wish to modify an existing Wall Component while keeping its Profile ( from top of wall to bottom, for example ), then you must include that shape in your Profile. If you wish to confine a Wall Component ( such as a custom one ) to your Profile shape then draw that exact shape. Once you have drawn your Wall Component Profile, use the Profile command to create a New Profile Definition by setting the shape From your Closed Polyline. When queried for the Insertion Point, make sure to be specific about the location of where it will be attached to the current Wall Style. Note that this can sometimes be tricky because you may not always use the back of the Closed Polyline shape where it would simply attach to the Wall; sometimes you may have to calculate where your Closed Polyline shape attached to the Front of the Existing Wall Component. In both cases, you would typically use a point at the bottom of the Closed Polyline. In some cases, your Profile may invert when used to Sweep along your Wall and in such cases, simply mirror the original Closed Polyline and use the Set From option under the Profile Definitions Window to fix the error. Also illustrated to the right I show how some Wall Sweeps designs can produce rather frustrating and incorrect Plan Representations which would not be acceptable in Construction Documents. In general, Wall Sweeps tend to cause problems for Anchored Objects such as Doors and Windows that have been designed to Center within Walls so you may find that you will need to work with the Anchor Tab of some objects to get the proper results. |
 |
||||||||||||||
Wall Sweep Profile Miter Angles
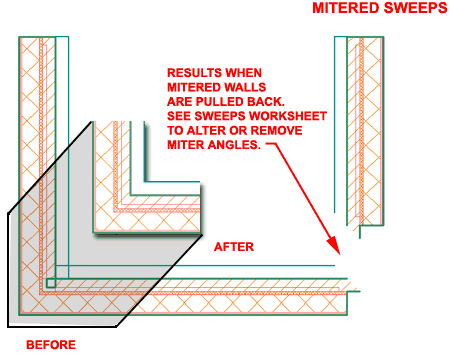
On the Add Wall Sweep dialog you should find the option to automatically Miter Selected Walls but in case your work unfolds in such a way that Wall Objects with Sweeps Attached meet at a later point, you can use the WallSweepMiterAngles command. Illustrated to the right I show the before and after screen captures of an example Wall Sweep scenario where the Walls were drawn independently. The obvious conclusion here is that Wall Sweeps do not follow the rule of Cleanup Settings and thus add further complexity to the use of Walls. Also illustrated to the right is an example of how Mitered Walls with Sweeps Attached behave when Stretched back from their corners. If you attempt to fix this problem with a Wall Endcap you will be quite surprised to find that the Endcap is correct. The fact of the matter is that Miters are stored under the Worksheets category. On the Sweeps dialog you will find Start and End Miter value fields that can be used to fix this little problem; simply set the Miter Angle back to zero. |
 |
||||||||||||||
Wall Body Modifier
This tool is similar to the Wall Interference tool but offers more definitive options for affecting Wall Components; in fact, unlike the Wall Interference tool, this tool can only be used to affect one Wall Component at a time. This means that in multi-component Wall Styles, Body Modifiers are not a good option to cut a hole completely through a Wall but can be used to cut into a component or extract the surface of a component.
Illustrated to the right I attempt to show some of the primary differences between the use of Body Modifiers and Wall Interferences. Notice that Wall interferences, outside of plan view, need their source objects in order to display correctly in non-plan views. Using a Wall Interference is a great way to punch a hole in a wall object and maintain the freedom to adjust that hole. Using a Wall Body Modifier is a great way to affect a specific component of a Wall and provides a means to avoid having to keep the original source object. Edit in Place can be used in both examples. Both can work with elements outside their physical space ( see columns ( additive shrinkwrap). I would think of a Wall Body Modifier as more of a static imprint and the Wall Interference as something attached with adhesive yet dynamic. To modify or remove, you can also use the Properties Palette and go to the Worksheets category and look for Body Modifiers. |
 |
||||||||||||||
Wall Body Restore
Wall Body Modifiers are stored on the Properties Palette under the Body Modifiers category for Worksheets - as illustrated to the left. By working with this dialog box, you can alter the affected Component, change the Operation, modify the Description and Delete the Modifier. When using this tool, you cannot isolate Modifiers on one Wall so the Restoration affects all Modifiers equally; i.e., to restore one you have to restore all. |
|
||||||||||||||
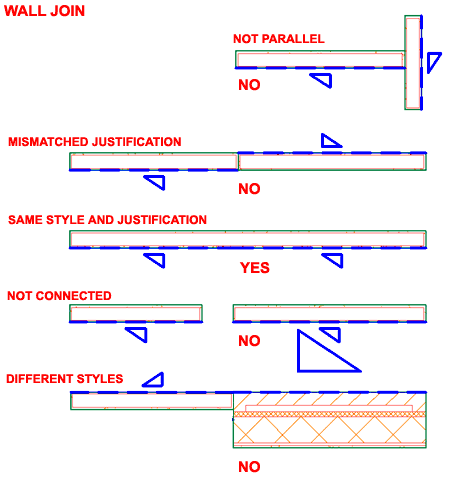
Wall
Join
This tool joins or welds two parallel, same Style, touching Walls together to make one single Wall. It does not work on any other Wall conditions - see illustration to the right. Once of the places this tool can come in handy is when you have a design scenario where two similar Style Walls meet from opposite ends that are full of Doors and Windows that you don't want to loose. In some cases, you can of course simply delete one of the Walls and Grip Stretch the other across as needed; or even use the Extend command so I find that I rarely use this tool.
|
 |
||||||||||||||
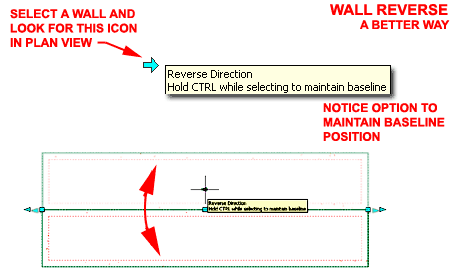
Reverse Wall Start/End
This tool flips a Wall Object along the Justification Line; a function similar to Mirroring through a specific axis ( often the edge ). This tool is extremely useful when working with multi-component Wall Objects that have a definitive inside and outside. This tool is also useful for fixing misaligned Walls that will not Fillet, Chamfer or Join correctly due to Baseline or Justification offsets. When using, be observant about the shifting of the Wall since it will flip relative to the Justification Line and can thus end up farther out or closer in than it was originally. Illustrated to the right I show that the Reverse Direction Icon has an extra option that makes this a superior method for reversing a single Wall Object: "Hold CTRL while selecting to maintain baseline". |
|
||||||||||||||
Anchor to Wall
This tool can be used to Attach or Detach Objects from Walls. You can also use this tool to Move an object from one Wall to another. |
When you use the Detach option, you "free" the object (such as a Door for example) and this object will float in space without the need for the Wall. At times this may be a useful option while modifying or switching Wall Styles. At a later point in time, you can use the Attach option to assign free floating objects back into Walls. |
||||||||||||||
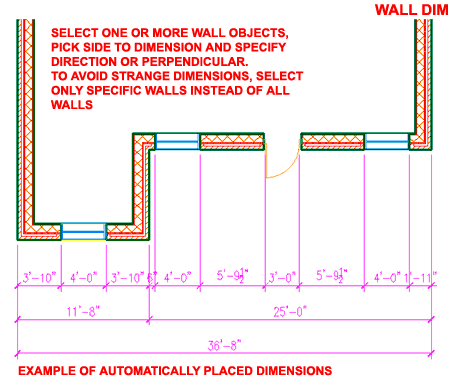
Dimension Wall
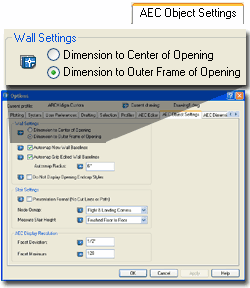
The WallDim command is a cross between the old AutoCAD dimensions and the new Wall Objects and offers the option to quickly dimension a Wall Object using Standard AutoCAD Dimension Styles. In other words, this is not the tool to use for AEC Dimensions which you can activate using the DimAdd command.
Use Wall Settings radio buttons on the AEC DWG Defaults Tab of the Options dialogue box to change the Wall Dim routine from Dimensioning the center of Openings to Dimensioning the edges (as illustrated, right). I have not found this routine very successful at dimensioning Walls that have excessive Modifications to them such as Sweeps. It does not appear to be configured well for Curved or Chamfered Walls. |
 |
||||||||||||||
| 5General Working Tools | 5-4 WALL TOOLS | ||||||||||||||
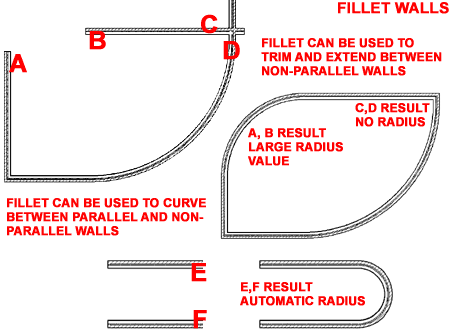
Fillet
Since Walls have Justification, Fillet may not always produce the results you seek due to misaligned Baselines. This is particularly obvious when working with Fillets that use a Radius Value greater than zero. If you observe corners that appear to misalign by about the width of the Wall, check the Baseline positions and you should find that they are opposite for the two Walls being Filleted. You may be able to fix this quickly by using the Wall Reverse tool. |
|
||||||||||||||
Chamfer
The Chamfer command appears to work on Walls about as well as it does on simple AutoCAD objects ( Lines, Plines, Arcs, etc.). You cannot Chamfer Curved Walls. The only tricky part about using the Chamfer settings is understanding how they affect the results. Illustrated to the right, I show that there is a simple logical relationship between the values ( like Dist 1 ) and the Wall that is selected first. This distance is always measured from the virtual intersection out from the two Walls. With the Angle option, you will need to specify one Distance value as with the two distance method. The Angle is then based off of the first object selected and the Distance specified out from the virtual intersection. |
|
||||||||||||||
| See AutoCAD commands that work
on Walls for comments on other AutoCAD working tools and Walls.
|
© Copyright 2001- 2003 ARCHIdigm. All rights reserved.
Spell 08.02.03
 The
primary set of Modification Tools for Walls can be accessed through the right-click object
specific pop-up menu illustrated to the right. There are a few modification tools on
the optional
The
primary set of Modification Tools for Walls can be accessed through the right-click object
specific pop-up menu illustrated to the right. There are a few modification tools on
the optional 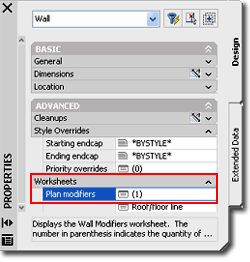 Once a Wall Modifier has been added to a Wall, you can access it to make
further changes by using the Wall Modifiers dialog, illustrated to the
right.
Once a Wall Modifier has been added to a Wall, you can access it to make
further changes by using the Wall Modifiers dialog, illustrated to the
right.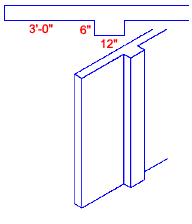
 To use, you can draw a non-closed Polyline right on the Wall
where you want to make the modification. Draw the shape from the edge of the Wall
out in such a way that it forms to outer shape as illustrated to the right. Once you
have drawn the shape, Select the Wall Object to be Modified, right-click
on your mouse, use the Plan Modifiers cascading menu option to Select
the Convert Polyline to Wall Modifier... option. When prompted to Select
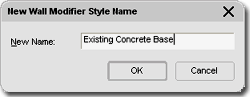
a Polyline, select your Polyline shape, Choose to Erase
it or not and then Type a Wall Modifier Name in on the New
Wall Modifier Style Name dialog, illustrated to the left.
To use, you can draw a non-closed Polyline right on the Wall
where you want to make the modification. Draw the shape from the edge of the Wall
out in such a way that it forms to outer shape as illustrated to the right. Once you
have drawn the shape, Select the Wall Object to be Modified, right-click
on your mouse, use the Plan Modifiers cascading menu option to Select
the Convert Polyline to Wall Modifier... option. When prompted to Select
a Polyline, select your Polyline shape, Choose to Erase
it or not and then Type a Wall Modifier Name in on the New
Wall Modifier Style Name dialog, illustrated to the left.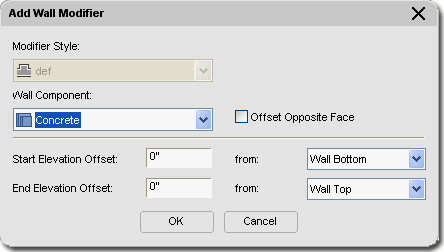
 To define a Wall
Modifier Style Name shape, Select the Wall Modifier Style Name,
right-click on your mouse and select the "Set From..."
pop-up menu option ( this "Set From" option is also available as a button - see
red circle right ). Once prompted to Select a Polyline Shape, select your non-closed
Polyline Wall Modifier Shape created earlier (see discussion above). Once a Wall
Modifier Style has been set with a Shape, you can attach this shape to any Wall at any
time by using the
To define a Wall
Modifier Style Name shape, Select the Wall Modifier Style Name,
right-click on your mouse and select the "Set From..."
pop-up menu option ( this "Set From" option is also available as a button - see
red circle right ). Once prompted to Select a Polyline Shape, select your non-closed
Polyline Wall Modifier Shape created earlier (see discussion above). Once a Wall
Modifier Style has been set with a Shape, you can attach this shape to any Wall at any
time by using the 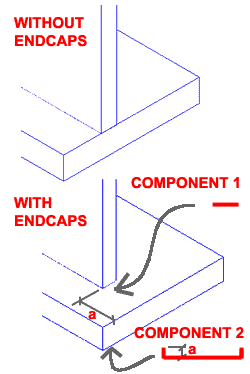 Styles whose shape can be defined by one or more
non-closed Polylines. There are two Endcap Styles for Walls: one for the physical
ends and one for ends created by Openings such as Doors, Windows, Window Assemblies and
simple Openings.
Styles whose shape can be defined by one or more
non-closed Polylines. There are two Endcap Styles for Walls: one for the physical
ends and one for ends created by Openings such as Doors, Windows, Window Assemblies and
simple Openings.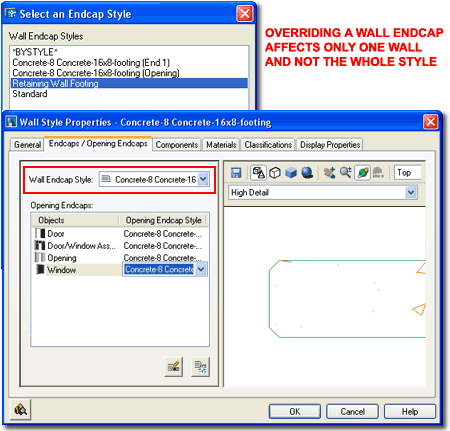
 Object
that you want to change. Once you have created a simple or complex Polyline shape,
use the "WallEndCapStyle" command to define a New Wall
Endcap Style Name. Select the newly created Wall Endcap Style
Name, right-click on your mouse and Select the "Set From..."
pop-up menu option. For simple Polyline shapes, all you have to do is Select the
single Polyline to Set it for the current Wall Endcap Style but for more complex Polyline
Shapes ( two or more ), you will need to Select each Polyline shape in order and assign
them a Wall Component Index Number.
Object
that you want to change. Once you have created a simple or complex Polyline shape,
use the "WallEndCapStyle" command to define a New Wall
Endcap Style Name. Select the newly created Wall Endcap Style
Name, right-click on your mouse and Select the "Set From..."
pop-up menu option. For simple Polyline shapes, all you have to do is Select the
single Polyline to Set it for the current Wall Endcap Style but for more complex Polyline
Shapes ( two or more ), you will need to Select each Polyline shape in order and assign
them a Wall Component Index Number.
 system
for providing such freedom. Though I applaud the effort, in my preliminary tests on
simple common architectural construction techniques, I found this tool incapable of
producing correct results ( like wrapping Gyp. Board around an opening edge and into the
Jamb of a Door or Window ). It should also be noted that these Endcap Styles do not
display in 3D by default so you may need to turn them on for proper display in 3D Views
and Perspective Renderings.
system
for providing such freedom. Though I applaud the effort, in my preliminary tests on
simple common architectural construction techniques, I found this tool incapable of
producing correct results ( like wrapping Gyp. Board around an opening edge and into the
Jamb of a Door or Window ). It should also be noted that these Endcap Styles do not
display in 3D by default so you may need to turn them on for proper display in 3D Views
and Perspective Renderings.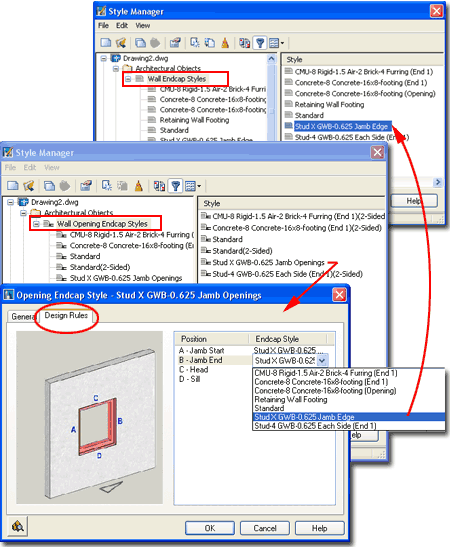
 There are three primary ways that you can work with Cleanup
Radius Overrides and all three methods affect the same values. Typically
Walls should clean up correctly without the need for overrides but in some cases the
intersections require a larger radius than the default value of zero. It should be
noted that though the default cleanup radius is zero, users will experience a phenomena
that feels like a cleanup radius is in effect; this behavior is actually a Snapping option
controlled by the "Autosnap Radius" value on the AEC Object Settings tab of the
Options dialog box. This setting is what makes Wall jump and clean up when they get
near each other.
There are three primary ways that you can work with Cleanup
Radius Overrides and all three methods affect the same values. Typically
Walls should clean up correctly without the need for overrides but in some cases the
intersections require a larger radius than the default value of zero. It should be
noted that though the default cleanup radius is zero, users will experience a phenomena
that feels like a cleanup radius is in effect; this behavior is actually a Snapping option
controlled by the "Autosnap Radius" value on the AEC Object Settings tab of the
Options dialog box. This setting is what makes Wall jump and clean up when they get
near each other. The
RoofLine command is one of my favorite Wall Tools in the whole suite and
that probably has something to do with the pain I suffered from having to adjust Walls on
Gable End conditions before this tool existed.
The
RoofLine command is one of my favorite Wall Tools in the whole suite and
that probably has something to do with the pain I suffered from having to adjust Walls on
Gable End conditions before this tool existed. 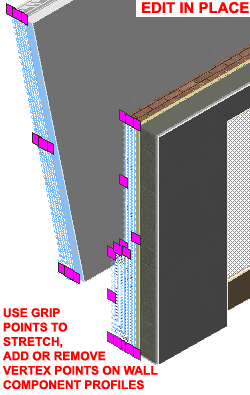 design Custom Walls.
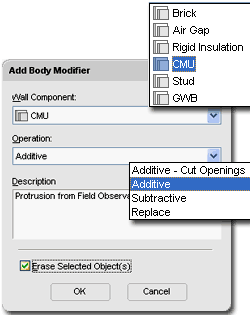 Wall
Body Modifiers are not dependant upon the original object to maintain the body
modification and thus you can think of this tool as one that imprints the shape of one
object on to a component of a Wall. To edit a Wall Body Modification, you can use
the
Wall
Body Modifiers are not dependant upon the original object to maintain the body
modification and thus you can think of this tool as one that imprints the shape of one
object on to a component of a Wall. To edit a Wall Body Modification, you can use
the 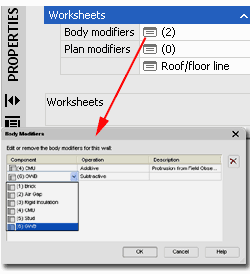 The Wall
Body Restore tool provides a great solution for retrieving original Body
Modifiers that may have been Erased when introduced to a Wall ( see options for WallBody,
above ). Once you have Restored one or more Wall Body Modifiers on a Wall Object,
you can Move, Copy or otherwise modify them for reuse. Be aware that a Restored Wall
Body Modifier is not connected to the Wall, but is just a separate object. If you
wish to edit the original to produce a different Body Modification result, use the Edit in
Place option ( "WallLineEdit" command ).
The Wall
Body Restore tool provides a great solution for retrieving original Body
Modifiers that may have been Erased when introduced to a Wall ( see options for WallBody,
above ). Once you have Restored one or more Wall Body Modifiers on a Wall Object,
you can Move, Copy or otherwise modify them for reuse. Be aware that a Restored Wall
Body Modifier is not connected to the Wall, but is just a separate object. If you
wish to edit the original to produce a different Body Modification result, use the Edit in
Place option ( "WallLineEdit" command ).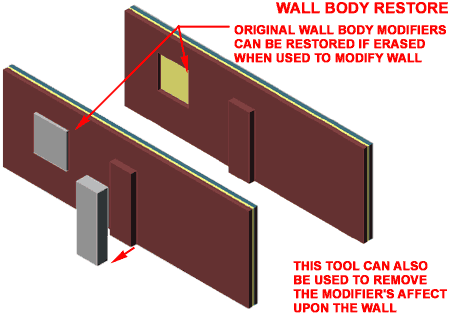
 To use, you can select one or many Walls
at the same time, pick the side of the Wall(s) you want
your Dimensions and then pick the direction you want
your dimensions to pull out from the Wall(s). Obviously, this routine cannot handle
all sides of a building at the same time given the types of queries it makes, so work on
one side at a time. As illustrated incorrectly to the right, when you use a
crossing-window to select a set of Walls, the dimension routine will also dimension the
widths of intersecting Walls. To avoid this, select just the Wall(s) you actually
want the Dimension tool to read; you can select several times and Shift-pick can also be
used to remove objects from the selection set.
To use, you can select one or many Walls
at the same time, pick the side of the Wall(s) you want
your Dimensions and then pick the direction you want
your dimensions to pull out from the Wall(s). Obviously, this routine cannot handle
all sides of a building at the same time given the types of queries it makes, so work on
one side at a time. As illustrated incorrectly to the right, when you use a
crossing-window to select a set of Walls, the dimension routine will also dimension the
widths of intersecting Walls. To avoid this, select just the Wall(s) you actually
want the Dimension tool to read; you can select several times and Shift-pick can also be
used to remove objects from the selection set.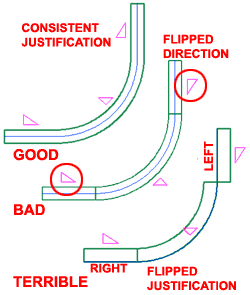 The
Fillet command works on Wall Objects in basically the same fashion as it
does on Lines and other AutoCAD objects but there are a few differences. On simple
AutoCAD objects you can use the "Crossing" option as a method for selecting two
objects to be filleted but this option is not available for Walls. With simple
AutoCAD objects you can also Fillet Curves such as Arcs but Curved Walls cannot be
Filleted. This means that you cannot Fillet a Fillet that used a Radius Value
greater than zero.
The
Fillet command works on Wall Objects in basically the same fashion as it
does on Lines and other AutoCAD objects but there are a few differences. On simple
AutoCAD objects you can use the "Crossing" option as a method for selecting two
objects to be filleted but this option is not available for Walls. With simple
AutoCAD objects you can also Fillet Curves such as Arcs but Curved Walls cannot be
Filleted. This means that you cannot Fillet a Fillet that used a Radius Value
greater than zero.