| 1Blocks - Profiles - Access |
.1-25 BLOCKS - PROFILES |
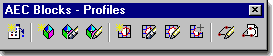
AEC Blocks - Profiles Toolbar
How do I get this toolbar?
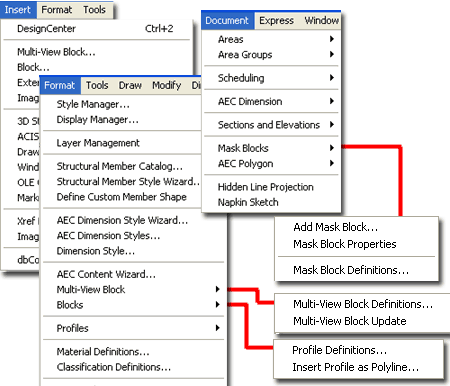
Access to these commands is scattered all over the place. You can, for example, find
access to the Multi-View Block management tools under the Format
pull-down but you must use the Insert pull-down menu to insert Multi-View Blocks;
unless you have our toolbar, use the DesignCenter or use the Tool Palette. For
Profiles, use the Format pull-down menu, select Profiles
and cascade to their respective commands. For Mask Blocks, you can use Alternate
Document pull-down menu. From the Document pull-down menu,
pick Mask Blocks> and cascade to their respective command options. |
 |
AEC Blocks - Profiles pull-down menus
AEC Content Wizard, Multi-View Blocks, Mask Blocks and ProfilesAs you can see from the pull-down menus illustrated to the right,
access to the various tools discussed in this chapter is primarily through the Format
pull-down menu where you will find the AEC Content Wizard, Multi-View
Block and Profiles menu items. Unfortunately, you will
need to load the Alternate Document pull-down menu if you want access to the Mask Blocks
which probably should have been included on the Format menu under Multi-View Blocks.
In some respects you can think of Mask Blocks as a subset of MvBlocks since they
are often combined to produce an MvBlock that is able to Mask other ADT Objects much like
a Wipeout can be used to mask out regular linework.
Profiles are pretty much becoming a
ubiquitous aspect of most of the Object Styles in ADT and should definitely master this
tool. Multi-View Blocks are incredibly time consuming to create, on
average I spend about 2 hours just to create something like a Chair, so you may find that
creating them is something better suited for those with a lot of extra free time. Mask
Blocks are self-evident in their importance and are fairly easy to create
but due to the fact that they only Mask through Attachment to other ADT Objects, you may
quickly find them too limited to be a part of regular drafting ( I see them more as useful
in a pinch ). And finally, the AEC Content Wizard is a subject that
I have serious doubts about elaborating on given that the DesignCenter is obviously on its
way to retirement. By using the Tool Palette Icon Tools you can now program default
Properties into numerous ADT Objects that provides more flexibility than what the AEC
Content Wizard provided so you may just want to skip this subject altogether. |
 |
| 2Adding Multi-View Blocks |
2-25 BLOCKS - PROFILES |
Add Multi-View Block Properties Palette
| Alt.Menu |
Insert>
Multi-View Blocks... |
 |
 |
| Keyboard |
MvBlockAdd |
| Links |
Multi-View Block Styles -
for how to load other MvBlocks |
| |
Design Content -
Multi-View Blocks - for an example of what a Multi-View block is and how it works. |
 The Add Multi-View Block Properties Palette
may be one that you will never use since most Multi-View Blocks come in through other
means, like the DesignCenter and Tool Palette.
If you do Add Multi-View Blocks with the Add Multi-View Block Properties
Palette, you risk missing out on a lot of features brought about when you drag-n-drop
items from the DesignCenter and Tool Palette. These features, such as auto-layering and
auto-scaling are programmed into the Multi-View Blocks via the Aec Content Wizard (for the
DesignCenter) or part of the default Properties via the Tool Palette. The Add Multi-View Block Properties Palette
may be one that you will never use since most Multi-View Blocks come in through other
means, like the DesignCenter and Tool Palette.
If you do Add Multi-View Blocks with the Add Multi-View Block Properties
Palette, you risk missing out on a lot of features brought about when you drag-n-drop
items from the DesignCenter and Tool Palette. These features, such as auto-layering and
auto-scaling are programmed into the Multi-View Blocks via the Aec Content Wizard (for the
DesignCenter) or part of the default Properties via the Tool Palette.
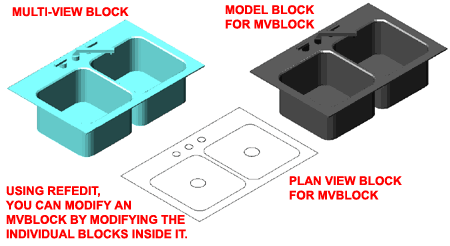
No matter how you insert an MvBlock, however, it is always
an MvBlock which is basically a View Specific bundle of nested Blocks. In the
illustration to the left I show six different Blocks (two are identical) that represent
the contents of a common MvBlock. When you change the View in your drawing, only one
of these Blocks should appear and hopefully it is the one that matches your current
orientation; i.e, Front when viewed from Front.
Read the section on Modifying Multi-View Blocks for more
information on the options illustrated to the right.
|
 Illustrated
above I show the Properties Palette as it appears when you use the MvBlockAdd command.
Since an MvBlock is really a fancy ADT version of a regular AutoCAD Block, you
should find that the types of options are very similar. One rather interesting
option is the Insert
Offsets values that not only operate independently for the X,Y and Z
coordinates but also for each of the individual Blocks that make up the MvBlock.
This means that you can push a Sink to a height of 36", for example, while leaving
the other Blocks at zero (you shouldn't need to do such things but it's an interesting
feature). |
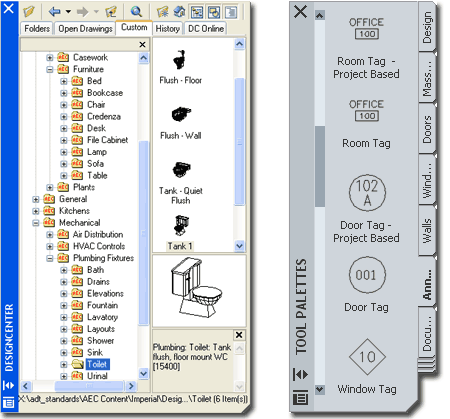
| Add Multi-View Block -
DesignCenter and Tool Palettes
The best and most common method for adding MvBlocks to
drawings is through the DesignCenter or the Tool Palettes
as illustrated to the right. When you drag object in through either of these tools,
you not only get the MvBlock but you should also get auto-layering, auto-scaling and any
number of other features that have been set as part of the Object's Insertion Properties.
Once you have inserted an MvBlock you may notice that it is
listed under the Multi-View Block Definitions section of the Multi-Purpose
Objects folder in the Style Manager Window. You may also
notice that some MvBlocks tend to bring in a lot of regular AutoCAD Blocks so your list of
blocks can expand dramatically as an ADT project grows. MvBlocks can also be
incredibly memory consumptive because of all the detailed linework and the 3D Model
included with them. For this reason, I have been experimenting with the use of
Xref's to manage MvBlocks instead of Inserting them.
The special automatic reactions that occur when you
drag-n-drop an MvBlock from the DesignCenter are programmed into the MvBlock by using the Aec Content Wizard -
see discussion below for more on this subject. |
The special automatic reactions that occur when you use the Tool Palettes to
insert MvBlocks is programmed into them when they are dragged from the
DesignCenter over to a Tool Palette or when a custom MvBlock tool is created
for the Tool Palette with
default Properties set to produce certain desired results. |
| 3Modifying Multi-View Blocks |
3-25 BLOCKS - PROFILES |
Modify Multi-View Block Properties Palette
| Menu |
Format>
Multi-View Block> Multi-View Definitions... |
 |
|
| Keyboard |
MvBlockModify |
| Mouse |
Double-pick on
Object or Select Object, right-click, select Properties |
| Links |
Modifying Design Content - for
more on the same subject |
For Modifying Multi-View Blocks you can
use the Properties Palette which offers nearly all of the same options as
those found when Adding Multi-View Blocks with the Properties Palette. Since
MvBlocks are much like regular Blocks, there really isn't much that you can modify unless
you go deeper into the Multi-View Block Definition Style.
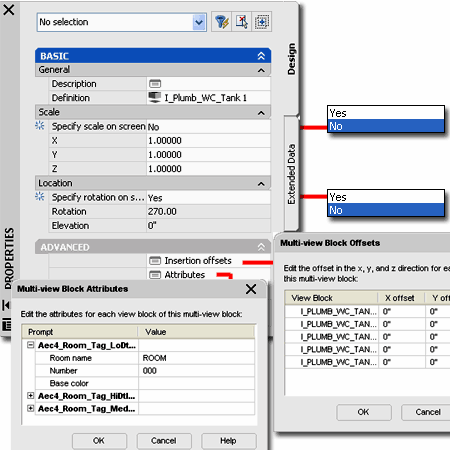
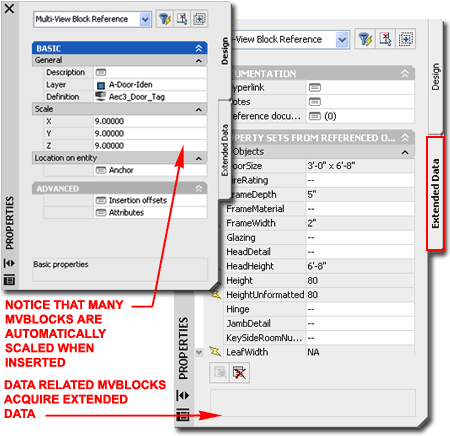
Illustrated to the right I show what the Properties Palette
looks like when Modifying a common Door Tag Multi-View Block. Many MvBlocks are
automatically scaled for the Drawing Scale
and you may find these numbers on the value fields under the Scale section. Some
Annotation MvBlocks offer Attribute fields that can be accessed and modified through the Multi-view
Block Attributes dialog. Other Annotation MvBlocks that are Anchored to
Objects such as Doors and Windows, may offer access to Extended Data as illustrated to the
right. You can learn more about Extended Data in Part 18 - Schedules.
If you need an object to be a different dimension in Width,
Depth or Height, you can change these values to match what you want. |
In some cases, however, this will create odd results; such as if you attempt
to make a Range wider ( the burners will become ellipses ). X - width of object, Y - depth
of object, Z - height of object. |
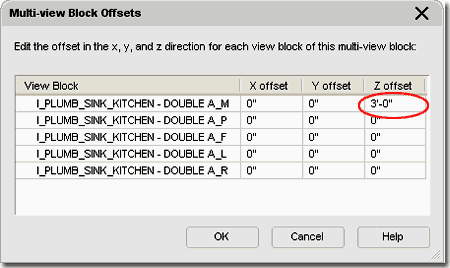
| Multi-View
Block Reference Properties - Offsets tab On
the Multi-View Block Offsets dialog box you will find all of the
individual Blocks that make up the Multi-View Block you have selected. If you have
selected a complicated MvBlock, like a Range ( Cooker ), you may see as many as five
blocks. Each Block is used for a different View orientation so you might see letters
used in their names that indicate what View they are used for; such as M (Model), P
(Plan), F (Front), L (Left) and R (Right).
The X, Y and Z Offset value
fields allow you to uniquely reposition each of the individual Blocks within a Multi-View
Block. It would be a rare occasion where you would use this option but in the case
of a Kitchen Sink, for example, you may decide that you want to leave most of the 2D
Blocks at zero while pushing the Model Block up to the correct countertop height.
Typically I put all my Sink MvBlocks at the right height since it doesn't appear to matter
for the Plan Views but at least you have the option to do things like that. |
 |
| Multi-View
Block Reference Properties - Attributes tab 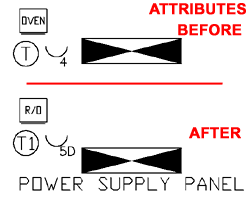 On the Multi-View Block Attributes
dialog box you will find any value fields associated with Attributes within the MvBlock.
These are very similar to the Attribute fields that you can edit with the AttEdit
command on regular AutoCAD Blocks. MvBlock Attributes cannot be edited with the
AttEdit command because the Attributes are buried one level deeper in a nested Block so
you will need to use this dialog to get to them. On the Multi-View Block Attributes
dialog box you will find any value fields associated with Attributes within the MvBlock.
These are very similar to the Attribute fields that you can edit with the AttEdit
command on regular AutoCAD Blocks. MvBlock Attributes cannot be edited with the
AttEdit command because the Attributes are buried one level deeper in a nested Block so
you will need to use this dialog to get to them.
Illustrated to the left and right I show examples of how
you can use the Multi-View Block Attributes dialog box to modify some of the Attribute
fields within the default ADT MvBlocks. |

Though there are not that many default MvBlocks with Attribute fields in ADT, you may want to create your own - see more under
Customizing and Tricks. |
| Multi-View
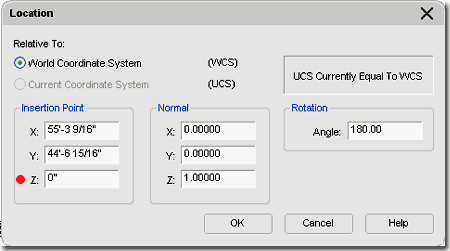
Block Reference Properties - Location dialog 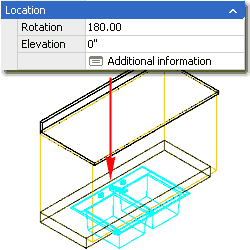 On the Location
dialog box you will find Insertion Point value fields that you can use to adjust the
position of a Multi-View block should its default Insertion Point prove to be undesirable;
some 3D MvBlocks insert at Z=0, for example. On the Location
dialog box you will find Insertion Point value fields that you can use to adjust the
position of a Multi-View block should its default Insertion Point prove to be undesirable;
some 3D MvBlocks insert at Z=0, for example.
For many MvBlocks, you can Modify the Z-axis value directly
without having to use the Location dialog. Illustrated to the left I show how the Elevation
value field can be used to set a new Z-axis value rather than using the Z Insertion Pont
value field on the Location tab illustrated to the right. I tend to use the Location
dialog only as a quick checking tool for anomalies in X, Y or Z insertion values but for
the most part I alter these values directly on the screen by moving the Objects in the X,
Y or Z direction. |
 |
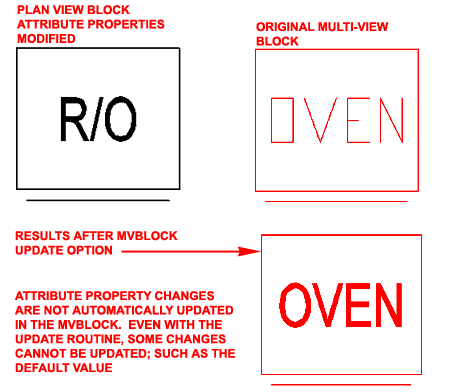
| Multi-View Blocks - Update This option is designed to update Attributed information in MvBlocks when it
has been changed in one or more of the Blocks that define it. Because Attributes
become buried inside Multi-View Block Definitions, they also become orphaned in a sense
and do not automatically update when the Attributes of the Parent Block are changed.
In the illustration to the right I show what a default
MvBlock might look like when first inserted - far right. By inserting the Top or
Plan View Block of this MvBlock Definition, I can use the Refedit routine to access the
Attribute Properties and change them as illustrated by the new font and the letters
"R/O". When this change is saved using the RefClose command, the Block
will be saved and updated but the Block within existing MvBlocks do not automatically
update. After running the MvBlock Update option, lower right, the font illustrates
that it has updated.
If you insert another copy of the MvBlock, it will not only
display the Font change but it will also display the new "R/O" default value. |
 |
| Multi-View Blocks and
Grips For those familiar with the process of
making Blocks, the process of making MvBlocks may be a bit confusing since there is never
a query to Select Objects nor one for Specifying Insertion Point. |
When you Select an MvBlock, there is a Grip Point and it is at the Insertion Point but since you typically
can only view on Block at a time within an MvBlock, the Grip is get is the one from that
particular Block. This means that there can be different Insertion Points and you
can end up with a Top View Block having a different Grip Position than the Elevation View
Block. This is not an ideal situation and typically this indicates that the
different Blocks within an MvBlock don't actually line up in space. |
Multi-View Blocks and
Refedit
| Menu |
Modify> Xref and
Block Editing> Edit Reference In-Place |
 |
 |
| Keyboard |
RefEdit |
| Mouse |
Double left-pick on Block
Object. |
| Links |
Modifying Design Content - for
more on the same subject |
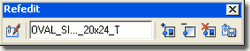
 Though
you cannot use the Refedit tool to Modify MvBlocks, you can use it to Modify the original
Blocks within it. If a Plan View (Top) portion of an MvBlock is incorrect, for
example, you can Insert that Block and use the RefEdit command to make changes to that
Block which, when Saved, will automatically alter the Plan View for the MvBlock it is
associated with. Though
you cannot use the Refedit tool to Modify MvBlocks, you can use it to Modify the original
Blocks within it. If a Plan View (Top) portion of an MvBlock is incorrect, for
example, you can Insert that Block and use the RefEdit command to make changes to that
Block which, when Saved, will automatically alter the Plan View for the MvBlock it is
associated with.
|
 |
| Multi-View Blocks and
Explode Generally we all know the song and
dance about NOT EXPLODING Blocks but there are times when it has to be done. Since
MvBlocks are actually a series of Blocks nested within one MvBlock, the process of
Exploding and the the results of that work is different than with regular Blocks. |
The
first thing you need to realize is that the View Orientation, such as Top Plan or
Isometric, affect the results of Exploding an MvBlock. The current Display
Configuration setting can also affect the result of Exploding so take these matters into
consideration before doing this drastic act. Typically, if you Explode an MvBlock
from a Top View with something like Medium Detail as the current Display Configuration,
that is exactly what you will get: the top view Block as designed for the Medium Detail
Display Configuration.
The first Explode action will result in the
creation of an Anonymous Block that is basically useless. The second Explode will
release the actual Block which you can Edit In Place if you wish. The third Explode
will free the entities within the Block as would normally occur when Exploding a Block. |
Multi-View Blocks and Purging
| Menu |
Format>
Multi-View Blocks> Multi-View Block Definitions... |
 |
|
| Keyboard |
MvBlockDefine |
| Keyboard |
Purge - to
remove the Blocks |
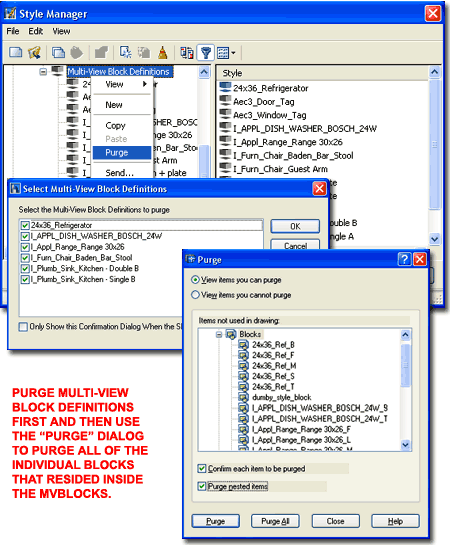
For Multi-View Block Definition Styles as
with many ADT Object Styles, the process of Purging is not as straight
forward as it is with regular AutoCAD Objects. Since many MvBlocks include regular
AutoCAD Blocks, the process for purging requires the use of both ADT's Purging tools and
AutoCAD's. To Purge all unused and unreferenced MvBlocks, go to the Multi-View Block
Definition Style under the Multi-Purpose Objects folder of the Style Manager and use
either the Purge button or the Purge option on the right-click pop-up menu as illustrated
to the right.
You can Purge from the Multi-View
Block Definitions title or by selecting individual Style Names.
If you active the Purge option from the title, as illustrated, you will invoke the
"Select Multi-View Block Definitions dialog" for confirmation
of the various MvBlocks that you can Purge. I find this option rather useful when
attempting to clean up a file so I can read off the names of MvBlocks that I may want to
keep. If you Select a specific MvBlock Style Name, it will be Purged directly if
possible.
After MvBlocks have been Purged, you will need to use the Purge
command to remove all of the Blocks that may have been part of the MvBlock
Definition Styles. |
 |
| 4Multi-View Block Styles |
4-25 BLOCKS - PROFILES |
Multi-View Block Definitions - Style Manager
| Menu |
Format>
Multi-View Blocks> Multi-View Block Definitions... |
|
|
| Keyboard |
MvBlockDefine |
| Links |
Modifying Design Content - for
more on the same subject |
Multi-View Blocks are managed by the Style
Manager where, unlike most other ADT objects, you will find very little in terms
of options. This is because there really isn't much to manage. The primary
tool you will find for managing MvBlocks is the View Blocks tab on the
Multi-View Blocks Definition Properties dialog - see discussion below.
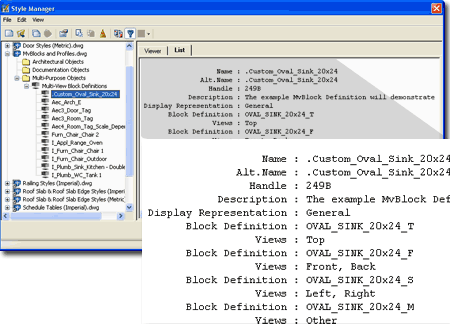
Illustrated to the right, I show the List
tab of a typical ADT Multi-View Block Object: a Sink and the various Blocks that reside
within the Multi-View Block. In the List, you will see the View Direction listed
next to each Block Definition Name.
Though MvBlocks often have Blocks for each View
Orientation, many Annotation based MvBlocks, such as Section Bubbles and Room Labels only
have one or two Blocks designed for Plan View only. |
One of the most useful features of carefully designed Annotation MvBlocks is automatic scaling for different Display
Configurations. You can see a great example of this scaling option by working with
the Scale Dependent Area Tags discussed in Part 18 Schedules - Adding Area Tags |
| Multi-View Block
Definitions dialog - General tab For
Multi-View Block Definition Styles, you can use the Style Manager to
load, modify, delete and create new Multi-View Block Styles. Though ADT does not
come with a default Style file full of MvBlock Definition Styles like those for Doors,
Windows and numerous other Objects, you can create your own should you wish to.
MvBlock Styles can also be acquired by Copying and Pasting between drawing files which is
a very command way to exchange these Objects. The most common way to acquire
MvBlocks is through the DesignCenter and Tool Palettes where you simply drag-n-drop or
Insert these Object Styles without giving any thought to the fact that they are actually
Styles. Because they are Styles, however, you can actually use the Style Manager to
access other ADT drawing files to copy them as Styles without having to Open those drawing
files.
When creating New MvBlocks, this is one of the few times
where I recommend that you do not use an existing MvBlock Definition Style as the source
for a new one but that you actually create it from Scratch. The reason for this
recommendation is that you usually don't want the Blocks from another MvBlock but new ones
that you have just created
Illustrated to the right I show the process of
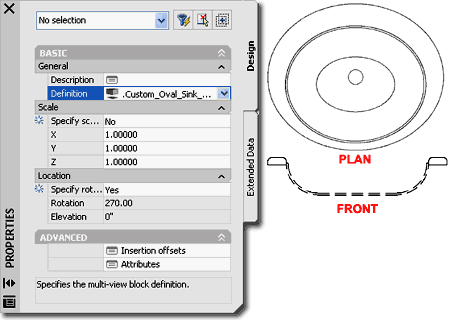
creating a New Multi-View Block Definition Style that I have Named ".Custom_Oval_Sink_20x24".
By double-clicking on this new style, I show that I have also activated
the Multi-View Block Definition Properties dialog box where all of the
custom settings can be made for the Block Associations to specific View Directions.
The General tab
provides access to the Name and Description
fields for a Style; plus access to the attachment of Notes
and
Property Sets. |

If you expect to extract data for Schedules or Spread sheets based on your
MvBlock, you may want to consider using the Property Sets... option to
pre-assign Property Data so you won't have to Tag the Object after Insertion
into your drawing. If you use Tags for Objects like Furniture MvBlocks,
this won't be necessary. |
| Multi-View
Block Definitions dialog - View Blocks tab On the View Blocks tab of the Multi-view Block
Definition Properties dialog box, illustrated to the right, hopefully all of the
mystery behind MvBlocks will reveal itself to you.
Display Representations
Under this category you will find all of the Display Representations that are currently
available for MvBlocks in the current drawing file. You may find that you have more
or less depending on the file you are using. The illustration to the right is based
on one of the default template files that come with ADT. You can also create your
own custom Display Representations for MvBlocks to expand on this feature. When you
create your MvBlock Definition Style, you will need to highlight one Display
Representation and Add... all of the Blocks you intend to use for each of the View
Directions and associate them with their matching View Directions. This means that
you may need to repeat a bit of work for each Display Representation and I often find this
incredibly tedious. The General and Model Display Representations are the two most
commonly used but depending on your MvBlock, you may also need to consider the Reflected
Display Representation. The three Plan Display Representations will not produce any
results unless you modify the settings on the Display Manager Window for all MvBlocks.
View Blocks:
Under this category you will need to use the Add.. button to access the Select A Block
dialog which will display all of the Blocks you have in the current drawing file.
From this list you will need to Select one Block at a time that you want to use in your
MvBlock. You can Add each one and then match them to their View Directions or do it
concurrently.
View Directions
Once you have a Block highlighted under the View Blocks category, you can check and
uncheck any of the View Directions checkboxes. For most MvBlocks, you will want a
Plan or Top View Block and thus you would check the Top View Direction checkbox but
uncheck the rest. If you make a mistake on any of these checkboxes, the results will
often be obvious as you use the View buttons to look at your ADT work from different
directions. I have made many mistakes and found some very confusing linework later
down the road so I recommend that you check your MvBlock from all directions as soon as
you finish one. You can always come back and change these View Directions settings
so fixing mistakes is easy. Set
Interference Block
Use this button to access the Select a Block dialog where you can pick yet
another block for an invisible body that can be used as an Interference
Reactor. One of best examples of where to use this feature is with
custom Sink and Lavatories where you may want to Subtract a hole in your
Casework. The hole needs to be a solid Mass Element that will remove
enough space around the object the sink is sitting in so you will not see
the cabinetry running through the sink itself. By making a Block of a
Mass Element, you can create Interference Bodies for all sorts of MvBlocks.
|
An Interference Block added to a Refrigerator, for example, can be used to
punch a hole in any Wall you may want to recess it into.
Creating a
Multi-View Block Interference Block - for an example of how this
works.
Note:
If you like to show your Switch MvBlocks on your Reflected Ceiling Plans, as I do, you
will need to make this modification to ADT's default Switch Multi-view blocks because they
 are set to not display in RCP's. By using the same block ADT
uses for plan view on the General Display Representation, you can Add it to the Reflected
Display Representation and orient it for Top View. The blocks for the various view
directions will have names that are very similar with exception of the last letter which
indicates view direction; such as "P" for Plan and "L" for Left and
Right view and "M" for Model. In the case of the dimmer switch or regular
switch you should see a block name such as "I_ELEC_SWITCH_DIMMER_P" or
"I_ELEC_SWITCH_SINGLE_POLE_P". are set to not display in RCP's. By using the same block ADT
uses for plan view on the General Display Representation, you can Add it to the Reflected
Display Representation and orient it for Top View. The blocks for the various view
directions will have names that are very similar with exception of the last letter which
indicates view direction; such as "P" for Plan and "L" for Left and
Right view and "M" for Model. In the case of the dimmer switch or regular
switch you should see a block name such as "I_ELEC_SWITCH_DIMMER_P" or
"I_ELEC_SWITCH_SINGLE_POLE_P".
If you want to make this a permanent change
for the DesignCenter, you can edit the source Multi-view block by opening it
directly. It's just a drawing file residing in the folder you see in the
DesignCenter. Once you have it opened, you can repeat this example and save the
file. Another change you might want to make, is to Add... the 3D switch Block, from
the same directory, on all your Switch Multi-view blocks. |
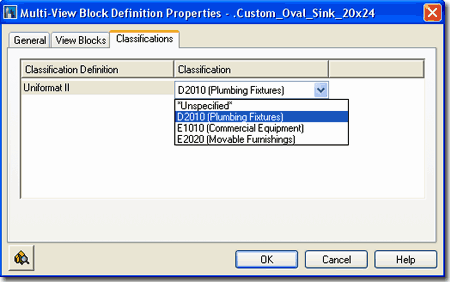
| Multi-View Block
Definitions dialog - Classifications tab
Classifications offer another way to
separate Object Styles into categories that can be used in Schedules and
even in Display Representation Sets ( as "Show"
or "Hide" ). Many of the default ADT MvBlocks use the
Uniformat II Classification Definition Style as a source for classifying them by
discipline as illustrated to the right.
This topic will be discussed further under Part 18 -
Schedules. You can also read a bit more about how to create Classification
Definitions in Part 1 -
Display. |
 |
| 5Multi-View Block Display Properties |
5-25 BLOCKS - PROFILES |
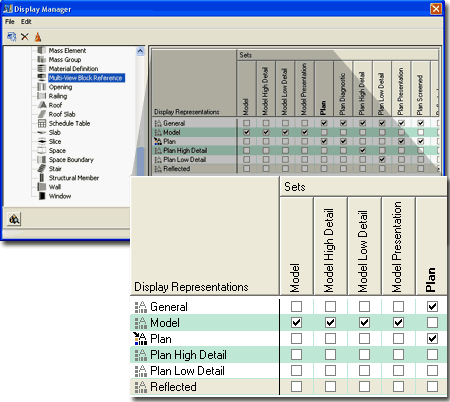
| Multi-View Blocks -
Display Properties
Though you may find several Display Representations
for Multi-View Block Definitions under the Representation by Object folder
of the Display Manager Window, MvBlocks actually don't have Display
Representations. As you may notice, all of the Display Representations are gray and
you cannot access them for Modifications. What you can do with these false Display
Representations is use them as an On or Off switch for the various Display Representation
Sets, which in turn, are triggered by the Display Configurations you set for your drawing.
In other words, you may want to use the Plan and Plan High Detail ( or create your
own ) Display Representations to differentiate between a Small Scale version of one
MvBlock and a Large Scale version.
|
 |
| Multi-View
Blocks and Printing
Scales Among the default set of false Display
Representations for Multi-View Blocks, you should find "Plan High Detail"
and "Plan Low Detail". These Display Representations can
be used to manage MvBlocks that have graphics designed for different Printing Scales but
you can also create your own custom Display Representations for such tasks.
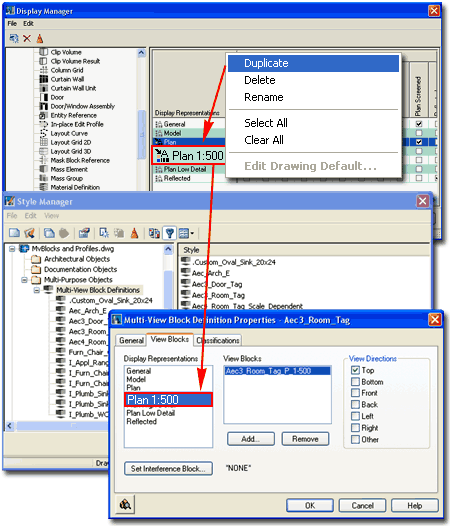
Illustrated to the right I show how you can highlight
an existing Display Representation,
like "Plan", right-click and use the "Duplicate"
pop-up menu option to create a Copy of the highlighted Display
Representation. Once you have created a Duplicate, you can rename
it to anything you want but choosing a name that indicates the intended printing scale is
quite useful. In the illustration to the right I show how I created a Plan for
"Plan 1:500" printing scale.
Once you have created a custom Display Representation for
your MvBlocks, you will see how this Display Representation is now available for all Multi-View
Block Definitions on the View Blocks tab of the Multi-View
Block Definitions Properties dialog - as illustrated to the lower right.
By having extra Display Representations for MvBlocks, you
can use the Add... button to Add Blocks that have been designed to be
used for those unique Display Representations. This might be something as simple as
a copy of the original block but scaled up 500 times.
To use the new Display Representation you will, of course,
need to create a Display Representation Set and Display Configuration that provides the
means for switching to it. You can read up on this subject in Part 1 - AEC - Setup - Display but
the basic solution goes as follows:
Under the Display Sets folder in the Display
Manager Window, highlight a Display Set ( something like Plan
) and create a New Set based on the the highlighted one. Under the
Objects category ( right pane ) find the Multi-View Block Reference row and
make sure to only have one Display Representation Checked for this whole
row. The Display Representation that you should have checked is the one created
earlier specifically for the new scale (something like Plan 1:500).
|
Now go to the Display Configurations folder in the Display Manager
and repeat the process of creating a New Display Configuration based on
the same logic used for creating a New Display Set ( highlight one that you like and
create a new one based on it ). For this New Display Configuration (named something
like Medium 1:500), use the Display Representation Set drop-down list in
the right pane next to View Direction ( on the Configuration tab ) to set the new Display
Representation Set (Plan 1:500) created earlier. If Plan is the place you want the
Printing Scale to change, set the Plan View Direction to the New Display Representation.
You are now done and should find that you can switch the Display Configuration to
the New one and that any MvBlocks that have a Block set for the new Display Representation
will automatically switch. |
| 6Creating Multi-View Blocks |
6-25 BLOCKS - PROFILES |
Comprehending the Process
| Download |
multi-view_block_example.dwg - for all of the
pieces in this example. Note: there are a few differences like the insertion points
but it's very close. |
Now that you have read all about the basics behind
Multi-View Blocks, it's time to create your own. ADT uses Multi-View Blocks in all
sorts of places and not all MvBlocks are constructed the same way. Annotation
MvBlocks, such as Detail Bubbles, obviously don't need 3D geometry or side views but other
content such as Appliances do.
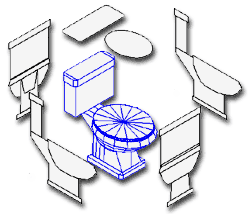
In the illustration to the right and in the following
discussion, I will take you through the steps needed to create a simple but very useful
MvBlock: a bathroom lavatory. You can use this process to create an endless supply
of 3D Content for your library.
To make a Multi-View Block, you must first draw the various
views of your object and then make regular AutoCAD Blocks out of them with the Bmake
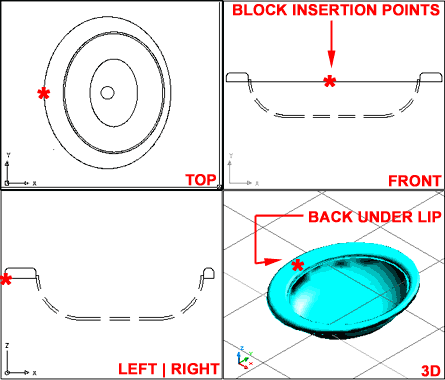
(Block Make) command. For this example I am going to use the Front View for the Back
and the Right Side for the Left but if you need to add greater detail you will have to
draw each one for each view that is actually different( including the Bottom if you happen
to look from that direction ).
For the following steps, draw as you normally would in 2D
AutoCAD mode. Use Polylines, Arc, Circles, Rectangles, Lines, Plines and other 2D
objects. Draw everything on Layer 0 (zero). If you are creating an actual
physical object and not an annotation symbol, draw it at a scale of 1:1 ( real size,
unless you are one of those clever folks who uses one block for various sizes ). For
Linetypes, select an appropriate Style that would work in the finished drawing; i.e., when
inserted, the Ltscale of that drawing will govern the Linetype scaling.
For the 3D Model, draw it on Layer 0 as well and consider
which modeling tools to use before jumping in. ADT has 3 types of Modeling objects:
Surfaces, Solids and ADT's native Facets ( also know as Masses ). |
 Note:
When you draw the Side, Front and Back Views, you must create them in the same orientation
as they will display relative to the World UCS. This means that when you draw the
Right Elevation View, for example, you will need to draw that view in Right View
Orientation with the UCS icon set to match. |
Creating Blocks for each View
| Menu |
View> 3D
Views> |
| |
 |
| Keyboard |
View |
 Before you create each Block for each View Direction and/or Display
Representation ( usually for scale purposes ), confirm the Properties of your linework.
For best results, set all linework to Layer 0 because that
prevents inheritance of unwanted Layers and allows for greater flexibility in changing the
Layer Properties of the MvBlock later. For Color, the standard has been to set this
Property to "By Block" but if you plan to Xref your MvBlock
this option doesn't work but "By Layer" does. For the
remaining Properties, "By Block" tends to be the standard but this has the same
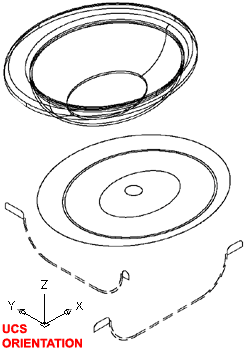
problem when the MvBlock is Xref'd instead of Inserted. Set the UCS icon to World
before making your Blocks. Before you create each Block for each View Direction and/or Display
Representation ( usually for scale purposes ), confirm the Properties of your linework.
For best results, set all linework to Layer 0 because that
prevents inheritance of unwanted Layers and allows for greater flexibility in changing the
Layer Properties of the MvBlock later. For Color, the standard has been to set this
Property to "By Block" but if you plan to Xref your MvBlock
this option doesn't work but "By Layer" does. For the
remaining Properties, "By Block" tends to be the standard but this has the same
problem when the MvBlock is Xref'd instead of Inserted. Set the UCS icon to World
before making your Blocks.
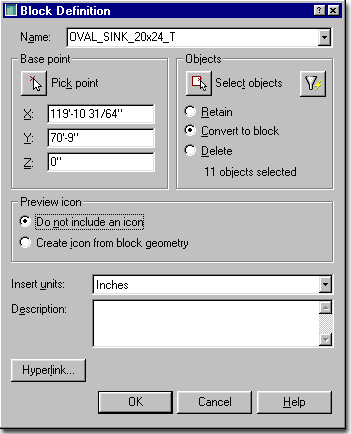
STEP 1
Set the View to Top,
draw a Top view of your MvBlock and make a Block of it with a unique
indicator in the name that refers to Top View; something like "ObjectName_ObjectSize_T".
Use a very specific Insertion Point that will be the same in all of the other
Blocks. If this is impossible to figure out, you can make Offset adjustments later.
STEP 2
Set the View to Front,
draw a Front view of your MvBlock and make a Block of it with a unique
indicator in the name that refers to Front View; something like "ObjectName_ObjectSize_F".
If you know that you will have different views for Front and Back, draw these and use
something like "F" and "B" for Front and Back in the Block
names. Try to use an Insertion Point similar to that selected for the Top view ( as
seen from the Front ).
|
STEP 3
Set the View to Right,
draw a Side view of your MvBlock and make a Block of it with a unique
indicator in the name that refers to the Side View; something like "ObjectName_ObjectSize_S".
If you know that you will have different views for Left and Right, draw these and use
something like "L" and "R" for Left and Right in the Block
names. Try to use an Insertion Point similar to that selected for the Top view ( as
seen from the Side ).
STEP 4
Set the View to Isometric, draw a 3D
Model view of your MvBlock and make a Block of it with a unique indicator in the
name that refers to Model View; something like "ObjectName_ObjectSize_M".
Try to use an Insertion Point similar to that selected for the Top view ( as seen from an
Isometric ). We can get into a whole philosophical debate on how to best model these
objects. If you want the smallest object size, use Surfaces. If you only know
how to Mass Model ( Facet Model ), use them and if you are already a master of Solid
Modeling, well, why not use that. These things tend to get big no matter what you do
and for a Sink or Lavatory, the easiest thing is to use Solid Modeling tools. |
Creating a Multi-View Block Style
| Menu |
Format>
Multi-View Blocks> Multi-View Block Definitions... |
|
|
| Keyboard |
MvBlockDefine |
After creating the various Blocks needed for each of the
View Directions, proceed to the process of Creating a Multi-View Block.
STEP 5
On the command line type "MvBlockDefine"
or use the Format pull-down menu to access the Multi-View Block cascading menu and select
"Multi-View Block Definitions..." On the Style
Manager Window filtered for Multi-View Block definitions, use
the New button to create a New MvBlock Definition.
STEP 6
Highlight your new MvBlock Definition and use
the Edit... button to access the Multi-View Block Definition
Properties dialog box
On the General tab of the Multi-View Block
Definition Properties dialogue box, provide a description of your cool
new block.
STEP 7
On the View Blocks tab of the Multi-View
Block Definition Properties dialog box, select a Display Representation and
use the Add... button to insert each of the Blocks created for the various views.
You will need to add them one at a time, unfortunately.
Once you have Added all of the Blocks for the
various views, highlight one block and assign it one or
more View Directions.
Repeat this process for each Display
Representation that you wish your MvBlock to display in. The most common Display
Representation for general furniture and fixtures would be the General, Model
and possibly Reflected Display Representations.
For the General Display
Representation, assign all View Blocks to their respective View
Directions and use your Model Block for the "Other"
View Direction if appropriate.
|
For the Model Display
Representation, use only the 3D Model Block but set it for
all View Directions.
For
the Reflected Display Representation, use any View Blocks that you have
created for Reflected views or use a plan view if you want it to display in Reflected
plans. Set it to Top View Direction.
For other Display Representations, you might
want to use them for advanced display control. This is where you might have a full
set of MvBlocks for one scale or type of output and another whole set for details.
As far as I know, none of the default ADT MvBlocks have this level of sophistication built
in yet but you could do it. The problem is that the more you add the more memory
each MvBlock consumes. Personally, I would love a library of symbols that could
match my different printing scales and know the difference between a client presentation
drawing and construction documents. How about you? |
|
Creating a
Multi-View Block Interference Block STEP
8 - OPTIONAL
For some Multi-View Objects,
such as this Sinks and Lavatories, you may need to have them interact with
other Objects to Add or Subtract matter from them. For such
situations, you can employ an invisible Block form that is used as an
Interference Object.
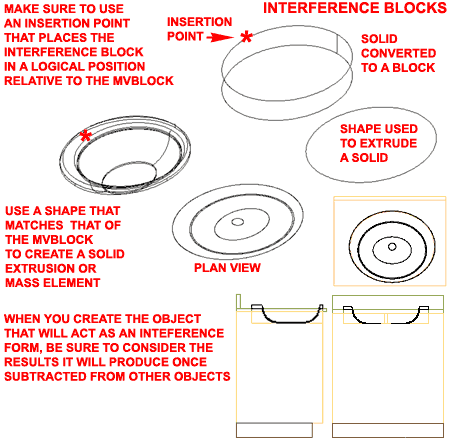
 Illustrated
to the right I show how I used one of the Plan View shapes of my example
Lavatory to create a Solid by using the Extrude command. I
chose one of the Plan View lines to help make the resulting subtraction
disappear in my construction documents; i.e., if your Interference Object
doesn't match up with your Plan View Block, you are likely to see extra
linework that you may not want to display. Illustrated
to the right I show how I used one of the Plan View shapes of my example
Lavatory to create a Solid by using the Extrude command. I
chose one of the Plan View lines to help make the resulting subtraction
disappear in my construction documents; i.e., if your Interference Object
doesn't match up with your Plan View Block, you are likely to see extra
linework that you may not want to display.
When making a Block out of the Solid
or Mass Element to be used as an Interference Object, it is very important
that you choose an Insertion Point that corresponds to the 3D Model
Block of your MvBlock Definition. The logic simply follows suit with
the process of creating the other View Blocks of any MvBlock.
Once you have created an Interference Block,
use the Set Interference Block... button on the View Blocks
tab, see above, to assign it to your MvBlock Definition and it will be
ready for use whenever you wish to.
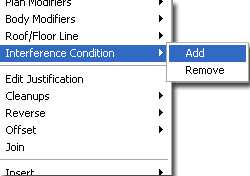
To use the Interference Block, look for the
option to Add an Interference Condition to other Objects, such
as Walls - see context menu example, left. When you Add an
Interference Condition to a Wall, for example, you will be prompted to
Select the Object that will act as an interference condition and then you
will be prompted for how you want this Object to display in Plan with
respect to the Shrinkwrap: Additive, Subtractive or Ignore. |
If, in the case of this Wall example, the
Shrinkwrap is not used then any of these options will appear to produce the
same results but if the Shrinkwrap component is On, the Additive option will
expand the Shrinkwrap line out around the Sink if it protrudes beyond the
outer edge of the Wall.
Command: WallInterferenceAdd
Select AEC objects to add: <Select MvBlock>
Select AEC objects to add:
Enter shrinkwrap plan effect [Additive/Subtractive/Ignore]: <I typically
use Subtractive> |
Test your MvBlock
| Menu |
Format>
Multi-View Blocks> Add Multi-View Block... |
|
|
| Keyboard |
MvBlockAdd |
| Menu |
View> 3D
Views> |
| |
|
| Keyboard |
View |
Now that you have created your Multi-View Block, you will
need to test it to confirm that the correct View Blocks pop up for the
proper View
Directions. Use the Add Multi-View Block button and insert your new
MvBlock in a blank drawing. Use the View button on the View toolbar,
illustrated above, and make sure that you see only the appropriate View Block for
the various 2D viewing angles. For the Isometric Views, you should see only the 3D
View Block. |
 If there are errors, you can go back to the Style
Manager and Edit... the Definition Properties. If there are errors in any of the
individual blocks, you can insert them and use the Refedit command to make the necessary
corrections. If all you see in a particular View Direction is a Line, that either
means the original orientation of the Block was incorrect or you accidentally chose the
wrong Block within the MvBlock Definition. |
| I Created
an MvBlock but how do I get it into the DesignCenter?
When you are done creating a custom MvBlock,
you will probably want to add this item to the DesignCenter or a
custom Tool Palette. Adding an MvBlock to a Tool Palette is far
easier than adding it to the DesignCenter.
|
 To
create a Tool Palette tool all you need to do is drag the MvBlock over to a
Palette but be sure to set the "Style Location" path to the source of the
MvBlock which can either be saved as a single separate file or be part of a
Style File. To
create a Tool Palette tool all you need to do is drag the MvBlock over to a
Palette but be sure to set the "Style Location" path to the source of the
MvBlock which can either be saved as a single separate file or be part of a
Style File. To add Content
to the DesingCenter, you will need to use the Create AEC Content Wizard
and run it through a few basic steps that involve setting a Layer Key,
Scales and Icon - see Part
17 - Documentation for more. |
| 7Adding and Attaching Mask Blocks |
7-25 BLOCKS - PROFILES |
Add Mask Block Properties Palette
| Alt.Menu |
Document> Mask
Blocks> Add Mask Block... |
 |
|
| Keyboard |
MaskAdd |
| Links |
Mask Block Styles - for how to load
other mask blocks |
| |
|
The Add Mask Block Properties Palette may
be one that you will never use since most Mask Blocks come in through other means, like
the DesignCenter. When you drag in Mask Blocks via the DesignCenter or Tool Palette,
you will not notice that it is any different than other Blocks such as Multi-View Blocks.
One thing that you need to be clear about is that a Mask Block is little more than
Pline shape but it can include a multitude of other Object Types such as MvBlocks.
The other Object Types are referred to as "Additional Graphics".
Therefore, you might think of a Mask Block Definition as something similar to
a special grouping tool with a unique ability to Mask out other graphics.
As with MvBlocks, Layer Keying, Scaling and other features
are automated through the dragging action from the DesignCenter or Tool Palette and thus
Adding Mask Blocks directly with the MaskAdd command may not be the best option because no
automated actions will transpire. |
 Having said that, there have been times when I have crated Mask Block
Definitions out of Polyline shapes and added them directly as a solution for masking out
things like chairs under a bar countertop. This is similar to using a Wipeout in
AutoCAD but a bit more specific to ADT Objects and the current Display Configuration. |
| Adding a Ceiling Fixture - Example
One of the best examples of how a Mask Block offers
fantastic results is with Ceiling Fixtures that have to work within a
specific Ceiling Grid that doesn't accommodate the fixture properly. I usually come
across this situation when doing "As-Built" surveys.
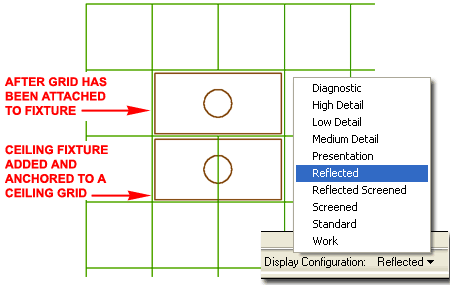
Illustrated to the right I show a common square T-bar
ceiling grid with one of the default Fluorescent ceiling fixtures from ADT's library.
To see these objects you must set the current Display Configuration to Reflected.
By using the Mask Block, I show that I can have the ceiling fixture cover or
"mask" the grid line that passes through it. Below I outline how this
specific example was achieved.
Mask Blocks are designed for 2D use and will not
"mask" in 3D Views where Shading or Hiding would typically be used to achieve
similar results. Mask Blocks only mask the Object they have been Attached to.
Mask Blocks only mask one Display Representation at a time so, for example, if you mask
for "High Detail" that may not mask for "Low Detail". |
 |
Attach Mask Blocks to Objects
| Menu |
N.A. |
 |
|
| Keyboard |
MaskAttach |
| Links |
Mask Block Styles - for how to load
other mask blocks |
| |
|
Mask Blocks don't automatically "mask" anything
though you might think they should by the very nature of their structure; you actually
have to set the Object they should mask by using the MaskAttach command.
Mask Blocks can mask multiple Objects but each Attachment has to be done
as a separate operation; i.e., you cannot select multiple objects to be masked at once.
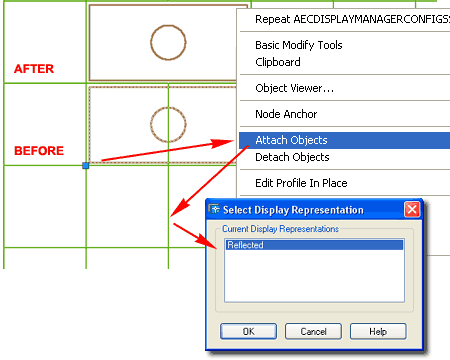
Illustrated to the right I show how you can use the Attach
Objects pop-up menu option to make a ceiling fixture cover any unwanted
ceiling grid linework. To follow this example, select a mask block, right-click to
invoke the object specific pop-up menu, select "Attach Objects", Select the
target Object to be masked and then Select the appropriate Display Representation where
you want the "masking" effect to occur. |
 |
| 8Modifying Mask Blocks |
8-25 BLOCKS - PROFILES |
Modify Mask Block Properties Palette
| Alt.Menu |
Document> Mask
Blocks> Mask Block Properties |
 |
|
| Keyboard |
MaskProps
or -MaskModify |
| Links |
Modifying Design Content - for
more on the same subject |
The Modify Mask Block Properties Palette
is basically identical to the Add Mask Properties Palette and thus also the same as the
Modify Multi-View Properties Palette. See Modify Multi-View Block
Properties Palette for more.
Other than the Attach and Detach
tools, there really isn't much more that can be Modified on Mask Blocks. Since Mask
Blocks, at the simplest level are nothing more than polylines and at the most complicated,
nothing more than polylines tied together with other ADT objects, Editing falls to either
the Mask Block Definition Styles or the other objects.
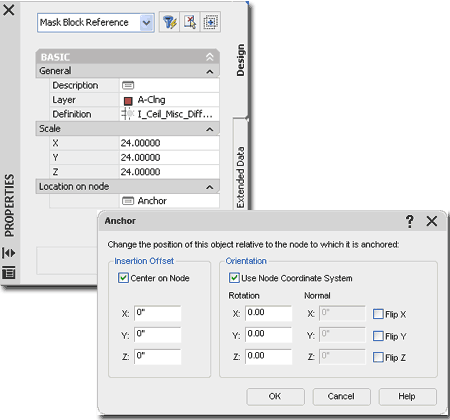
Illustrated to the right I show the Properties Palette for
an Anchored Ceiling Fixture and the Anchor dialog box that you can access from this
Palette. The Anchor dialog box will allow you to reposition an Anchored Object while
keeping it Anchored and thus provides the means for shifting the position for unusual
circumstances. |
 |
Modify Mask -
Context Menu Options
| Mouse |
Select Mask Block, right-click to activate
Context menu |
| Links |
Modifying Design Content - for
more on the same subject |
Because Mask Block Definitions are rather basic in nature, there is a fairly
limited set of Modification options. Though Mask Blocks can appear complex, remember
that the complexity usually is the result of the "Additional Graphics"
associated with the Mask itself and thus the Modification you may want to make is actually
on this "Additional Graphics" ( typically MvBlocks).
|
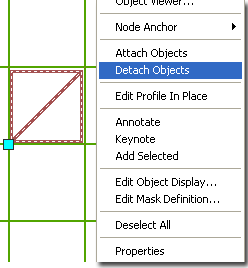 Illustrated to the left I show the options you will find on
the Object Specific pop-up menu for a Mask Block. As discussed above, the Attach
and Detach options are what make a mask Block actually mask another
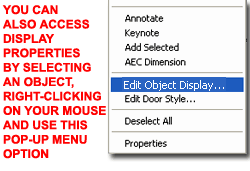
object; Detach releases the masking effect. the Edit Profile
In Place provide access to the Polyline shape used to define the Mask shape and
works much like any of the Edit Profile In Place options - see discussion on Profiles below.
For Edit Object Display...,
see discussion below. Illustrated to the left I show the options you will find on
the Object Specific pop-up menu for a Mask Block. As discussed above, the Attach
and Detach options are what make a mask Block actually mask another
object; Detach releases the masking effect. the Edit Profile
In Place provide access to the Polyline shape used to define the Mask shape and
works much like any of the Edit Profile In Place options - see discussion on Profiles below.
For Edit Object Display...,
see discussion below.
|
| 9Mask Block Styles |
9-25 BLOCKS - PROFILES |
Mask Block Definition - Style
Manager
| Alt.Menu |
Document> Mask
Blocks> Mask Block Definitions... |
 |
|
| Keyboard |
MaskDefine |
| Links |
|
For Mask Block Definition Styles, you can
use the Style Manager to load, modify, delete and create new Mask Block
Styles. Though ADT does not come with a default Style file full of Mask Block
Definition Styles like those for Doors, Windows and numerous other Objects, you can create
your own should you wish to. Mask Block Styles can also be acquired by Copying and
Pasting between drawing files which is a very command way to exchange these Objects.
The most common way to acquire Mask Blocks is through the DesignCenter and Tool Palettes
where you simply drag-n-drop or Insert these Object Styles without giving any thought to
the fact that they are actually Styles. Because they are Styles, however, you can
actually use the Style Manager to access other ADT drawing files to copy them as Styles
without having to Open those drawing files.
When creating New Mask Blocks, this is one of the few times
where I recommend that you do not use an existing Mask Block Definition Style as the
source for a new one but that you actually create it from Scratch. The reason for
this recommendation is that you Mask Blocks are created by using the Set From tool to
Select specific Objects on the screen and you might accidentally end up with the wrong
graphics if you copy a Style.
Illustrated to the right I show the process of
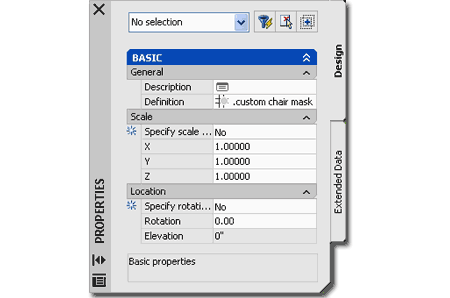
creating a New Mask Block Definition Style that I have Named ".custom
chair mask". By double-clicking on this new style, I
show that I have also activated the Mask Block Definition Properties dialog box
where a few basic settings can be made for these Object Styles. The Primary work is
achieved through the "Set From" tool as discussed below. |
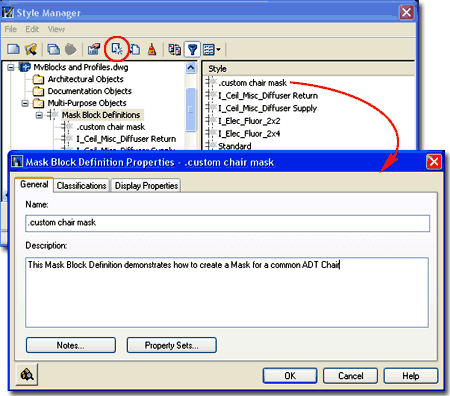 The
General tab provides access to the Name and Description
fields for a Style; plus access to the attachment of Notes and Property Sets.
If you expect to extract data for Schedules or Spread sheets based on your Mask
Block, you may want to consider using the Property Sets... option to pre-assign Property
Data so you won't have to Tag the Object after Insertion into your drawing. If you
use Tags for Objects like Furniture Mask Blocks, this won't be necessary. |
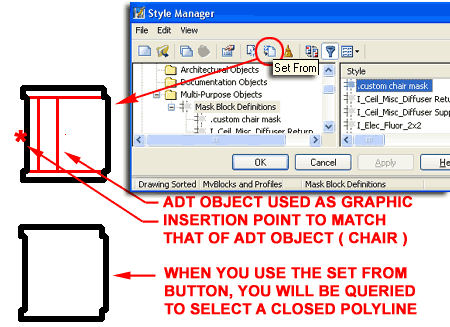
| Mask
Block Definition Style- Set From Once
you have created a Mask Block Definition Name, you will have to use the Set From
button on the Style Manager Window to define the shape that the Mask will have. For
the shape, you have to use a Closed Polyline drawn prior to getting to this point.
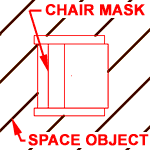 Illustrated to the right, I show a common ADT object ( a Chair )
with a Polyline traced around the exterior edge. By using the Set From tool, I
selected the Polyline around the chair to define the Mask Block and then Selected the
Chair MvBlock as "Additional Graphics". Illustrated to the right, I show a common ADT object ( a Chair )
with a Polyline traced around the exterior edge. By using the Set From tool, I
selected the Polyline around the chair to define the Mask Block and then Selected the
Chair MvBlock as "Additional Graphics".
After picking the Set From button, Select
the Polyline, Do not Add Another Ring, Set the Insertion
Base Point to match that of the object to be included ( the Chair ) and then Select
the "Addition Graphics" ( the Chair ).
Note:
Adding Rings provides you with the option to make a Mask that has a hole or alternating
Masked and unMasked sections ( like a ring ).
Adding Additional Graphics is not necessary but most likely
the way you will use Masks. All of the Ceiling Lights that have Masks, were created
this way. Adding Additional Graphics simply means that you want your Mask outline
with something in the place of the Mask; lines, blocks or other ADT objects. |
 |
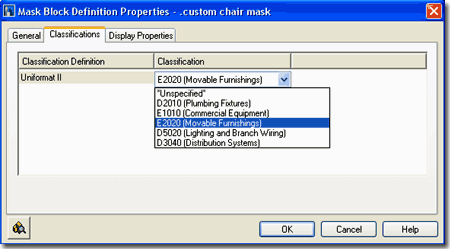
| Mask
Block Definition Style - Classifications tab
Classifications offer another way to
separate Object Styles into categories that can be used in Schedules and
even in Display Representation Sets ( as "Show"
or "Hide" ). Many of the default ADT Mask Blocks use the
Uniformat II Classification Definition Style as a source for classifying them by
discipline as illustrated to the right.
This topic will be discussed further under Part 18 -
Schedules. You can also read a bit more about how to create Classification
Definitions in Part 1 -
Display. |
 |
| Mask Block Definition Style - Display Properties The Display Properties tab on the Mask
Block Definition Style dialog box, illustrated to the right, provides
access to a very limited list of Display Representations. For any Display
Representation, Mask Blocks only offer two Display Components: Boundary Profile an
Additional Graphics. As with the Multi-View Block,
discussed above, you can use the Display Manager to quickly turn on or
off all Mask Blocks for General or Reflected Display Representations.
 Illustrated
to the left, is another way to access the Display Properties tab; select
the specific object, right click on your mouse
to invoke the object-specific pop-up menu and select Edit Object Display... Just
be aware that when you use this approach, you can actually set an Object Override as
opposed to a Style Override. Object Overrides can be extremely useful because they
allow you to turn Off things like Boundary Profiles on any single object within a Style
Family but they can also be problematic because they lock you out from more centralized,
Style level, controls. Illustrated
to the left, is another way to access the Display Properties tab; select
the specific object, right click on your mouse
to invoke the object-specific pop-up menu and select Edit Object Display... Just
be aware that when you use this approach, you can actually set an Object Override as
opposed to a Style Override. Object Overrides can be extremely useful because they
allow you to turn Off things like Boundary Profiles on any single object within a Style
Family but they can also be problematic because they lock you out from more centralized,
Style level, controls.
|
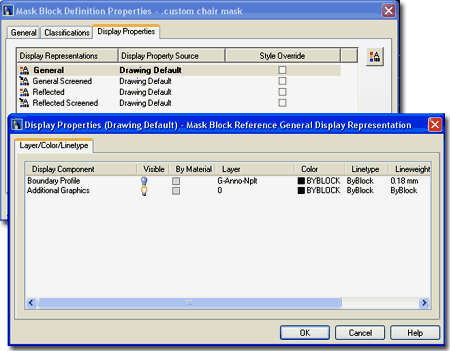 |
| Mask Block
Definitions Style - Display Properties - Components On the Layer / Color / Linetype tab of the Display
Properties dialog box you should find that there are only two Components to a
Mask object: Boundary Profile and Additional Graphics.
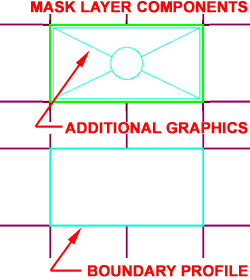 Boundary Profile - this is the
actual Mask edge or edges if you Added Rings. Generally, you don't want the
Boundaries if you are using Graphics with your Mask but if you are using the Mask alone as
an object in itself, you will probably want that outline so you can work with it.
For the ADT Ceiling Fixtures, they use the Mask outline as part of the fixture graphics so
this is another case where you will want it on. Boundary Profile - this is the
actual Mask edge or edges if you Added Rings. Generally, you don't want the
Boundaries if you are using Graphics with your Mask but if you are using the Mask alone as
an object in itself, you will probably want that outline so you can work with it.
For the ADT Ceiling Fixtures, they use the Mask outline as part of the fixture graphics so
this is another case where you will want it on.
|
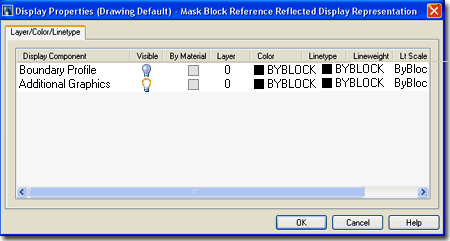 Additional Graphics - this option is only
valid if you selected additional graphics when you created your Mask. The option is
interesting because on objects, like some of the ceiling fixtures, you can turn off the
symbolism leaving only the Mask outline. |
| 10Create AEC Content Wizard |
10-25 BLOCKS - PROFILES |
Note:
With the introduction of Tool Palettes, Design Content is quickly moving
away from the DesignCenter as can be observed by comparing the folder list
of past releases with the current release. As such, this is part of an
evolutionary process away from the DesignCenter. For ADT this affects
a good number of Objects that were originally created and managed with the
AEC Content Wizard. At present, not all Content has been fully
migrated to Tools and thus there is still a need to know one or two things
about the Create AEC Content Wizard and the corresponding Custom Tab of the
DesignCenter. |
For Blocks and MvBlocks as
discussed under Part 25, it is likely that you do not need to use the Create
AEC Content Wizard at all because there are Tool Palette Tools designed for
working with these Objects. However, should you wish to include
special behaviorial functionality as attributed to the use of the Command
String, you will still need to use this tool. For information on
writing Custom Command Strings, read
Part - 17 Documentation -
AEC Content Wizard. |
Create AEC Content Wizard dialogue box
| Menu |
Format> AEC Content
Wizard... |
 |
|
| Keyboard |
CreateContent |
| Links |
|
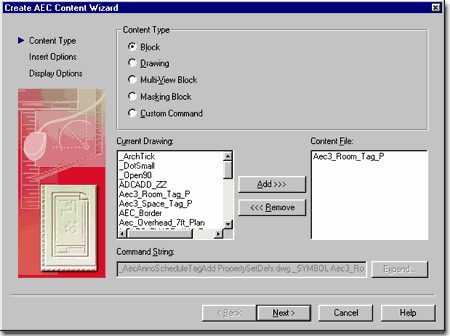
The Create AEC Content Wizard is probably
the most significant tool in all of ADT for creating custom content. This is where
you get to make Blocks, Multi-View Blocks, Masking Blocks and Custom Command sequences all
follow certain ADT based guidelines like Layer Keying and Drawing Scale sizing.
Every time you drag-n-drop an ADT object from the
DesignCenter that object has certain rules that it abides by which are all controlled
through the Content Wizard. If you highlight an ADT object in the DesignCenter,
right-click and Select Edit... from the pop-up menu, you will get this Wizard as your tool
to Edit that object.
Though it may appear as a complex set of steps, once you
run one object through this Wizard you should find that it is basically the same routine
for all content you want to make. To become familiar with all of the options, lets
start by looking at running a typical AutoCAD Block through the Create AEC Content Wizard
and see what a smart ADT Block we can make of it. |
 |
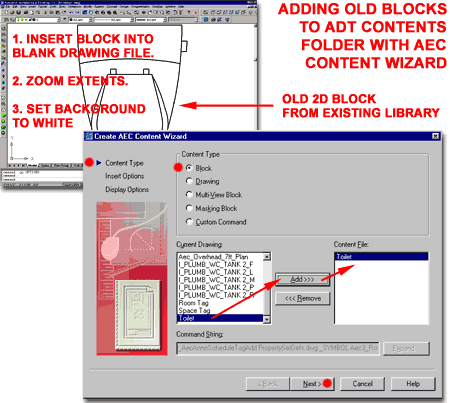
| Adding
a Block STEP 1
There are basically 3 steps
required to run any Content Type through the AEC Content Wizard. Illustrated to the
right and immediately below, we will go through the 3 steps required to run an old 2D
block from an old office library through the AEC Content Wizard so that we can update it
with Layer Keying and add it to the DesignCenter's Content Library.
In the first phase of converting an old block to an ADT
Block, you will need to Start a New Drawing from scratch and insert
the old Block. Then, you should use the Zoom command to
maximize ( Extents ) the Block on the screen and center it ( Pan
) as illustrated to the right.
In order to get a nice clean image in the DesignCenter, it
seems to work best to set the background color to White.
This can be done by using the Options ( type "OP" )
dialogue box, go to the Display tab and use the Colors
button.
Activate the Create AEC Content Wizard and
set the Content Type to Block.
On the Current Drawing list, select the
Block Name you just inserted and use the Add>>> button
to bring it over to the Content File list.
Use the Next> button to proceed to Step
2. |
 |
| Setting
Block Behavior STEP
2
In the second phase of converting an old block
to an ADT Block, you will need to look over all of the Insert Options and decide on how
you want your ADT Block to behave once it is inserted ( or drag-n-dropped ). For
this example, it is really simple because we basically want all of the default settings:
Explode on Insert unchecked
Preset Elevation set to 0
Anchor Type set to None
Scale for X,Y and Z
set to 1
Additional Scaling set to None
Enable AEC Unit Scaling unchecked
Attributes are Not Applicable
here
Layer Key is the real reason we are on
this dialogue box and going through most of this work. Use the Select Layer
Key... button to access the Select Layer Key dialogue box and
select an appropriate Layer Key to assign to your ADT Block. In the case of this
Toilet example, I will have ADT place it on the same layer as with other similar blocks;
the PFIXT Layer Key which is the default AIA Layer for A-Flor-Pfix.
If you don't see any Layer Keys, exit the AEC Content
Wizard and Set A Layer Standard.
Then load the AEC Content Wizard again and go through these steps once more. |
 |
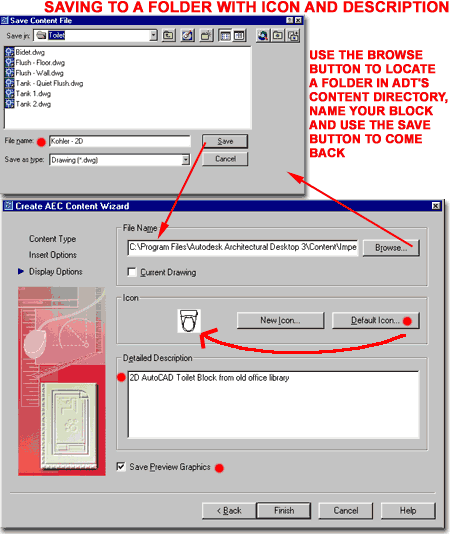
| Setting Block Name, Icon and Location STEP 3
In the final phase of converting an old block to an ADT Block,
you will need to use the Browse... button to Locate and Name
your new ADT Block. Though you do not have to use any of the ADT Folders, it helps
to add content within the existing structure so that is why I show the example Toilet
block being added to the Toilet Folder.
See Part 16 -
Design Content for a listing of all the ADT Content Folder locations.
C:\Program Files\\AutoCAD Architectural Desktop
3\Content\Imperial\
C:\Program Files\\AutoCAD Architectural Desktop 3\Content\Metric\
Once you have Located and Named your ADT Block, you can use
the Default Icon... button to reset the Icon to match your current Screen
Display. This is why we started this process with the Block set to a Zoom Extents
and with a White Background.
For the Detailed Description, you can add information that
will be seen in the DesignCenter in the Description Pane.
Save Preview Graphics should be checked so
that you have this image for your DesignCenter.
When you have Finished all of these steps,
you should be able to see and use your new ADT Block from the DesignCenter
as illustrated to the left. When you drag-n-drop the new block, it
should automatically Key to the correct Layer as with all other ADT content.
|
 |
| 11Applying Profiles |
11-25 BLOCKS - PROFILES |
| Profiles - Using on an Add
[Object] Properties Palette 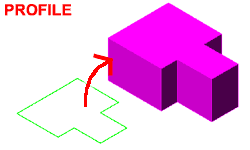 It
doesn't take a genius to realize that at some fundamental point within ADT there has to be
an Object that defines the shape in section or profile for almost every other object.
This shape defining object is called a "Profile".
As the name suggests, a Profile is a closed shape that represents a cross-sectional cut
through an object. It
doesn't take a genius to realize that at some fundamental point within ADT there has to be
an Object that defines the shape in section or profile for almost every other object.
This shape defining object is called a "Profile".
As the name suggests, a Profile is a closed shape that represents a cross-sectional cut
through an object.
For some objects the Profile represents a Plan
View cross-section but for other objects, such as Frames in Door-Window Assemblies or
Curtain Walls, it may also represent an Elevation View cross-section. This means
that for some cases the orientation and insertion point is very important and for other
objects, such as Mass Elements, it is not particularly important. For most Objects
that utilize a Profile shape, you should find you can utilize the "Edit-In-Place"
option to change the Profile shape directly on the object in the place it is being used.
Some Objects, such as Doors and Windows have
yet to offer the option to use Profiles for the Frame, Jamb and Sill but you can use them
to control the shape of the Door or Window as a whole. |
 Illustrated above, I show the Add Mass
Element Properties Palette with the Shape set to Extrusion.
By using a Shape of either Extrusion or Revolution, you
are allowed to select a unique Profile Style Name - as
illustrated.
Once a unique Profile Style Name has been set,
you can use any available size fields to control the proportions of your object or simply
use the Specify on Screen option. |
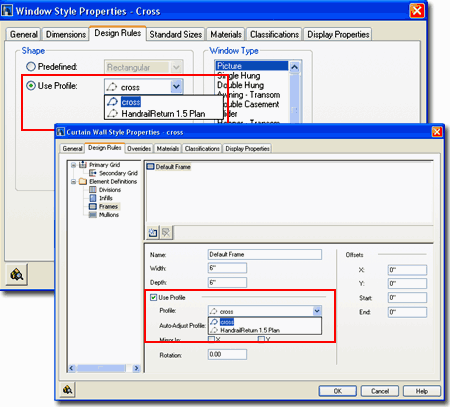
| Profiles
- Using as part of an Object Style
The majority of Objects that provide the option for using a
Profile within their structure do so at the Style level so you can predefine an Object
Style to produce unique results and save the whole configuration a library item.
Illustrated to the right I show how a Window Style offers the "Use Profile"
option on the Design Rules tab and how the Curtain Wall Style offers a similar option for
the Frame under the Frames section.
The variety of places you can use Profiles within Object
Styles continues to surprise me as I delve in deeper and deeper so you should find plenty
of places to employ them. Recently I discovered that you need to create a Profile if
you want to add custom detailing to the Plan View of a Railing Style as part of the
Display Properties while most objects allow you to use a Block. |
 |
| 12Modifying Profiles |
12-25 BLOCKS - PROFILES |
Profiles - Insert as Pline
| Menu |
Format>
Profiles> Insert Profile as Polyline... |
 |
|
| Keyboard |
ProfileAsPolyline |
| Links |
|
Once a Profile Style has been defined, the shape used to
define it can always be Inserted as a Polyline Object with the ProfileAsPolyline
command allowing you to use it for whatever purpose you may see fit. In many cases
you will want to Insert it to Modify it and reset the original Profile Style while in
other case you may want to use it as the base for creating a New Profile Style. |
 When you insert a Profile as a Polyline there is
no connection to the original Profile shape or Name so in order to save any modifications
to this Polyline, you must use the Set From... option on the Style
Manager Window to reset the current Profile Name to the new shape.
At times you may discover that your Profile is
not in the right orientation for the object that you wish to use it on and in situations
like that, inserting the Profile as a Polyline and rotating it before resetting the
Profile Definition Name is a fast way to solve this problem |
Profiles - Edit In Place
| Menu |
Format>
Profiles> Insert Profile as Polyline... |
| |
 |
| Keyboard |
Each Profile has a unique
name like OpeningProfileEdit |
| Mouse |
Select Object, right-click
and look for Edit Profile In Place. For some objects this option is on a sub-menu
off a feature like Frame/Mullion> |
| Links |
|
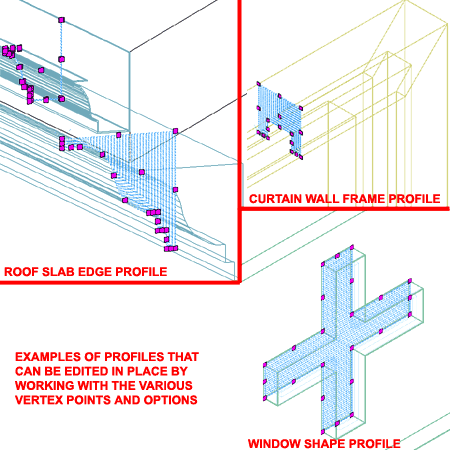
 Most Objects in ADT that utilize a Profile shape offer the option to have
that Profile shape edited right on the Object itself as illustrated to the right.
For many Objects such as Doors, Windows, Openings and Slab Edges you will find the option
to "Edit Profile In Place" directly on the Object Specific
Pop-up Menu but for other Objects such as Window Assemblies and Curtain Walls, where the
Profile may be a part of an internal component, you will need to look for the "Edit
Profile In Place" option off one of the numerous cascading menus. Most Objects in ADT that utilize a Profile shape offer the option to have
that Profile shape edited right on the Object itself as illustrated to the right.
For many Objects such as Doors, Windows, Openings and Slab Edges you will find the option
to "Edit Profile In Place" directly on the Object Specific
Pop-up Menu but for other Objects such as Window Assemblies and Curtain Walls, where the
Profile may be a part of an internal component, you will need to look for the "Edit
Profile In Place" option off one of the numerous cascading menus.
Editing a Profile In Place is much like Editing a Block or
Xref In Place and you will find that there are limitations to what commands and actions
can be performed during an Edit In Place session; Profiles cannot be Rotated, Mirrored or
Scaled, for example. |
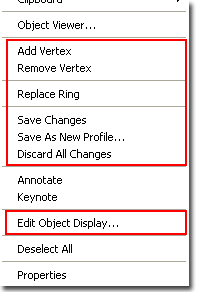
 Once an Edit In Place session for a Profile is active, you should see a
distinctive outline that has a crosshatch pattern through it and Grip points
along the perimeter edge ( in some cases along an internal ring as well ). By Stretching
these Vertex Points or by using the options on the Edit
In Place pop-up menu, illustrated to the left, you can make some pretty significant
alterations to the shape of a Profile.
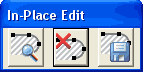
Changes are not saved unless you use the
"Save All Changes" button on the In-Place Edit toolbar or the
"Save Changes" pop-up menu option.
If you find the appearance of the Profile
shape during an Edit In Place session difficult to see, you can actually make Display
Property changes to this temporary Object - see discussion below. |
Profiles - Edit In Place
- Display Properties
| Menu |
Format> Display
Manager... |
 |
 |
| Keyboard |
DISPLAYMANAGER |
| Links |
Display Sets - for direct link to the Display
Manager |
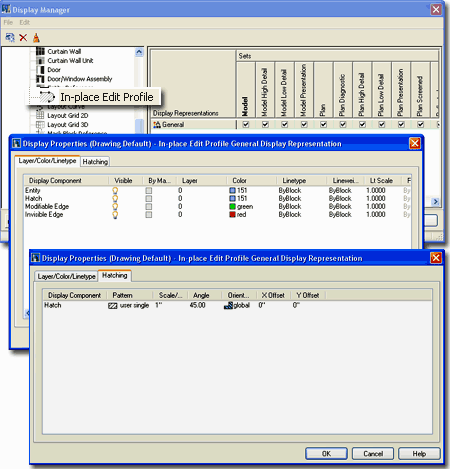
When you activate an Edit In Place session for a Profile,
the appearance of the temporary Profile Object can be altered by using the Edit
Object Display... pop-up menu option ( see above left ) or by modifying the General
Display Representation for the In-Place Edit Profile item under
the Representations by Object folder in the Display Manager
as illustrated to the right.
As incredible as it may seem, you have four Display
Components and one Hatch Component to work with. The Display Components are: Entity,
Hatch, Modifiable Edge and Invisible
Edge. |
 |
| 13Profiles Styles |
13-25 BLOCKS - PROFILES |
Style Manager - Profiles
| Menu |
Format>
Profiles> Profile Definitions... |
 |
|
| Keyboard |
ProfileDefine |
| Links |
Profiling
your own Mass Shapes - for more examples on how to use a Profile on the Add Mass
Element dialogue box. |
For Profile Styles, you can use the Style
Manager to load, modify, delete and create new Profile Styles. ADT comes
with a short list of predefined Profile Definition Styles that you can access through the
Profiles (Imperial).dwg or Profiles(Metric).dwg. You can use this file or create a
new one to act as a container of the various Profiles that you may want to share among
many projects. You may find that many of the Objects in ADT come with their own
Profiles as you load them from the library. When you Copy and Past Objects that use
custom Profile Styles, you will also acquire the Profile Style. Because they are
Styles you can actually use the Style Manager to access other ADT drawing files to copy
them as Styles without having to Open those drawing files.
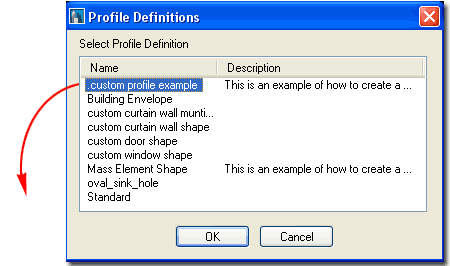
When creating a New Profile Definition
Style there is really very little to set so creating one from Scratch is the obvious
choice. The primary task will be to use the Set From... button or
pop-up menu option to Select the closed Polyline shape(s) that you want to use as the
Profile.
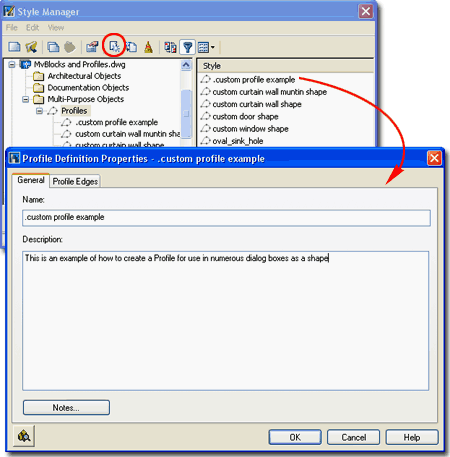
Illustrated to the right, I show the process of creating a New
Profile Style that I have Named "Custom Profile Example".
By double-clicking on this new style, you will invoke the Profile
Definition Properties dialog box - as illustrated.
The General tab provides access to the Name
and Description fields for a Style; plus access to the attachment of
Notes. |
 |
| Style Manager - Profiles - Set From The key to creating a Profile Style is using the Set From
button on the Style Manager window. You can also access this option from the
right-click pop-up menu, as illustrated to the right.
Once you have selected the Set From
option, you will need to select a Closed Polyline shape
somewhere in your drawing. Once you have selected a Closed Polyline Object, you will
be prompted, on the command line, to "Add another ring?[Yes/No]";
which refers to internal holes. For this query, you would answer Yes and Select yet
another Closed Polyline Object to define a ring of solid with an internal void. You
can have multiple rings that alternate between solid and void.
The last question will be about "Insertion
Point or <Centroid>", which allows you to OSNAP to an insertion point
or allow the default option to calculate an absolute middle. Insertion point is
really a matter of how you want your object that uses this profile to behave. With
Mass Elements, for example, many of the pre-defined shapes have an insertion point based
upon their Centroid. You can actually OSNAP to this Centroid using the NODE OSNAP,
so it can be handy to use Centroid.
Command: profile
Profile [as Pline/Definitions]: d
Select a closed polyline:
Add another ring? [Yes/No] <N>:
Insertion Point or <Centroid>:
Profile [as Pline/Definitions]:
Command: |
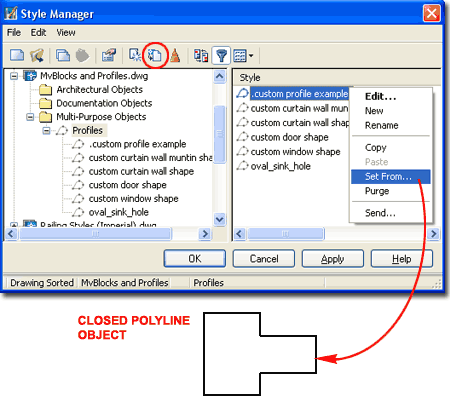 Note:
In most cases, the layer and the size of the closed Pline object does not matter when you
create it since most ADT objects are automatically keyed to a layer and offer options for
controlling the actual dimensional proportions of your profile. In other words, if
you are in a hurry, you can be pretty sloppy; just get the dimensional proportions/ratios
right.
You can change a Profile any time by using the
Set From option and selecting another Closed Polyline Object. Doing this will change
all objects, in the current drawing, that are using this Profile Definition. |
| Profile Definition
Properties Dialog - Profile Edges tab The Profile
Edges tab of the Profile Definition Properties dialog box
provides access to a feature that I am not entirely convinced actually works at the time
of this writing. For each of the three primary axis directions set under the
Extrusion Directions drop-down list, you can manipulate the Position settings of each
edge. The ability to modify the Edge Positions as they apply to different Objects
that use them as X, Y or Z extrusion outlines is incredibly powerful but all of my tests
resulted in no change. Using the Discard option worked and provided the option to
remove one or more faces resulting in hollow looking extrusions.
As I understand this tool, the intent is to allow you to
rotate your Profile here rather than having to Insert it, Rotate is and Redefine it.
It also provides the means to define how it will be applied for different Objects
so you don't need to create three different Profile Definitions of the same shape should
you actually use the same shape for three different Object Styles.
I will report back on this set of options in a future
update when I get updated information or a patch that fixes the problems I found. |
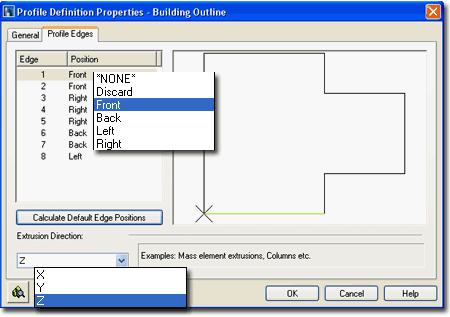 |
Convert Linework to Profile Definition
| Menu |
N.A. |
| |
N.A. |
| Keyboard |
ConvertLineworkToProfileDef |
| Mouse |
Select Object, right-click,
select Convert To> and cascade over to Profile Definition... |
| Objects |
Closed Polylines, Splines,
Ellipses and Circles can all be used |
| Links |
|
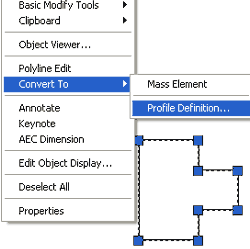 The
Convert Linework to Profile Definition tool is basically a short-cut for
using the Style Manager to achieve the same results - as illustrated to
the right. You should find that the object-specific pop-up menu provides quick
access to this option whenever you Select an Object that can be converted into a Profile:
Polylines, Circles and Splines. The
Convert Linework to Profile Definition tool is basically a short-cut for
using the Style Manager to achieve the same results - as illustrated to
the right. You should find that the object-specific pop-up menu provides quick
access to this option whenever you Select an Object that can be converted into a Profile:
Polylines, Circles and Splines.
Command line sequence:
Command: ConvertLineworkToProfileDef
Insertion point or [Add ring/Centroid]: <specify insertion point or type
"A" to Add voids>
Select a closed polyline: <select a closed Pline to become a Void (by default)
>
Insertion point or [Add ring/Centroid]: <continue the process of
Adding Voids or specify an insertion point>
Profile Definition [New/Existing] <New>: < type "N" to create a
New Profile Definition Style Name or "E" to select from a list of existing
Profile Definition Style Names > |
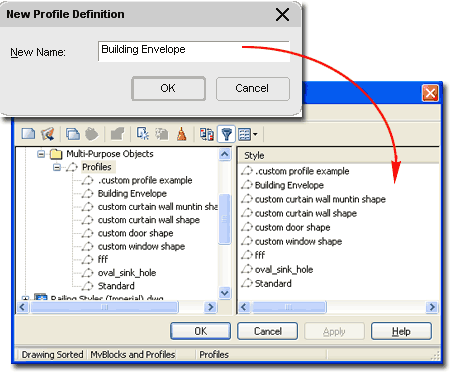 Note:
Read up on the whole Profile story, above, for information on how to use Profiles, how to
edit them and so forth. |
| 14Customizing and Tricks |
14-25 BLOCKS - PROFILES |
| Using Xref's to Manage
Multi-View Blocks As MvBlocks become more
and more fundamental to the process of creating Construction Documents and Presentation
drawings, I started to notice the bloating of my files. It occurred to me that when
you work with large entities such as MvBlocks that can be up to 500K, why not Xref them;
especially if you are using multiple copies of them. High quality conference room
chairs are a great example of where Xref'ing MvBlocks can really pay off in file size
management. This may all seem logical but there is one frustrating problem in the
design of MvBlocks and that has to do with how you create the internal Block Properties.
|
For the majority of users, "By Block" has been the defacto standard
because it provided the greatest flexibility to change the Properties of Blocks after
insertion but with MvBlocks, this Property doesn't not work correctly when it is Xref'd.
In other words, in order to get an MvBlocks to respond correctly to Property
Changes in a target, when Xref'd, you have to use "By Layer" for the Property
Settings of the original Blocks.
The work-around solution for dealing with the problem of
"By Layer" vs. "By Block" in Xref'd MvBlocks is to create a template
file with as little junk data in it as possible and then insert your MvBlock into this
file. Save this file as part of your working project files and use it as the source
Xref object instead of trying to Xref Attach an original MvBlock from the Content Library
folder. |
|
Creating Attributed
MvBlocks
Creating an Attributed MvBlock simply involves the process
of creating a regular Block with Attributes and then Adding that Block to a Multi-View
Block Definition. The problem is that by burying an Attributed Block inside a
Multi-View Block Definition, you lose the ability to edit it directly with the ATE
command. You can, however, edit Attributes within MvBlocks by using the Multi-View
Block Attributes dialog via the Properties Palettes |
|