| 1Doors
- Windows - Openings Access |
1-6 DOORS - WINDOWS - OPENINGS - ASSEMBLIES |
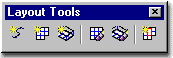
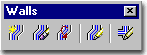
Doors - Windows - Openings Toolbar
How do I get this toolbar?
You can also acquire access to these commands from the Alternate Design pull-down menu. From
the Design pull-down menu, pick Openings >, Doors
>, Windows > or Window Assemblies >
and cascade to the right for commands. |
 |
Doors
- Windows - Openings Pull-down Menus
| Alt.Menu |
Design>
Doors>, Windows>, Door/Window Assemblies> or Openings> |
 |
 |
| Keyboard |
DoorAdd, WindowAdd,
DoorWinAssemblyAdd or OpeningAdd |
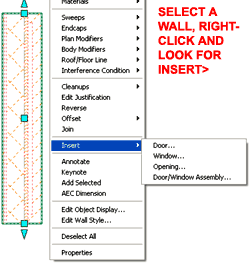
| Mouse |
Select Wall, right-click to
access menu illustrated below, right. |
| Links |
Adjusting
to the New Interface for AutoCAD and ADT Users- for how to activate the Design
pull-down menu |
 The
Primary Set of Wall Opening Objects can be categorized as sets consisting of Doors, Windows,
Openings and Door/Window Assemblies. It is true that you can create Openings in Wall
Objects with other entities but such solutions may not provide the best options for
editing or presentation in Construction Documents. The
Primary Set of Wall Opening Objects can be categorized as sets consisting of Doors, Windows,
Openings and Door/Window Assemblies. It is true that you can create Openings in Wall
Objects with other entities but such solutions may not provide the best options for
editing or presentation in Construction Documents.
In this group, you should know that Openings
are basically Polyline Based shapes that will cut through an entire Wall Object.
They behave much like Doors and Windows but have no option for jambs, trim or other
decorative elements. Door/Window Assemblies are basically Curtain
Walls that Anchor into Wall Objects and thus can offer more design options than just Door
and Window Containers.
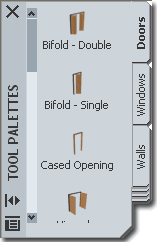
To Add any of these Objects you can take
several routes depending upon your preference for working in Architectural Desktop.
Remember that only the Tool Palette offers the option for Adding an
Object Style that in not already in the current drawing file.
On the command line, you can type "Opening",
"Door", "Window" and "DoorWinAssembly" to acquire access to
these tools. For direct access to an option within the various opening command-line
menus, you can type the primary command plus the option you want direct access to.
For example, if you want to Add a Door, you can type "DoorAdd"
or if you want to Modify a Window, you can type "WindowProps"
or "-WindowModify" ( notice the dash). |
Command: Opening
Opening [Add/ Properties]:
Command: Door
Door [Add/ Properties/ STyles/ Hinge/ SWing]:
Command: Window
Window [Add/ Properties/ STyles/ Hinge/ SWing]:
Command: DoorWinAssembly
Window Assembly [Add/ Convert/ Properties/ Styles/ Interference]: |
| 2Doors, Windows & Assemblies Style Loading |
2-6 DOORS - WINDOWS - OPENINGS - ASSEMBLIES |
Opening
a Door Style template file in Style Manager
| Menu |
Design> Doors>
Door Styles... |
 |
 |
| Keyboard |
DoorStyle |
| Menu |
Design>
Window> Window Styles... |
 |
|
| Keyboard |
WindowStyle |
| Menu |
Design>
Door/Window Assemblies> Door/Window Assembly Styles... |
 |
|
| Keyboard |
DoorWinAssemblyStyle |
| Links |
Object Style Management -
for information on how to work with the Style Manager to load Styles. |
| |
Copying Wall Styles in
the Style Manager - for example of copying a Style to the Tool Palette. |
 ADT comes with a rather extensive library of
Door, Window and Door-Window Assembly Styles that go far beyond the basic set you will
find on the default Tool Palettes so be sure to visit the Content Browser or go directly
to these Object Styles through the Style Manager - illustrated to the right. ADT comes with a rather extensive library of
Door, Window and Door-Window Assembly Styles that go far beyond the basic set you will
find on the default Tool Palettes so be sure to visit the Content Browser or go directly
to these Object Styles through the Style Manager - illustrated to the right.
For local installations of ADT, you are likely to find the Imperial
or Metric Wall Styles in the Styles Folder
as illustrated to the left. The full path to this location may vary but typically it
is as illustrated. On a Network based installation of ADT, these Styles should be on
a captured drive (like "G:\offices standards") or similar location with a folder
name that indicates Styles. Consult your CAD or IT manager if you cannot locate the
Styles Folder.
Imperial
Doors Styles (Imperial).dwg
Windows Styles (Imperial).dwg
Dooor-Window Assembly Styles (Imperial).dwg
Metric
Doors Styles (Metric).dwg
Windows Styles (Metric).dwg
Door-Window Assembly Styles (Metric).dwg |
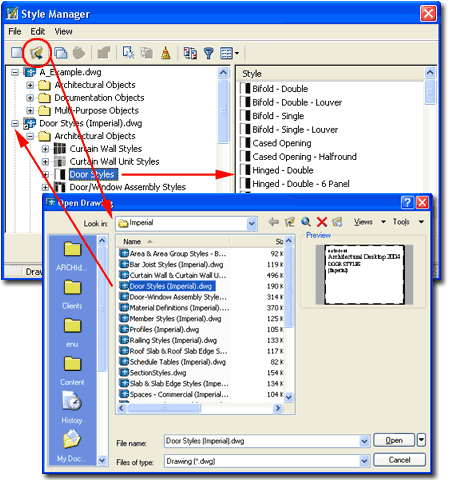
Illustrated above, I show how you use the Style
Manager to access any of the various Object Style Files such as the Door Style
(Imperial).dwg. Once Opened, you should find an extensive list of Style Types that
you can Copy/Paste or Drag-n-drop right into your current drawing file. When you
wish to bring these styles into your current drawing, be sure to use the Folders under
your current drawing because you cannot simply drag the object style directly into your
drawing - look for the Architectural Objects Folder for your current drawing file.
If you find this difficult to understand, read up on how to use the Style Manager in Part
1 - Display - Object
Style Management
There are no Styles for
Openings since they are basically geometric cuts in Walls. These files contain a set of
standard Door or Window types that you can import into your current drawing file. |
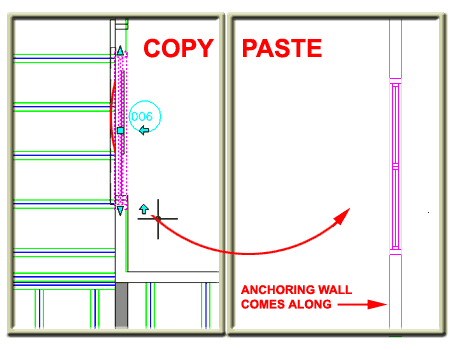
| Copy /
Paste for Style Loading Many AutoCAD users
love to Copy data between files by using the Copy/Paste technique and as long as you
understand the consequences of applying this technique within ADT, you'll be fine.
Illustrated to the right I show how using the Copy tool
from the Edit pull-down menu or Ctrl+C key has successfully transferred a Window Style from
one Drawing File over to another. I also show that since Doors, Windows, Openings
and Door-Window Assemblies are all objects that are Anchored to Walls, those Walls come
along for the ride. This means that you will be adding additional Styles to a
drawing when you use this technique. You should also make note of the fact that you
could end up with redundant Walls if you attempt to Copy between design Versions where you
already have those Walls. I've done this and it makes a nasty mess.
Keep in mind that you can always Purge unwanted Object Styles
so don't be too concerned. Keep in mind that unique Display Characteristics may not
transfer with this technique so you might notice that your object looks one way in the
source file and another way in the target file. |
 |
| 3Doors |
3-6 DOORS - WINDOWS - OPENINGS - ASSEMBLIES |
Add Doors - Properties Palette
| Alt.Menu |
Design> Doors>
Add Door... |
 |
|
| Keyboard |
DoorAdd |
| Mouse |
Select Wall, right-click,
select Insert > and cascade over to Door... |
As discussed under Doors - Windows - Openings
Pull-down Menus, you can Add Doors through several different techniques in
Architectural Desktop but most of these bring up the same Door Properties Palette
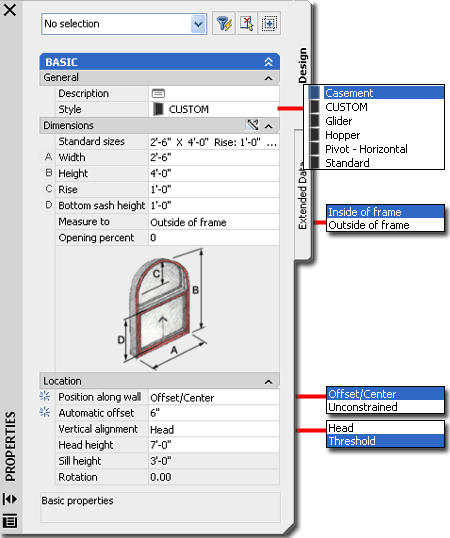
(illustrated to the right).
The Door Properties Palette has a fairly
basic and somewhat intuitive set of options that you work with for every Door you Add.
Because this Palette is large in size and slow to load, I find it best to use the
Copy command and Copy existing Doors around to other Walls whenever possible. For
Modifying existing Doors, you will find that the Palette is basically the same.
Description
- use this note field to add text based notes about the Door if you find that it
will help others. You could, for example, explain that the Door should be verified
in the field when possible.
Style
- drop-down list for selecting any Door Styles that are present in the current
drawing file. Use the Style
Manager or Door Palette to create or load others. Custom Shapes will be
discussed below.
Standard Sizes - this drop-down list is
tied to the Standard
Sizes tab of the Door Style Properties dialog box and many tend to
ignore this
option so you may not find any predefined sizes.
Width - this value field will accept
numerical values for door widths and the measurement depends on the Measure to setting.
Height - this value filed is similar to
the Width value field.
Rise - this value field controls the
height of Door Styles with an Arch or Peak Shape and is thus not always available.
Leaf Width - this value field controls the
size of Doors Styles using the Uneven Type and is thus not always available.
Measure to - this
drop-down list offers two settings: Inside of frame and Outside
of frame. The drafting of Doors is usually based upon the actual size of
the door as opposed to the frame opening and thus "Inside of frame"
tends to be the default for Imperial and Metric. Be aware, however, that this is not
always the preference in offices (particularly offices that specialize in commercial
architectural) so confirm this before going too far with your work.
Swing angle - this value field allows you
to specify the actual angle of opening for the door in Plan View; where zero (0) is
equivalent to closed and 90 is equivalent to the standard 90 degree or 50% open used in
most architectural drawings. This is not how doors display as closed in Isometric
Views and open in Plan - see Door Style's display
properties for how to control those unique display settings.
Position along wall - this drop-down list
will provide you with the Offset/Center and Unconstrained
options. Offset/Center - will offset from other objects or Wall
Corners by the amount specified under the Automatic offset value field.
When you approach the midpoint of a Wall Object, this option will automatically
center a Door. Unconstrained - will deactivate the Automatic offset
option and allow you to position a Door at any position within a Wall ( not very desirable
if you don't have points to OSNAP to ). |
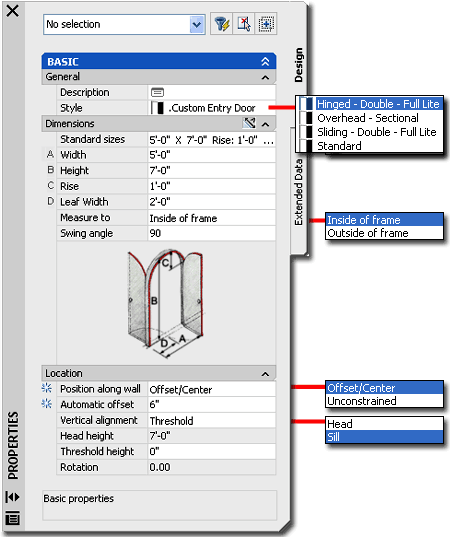 Automatic
offset - this value field can be used to specify an amount of distance you want
for a Door to be placed away from the next closest object, wall corner or other
entities. Position along wall must be set to Offset/Center
for this option to be available.
Vertical Alignment - this
drop-down list offers the option for placing a Door in a Wall based upon the Head
height or the Threshold height. I tend to use the Threshold option
for my Doors since I always place them at the very base of my Walls.
Head height - this value
field will only be available if the Vertical Alignment has been set to Head. Any
height specified here will control how a door is placed in a Wall relative to the top or
header position. Too low a value will push a door below the Wall Base or Plate
Line.
Threshold height - this value
field will only be available if the Vertical Alignment has been set to Threshold. Any
height specified here will control how a door is placed in a Wall relative to the base,
threshold or sill of a Door.
Rotation - this value
field is only available when Modifying an existing Door Object.
Note:
Most of the settings on this Palette will become the default for all other Doors
being Added so you may want to be careful about such settings as Measure to, Swing angle,
Vertical alignment and Heights. |
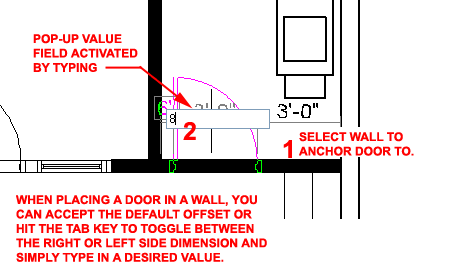
| Placing
Doors in Walls When Adding Door
Objects to Wall Objects, you must first Select
the Wall to Anchor the Door to. If you use the
right-mouse button or <Enter> key on your keyboard to register an
extra "enter", the Door will not be anchored to any Wall and will basically be a
free-floating Block. "Free-floating" a Door may be useful when creating
such things as garden or security gates.
Once a Door Object has been Anchored to a Selected Wall,
you can Slide the Door back and forth over the Wall until you decide where you want to
place it in the Wall. By reading the automatic temporary dimensions, you should be
able to get a good sense of where the door will be cutting the wall. By picking
with your left-mouse button, you will place the door and finish the work.
Recall that the Door Properties Palette offers the Automatic
Offset value to help place Doors more accurately and with less effort.
Illustrated to the right I show how ADT will present you
with three automatic temporary dimensions when Adding a Door to a Wall. By using the
Tab key on your keyboard, you can toggle between the right and left
dimension. If you begin to type a number on your keyboard, you will see a
rectangular pop-up value field in which you can now specify a desired dimension even if it
is something other than the default offset value. |
Note:
With tight tolerances on door locations, I find it easiest to simply place the door near
the location where I want it and then carefully Move it later. You may find that
Doors sometimes "pop" over to adjacent Walls. For the worst case
situations, you may want to use the Anchor option under the Location
Category of the Modify Door Properties Palette. |
| 4 Windows |
4-6 DOORS - WINDOWS - OPENINGS - ASSEMBLIES |
Add Windows - Properties Palette
| Alt.Menu |
Design>
Windows> Add Window... |
 |
|
| Keyboard |
WindowAdd |
| Mouse |
Select Wall, right-click,
select Insert > and cascade over to Window... |
| Links |
Adding
Skylights - for information on something that does not really work at
this time. |
As discussed under Doors - Windows - Openings
Pull-down Menus, you can Add Windows through several different techniques in
Architectural Desktop but most of these bring up the same Windows Properties Palette
(illustrated to the right).
The Window Properties Palette has is
almost identical to the Door Properties Palette. Read Section
3 - Doors for the full discussion of all the options and settings on this
Palette. Below I discuss some of the options and settings that are a little
different for Window than Doors.
Rise - this value field controls the
height of Windows Styles with an Arch or Peak Shape and is thus not always available.
Bottom sash height - this value field
controls the height of the lower portion of Uneven Window Types and is thus not always available.
Measure to - this drop-down list offers
two settings: Inside of frame and Outside of frame.
The drafting of Windows is usually based upon the actual size of the window unit as
opposed to the glazing component and thus "Outside of frame"
tends to be the default for Imperial and Metric. Be aware, however, that this is not
always the preference in offices.
Opening (percent) - shows the Window
in open, partial open, closed or anywhere in between modes if the Window Style has
operable components. 100 is for full open and 0 is for closed. There is
another feature to Windows that will control how they behave in an elevation, for example;
this is part of a Window's
Style's display properties. See also pull-down menu - Change
Opening Percent.
Vertical Alignment - this
drop-down list offers the option for placing a Window in a Wall based upon the Head
height or the Sill height. In residential architecture it is often a
standard to measure Windows by their Head height to assure that they align with the top or
header height of doors. |
 |
| 5 Openings |
5-6 DOORS - WINDOWS - OPENINGS - ASSEMBLIES |
Add Opening - Properties Palette
| Alt.Menu |
Design>
Openings> Add Opening... |
 |
|
| Keyboard |
OpeningAdd |
| Mouse |
Select Wall, right-click,
select Insert > and cascade over to Opening... |
| Links |
Profile - for
information on how to convert a Closed Polyline into a Profile Definition that can be used
as a Custom Shape for Openings. |
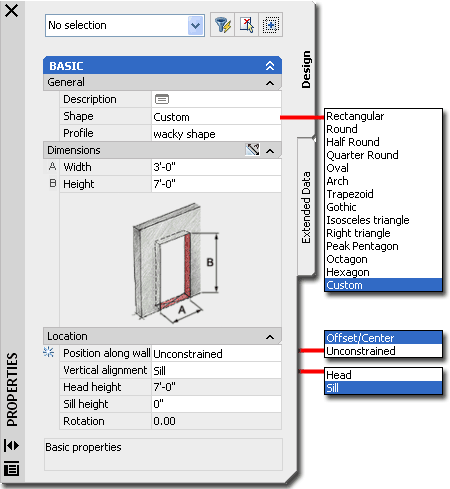
The Opening Object can, at times, be a
little enigmatic since it isn't as sophisticated as a Door or Window yet offers many of
the same features. The primary difference is that there are no Opening Styles since
there really is only one Type of Opening: a hole. This is why you find the Shape
option on the Openings Properties Palette, illustrated right.
Read Section 3 - Doors for
the full discussion of all the options and settings on this Palette. Below I discuss
some of the options and settings that are a little different for Openings than Doors.
Shape - this drop-down list offers
numerous predefined geometric shapes and the option to use "Custom"
for any shape that you can draw as a Closed Polyline and define as a Profile Definition.
Profile - this drop-down list is only
available when the Shape has been set to "Custom". Profile Definitions can
be used to capture Closed Polyline shapes so they can be used as custom Openings - see Part 25 - Blocks and Profiles. |
 |
| Opening
Display Properties
Since the Opening Object has no Styles,
you can only make changes to its Display Properties by working with a
Selected Opening Object or by using the Display Manager. I 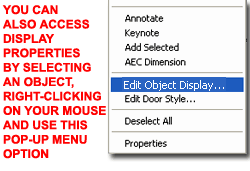 typically
select one, right-click and select the Edit Object Display... option from
the object specific pop-up menu since this techniques gets to the heart of the problem
rather quickly. typically
select one, right-click and select the Edit Object Display... option from
the object specific pop-up menu since this techniques gets to the heart of the problem
rather quickly.
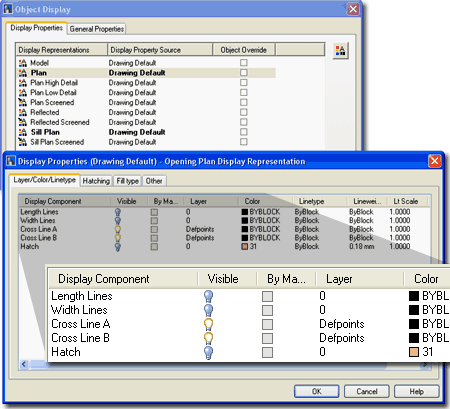
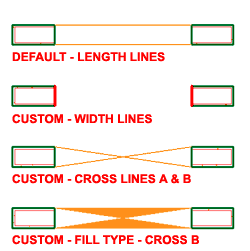
Illustrated to the right I show some of the Display
Representations that come with the ADT Template Files and the Display
Properties for the Plan Display Representation. It's
rather fascinating to see just how far the ADT team has come with options for how to
present a simple thing like an Opening and yet I still can't find the perfect solution.
For me, the main problem is that I don't want the Opening Object to display at all
in my Construction Documents ( except for the hole it makes ) but since ADT uses objects,
we need something there to Select when making Modifications. So far, what I have
come up with is to use the Cross Line A and Cross Line B
Display Components and then set them so they use Layer
"Defpoints" which will never print.
Notice that the Display Properties dialog
offers other Tabs for such options as Hatching, Fill
type and Other. Illustrated below right I show a few of
these options in Plan View. Notice also that Openings have a Sill Plan Display
Property for which you can control the lines in Plan for Sills; much like you
can for Doors and Windows. |
  |
| 6Modifying
Doors, Windows and Openings |
6-6 DOORS - WINDOWS - OPENINGS - ASSEMBLIES |
Copying and
Moving Doors across Wall Cleanup Groups
| Alt.Menu |
Design> Walls>
Cleanup Group Definitions... |
 |
 |
| Keyboard |
Wall <enter>
CL |
| Links |
Wall Cleanup Group Definitions
- for more information on this subject and how to access this setting. |
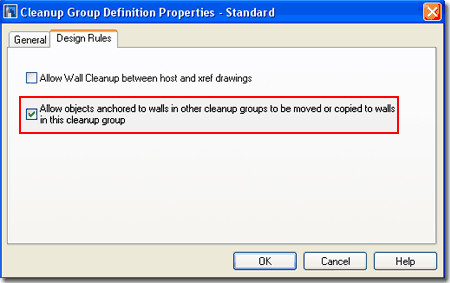
When you create Wall Cleanup Group Definitions,
you should find that there is a setting on the Design Rules tab of each
Cleanup Group Definition that will allow or disallow cross pollination of Anchored
Objects. Typically this setting is on by default and you may not notice any problems
when copying Doors, Windows, Openings and Door-Window Assemblies from one set of Walls to
another but this was quite a problem in previous releases of ADT. |
 |
Modify Doors, Windows and Openings - Properties Palette
| Alt. Menu |
Design> Doors>
Door Properties |
 |
|
 |
|
 |
|
| Keyboard |
DoorProps,
WindowProps and OpeningProps |
| Mouse |
Double Left Click on an
Object to invoke the Properties Palette |
| Links |
Object
Properties - Anchor tab - complex objects - for explanation of Anchor
tab options. |
| |
See Doors, Windows or
Openings for full nformation on the Properties Palette |
The primary modification tool for Doors, Windows and
Openings is the Properties Palette, illustrated to the right where you
will find most of the options and settings for creating these objects. Illustrated
to the right I show two options that are only available after the object has been Anchored
to a Wall: Anchor and Endcaps.
The
Anchor dialog box is a fantastic tool
for fine-tuning the position of Doors, Windows and Openings in Walls and though most of
these settings can be done with Grip work live on the Objects, I often find this a more
comprehensive tool to reposition these objects.
The Endcaps drop-down list is really an
Override option that affects the Wall. If you select another Endcap
Style than that assigned within the Wall Style, the Override only applies to
the specific Object Selected. |

This means that you can Select one Window or Door, for example, and assign a
different Opening Endcap Style ( which is actually four endcaps - one for each side of the
opening ). This can be a fantastic option or a nightmare depending upon the use and
comprehension of how it creates an Override. |
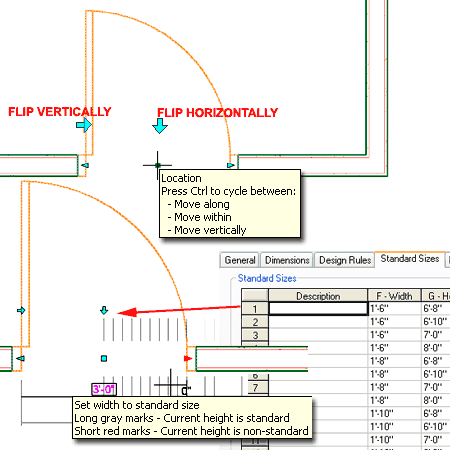
| Using Grips to modify Doors Doors, Windows and Openings all have similar Grip Controls with similar
Ctrl-key sub-options that can be utilized to achieve some great modifications.
In the illustration to the right I use a Door example to
show the Flip Controls that will alter the direction a Door will swing.
The center Grip provides the option for Moving the Object with sub-options for
Along, Within and Vertically. The Along option, the default, simply allows you to
drag the Object along the length of the Wall with temporary Dimensions to assist in
accuracy. The Within option allows you to slide the door perpendicular to the length
providing a quick solution for situations where you don't want the Object centered in the
Wall. The Vertically option allows you to move the Object up and down in the Z-axis
and is best done in Isometric Views for better accuracy and control. The
unfortunate
aspect of the Move options is that architects generally know how far they want the edge or
jamb of a Door or Window from another object, like a Wall and the center Grip does not
offer this option (see discussion on Reposition Along Wall below).
The two Edge Grips allow you to resize a
Door, Window or Opening simply by Stretching. Illustrated lower right I show that by
hitting the Ctrl key after picking one of these Edge Grips, you can actually see all of
the predefined Width Values as set under the Standard Sizes tab on the Object Style
Properties dialog. |
 |
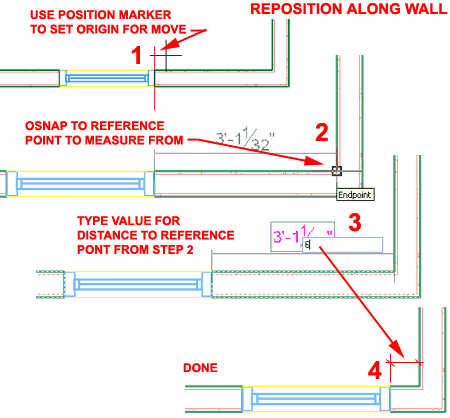
Reposition
Along Wall
| Keyboard |
RepositionAlong |
| Mouse |
Select Object, right click,
select Reposition Along Wall |
| Links |
|
Because the center Grip control, discussed above, is
actually a rather poor option for positioning Doors, Windows and Openings (unless you work
with centerline positions), I decided to show a better solution.
Illustrated to the right I show how you can use the Reposition
Along Wall tool to quickly set the distance from another point in space that you
want a Door, Window or Opening located from. The unique red-line marker
will pop up and allow you to choose one of three position points: right edge, center or
left edge. Depending upon how you have your Measure
To setting when creating Doors, Windows and Openings, the red-line marker may
position itself on the inside or outside of Jambs.
Once you have picked the position you want to "reposition"
your Door, Window or Opening at, you simply OSNAP to
another point in space that you want to measure off of ( from
). The final step is to type the actual distance you want between the 1st point and
the 2nd point and viola, the move is complete and accurate.
Note:
For Doors, you may need to consider the Width of the Frame and add that to your From
distance so the rough opening comes out as desired. |
 |
| 7Door and Window Style Properties |
7-6 DOORS - WINDOWS - OPENINGS - ASSEMBLIES |
| Style Manager
For Door and Window Objects, you can use the Style
Manager to load, modify, delete and create new Door and Window Styles. The
process for working with Door and Window Styles is almost identical so I will cover both
in the following discussion.
Though you can easily create New Door and Window Styles
from Scratch using the New button, you may want to use the Copy/Paste
technique instead because it is far easier to Modify Settings of an existing Object Style
than it is to create one from Scratch. In some cases, you may even miss specific
settings that can come back to haunt you much farther down the road on a project - things
like Display Representations or Data for Schedules.
Illustrated to the right, I show the process of creating a New
Door Style (from scratch) that I have Named "Custom Entry Door".
By double-clicking on this new style, I show that I have also activated
the Door Style Properties dialog box where all of the custom settings can
be made for the size, shape and look of this particular object style. |
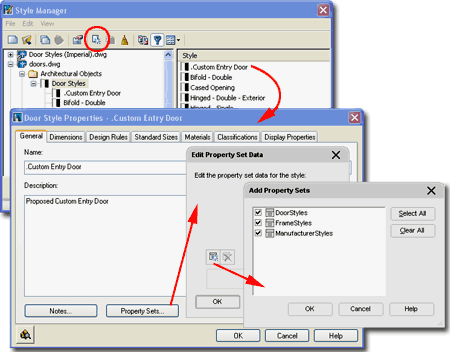
On the General Tab of the Door
Style Properties dialog, you will find a place to modify the Name,
add a Description, add Notes... and Property
Sets... If you intend to use the Schedule Tags and Schedule Objects in ADT,
you must use the Property Sets... button to Add the appropriate Property Data. For
Doors, the minimum would be the DoorStyles Property Data Set and for Windows, the minimum
would be the WindowStyle Property Data Set. Other Data can be added for expanded
Schedules or additional Schedule Styles and you can even create new Data Sets but let's
put that topic off to Part 18 - Schedules. |
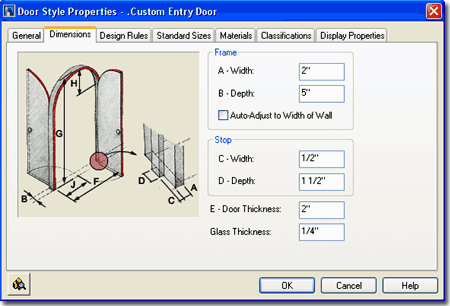
| Style
Properties - Dimensions tab On the Dimensions
tab of the Door or Window Style Properties dialog box, you can input "real
world" Frame, Stop and Door Thickness
dimensions.
For designers in a rush, using the Auto-Adjust to
Width of Wall checkbox can save a lot of time and is a setting
that can always be unchecked later once specifications have been collected.
You can set values to zero and you can even set the Frame
Width to negative values for unique results. If you don't want Frames at any time,
setting them to a Width of zero is acceptable but the other components can actually be
turned off under the Display Properties tab ( see discussion farther down ). |
 |
| Style
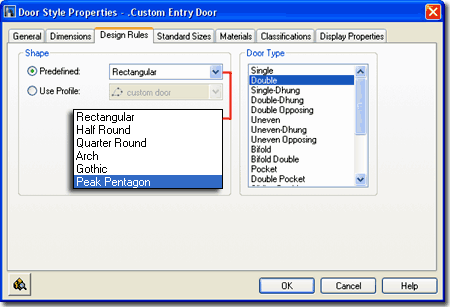
Properties - Design Rules tab The Design
Rules tab of the Door or Window Style Properties dialog box, holds the secret to
creating a variety of Door Types and Custom Shapes.
To create a basic Door or Window shape, use the Predefined
pull-down list in the Shape category. This list will provide you with some common
shapes such as Rectangular, Half Round, Arch and so forth.
To create a more unique Door or Window shape, use the Use
Profile drop-down list to select a Profile. Profiles are Pline
outlines that have been saved as Profile Definitions within the Style Manager
Window. To learn more about creating a custom Door or Window Shape, see Customizing and Tricks below.
The Door Type or Window
Type list provides a fixed list of common types to base your design on. If
you need another Type that is not listed here, like a Dutch Door, you may have to be
incredibly inventive with other Objects. Some are finding that they can use a
Door-Window Assembly to create things like Dutch Doors ( one in the top cell and one in
the bottom ) but though this may look great in Plan or 3D, you may not like what the
Schedules pick up. |
 |
| Style
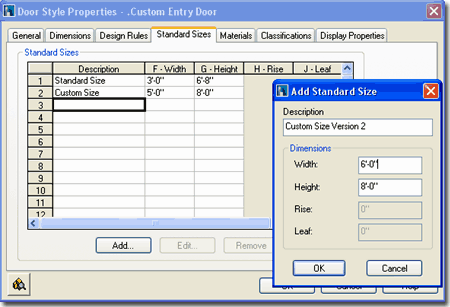
Properties - Standard Sizes tab The Standard
Sizes tab of the Door or Window Style Properties dialog box uses an Excel-like
spread sheet to store preset sizes for quick access on the Size drop-down list of the
Properties Palette. This part of a design is not required since you can input sizes
on the Properties Palette when Adding them, but it can be helpful if working in Metric or
if using odd (fractional) numbers that take too long to type.
The values input here can also be used when Modifying Doors
and Windows using the Grips - see Using
Grips to Modify Doors.
Rise - available for Styles that have
pitched or peak Shapes.
Leaf - available for Types
that use Uneven pairs. |
 |
| Style
Properties - Materials
The subject of Materials is one of the
most expansive and confusing topics in Architectural Desktop because it requires a
complete comprehension of the product in order to take full advantage of this feature;
from object styles to display representations. This subject will be discussed under Part 1 - Display
and in the Presentation eGuide.
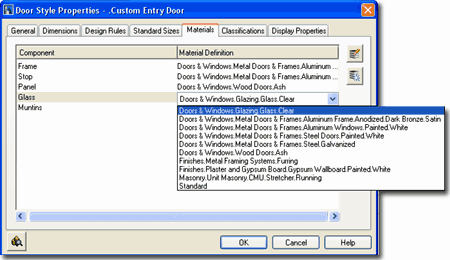
Illustrated to the right I show that Doors and Windows will
offer a predefined list of Components and that the Material
Definition Names will all be set to "Standard" when you create a Style
from scratch. If you have imported any of the Architectural Desktop Doors or
Windows from the Object Style Library, you should find that you will be able to use the
Material Definitions that come with those objects - as illustrated to the right.
Though you are not required to use Material Definitions in
Architectural Desktop, you are likely to find it difficult to avoid using them since most
of the predefined Styles use them. Materials have thrown a monkey-wrench into the
whole Display System because they can actually take over control of how your linework
appears in Plan View for Construction Documents ( discussed below under Display Properties
). The best thing to do when learning about Material Definitions is to match how
most of the predefined Door and Window Styles have been configured; i.e., reverse engineer
the ADT Styles. |
 |
|
Style
Properties - Classifications
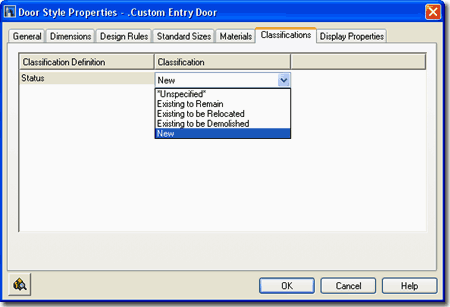
The subject of Classifications is
thankfully no where near as complicated as that of Materials so the only real question you
will need to consider is if you need to use them. Classifications offer another way
to separate Object Styles into categories that can be used in Schedules
and even in Display Representation Sets ( as "Show"
or "Hide" ).
Illustrated to the right I show that I have one Classification
Definition ( see Format pull-down menu) with a list of Classification
Names or Types. Generally you will not have any options on this Tab but if
you have created at least one Classification Style that has been set to "Apply
To" Door or Window Object Styles, you will be able to use it here. The range of
use is really up to your imagination but it is fairly obvious that Classifications can be
quite handy in Schedules. This topic will be discussed further under Part 18 -
Schedules. You can also read a bit more about how to create Classification
Definitions in Part 1 -
Display. |
 |
| Style
Properties - Display Properties tab
The Display Properties tab of the Door or
Window Style Properties dialog box, illustrated right, provides access to some of
the most powerful options for these two objects. This is where the Door or Window is
configured to look different in different Views and different plans. It is also
where you can add amazing customized features such as hardware, awnings, stained glass and
so forth.
Illustrated
to the left, is another way to access the Display Properties tab; select
the specific object, right click on your mouse
to invoke the object-specific pop-up menu and select Edit Object Display... Just
be aware that when you use this approach, you can actually set an Object Override as
opposed to a Style Override. Object Overrides can be extremely useful because they
allow you to add things like Sills or Thresholds to any object within a Style Family but
they can also be problematic because they lock you out from more centralized, Style level,
controls. |
 |
| Display
Properties (Drawing Default)  Doors and Windows have an amazing and almost unfathomable amount of
options under the category of Display Properties so it is basically impossible for me to
cover everything you can do. The good news is that there is a lot of
redundancy in
this matrix so once you get the general concepts down you can expand upon that knowledge
to master the greater body of options. To be perfectly forthright, I don't use most
of the options here since it takes way too much time to tinker with it all when I have
more pressing demands to get Construction Documents out the door. Doors and Windows have an amazing and almost unfathomable amount of
options under the category of Display Properties so it is basically impossible for me to
cover everything you can do. The good news is that there is a lot of
redundancy in
this matrix so once you get the general concepts down you can expand upon that knowledge
to master the greater body of options. To be perfectly forthright, I don't use most
of the options here since it takes way too much time to tinker with it all when I have
more pressing demands to get Construction Documents out the door.
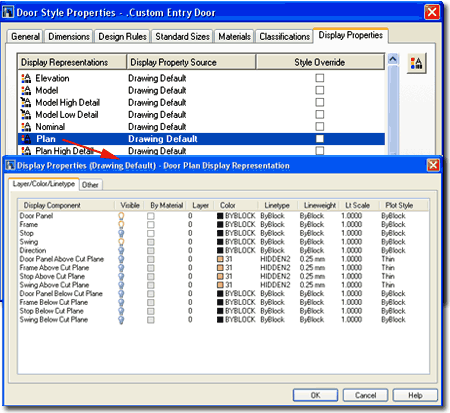
Illustrated to the right I show the Layer/ Color/
Linetype tab on the Display Properties dialog for the Plan
High Detail Display Representation of a Door Style. You
may notice that the number of Display Components for the Plan High Detail and Plan Display
Representations are exactly the same and this reiterates some of that redundancy I alluded
to earlier. However, you should notice that the Plan High Detail Display
Representation does offer an extra Tab for Frame Display
and more options on the Other Tab so there are differences that explain
why this Display Representation was created. |
 In the illustration above I also show that I have changed the Color for the
Swing Display Component of my example Door Style. Since I have not Attached a Style
Override for the Display Representation of this Door Style, whatever changes I make here
will also affect all other Door Styles that don't have any Style Overrides for this
particular Display Representation. That means that since I am setting my Swing
Display Component to Red, I should find that all Swings are now Red when I set my Display
Configuration to "High Detail". I have provided this simple example so you
can start with something equally basic before proceeding on to more elaborate and
sophisticated settings. |
| 8Door and Window
Display Properties |
8-6 DOORS - WINDOWS - OPENINGS - ASSEMBLIES |
| Door
and Window Display Property Overview  When it comes to the Display Properties of Doors
and Windows, there's practically no limit to what and how you want
information presented. If your desire is to create Doors and Windows that are
completely out of this world, you can Attach your own Blocks to replace or expand the
existing default linework for these objects. When it comes to the Display Properties of Doors
and Windows, there's practically no limit to what and how you want
information presented. If your desire is to create Doors and Windows that are
completely out of this world, you can Attach your own Blocks to replace or expand the
existing default linework for these objects.
In this section I will cover some of the primary options
within the Display Properties for these two Objects that I think may be of significant
importance to your mastery of this product. For me, though I realize there are a
lot of cool things that you can do here, my emphasis is always on the things that pay the
bills so I will focus on Plans and Elevations.
Illustrated to the right I show three different Views of
the same Wall, Window and Doors.
In Plan View with the Medium Detail Display
Configuration active, I show that I have used an Override on the Open
Percent for an Arched Double Casement Window, Added Sills to both sides and increased the
lineweight of the Frames. In Elevation View, I show that I have Added Muntins with
the Parametric Muntin Builder and in a Perspective View, I show that I have set Materials
for each of the items set in the Elevation. |
 |
Doors and Windows in Plan
| Menu |
Format> Display
Manager... |
 |
 |
| Keyboard |
DisplayManager |
| Keyboard |
DisplayProps [Attach] |
| Mouse |
Select Object, right-click,
select Edit Door Style... or Edit Window Style... or Edit Object Display... |
| Links |
Part 1 - Display - Object
Display Properties Overview - for more information on how to access the Display
Properties of this Object. |
 In my opinion, the Plan View for Doors and Windows
is the most important one to focus on since that is the primary display we use to
communicate information to planning departments, builders and so forth. Since Doors
and Windows are Anchored to Walls, the Wall Object and Style also becomes
integral to the subject of getting proper Display Properties in 2D Plan View. In my opinion, the Plan View for Doors and Windows
is the most important one to focus on since that is the primary display we use to
communicate information to planning departments, builders and so forth. Since Doors
and Windows are Anchored to Walls, the Wall Object and Style also becomes
integral to the subject of getting proper Display Properties in 2D Plan View.
There are quite a few different places that you can adjust
settings that affect the display of Doors and Windows so you might want to make sure you
are calm and relaxed before reading the rest of this sections.
At the most elementary level, you can affect the display of
Doors and Windows through at least one Layer; like A-Door
and A-Glaz, for example. At the Style level you
have the physical dimensions for the various components - see illustration to the
left. At the Display Properties level ( accessed either through the
Object, Object Style or the Display Manager ) you have Layer-like controls for the
physical components (yep, once again ) and for Components you may not even understand -
see illustration to the right. And finally, just to make this really interesting,
you have the Wall Object/Style to deal with which has all of these types
of options as well ( we'll look at this wall).
The best way to tackle all of this is to break it down by
working with the Display Configuration you have decided to use for your
Construction Documents. Illustrated to the right I show the default "Medium
Detail" Display Configuration which uses the "Plan"
Display Representation for most Objects. I made Visible a
couple
of extra Display Components that you may not find turned on in your file.
The first thing you need to decide on is what you want to
see and what you don't and then begin to make the most logical changes that will produce
those Display results. In the case of the Primary Components for Doors and Windows,
you have Panels, Frames, Stops, Sashes,
Swing, Glass and Direction.
Though you can easily make these Components disappear by turning their Visibility
Off under the Display Representations, you may not like the
results. With Frames, for example, simply turning a Frame Off will not produce a
plausible Door because the space it consumes will still be visible in the Wall - leaving
the appearance of a floating Door. Instead, use the Dimensions Tab on the Door Style
Properties dialog to set the Frame Width to zero (0). You can use this type of logic
on many of the other Components. |
 Keep
in mind, however, that if you specify zero value Dimensions for Components they will
always hold that value and thus you will not see these Components in Reflected Ceiling
Plans, Elevations, Sections or 3D Views. In the case of the Frame though, you just
can't win with this product so if you don't want to see it in Plan View, you will need to
set the Width Dimension to zero. You might want to argue this point with me given
that the default "Low Detail" Display Configuration
clearly shows another solution, but if you study this solution you will find that it
actually increases the size of the Door and the Swing ( a potential liability issue ).
Some Components, like Glass and Stops can be
turned Off rather than set to a zero Dimension and I recommend that you employ this
technique wherever possible because then you will always have the option to turn these
Components On through other Display Representations and Display Configurations ( like
Model for 3D Views ).
Tricks:
You can actually set the Frame Widths to negative values thus pushing them into the Walls.
Some have used this technique to get the best of both worlds where it look a bit
more simple in Plan while offering more detail in 3D. If you increase the Width to a
value a bit more than your Wall Widths, the Frames can even appear as Trim or
Molding. |
| Doors and Windows Above or Below the Cutting Plane
 Generally speaking, you should find that getting Doors and Windows to display
as you prefer in simple design scenarios is reasonable; especially with the knowledge of
how to make basic changes as discussed above. However, when it comes to working with
Doors and Windows that don't fall into a "normal" vertical position ( within the
default "cut-plane" range ), you may find some frustrating
surprises. Generally speaking, you should find that getting Doors and Windows to display
as you prefer in simple design scenarios is reasonable; especially with the knowledge of
how to make basic changes as discussed above. However, when it comes to working with
Doors and Windows that don't fall into a "normal" vertical position ( within the
default "cut-plane" range ), you may find some frustrating
surprises.
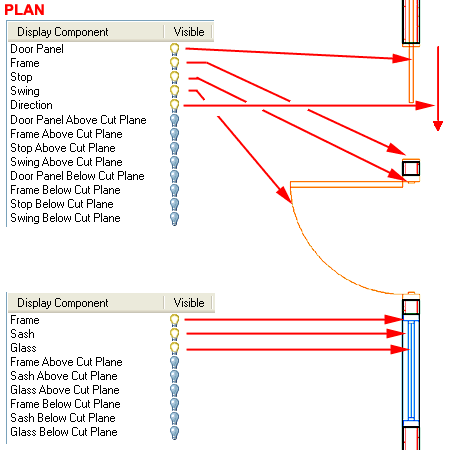
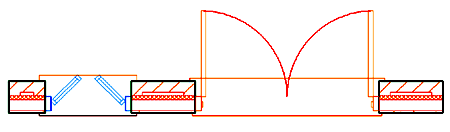
Illustrated to the right I show what will happen to a Door
and a Window in Plan View using the "Medium
Detail" Display Configuration. Since
the Window is well above the Wall's Cut Plane it actually disappears so you can't even
work on it. The Door, being well below the Wall's Cut Plane will also disappear but
at least you see two jamb lines. This raises some serious questions, doesn't it?
In the Illustration to the right I show three examples of
some fairly simple Display Representation Settings that you can work with to alter the
Default Display of these two Objects.
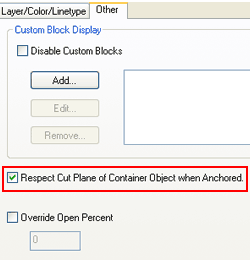
On example 1, I show that you can always
deactivate the "Respect Cut Plane of Container Object When Anchored"
setting on the Other Tab of the Display Properties for Doors and
Windows ( and even Openings ). This keeps the Doors and Windows from ever
disappearing because what you see is their internal cut-plane.
On example 2, I show that instead of
deactivating the "Respect Cut Plane of Container Object When Anchored" setting as
per example 1, you can take advantage of the Above
and Below Cut Plane Display Components to turn Components
On and alter their appearance to help indicate that they are above or
below. |
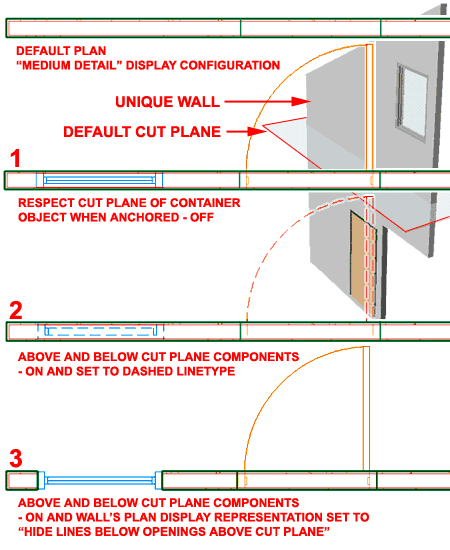 On
example 3, I show that you can use the information from example 1 or 2
and combine it with some changes to the Wall Display Properties. Here, I
activated the "Hide
Lines Below Openings Above Cut Plane" setting found on the Other Tab of
a Wall Style's Plan Display Representation Properties.
You can go a bit further and change the Cut Plane Height
of the Wall to a point that cuts through the Door; something in the negative range.
This would make the Plan View of this scenario appear as a normal Wall with a
Window and Door at a normal position. |
| Doors and
Windows with Thresholds
and Sills Both Windows and Doors have unique
Display Representation
for Sills and Thresholds so you can add extra linework
for these items when you need to. Unfortunately, there are some limitations and one
of the most disappointing discoveries you may soon find is that both Display
Representations are only for Plan View; thus they do not offer anything
for Elevations or 3D Views. One other little irritation I discovered with these
Display Representation is that they don't Trim around Window or Door Panels so you will
see a line running right through these objects when they are Open in Plan View ( this is
something I can live with but it is a little irritating).
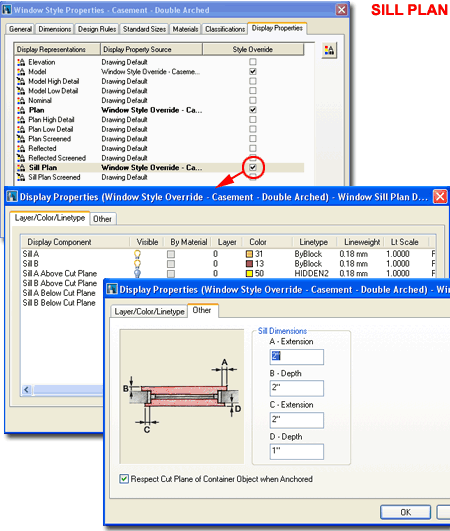
Illustrated to the right I show an example Window
Style Properties dialog box where I have used the Style Override
option to set the Sill Plan Display Properties for the
current Window Style. The reason I have chosen to use an Override is that I don't want to
use the same Sill Display Properties for all of my Window Styles. By using the
Override at the Style Level, you can control how the Sill Display Properties will appear
for the current Style only rather than suddenly discovering that all of your Windows have
Sills.
 On the Display
Properties dialog,
also illustrated to the right, I show that I have turned on both Sill A
and Sill B and set the Dimensions for these Sills on the
Other Tab using the Extension and Depth
value fields ( as illustrated ). On the Display
Properties dialog,
also illustrated to the right, I show that I have turned on both Sill A
and Sill B and set the Dimensions for these Sills on the
Other Tab using the Extension and Depth
value fields ( as illustrated ).
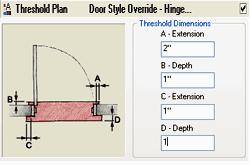
For Door Styles, you will find all of the
same options and settings under the Threshold Plan Display Representation
- see illustration, left.
|
|
| Doors and
Windows in Model and Elevation As discussed
above, I feel that the Plan View is the most important area to focus on for Display
Properties but once you begin to take advantage of Architectural Desktop's Elevations,
Sections and 3D Views you will want to explore the Elevation and Model
Display Representations to add things like Muntins.
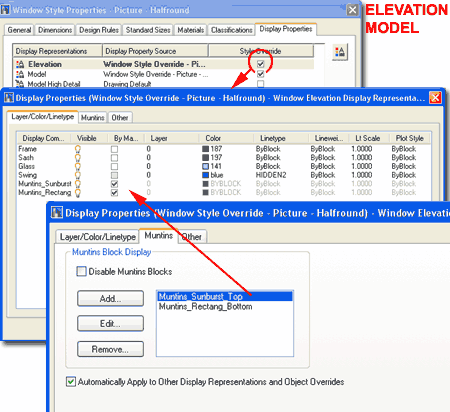
Illustrated to the right I show the Display
Properties tab for a Window Style that I am in the process of Adding Muntins to.
You may notice that on the Window Style Properties dialog, I have used Style
Overrides for both the Elevation and Model Display Representations and this is
because I
want Muntins for both Views. If you don't imply the Style Override, you will end up
with the same Muntins on all Window Styles.
On the Display Properties dialog, accessed
by checking the Override checkbox or by Modifying one of the Display Representations, I
show that there are new Display Components for each
Muntin I have Added on the Muntins Tab. This will allow you to control the Material,
Color, Lineweight and so forth for the Muntins ( a great option).
On the Muntins tab of the Display
Properties dialog, illustrated lower right, I show that I have used Add...
button to add two "Muntin Blocks". The reason I show two
of these is to illustrate how you might create a Top Muntin Pattern that is different than
the Bottom Muntin Patterin in a Double Hung Window Style, for example.
If you have one design or set of settings in mind for the
Elevation Display Representation that will be different than the Model Display
Representation, then you will need to repeat all of these steps for the other
Display
Representation - as I have shown here. Otherwise, you may be able to take
advantage
of the "Automatically Apply to Other Display Representations..." option at the
bottom of the Muntins tab. |
 Automatically Apply to Other Display Representations - this
option will display on the Muntins tab when no Override is being used. If you are
unsure about the effects of this option, uncheck it before Adding and you will see a
dialog with a list of other Display Representations that you can Apply to later. The
concept is relatively simple: you use this option when you want the Muntins you create
under the Elevation or Model Display Representation to be added to the other Display
Representations that should also display the same Muntin Layout. Be aware that this
option does not always produce the results you wish if you are using Overrides.
Automatically Apply to Other Display
Representations and Object Overrides - this option will display on the Muntins
tab when using an Override. It works as described above but with the added bonus of
catching Objects that have Overrides at the Object Level instead of the Style Level.
|
| Doors and Windows -
Parametric Muntins - Patterns After
selecting the Add... button on the Muntins Tab for
Window or Door Styles, you will be taken to the Muntins Block dialog box
illustrated to the right. This tool is termed a "parametric tool" because
it's settings automatically adjust to whatever sizes you specify when creating the
objects; e.g., if you specify 3 Muntins, you will always get just 3 Muntins of equal
spacing.
Illustrated to the right, I show that I have specified a
unique Name so that I can figure out which one to Edit in the future ( if I have more than
one, this can be really helpful). I also show that I have chosen to use the Top
Window Pane to set a Sunburst Light Pattern that will be part of my Half round fixed Window
Style. The fact that you don't see the Rectangular bottom portion of this Window
Style appears to be a bug in the software since this was not a problem in previous
releases. When you Add.. another Muntin Block for the bottom portion of this Window
Style, it will continue to show the Arched Top so you'll have to pretend it is a
rectangular shape. The final outcome will be okay.
The trick to getting all of the options illustrated to the
right has to do with using a Window Type and Window Shape
that allows you to use these options. The Window Style illustrated to the right is
the Picture Half Round - which is a Picture Type with a Half
Round Shape. You can thus mix and match several Types and Shapes.
When you Modify the Display Properties for a custom Window Shape,
such as this one, you will most likely need to use an Override
because the default "Standard" Window Style is set to be a Rectangular
Window Shape with Display Properties to match; i.e., no options for a Hub,
etc.
Name - automatically generated but you can
type in your own and I highly recommend that you do when using multiples.
Window Pane - Top will
automatically set you to the top pane in a multi-paned window ( like the top in a
double-hung window ).
Other will allow you to specify what Pane you want; where All
gets all panes and Single allows you to manually go to the specific pane
number you want ( in a double hung case, choosing number 2 would be equal to using the Top
option ).
Muntin - Width and Depth of the muntins
themselves.
Clean Up Joints - creates a traditional architectural graphic look where
the muntin intersections don't show any crossing lines; a clean look that I use but it's
not reality - the other option is worse where all lines cross - hmmm, where's the next
option as with Assemblies and Curtain walls?
Convert to Body - creates a 3-dimensional version of the muntins and adds
detail to 3D Views. This is a great option but can put a heavy load on system
resources and should thus be used sparingly and only when needed; i.e., it's not need in
2D Elevations and Sections. |
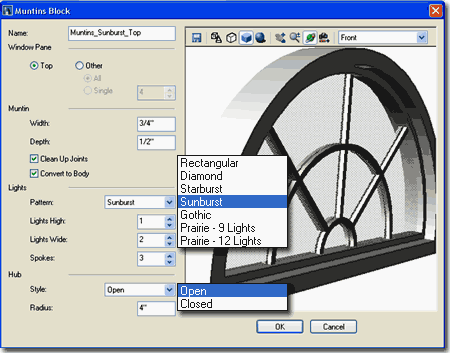 Lights
Pattern - a drop-down list offering different muntin patterns and varies
dramatically depending on what Window or Door Style you are working with; a "Picture
Half Round" Style, shown below above, has many options. A standard double-hung
window will only offer Rectangular and Diamond muntin patterns.
Lights High - divides the selected Pane(s) into equal vertical numbers.
Lights Wide - divides the selected Pane(s) into equal horizontal numbers.
Spokes - divides a Style with an Arched top into equal polar numbers.
Hub
Style - a drop-down list offering either Open or Closed hub designs where
Spokes are used. Closed simply fills the inner hub with a solid form and no glazing.
Radius - a value field that allows you to specify the Hub radius
and consequent vertical lights.
Starburst / Sunburst / Gothic - Window
Types:
Awning, Single Hopper, Single Transom, Vertical Pivot, Horizontal Pivot, Double Hung,
Glider, Single Hung, Single Casement and Picture.
Starburst / Sunburst - Window Shapes:
Round, Half Round and Quarter Round.
Gothic - Window Shapes:
Round, Half Round, Gothic, Peak Pentagon and Arch.
Note: You may find that
while you are making changes, your graphics card stops delivering real-time changes in the
preview area. To fix this problem, OK out of this dialog box and simply use the
Edit... button to return. If the problem persists, OK back out further and return. |
| Doors and Windows - Parametric Muntins -
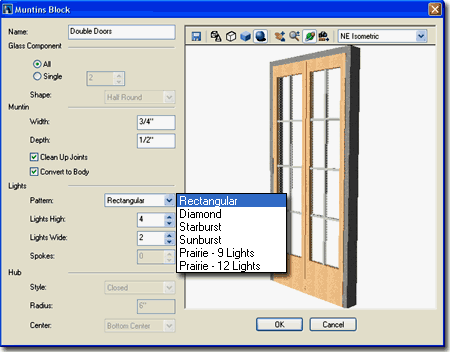
Multiples 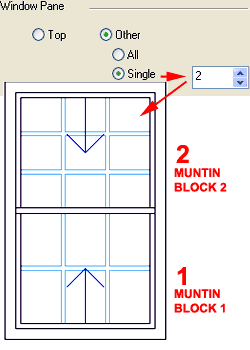 For the bottom portion of the Half round Picture Style discussed above and for
numerous other Window and Door Styles that have multiple Window Panes,
you can continue to Add... as many Muntin Blocks as you need for each Pane. For the bottom portion of the Half round Picture Style discussed above and for
numerous other Window and Door Styles that have multiple Window Panes,
you can continue to Add... as many Muntin Blocks as you need for each Pane.
Illustrated to the left I show that I have used two
Muntin Blocks to create two different Muntin Patterns; one for the Top
and one for the Bottom of an example Double Hung Window Style. To
specify which Pane you want to set the current Pattern for, use the Other radio
button and set the Single Pane number to match the Preview area.
Once you add Muntins, you will instantly see which Pane you are affecting.
Illustrated to the right I show that I have used the All
radio button for the Glass Component of an example
Double Glazed Door Style to set the same Retangular Lights Pattern for both Panes.
|
 If you want to keep one Door or Window Style but
have independent control over Muntin arrangements, you can use the Edit Display
Props... object-specific pop-up menu choice and use Object Overrides to work on
individual Window or Door Display Properties. The drawback to this technique is that
rapid style changes cannot be achieved from a central Style change; instead, you will have
to track down every door or window you modified uniquely and change their individual
Display Properties. It's best to create individual Styles for each Muntin layout. |
| Doors and
Windows - Other Tab
The Other Tab on the Display
Properties dialog box, illustrated to the right, is primarily designed to manage
the attachment of unique Blocks for items that are not available for Doors,
Windows and Openings. On this tab you will also
find the option to Override the Open Percent
and, for Doors, the option to display Swings as Straight lines.
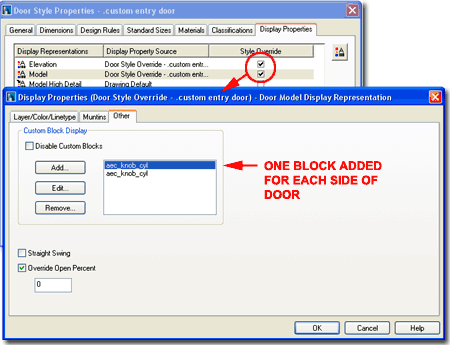
Illustrated to the right I show that I have used the Add...
button to attach a custom Block of a Door Knob. I have Added it twice because I
wanted one on each side of the Door Panel.
Custom Blocks provide you with the option
to add components to an ADT Object that isn't part of it's original design. In this
example I am illustrating how to Add... door knobs but you can add just about anything you
can think of. I have added two of the same because I want one door knob for each
side of my door.
Straight Swing - a graphic swing line that
is straight rather than arched.
Override Open Percent - a check box that
allows you to control the percentage of the Door's Swing; zero ( 0" ) is closed and
100 percent is 180 degrees open. This is obviously necessary in cases where two
adjacent doors need to be shown clearly and not overlapping or in cases where you need to
show two-way swing doors. |
 |
| Display Properties - Other -
Custom Block Once you pick on the Add...
button on the Other tab of a Door Style's Entity Properties
dialog box, you should see a large Custom Block dialog box as illustrated
to the right.
In the illustration to the right, I have attached the same
2D "door_knob_plan" block that I created with the Block
command. The insertion point was at the back center but you can choose just about
any insertion point because the Custom Block dialog box provides Insertion Point
and Insertion Offset setting options to allow you to massage your custom
block to a point right where you want it.
Scale to Fit - these check box options
provide controls to match component proportions of a door so that you can use the Custom
Block in a fashion that is similar to parametrics. this may work well with
ornamental designs, glazing and similar dynamic forms but it doesn't work with hardware
that needs to stay a fixed size and shape.
Mirror In - these check boxes allow you to
flip a block to match how you want it to appear with respect to the Door. These options
become very valuable when you want to use on block, such as a door know, for each side of
the same door.
Insertion Point and Insertion
Offset values allow you to position your custom block base upon its insertion
point. |
 Frame Component Outside relates
to the outer portion of you Door for the block attachment and position while Inside
relates to any internal components such as a window or vent.
There are a number of problems with this
technique, the worst one being that the object you attach and painstakingly locate does
not rotate with a Door's Open Percent value so you can end up with door knobs in space if
you choose to close it.
Note: You may find that
while you are making changes, your graphics card stops delivering real-time changes in the
preview area. To fix this problem, OK out of this dialog box and simply use the
Edit... button to return. If the problem still exists, OK back out further and
return. |
| 9Door/Window Assemblies |
9-6 DOORS - WINDOWS - OPENINGS - ASSEMBLIES |
Add
Door/Window Assemblies Properties Palette
| Alt.Menu |
Design>
Door/Window
Assemblies> Add Door/Window Assembly... |

|
|
| Keyboard |
DoorWinAssemblyAdd |
| Links |
Doors, Windows & Assemblies Style Loading
- for information on where to load Door/Window Assembly Styles. |
Door and Window Assemblies are basically mathematical grids within
which you can associate other Objects like Doors and Windows to create a composite
assembly of parts. These "Assemblies" are a derivative of the Curtain
Wall Style but have been designed to Anchor to Wall Objects much like Doors,
Windows and Openings do.
Once you have loaded your
Assembly Styles, you can begin to Add them. On the Add
Window Assemblies Properties Palette, use the Style drop-down list to pick your style.
Illustrated to the right I show just a portion of the predefined Styles that
come with ADT.
DIMENSIONS
Length - input the overall out-to-out frame length of your
Door/Window Assembly. Once you have placed your Door/Window Assembly,
you can use the Properties Palette or Grips to modify this value.
Height - depending on the design of
the Door/Window Assembly this typically represents the finished floor to top
of frame height so this height would be greater than a standard Door Height
if you expect to insert a Standard Door into the Assembly; i.e., the height
of the Door plus the frame height, for example.
Rise - is for Assemblies that have a pitched
or arched top, much like a triangle or vault and
can be set within the Door/Window Assembly Style; see Defaults tab - option 'C'
 Start
and End Miter Angles - angle settings for these two value fields only
affect the top and bottom frame. Since you cannot create perfectly
mitered corners within Walls using any of the default Door/Window Assembly
Styles, this option is a bit misleading - especially the little graphic on
this Palette. Start
and End Miter Angles - angle settings for these two value fields only
affect the top and bottom frame. Since you cannot create perfectly
mitered corners within Walls using any of the default Door/Window Assembly
Styles, this option is a bit misleading - especially the little graphic on
this Palette.
|
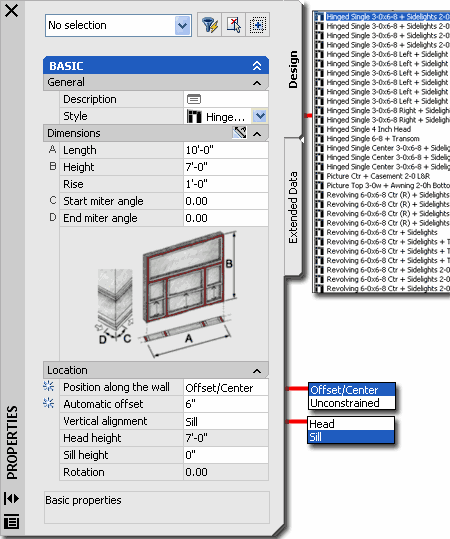 LOCATION
Position Along the Wall - this drop-down list offers the same two
choices found for Doors, Windows and Openings. I find that using the
Offset/Center with a well chosen Automatic Offset value works best.
If you use the Unconstrained option, you can still come back with the
Anchor dialog box an set a highly accurate position value.
Automatic Offset -
this value field is only available when you use the Offset/Center option for
Position along the Wall. Setting a value here will allow you to
position your Door/Window Assembly at Center-points within Wall Objects or
the specified Offset distance from Wall Ends, Wall Intersections or other
Openings in the current Wall. Working on Curved Walls can prove
to be difficult with this option and you may need to use an arbitrary
location at first and then come back with the Anchor dialog box for more
accurate positioning.
Vertical Alignment - this
drop-down list offers two options for setting the vertical height of the
Assembly: with respect to the Sill or the Head. Since
Door\Window Assemblies are often placed as Doors, you may want to use the
Sill option.
Head and Sill Height - depending upon
the setting made for Vertical Alignment, you will either have a Head height
or Sill height value field to set your height value for. If you want
your Assembly to be placed at the base of a Wall, for example, you would
most likely use the Sill option and set the height to zero.
|
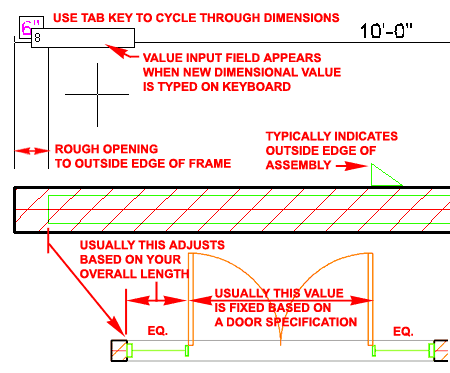
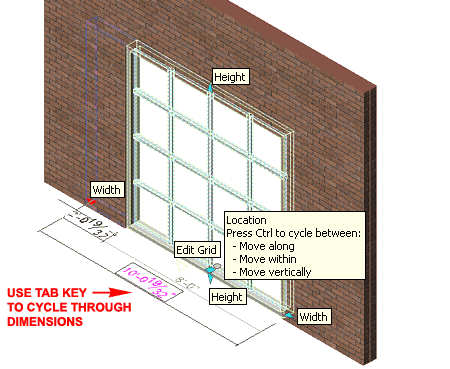
| Placing
Door/Window Assemblies in Walls
Adding Door and
Window Assemblies is very similar to Adding any of the other opening
objects. After Selecting a Wall Object to Anchor your Assembly to,
familiar Dimensional values should appear on your screen as illustrated to
the right. By using the Tab key you can cycle through any of these
temporary dimensions and type a new value as desired. From an Edge,
the Door and Window Assembly us usually measured to the outside edge of the
primary frame or grid as it is referred to in ADT.
Many of the
predefined Door/Window Assembly Styles in ADT have a set of fixed and
variable cells that allow you, for example, to Add a double entry door
system with variable length sidelights. These Style can be
designed to function in many different ways so make sure to read up on
Door/Window Styles if you find that the default ones don't produce the
results that you seek.
Should you,
for whatever reason, want to use a Door and Window Assembly without
Anchoring it to a Wall Object, you can Release an Existing one or hit the
Enter Key when queried to Select a Wall. There is no simple solution
for mitered corner glazing units. Though you can Anchor an Assembly to
the very end of one Wall Object, you cannot Anchor both to the out ends at a
corner unless you employ a trick like using different
Wall Cleanup
Groups.
|
 |
Convert
Linework to Door/Window Assembly
| Menu |
N.A. |

|
|
| Keyboard |
DoorWinAssemblyConvert |
|
Tools |
Right-click over Door/Window Assembly Tool, select Apply Tool
Properties To and cascade to Elevation Sketch |
| Links |
Custom Window Assemblies - for
a lengthy article with all of the steps for creating a storefront assembly with doors and
sidelights. |
For a quick Door and Window Assembly design
solution, you can use regular AutoCAD based Lines, Arcs,
Polylines and Circles to "sketch" out your concept in 2D.
The exterior linework will be converted into the Primary Grid or frame and
will represent the exterior dimension while all interior linework will be
converted to Mullions centered on the linework. Be aware that though
this technique is very attractive, there are significant drawbacks when it
comes to modifications. As a Style, you cannot modify the grid because
it becomes a "Custom Grid" but at least you can modify Panels, Mullion
Profiles and so forth. As an Object, however, you can use
Edit-in-Place techniques to modify the Grid and the Mullion Positions so
this is not too bad an option if you don't mind the limitations within the
Style Manager.
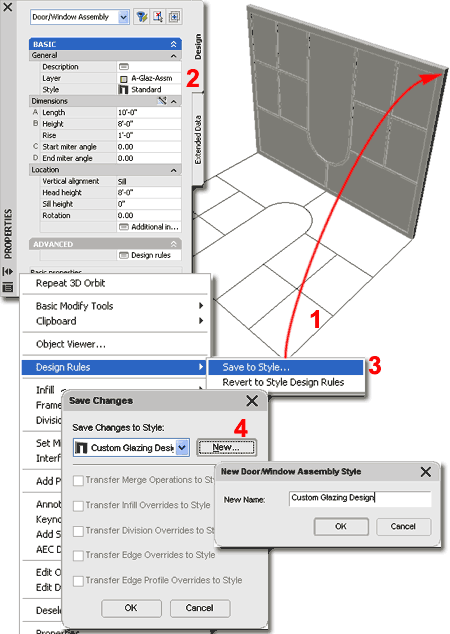
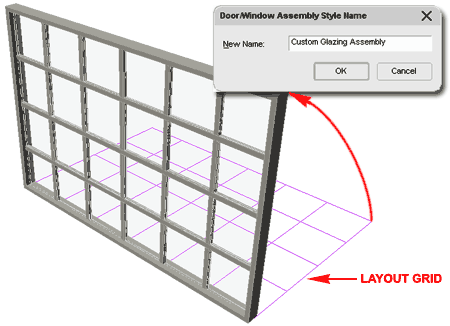
Illustrated to the right I show an overview
of the process and the tools involved in converting linework to a
Door/Window Assembly Style. After creating your 2D grid design for the
frame and mullions, use the DoorWinAssemblyConvert command and specify LInework
when queried as follows: "Convert [LInework/LAyoutGrid]:"
You can draw the linework in Plan (Top) View
or in the Elevation View where you need it. The position of the X-axis
on the UCS icon will determine the base unless you select another object as
the "baseline".
Select your linework and hit the Enter key
( 1 ). When queried to "Select
baseline or RETURN for default:", hit the Enter key unless you
want the Door/Window Assembly to match the Plane of the linework such as
when converting linework drawn in Elevation View. My preference to
draw in Plan View and Convert to an upright position as illustrated to the
right. When queried to "Erase layout geometry? [Yes/No] <No>:",
I find that it is best to keep the linework around in case I made mistakes.
After the Conversion takes place, you should
see a 3D Door/Window Assembly Object and the ( 2
) Properties Palette. The default Style will be set
to Standard until you use the Design Rules pop-up menu option to cascade
over to ( 3 ) "Save to Style..."
as illustrated to the right. On the ( 4
) Save Changes dialog, you will need to use the New...
button to type in a New Name for your custom Door/Window Assembly Style..
Once you have Converted your linework to the
Door/Window Assembly Object, you are automatically put into something
similar to an Edit-in-Place mode indicated by the "Design Rules are on the
object..." reference you will see on the command line. You can
modify the Assembly Object using the pop-up menu options before saving it to
a Style. At any time after making Modifications, you can use the Save
to Style... pop-up menu option to Save the Converted Assembly as a New Style
to be used in Walls.
To use simply Add the New Style as you
would other Door/Window Assembly Styles.
|
Command: DoorWinAssemblyConvert
Convert [LInework/LAyoutGrid]: li
Select elevation linework: Specify opposite corner: 9 found
Select elevation linework:
Select baseline or RETURN for default:
Erase layout geometry? [Yes/No] <No>:
Design rules are on the object. Select Save Changes
from the context menu to
create a new style.
Convert [LInework/LAyoutGrid]:
|
| Convert
Layout Grid to Door/Window Assembly
 The
DoorWinAssemblyConvertGrid command is really just a direct path to an
option under the DoorWinAssemblyConvert command discussed above.
Because this option uses an ADT grid as the template for conversion, the
process and the results are a lot easier to work with than that of
converting linework. In fact, a Layout Grid translated directly to the
Primary and Secondary Grid Divisions within the Door/Window Assembly Style
dialog box so, among other things, you can modify the spacing between
Mullions after conversion. The
DoorWinAssemblyConvertGrid command is really just a direct path to an
option under the DoorWinAssemblyConvert command discussed above.
Because this option uses an ADT grid as the template for conversion, the
process and the results are a lot easier to work with than that of
converting linework. In fact, a Layout Grid translated directly to the
Primary and Secondary Grid Divisions within the Door/Window Assembly Style
dialog box so, among other things, you can modify the spacing between
Mullions after conversion.
|
The only unusual question you will find when
using this tool is the "Primary Division [Vertical] <Horizontal>:"
query. This is simply an option to define a dominant Mullion direction
in cases where you may have one that is dimensionally larger than the other
- see illustration to the left.
Command: DoorWinAssemblyConvertGrid
Select a 2d layout grid:
Erase layout geometry? [Yes/No] <N>:
Primary Division [Vertical] <Horizontal>: |
|
10Modify
Door/Window Assemblies |
10-6 DOORS - WINDOWS - OPENINGS - ASSEMBLIES |
Modify
Door/Window Assemblies
Properties Palette
| Alt.Menu |
Design> Door/Window Assemblies> Door/Window Assembly Properties |
|
|
| Keyboard |
DoorWinAssemblyProps or -DoorWinAssemblyModify |
| Mouse |
Double Left Click on an
Object to invoke the Properties Palette |
| Links |
Object
Properties - Anchor tab - complex objects - for explanation of Anchor
tab options. |
| |
See
Add Door/Window Assemblies for full
information on the Properties Palette |
For most conditions, you should find that the
Properties Palette offers the same list of options as those found
when Adding Door and Window Assemblies. However, once you
explore advanced editing features, you may find new options under the "Advanced"
section of the Properties Palette as illustrated to the right.
For information on the Basic list of features
on the Properties Palette, see
Add
Door/Window Assemblies Properties Palette above.
LOCATION
Anchor - provides access
to the Anchor dialog box which can be used
for fine-tuning the position of Door/Window Assemblies in Walls and though most of
these settings can be done with Grip work live on the Object, I often find
this a more comprehensive tool to reposition this object.
ENDCAPS
Opening Endcap - this drop-down list is really an
Override option that affects the Wall. If you select another Endcap Style than that
assigned within the Wall Style, the Override only applies to the specific Object Selected.
This means that you can Select one Assembly, for example, and assign a
different Opening Endcap Style ( which is actually four Endcaps - one for each side of the
opening ). This can be a fantastic option or a nightmare depending upon the use and
comprehension of how it creates an Override. |
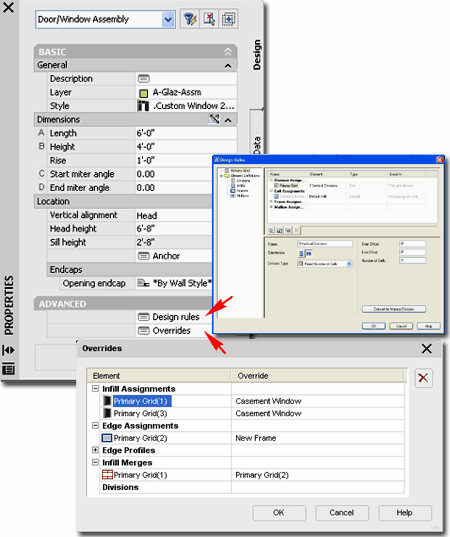
ADVANCED
These options are only available when the Design Rules are governed by the
Object instead of the Style. By working with the Context (object
specific) pop-up menu, you can use the Design Rules> menu option to
toggle between these two options.
Design Rules - provides access to the
Design Rules dialog box which is basically the tab of the same name from the
Door/Window Assembly Style Properties dialog box. Since this is a type
of Override, you are able to work on the dimensional proportions of a single
Door/Window Assembly uniquely while still keeping other forms of Style
control through its Style Settings. Overrides -
provides access to the Overrides dialog box where Edit-in-Place changes are
stored. You can Remove or Change the Override Settings but you cannot
Add them through this dialog box. |
|
Door/Window Assembly Grip Points
Door and Window
Assemblies have four primary Grip Points
from which you can Stretch the Width
and Height.
As with most other Objects in ADT, you also have the
Location Grip Point with options
for Move
along,
within and
vertically; all cycled through by
using the Ctrl key. The last Grip Point, Edit Grid,
activates the Edit-in-Place mode where you are queried to Select an Edge of
the Assembly that represents the grid-direction that you wish to edit.
When you
active the Grid for Editing in Place, you have actually activated the
Division pop-up menu option -
see discussion below for information on this subject and how to set
Divisions to Manual control. |
 |
|
Door/Window
Assembly Context pop-up menu options
One of the more powerful and intuitive ways
to work with existing Door/Window Assemblies is to use the Context or object-specific pop-up menu.
The only problem with working on Assemblies "in-place" is that you will
eventually need to decide on how those changes are saved. If you
simply make changes such as Cell Merges on an Assembly and don't do anything
else, the changes will only be stored under the Advanced section of the
Properties Palette. If you use the Save to Style... option, you can
push your changes back to the original Assembly Style or create a new
permutation based on your changes.
Design
Rules> - use this menu option to toggle between the default setting of
Style based Design Rules and Object based Design Rules. When you use
the "Transfer to Object" menu option, Overrides are transferred to
the Object Level and can be accessed on the Properties Palette under the
Advanced section. You can also use the Design Rules dialog box to
modify all of the Design Rules Style Settings uniquely for the current
Assembly. By using the Save to Style... menu option, you can
Save Object-specific changes back to the original Assembly Style or to a
New... Style based on the current form of the Assembly. You can
also use the "Revert to Style Design Rules" menu option to return to
the default configuration.
Infill> - use these menu options to
work with Cell Infills directly on the Door/Window Assembly Object. By
using the Show Markers toggle ( which changes to Hide Markers as per
illustration to the right ), you can activate a square marker for all Cells
so you can Select them for Merges or Assignment Overrides. Merging
Cells is another way of eliminating a Division by uniting two adjacent
Cells. The Override Assignment... option can be used to replace an
existing Infill with any other Infill Definition within the current Assembly
Style.
Frame / Mullion> - use these menu
options to adjust the profile shape of Frames and/or Mullions. See
discussion and examples below.
Division> - use these menu options
to adjust the Horizontal or Vertical Division Spacing of Mullions. You
can also go beyond the basic level of spacing control to a Manual mode where
you can Add, Remove and randomly space Mullions. See discussion and
example below.
Set Miter Angles - use this menu
option to let ADT automatically calculate the Miter Angle between two
adjacent Top and Bottom Frame Elements. See discussion and examples
below.
Interference> - use this menu
option to use any other ADT Object as an Interference Object that will
create a hole in the Assembly.
Add Profile - use this menu option to
activate the Add Door/Window Assembly Profile dialog box to
Select a predefined Profile Definition or to Edit the
current Profile "In-Place".
|
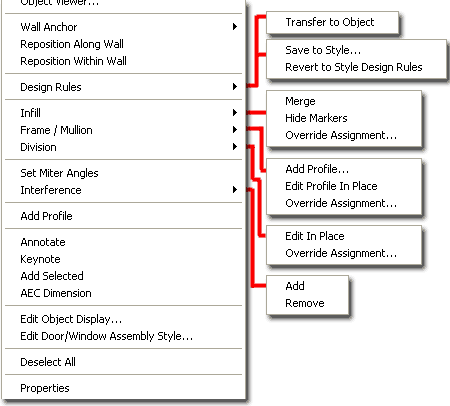 |
|
Door/Window Assembly Design Rules - Save to
Style If at some point in the
modification process you decide that you want to Save your Assembly changes
back to the original Door/Window Assembly Style or that you want to Save the
changes to a New Door/Window Assembly Style Name, you can use the Design
Rules pop-up menu option, set the state to "Transfer to Object" and Select
"Save to Style..."
On the Save Changes dialog box,
illustrated to the right, you can Select an Existing Door/Window Style Name
to Save to or use the New... button to create a New Style Name. By
using the checkbox options you can choose which changes to "Transfer" or
Save to the Style. The final result of this work will be a Style that
can reproduce the same design when using the Properties Palette to Add it to
Walls. Be aware, however, that Overrides remain as Overrides even when
you save them and you will find them on the Overrides Tab of the Door/Window
Assembly Style dialog box. In the case of Divisions, for example, this
can be a bit irritating since the grid layout may not actually be configured
by the Division Values on the Design Rules tab but rather by the Override
Settings on the Overrides tab - making it difficult to change and forcing
you to always use this Edit-in-Place technique.
Overall, I prefer to design Door/Window
Assemblies Styles directly with the Style dialog box rather than introduce
Overrides but having the Override option can make difficult situations less
time consuming. |
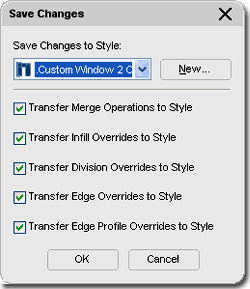 |
|
Door/Window Assembly Infill menu options
When using the Infill menu option, you should
find three options to choose from: Merge, Show Markers and Override
Assignment... The Show Markers option will change to Hide Markers when
the Cell Marks have been turned on.
Cell Markers are very useful for
identifying the Infills and in Selecting specific Infills for Merging and
Overrides. You can change the Color and Size of Cell Markers on the
Display Properties dialog box should you need to adjust them.
The Merge option will allow you to
unite two adjacent cells by removing the Mullion between them and expanding
the Infill of the Cell you select first.
The Infill Assignment Override dialog box
can be used to replace any existing Infill with any other Infill that
is defined within the Infills section of
the Style's Element Definitions Folder. You can also use this dialog
box to Remove any of the four outer Frames or just one Infill and a portion
of the adjoining Frame which can be quite useful when creating openings that
go to the floor.
|
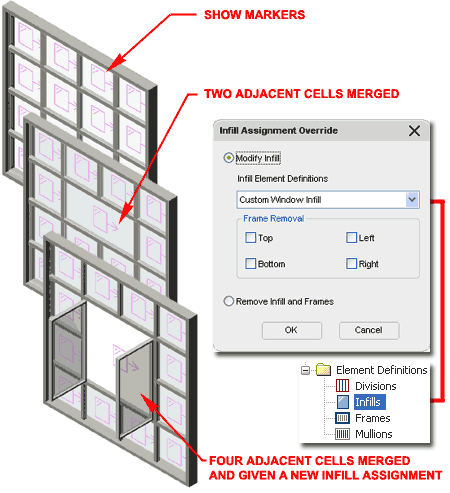 |
|
Door/Window Assembly Frame/Mullion menu options
When using
the Frame / Mullion menu option, you should find three options to choose
from but the "Edit Profile in Place"
option will only work once a custom Profile has been assigned to a Frame or
Mullion.
Illustrated
to the right I show the two primary options you can employ to create custom
Frame or Mullion changes.
The
Add Frame Profile dialog box
can either be used to transform the existing shape into a profile (Start
from scratch...) or be used to
Select an existing Profile Definition Name. For the Apply Profile
options, the "To Shared Frame Element Definition"
option will affect all connect frame or mullion elements while the "As
Frame Profile Override" option
will only affect the Selected Frame or Mullion.
The
Frame Assignments Override dialog box
offers a simple way to Replace a Selected Frame or Mullion with another as
defined within the Frames section of the Style's Element Definitions Folder.
You can also use this option to Remove a Frame or Mullion.
Note:
One of the easiest and fastest ways to create a custom Frame or Mullion
Profile change is to use the Start from scratch... option on the Add Frame
Profile dialog box. After typing in a Name for this new Profile and
setting the Apply Profile radio button to "As Frame Profile Override", all
you have to do is work with the default profile in the "Edit in Place" mode
where you can Add or Remove Vertex points and employ numerous other tools. |
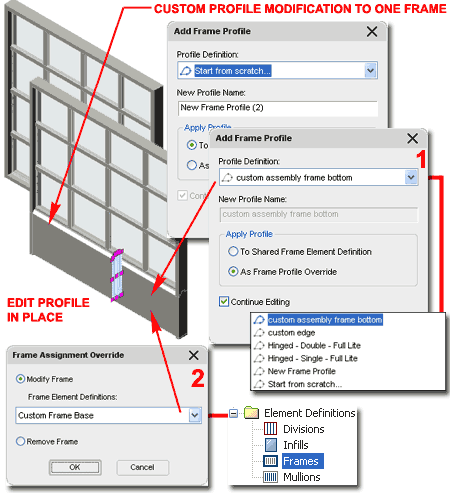 |
|
Door/Window Assembly Division menu options
When using the Division menu option, you
should find two options to choose from: Edit in Place and Override
Assignment... You can actually activate the Edit in Place mode
directly by Selecting the Edit Grid Grip Marker.
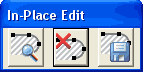 The
Edit in Place mode will query for a grid-edge Selection and then
activates the In-Place Edit tool bar and five special Grips as
illustrated the right. When you Select a grid-edge, you are also
setting the grid-direction that you want to edit since you cannot edit both
directions at the same time. Once you see the Grip markers, as
illustrated to the right, you can use the triangular Grips to Stretch or
Move Frames and Mullion and the circular Grips to activate special dialog
boxes. All of these Division controls have one thing in common and
that is uniformity based on Rules such as even increments of distance
between Mullions, for example. You cannot use these tools to set
Divisions at Manual Points within the Frame. The
Edit in Place mode will query for a grid-edge Selection and then
activates the In-Place Edit tool bar and five special Grips as
illustrated the right. When you Select a grid-edge, you are also
setting the grid-direction that you want to edit since you cannot edit both
directions at the same time. Once you see the Grip markers, as
illustrated to the right, you can use the triangular Grips to Stretch or
Move Frames and Mullion and the circular Grips to activate special dialog
boxes. All of these Division controls have one thing in common and
that is uniformity based on Rules such as even increments of distance
between Mullions, for example. You cannot use these tools to set
Divisions at Manual Points within the Frame.
 The
Division Assignment Override dialog box provides the option to select
a predefined Grid Division Definition as set within the Assembly Style.
This option is useful when working with permutations of a common Door/Window
Assembly where you want to control the overall design through one Style but
have variations on the Divisions within it. Be aware that the Grid
Direction you Select to Override must match the direction of the Definition
or you may find that you simply lose the whole Grid; i.e., Division
Definitions are set to either Horizontal or Vertical. The
Division Assignment Override dialog box provides the option to select
a predefined Grid Division Definition as set within the Assembly Style.
This option is useful when working with permutations of a common Door/Window
Assembly where you want to control the overall design through one Style but
have variations on the Divisions within it. Be aware that the Grid
Direction you Select to Override must match the direction of the Definition
or you may find that you simply lose the whole Grid; i.e., Division
Definitions are set to either Horizontal or Vertical.
|
 |
|
Door/Window Assembly Division menu options
 If
you have activated the Edit-in-Place mode for a Door and Window
Assembly, you can right click to select the Convert To
Manual menu option off of the Context pop-up menu as illustrated to the
left. If
you have activated the Edit-in-Place mode for a Door and Window
Assembly, you can right click to select the Convert To
Manual menu option off of the Context pop-up menu as illustrated to the
left.
By activating the Manual mode, you can use
the little Cross (plus icon) markers to Add new Grid
Lines, the little Dash (minus icon) markers to Remove
Grid Lines and the triangular makers to set unique position
values that don't necessarily conform to any Design Rules. See
illustration to the right.
|
 |
|
Door/Window Assembly Division Set Miter Angles
Though the Set
Miter Angles pop-up menu option seems simple enough to use, getting to a
point where you can actually use it is a whole different matter. Since
this tool comes from the Curtain Wall suite of tools, it makes more sense
there but illustrated to the right I show some of the tasks you are up
against.
The first
problem you might be faced with is getting two Door and Window Assemblies to
butt up against each other in a corner. In order to get the result I
show to the right, use the Anchor dialog box to push the Assemblies to the
outer edge of the Walls. Because two Walls will want to Clean Up, you
may want to change the Cleanup Group Definition of one Wall to something
different than the other. This may solve one problem while creating
another so confirm if this trick works for you.
Once your
Assemblies are actually set to form an actual connecting corner, you can use
the GridAssemblySetMiterAngles command to Select the two
Assemblies that you want to Miter. The result of this action only
affects the Top and Bottom Frames; it does not affect the Side Frame nor the
Mullions that may also need to be Mitered. I think this tool is rather
pathetic but if you have to use it here are more tips.
After getting a Miter result, you should find
that the Plan View (Top) will require significant modifications in order to
reflect an acceptable corner condition. For the Frames at the corner,
you will need to use a new custom Profile that can either be created
"In-Place" or by using a custom Profile Definition. For the Sill, I
suggest you simply turn this Display Component Off since you cannot set it
to display a Miter anyway. If you need to show the outline of the Sill
or Frame, use the Below Display Component available under the Plan Display
Representation for the Door/Window Assembly Style. And finally, if you
want a Frameless corner where the Mullions and Glazing meet, you can remove
the corner Frame and give it an Offset Value that will push the Infill and
Mullion out far enough to meet the adjacent corner.. |
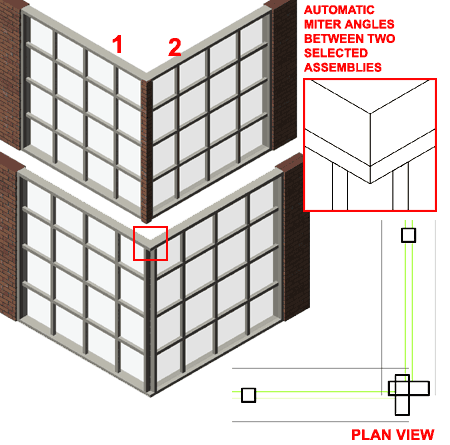 |
|
Door/Window Assembly Interference
The GridAssemblyInterfernceAdd command
can be used to remove portions of Assemblies much like the Subtraction
operation with Mass Elements or Solid Models. You can choose to
"subtract" Infills, Frames and/or Mullions. The original Object must
be kept and its position relative to the Assembly must remain as some form
of Intersection.
Illustrated to the right I show the result of
using a Mass Element as an Interference Object for the Infill, Frame and
Mullions. By turning the A-Area-Mass Layer Off, the Assembly appears
as if a hole has been punched through it. To remove the Interference,
you can use the GridAssemblyInterferenceRemove command or simply
Delete the Object.
Command: GridAssemblyInterferenceAdd
Select AEC objects to add: 1 found
Select AEC objects to add:
Apply to infill? [Yes/No] <Yes>:
Apply to frames? [Yes/No] <Yes>:
Apply to mullions? [Yes/No] <Yes>:
1 object(s) added as interference [237D]
Command: |
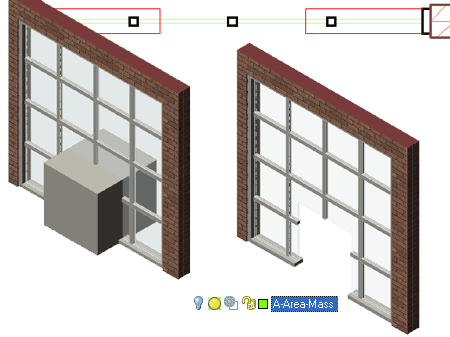 |
Door/Window Assembly Add Profile
| Menu |
N.A. |
| |
|
| Keyboard |
OpeningAddProfile |
| Mouse |
Select
Assembly, right-click, Select Add Profile |
| Links |
Profiles - Edit In Place
- for more information on Editing Profiles in place |
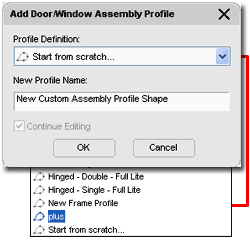 The
OpeningAddProfile command activates the Add Door/Window Assembly
Profile dialog box illustrated to the left. On this dialog box you
can Select a predefined Profile Definition Style as a
new shape for the Assembly or you can use the "Start from
scratch..." option to turn the current shape into a New Profile
Definition Name and activate the Edit-in-Place mode for this Profile. The
OpeningAddProfile command activates the Add Door/Window Assembly
Profile dialog box illustrated to the left. On this dialog box you
can Select a predefined Profile Definition Style as a
new shape for the Assembly or you can use the "Start from
scratch..." option to turn the current shape into a New Profile
Definition Name and activate the Edit-in-Place mode for this Profile.
Illustrated to the right I show the results
of a predefined Profile Definition Style and how the default Rectangular
Profile can be used as the basis for creating a new custom shape "In-Place".
|
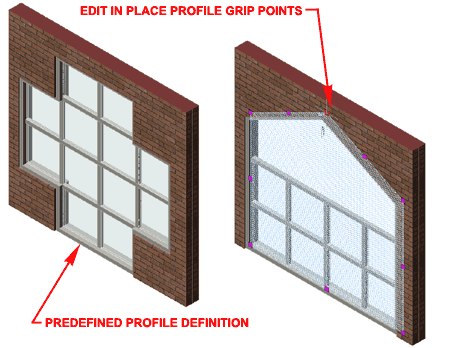 Note:
Dimensional conflicts with Mullion, Infill and Frame positions can cause
unusual results such as missing Elements. To avoid such problems, try
to design custom Profiles to work within the general dimensional proportions
of the Assembly Style. |
| 11Assemblies - Styles
and Properties |
11-6 DOORS - WINDOWS - OPENINGS - ASSEMBLIES |
| Style Manager
- Door/Window Assemblies
 For Window Assembly Objects, you can use the Style
Manager to load, modify, delete and create new Door/Window Assembly Styles.
Door/Window Assembly Style Properties utilize a subset of Curtain Wall Style
Properties and thus you are actually learning about both Object types at the
same time. The major difference between Curtain Walls and Door/Window
Assemblies is that these Assemblies Anchor to Wall Objects while Curtain
Walls do not. For Window Assembly Objects, you can use the Style
Manager to load, modify, delete and create new Door/Window Assembly Styles.
Door/Window Assembly Style Properties utilize a subset of Curtain Wall Style
Properties and thus you are actually learning about both Object types at the
same time. The major difference between Curtain Walls and Door/Window
Assemblies is that these Assemblies Anchor to Wall Objects while Curtain
Walls do not.
Though you can easily create New Door/Window
Assembly Styles
from Scratch using the New button, you may want to use the Copy/Paste
technique instead because it is far easier to Modify Settings of an existing Object Style
than it is to create one from Scratch. In some cases, you may even miss specific
settings that can come back to haunt you much farther down the road on a project - things
like Display Representations or Data for Schedules.
Illustrated to the right, I show the process of creating a New
Door/Window Assembly Style (from scratch) that I have Named "Custom
Window 2 Casement Center Fixed".
|
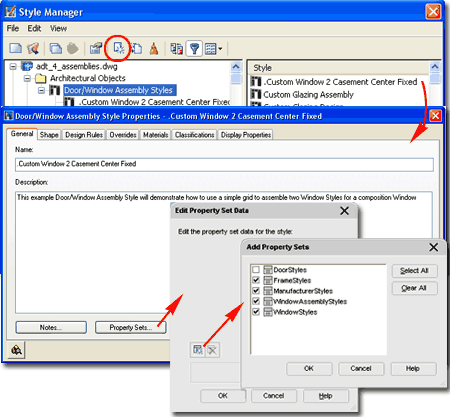
I have chosen this example to demonstrate how
you can combine Window Styles within one assembly to create another Window
type that is available on the market but not in ADT's Window Library: two side casements with a fixed
picture window in the middle.
By double-clicking on this new style, I show that I have also activated
the Door/Window Style Properties dialog box where all of the custom settings can
be made for the size, shape and look of this particular object style.
On the General Tab of the Door/Window
Assembly
Style Properties dialog, you will find a place to modify the Name,
add a Description, add Notes... and Property
Sets... If you intend to use the Schedule Tags and Schedule Objects in ADT,
you must use the Property Sets... button to Add the appropriate Property Data. For
Assemblies, the minimum would be the WindowAssemblyStyles Property Data Set. Other Data can be added for expanded
Schedules or additional Schedule Styles and you can even create new Data Sets but let's
put that topic off to Part 18 - Schedules. |
| Assembly
Style Properties - Shape tab The Shape
tab of the Door/Window Assembly Style Properties dialog box provides access to
the Predefined opening shapes in ADT and the Custom
shapes that are defined by the user base on Profiles.
To create a more unique Door/Window Assembly
Shape, use the Use
Profile drop-down list to select a Profile. Profiles are Pline
outlines that have been saved as Profile Definitions within the Style Manager
Window. To learn more about creating a custom Door or Window Shape, see Customizing and Tricks below.
|
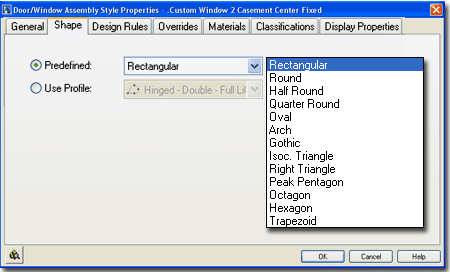 |
| Assembly
Style Properties - Design Rules Terminology This is one of the most complex tabs anywhere in ADT's dialog boxes. There
is only one way to understand the structure and that is by breaking it down piece by
piece. First we will look at the language and structure of this beast and then we
will get into the depth of the individual pieces. To get a generalized image in your
mind, think of Excel and image assigning an Excel spread sheet inside a single cell.
Think of all the edges and the potential for "nesting" cells within cells.
I hope that helps, forget that image if it makes you more confused.
Let's attempt to get the jargon or lingo down in plain
English:
Design Rules - the system that defines how
this ADT object will look and possibly behave.
Primary Grid - the unit that defines the
specific ADT object which may have default values and or Shapes as defined by the Defaults
and Shape tabs. It's basically a rectangle unless you have specified another Shape.
A Primary Grid is like an Excel Spread sheet; it's divided into Cells by the
Division Assignment, Surrounded by a Frame and Divided with Mullions. |
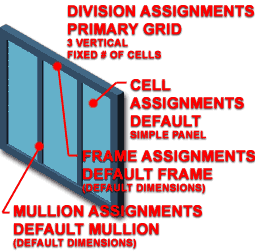 Division Assignment - How the
Primary Grid is to be divided. These Division Types fall into three
( 3 ) categories ( Fixed Dimension, Fixed Number and Manual ), two Orientations
( Horizontal and Vertical ) and can have an unlimited number of names as determined by the
user. It's basically the way you define Cells in the Grid. A Division can use
another Grid, called a "nested Grid" within the Primary Grid.
Cell Assignments - What goes
on within the Cells that are defined by the Divisions. You may have 3 Divisions and
thus 3 Cells that can each have a unique infill.
Frame Assignments - The
shape, proportions, dimensions and location of the Primary Grid's outer edge.
Mullion Assignments - The
shape, proportions, dimensions and location of the Primary Grid's Divisions and/or Cell
edges. |
| Assembly
Style Properties - Design Rules tab Illustrated to the right, I attempt to provide an understanding of the Design
Rules tab interface. On the left side is a Tree
View showing a Grid hierarchy, starting with a Primary
Grid and a folder containing the Element Definitions
that the Grids are comprised of. In the upper right side, is a Table
( Column and Rows ) of the current Grid Assignments. On the lower
right side, is a Properties or Settings view for the specific
configurations of the currently selected Elements.
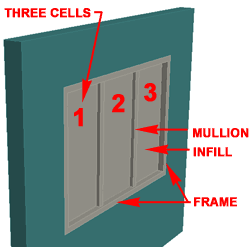 When you select an
Assignment, such as Primary Grid, you should find numerous configuration
options in the Properties View area. The Primary Grid, for example, provides options
for unique Names, Orientation of Cells, Division
Types and corresponding options for these Division Types ( see 1, 2, and 3 ). When you select an
Assignment, such as Primary Grid, you should find numerous configuration
options in the Properties View area. The Primary Grid, for example, provides options
for unique Names, Orientation of Cells, Division
Types and corresponding options for these Division Types ( see 1, 2, and 3 ).
To create the simple Window Assembly Style
illustrated above, right, the only non-default settings used on the Design Rules tab ( for
an Assembly started from New ), are:
Primary Grid ->
Orientation = Vertical
Division Type = Fixed Number of Cells ( see blue box labeled 2 )
Number of Cells = 3.
For more detail on the individual pieces of
this tab, read below: Section
9, Assemblies - Design Rules - Element and Section 10 - Assemblies -
Advanced Editing. |
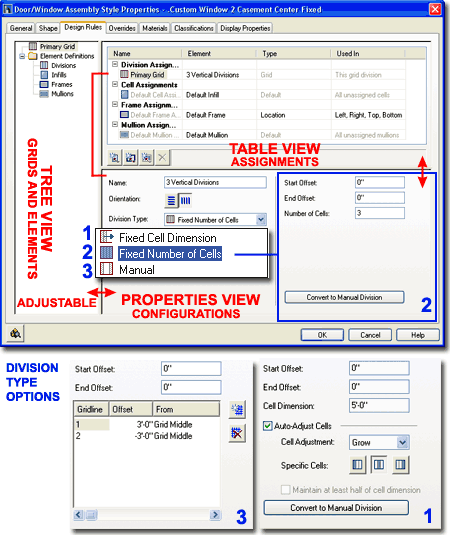 |
| Assembly Style Properties -
Overrides tab
The Overrides tab will not offer anything
other than the Override categories unless you have actually performed Override tasks and
Saved them to the current Window Assembly Style.
Once you have made Override changes and used the Save
Changes dialog box via the Edit in Place object-specific pop-up menu,
then you will see those changes reflected here as illustrated to the right. Not only
can you make more changes to overrides here, you can Remove them.
To find out about creating overrides, read Section 10 - Assemblies -
Advanced Editing. |
 |
| Assembly Style Properties -
Materials tab
Illustrated to the right I show that all Door
and Window Assembly Styles offer three Default Components under the
Material tab: Default Infill, Default Frame and Default Mullion.
If you create New Infill, Frame and/or Mullion Element Definitions they will
automatically be listed as new Components under the Materials tab.
This means that should you need unique Material characteristics such as
different Frame Materials for example, you can define New Frames for each
side of the Assembly. You can also use this feature to create Infills
that are Glazed, Metal, Wood or any other Material.
Since Materials can also be used to control
line properties, you may want to use an existing Assembly Style as the
source for any new ones you create. |
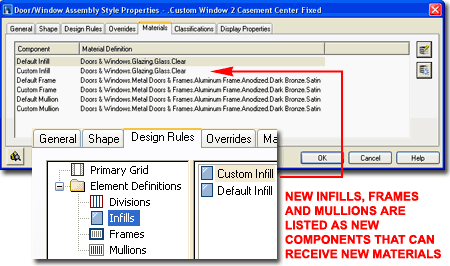 |
| Assembly Style Properties -
Classifications tab
Door/ Window Assemblies have a
Classifications tab that is identical to that for Doors and Windows.
See discussion under Doors and Windows above. |
|
|
Assembly Style Properties -
Display Properties tab
The Display Properties tab
of the Door/Window Assembly Style Properties dialog box, illustrated right, provides access
to a set of Display Representations similar to those found for Doors and
Windows. Keep in mind that in addition to the Display Properties for
the Assembly you can also control the Display Properties of the Objects you
use as Infills by working with their own Style Properties. In other
words, the Door/Window Assembly only provides control over its short list of
Display Components ( Infills, Frames and Mullions ) while Doors and Windows
are managed by their own Display Properties.
Illustrated
to the left, is another way to access the Display Properties tab; select
the specific object, right click on your mouse
to invoke the object-specific pop-up menu and select Edit Object Display... Just
be aware that when you use this approach, you can actually set an Object Override as
opposed to a Style Override. Object Overrides can be extremely useful because they
allow you to add things like Sills or Thresholds to any object within a Style Family but
they can also be problematic because they lock you out from more centralized, Style level,
controls. |
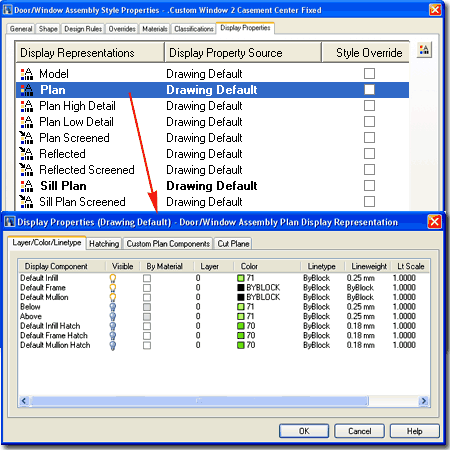 In Plan view, you have Layer controls for Infill,
Frame and Mullion. You can also have these
components filled with User Specified Hatch patterns controlled on the Hatch
tab. The Custom Plan Components tab offers the ability to add
custom features to the "generic" Assembly. The Cut Plane
tab allows you to re-define where you want the cut made on your Door/Window Assemblies.
This can be a valuable option if you introduce Interferences within your
Door/Window Assemblies
and wish to have those displayed or not displayed in plan view. |
| |
|
| 12Assemblies -
Display Properties |
12-6 DOORS - WINDOWS - OPENINGS - ASSEMBLIES |
| Door/Window
Assembly Display Property Overview
The Display Properties of Door and Window Assemblies are actually
quite simple since there are basically only three components to work with:
Frames, Mullions and Infills. At the most rudimentary level you can
think of Assemblies as containers of other Objects and those Objects can all
be controlled by their own Display Properties. At a higher level, you
can attempt to get as much graphical output of your Assemblies as possible
without introducing other Objects but because there are so few Display
Components, you may find that you are forced to use other Objects as Infills
in order to get the Display characteristics that you need.
In this section I will cover some of the primary options
within the Display Properties for these two Objects that I think may be of significant
importance to your mastery of this product. For me, though I realize there are a
lot of cool things that you can do here, my emphasis is always on the things that pay the
bills so I will focus on Plans and Elevations.
Illustrated to the right I show three different Views of
the same Door and Window Assembly Style.
In Plan View I show that I have pushed the Assembly back
inside the Wall by using the Anchor dialog box. I also show that the
Sill Plan is being used and that there is a custom Infill on the right-hand
side of the Assembly. In Elevation and Model View I show that the
custom Window Infill on the right-hand side has no Frame but has Muntins
that create another level of Divisions. |
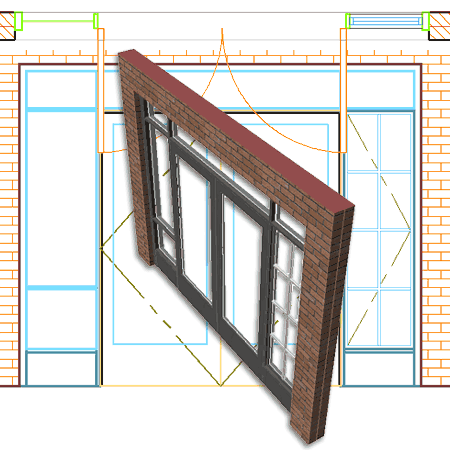 |
|
Door/Window Assemblies in Plan As
with Doors and Windows, I tend to focus on the Plan View display of Door and
Window Assemblies for Construction Documents. Illustrated to the right
I show a common Door/Window Assembly Object with two Sidelights and a pair
of double doors in the middle.
The Display Properties only control the basic
components of the Assembly and not the custom Objects you may have inserted
as Infills. Therefore, for example, Doors and Windows can only be
turned On or Off with the Default Infill Display Component but their other
Display Properties such as Color, Sills and so forth are controlled by their
own Style Properties.
Illustrated to the right I show some of the
basic Plan Display Components you can work with to produce varying results.
Infills, Frames and Mullions correspond to their respective components as do
the Hatch Patterns that you can apply within them. The Above and Below
Display Components can be used to express linework that you may want to
illustrate such as a Mullion outline below or a Transom Infill Above.
By default, most of the Door/Window Assembly Styles that come with ADT come
with the Sills turned On. Though Assemblies have no option for
automatically adjusting to the Width of any Wall they are inserted into, you
can use the Sill Display Component to draw lines that always match the Width
of the Wall. In the illustration to the right, I show that I have set
Sill A to appear more like the sill of a Door by setting Width and Depth
values to this Component. |
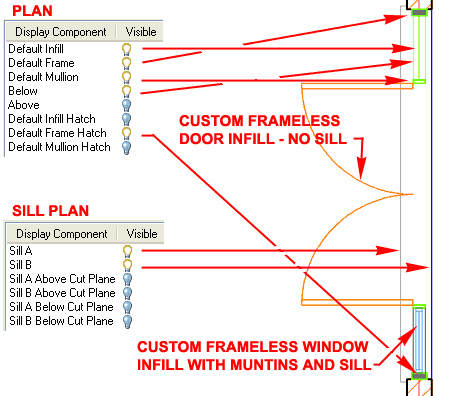 |
|
Door/Window Assemblies Above
or Below the Cutting Plane
Generally, Door and Window Assemblies should not give you any problems in
Plan View as long as the Assemblies pass through the Wall's default Cut
Plane Height.
In the Illustration to the right I show how
inserting an Assembly Above a Wall's default Cut Plane produces undesirable
results in Plan View. For starters, you won't even see the Assembly so
you will need to access it through the Style Manager Window or by Selecting
the Assembly in a Model View. In the illustration to the right I
turned the Visibility of the Above Display Component On so
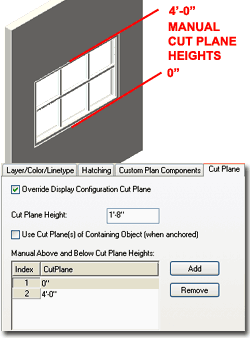 you can see the
dashed outline. Notice that the Wall is not Cut so this is the first
task to perform. you can see the
dashed outline. Notice that the Wall is not Cut so this is the first
task to perform.
You can change the Wall Cut Plane Height in
several ways: by the Global Display Configuration Cut Plane, by the Wall
Style or by the an Object Display Property Override. See
Wall Object Display Properties - Cut
Plane for more information on this topic.
Once you have set the Wall Cut Plane Height
to cut through the Assembly, you should find that the display of the
Assembly in Plan View is acceptable. By default, the Assembly should
have its Cut Plane set to "Use Cut Plane(s) of Containing Object (when
anchored)" but you can use the "Override Display Configuration Cut Plane"
check box to set your own cut plane height for the Assembly.
|
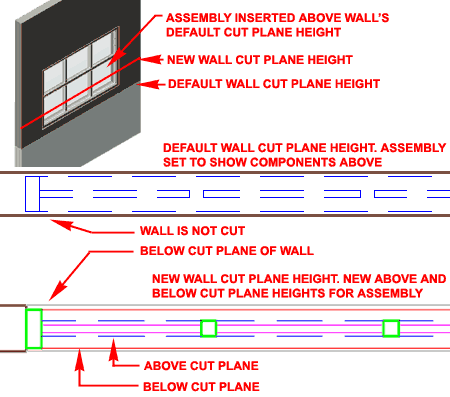
To set your own cut plane height, think of the
bottom of the Assembly, regardless of how high it sits in the Wall Object,
as the zero plane. To control how the Above and Below Display
Components appear, you can use the Add button on the Cut Plane tab to set
where the Above and Below lines with display. Illustrated to the left
I show the Cut Plane tab of
the Plan Display Representation. |
| 13Assemblies - Design
Rules - Elements |
13-6 DOORS - WINDOWS - OPENINGS - ASSEMBLIES |
| Design
Rules - Division Assignment - Orientation
The two Orientation buttons for the Grid
Assignment can be used at any point in the Window Assembly design process.
Division Type can also be changed at any point in the
design process.
Illustrated to the right I show how easy it is to use the
Fixed Number of Cells option to divide a Grid into 3 Number of Cells; or any number you
might want.
Read the discussion on Nested Cells
below, if you want to create an actual grid or if you want to divide a Cell up into more
Cells. |
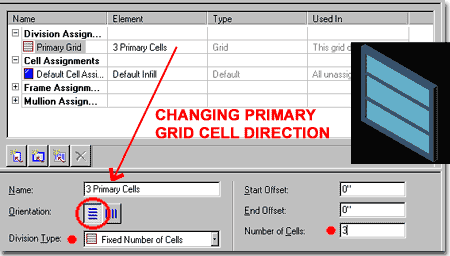 |
| Design Rules -
Division Assignment - Fixed Dimension The
Fixed Cell Dimension option for a Grid allows you to
define the space between Cells in definite terms but also provides options for how
adjacent cells my need to behave in situations where they cannot meet the fixed
dimensional value; see the Auto-Adjust Cells check box.
Auto-Adjust Cells - controls the behavior
of Cells with a fixed Dimension in situations where the Grid dimension does not
accommodate the fixed dimensional value perfectly ( which is probably most cases) ADT can,
for example, start the fixed Cell dimension from the Middle, the Left or the Right and
Grow or Shrink from that point out or in.
If you specify a Cell Dimension of 2'-0" ( 609.6 mm ),
for example, and set Auto-Adjust Cells to Shrink with the Specific Cells set to Middle,
the Cells will start from both edges and shrink towards the middle of the Grid. This way,
you may end up with a tiny or narrow cell in the middle. |
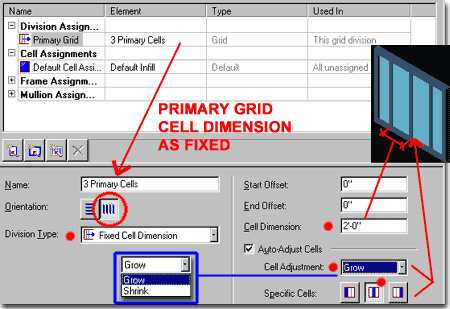 |
| Design
Rules - Division Assignment - Manual The
Manual Division Type option for a Grid allows you to define exact
locations for multiple Cell centerlines by using an Offset value and a From
setting based on Grid Start, Grid Middle, Grid
End or Grid Top, Grid Middle, Grid Bottom; depending upon Orientation.
To set up Manual Gridlines, use the Add Gridline button (
see red circle, far right ), input Offset distance and use the From drop-down list to
choose a point-of-origin. |
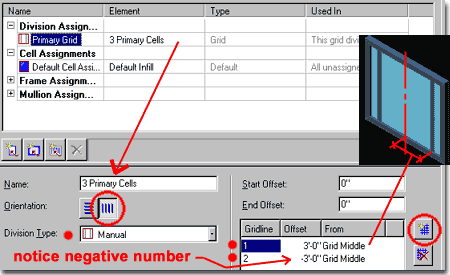 |
| Design Rules -
Cell Assignments Using a Primary Grid
with a Division Assignment of 3 Fixed Number of Cells, we can go to Cell Assignments and
work on what goes into the Cells.
Illustrated to the right, I show some of the various
possibilities for Cell Assignments. One of the most important things to do is Name
it because the default name will automatically be used for all subsequent Infills and that
can get confusing when you attempt to make design changes on them.
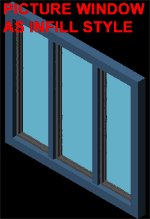 Generally, a simple panel may do the trick and you can use the Panel
Thickness option for this Infill Type to make it thicker or thinner. The Alignment
option works with the Offset option to allow you to position an Infill Type within the
Frame of your Window Assembly so think of this in elevation or cross-section; i.e., infill
is to the back or front of assembly with respect to it's face. Generally, a simple panel may do the trick and you can use the Panel
Thickness option for this Infill Type to make it thicker or thinner. The Alignment
option works with the Offset option to allow you to position an Infill Type within the
Frame of your Window Assembly so think of this in elevation or cross-section; i.e., infill
is to the back or front of assembly with respect to it's face.
One of the more exciting options is to set the Infill Type
to Style which thus allows you to select any currently loaded object Styles from the Style
scroll list; as illustrated to the right - see also image to the left. |
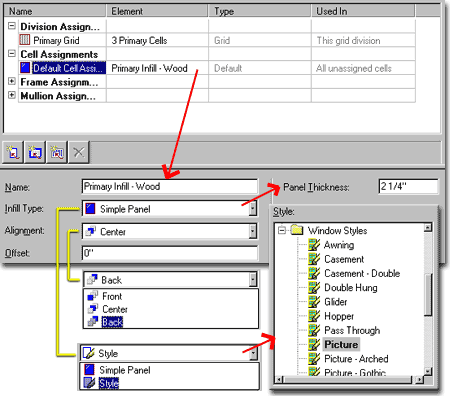 |
| Design
Rules - Cell Assignments - Nested Grids Once
you get ready to go beyond the basic Divisions and on to Divisions of existing Cells, you
get into something called "Nested Grids". To me, it's
really nothing more complex than thinking of Folders with sub-Folders.
Illustrated to the right, I show the process of creating a Cell
Assignment that is directed to a "Nested Grid" to be Used
for the Middle Cell of a Primary Grid with 3 Fixed Cell
Numbers. When you assign "Nested Grid" to a Cell, you are actually
directing the Cell to a new Grid and that is where, if you recall, we get to assign the
Divisions. |
 |
| Design Rules - Cell Assignments - Nested Grids - Division
Assignments Once you assign a Cell a
"Nested Grid" Element, you should immediately see a sub-Grid
under Primary Grid in the Tree View. If you select
the sub-Grid, as illustrated to the right, you should find that the
sub-Grid has all of the same options as a Primary Grid; hence the term "nested"
In the illustration to the right, I show that I have Renamed
the sub-Grid "Grid 2" and assigned it a new
Element that I called "2 Internal Cells". For
this Element, I have set Orientation to Horizontal, Division
Type to Fixed Number of Cells and Number of Cells
to 2.
Note: Naming all Elements is almost paramount to success
because ADT will simply use default names that are identical for every assignment and
thus, if you change a value one place it affects the look of something somewhere else that
you may not expect. |
 |
| Design Rules -
Frame Assignments Frame
Assignments provide access to options for the outer Grid Frame
of a Window Assembly. As illustrated to the right, you can easily create four
separate New Assignments with unique Element Names that correspond to the four sides of a
basic rectangular Grid. This means that you have the power to design four distinct
rails; even to the point of four unique profiles ( as discussed below ).
 Illustrated to the right and left, I show how you might want unique
Left and Right Frame dimensions that are different from the Top and Bottom Frame
dimensions. To achieve this result, simply Name the Default
Frame Assignment anything you want, create a New Frame
Assignment, Name this Frame Assignment, provide Width and Depth
values, Create a New Element, Name this Element
something different than the other frame element, provide Width and Depth values, and then
use the Used In pop-up dialog box to set the Locations ( Top
/ Bottom and Left / Right ). Illustrated to the right and left, I show how you might want unique
Left and Right Frame dimensions that are different from the Top and Bottom Frame
dimensions. To achieve this result, simply Name the Default
Frame Assignment anything you want, create a New Frame
Assignment, Name this Frame Assignment, provide Width and Depth
values, Create a New Element, Name this Element
something different than the other frame element, provide Width and Depth values, and then
use the Used In pop-up dialog box to set the Locations ( Top
/ Bottom and Left / Right ).
|
 |
| Design
Rules - Frame Assignments - Using Profiles If you really want to get fancy with Frame Assignments, you can use Profiles to create a more
architecturally correct frame cross-section.
In the illustration to the right, I show how you might
expand on the concept discussed above by using the Use Profile option to select your own
custom frame profile. Depending on how you created your frame profile, you may also
need to use the Profile options to help align it with your Window Assembly correctly.
In my example, I show that I had to use a Rotation of 90 degrees to compensate for
a Profile that was drawn as illustrated ( straight up ).
Note: The Centroid of a Profile
created for a Window Assembly is more important than with other Profiles - see red line in
Profile illustration to the right. In the Profile illustration to the right, I used
a line to calculate the centroid that would match this frame with the glass. |
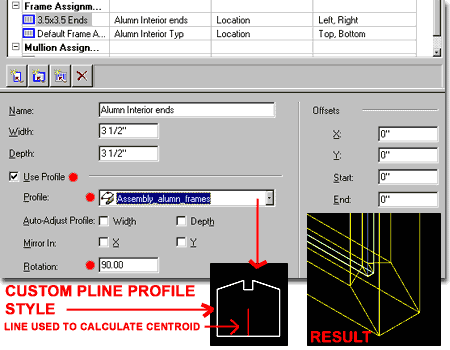 |
| Design Rules
- Mullion Assignments Mullion
Assignments provide access to options for the inner Gridlines of a Window
Assembly. As illustrated to the right, you can easily set a Width and Depth of
Mullions to be less than that of the Frame.
Mullions can also be based on a custom cross-section just
like Frames. For this, check the Use Profile option and assign a mullion profile
from the Profile drop-down list - see discussion above Design Rules
- Frame Assignments - Using Profiles for more information. |
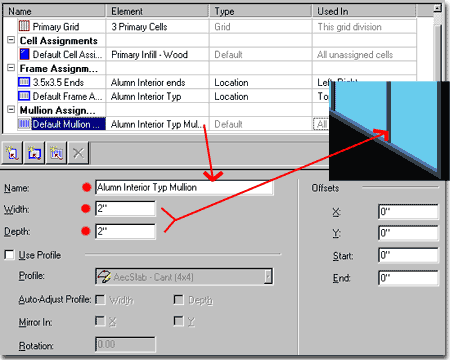 |
| 14Customizing and Tricks |
14-6 DOORS - WINDOWS - OPENINGS - ASSEMBLIES |
Creating
a Custom Door Shape
| Menu |
Format>
Profiles> Profile Definitions... |
 |
 |
| Keyboard |
ProfileDefine |
| Alt.Menu |
Design> Doors> Door
Styles... |
|
|
| Keyboard |
DoorStyle |
Architectural Desktop has the capability to allow for
nearly any custom Door or Window but if you want something beyond the basic architectural
shapes, you will have to go through extensive steps using 3D modeling. This is how
many of the styles in the "Doors - Custom
(Imperial).dwg" and "Windows -
Custom (Imperial).dwg" files were developed. By adding blocks of 3D models
inside custom door or window Styles, users can get just about anything they may want as
illustrated by our story" The Walls have Eyes" in the ARCHIdigm.com\lounge
Illustrated to the right I show the 3 basic steps
required to create a custom Door Shape for use within the Door Style
Properties dialog box. The first step in creating a custom door
shape is to draw the shape with a Pline or Rectangle and then add
interior Pline or Rectangular outlines where you expect to have glazing.
For double doors, you must draw a double door - however odd that might seem.
For best results, draw the actual door as it would be used at the optimum size because ADT
will simply scale the proportions equally for all other sizes; i.e., the door rails will
not remain constant because there are no constraints on such items.
The second step in creating a custom door
shape is to save the Plines and/or Rectangles as a Profile Definition ( this is similar
to Blocking the linework ). On the Style Manager, filtered for
Profiles, Add a New Profile Definition Name and then use
the Set From... option to Select the Outer
Rectangle for the door shape. When queried to Add 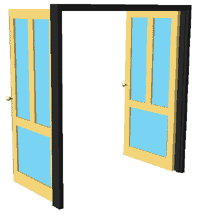 another
ring? [Yes/No], type "Y" for Yes and select an
Inner Rectangle for the glazing. When queried to specify if "Ring
is a void area? [Yes/No], type "Y" for Yes and
continue adding rings as voids for all glazed areas. When queried for "Insertion
Point or <Centroid>, simply use the default "Centroid"
option since this really doesn't matter for Doors. another
ring? [Yes/No], type "Y" for Yes and select an
Inner Rectangle for the glazing. When queried to specify if "Ring
is a void area? [Yes/No], type "Y" for Yes and
continue adding rings as voids for all glazed areas. When queried for "Insertion
Point or <Centroid>, simply use the default "Centroid"
option since this really doesn't matter for Doors.
The third step in creating a custom door
shape is to Apply the shape to a Door Style. Use the DoorStyle
command to invoke the Door Style Properties dialog box, as illustrated to
the right, and create a New Custom Door Style Name. On the Design
Rules tab of this new custom door style, set the Shape radio button
to "Custom" and use the adjacent drop-down list
to select the Profile Definition Name created in step 2.
When you Add this door to your Walls, you should see your
new custom door shape with glazing wherever you added Rings as Voids. |
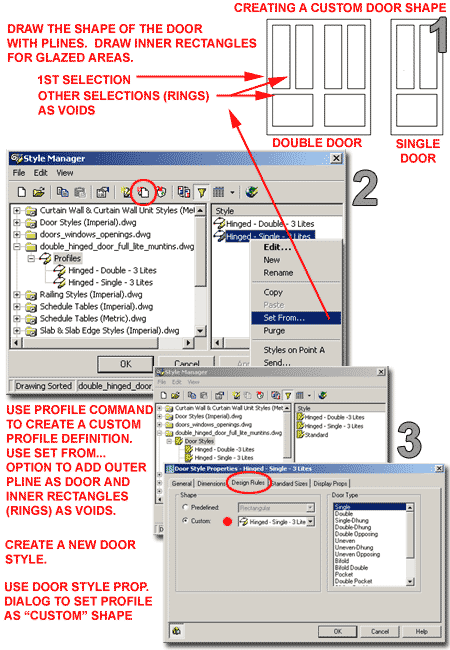 Below
are the command line steps:
Command: profile
Profile [as Pline/Define]: d
Select a closed polyline:
Add another ring? [Yes/No] <N>: y
Select a closed polyline:
Ring is a void area? [Yes/No] <Y>: y
Add another ring? [Yes/No] <N>: y
Select a closed polyline:
(and the loop continues until you are done with your door) |
Creating a Custom Window Shape
| Menu |
Desktop>
Profiles> Profile Definitions... |
|
|
| Keyboard |
ProfileDefine |
| Menu |
Design>Window>Window
Styles... |
|
|
| Keyboard |
WindowStyle |
| Links |
Design Rules - Cell Assignments
- for information on how to Add common Window Styles to an Assembly as a means to
have other custom shapes. |
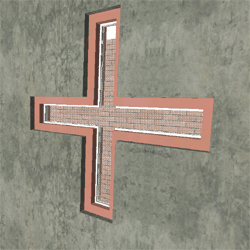 When you use Profiles for Window Styles, you
might find that they work a little differently than for Door Styles. Follow the
steps outlined above for a Custom Door Shape to create a Custom Window Shape. Be
aware, however, that adding inner rings does not work with Windows so you are basically
limited to the outer shape ( a simple Pline form ). For more flexibility on custom
Windows, consider using a Window Assembly and combine simple Window Shapes within a more
complex matrix - this is how we create window clusters like two casements with a fixed in
the middle. When you use Profiles for Window Styles, you
might find that they work a little differently than for Door Styles. Follow the
steps outlined above for a Custom Door Shape to create a Custom Window Shape. Be
aware, however, that adding inner rings does not work with Windows so you are basically
limited to the outer shape ( a simple Pline form ). For more flexibility on custom
Windows, consider using a Window Assembly and combine simple Window Shapes within a more
complex matrix - this is how we create window clusters like two casements with a fixed in
the middle.
Illustrated to the right, I show the steps required to
create a custom Window Shape from a Closed Pline drawing. When creating a New
Profile Definition, use the Set From... option to capture the Pline
Shape. When creating a New Window Style, use the "Use Profile"
radio button on the Design Rules Tab to choose the Profile Definition
Name just created. Once again, for best results, try Copying an existing Window
Style, Paste it, Rename it and then create your own from that Copy. This will assure
that you get Materials, Property Set Data and Display Representations that work and it is
far easier to adjust existing information than to create new stuff from scratch. |
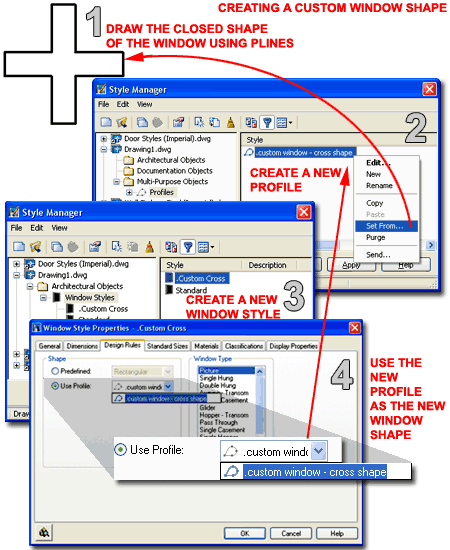 |
| Windows and Cut
Planes - Wall Display Representations
After doing some work on an unusual remodel where windows
had been placed on the finished floor line, at normal header heights and above normal
header heights, I quickly discovered some design flaws in ADT's Display Representation of
Windows. I have to say, that I actually preferred how ADT 3 - 3.3 just cut all
Windows if you wanted it to. In ADT 4 new options were added to provide more
flexibility in the display relative to cut planes but some of the options have not been
fully thought through. Rather than discuss the options that should have been offered
( like, remove all lines below all openings ), let's look at what options we do have and
how to make the best of them.
1 Illustrated to the right I show the default Plan View of a
"Standard" Wall Style with three "Standard"
Window Styles set at three different Header Heights. The Display
Configuration has been set to "Medium Detail" which
uses the "Plan" Display Representation
for most objects. "A" marks the global cut plane as set by the
"Medium Detail" Display Configuration. As you can see, only the Window
that actually passes through the global cut plane is displayed correctly while the other
two remain invisible.
2 One of the first steps you can take to get Windows Above and Below the global
cut plane to display is to change the Display Representation of
the Window Styles. Window Style have several Display Components for Frame,
Sash and Glass Above and Below
Cut Plane heights so you can not only turn the Visibility
of these Components On but also control their Color, Linetype and so
forth. See the discussion on Window Display Representations directly below.
In the illustration to the right I show that I have set the
Window Display Components to Green for Below
and Red-Dashed for Above. To
remove the Wall Lines Below Openings, I show that I checked the "Hide Lines
Below Openings at Cut Plane" option on the Other tab of the
Wall Style Display Properties. By using this option I do not turn
off the visibility of Walls that lie below the global cut plane but just the linework
under Openings. You may notice that using this option did not remove the linework
form under the Windows Above or Below the global cut plane but only the Window that
actually runs through the global cut plane. Also, this option actually removed the
jamb line for the Window below the global cut plane but well address these problems next.
3 On Wall Example three, right, I show that I have used the "Hide
Lines Below Openings Above Cut Plane" checkbox option on the Wall
Style Display Properties dialog box to make the Window Above appear more like a
traditional cut. I also changed the Display Component Linetype for the Window Styles
so it would appear as a Continuous Linetype instead of the Dashed that I used in example
2. Now, to resolve the missing jamb lines for the Window Below the global cut plane
I show that I have used the Manual Above and Below Cut Plane Heights option on the Cut
Plane tab of the Wall Style Display Properties dialog to Add two planes that cut right
through my lower and my higher windows - see B
and C. This just leaves one last
topic: removing the lines below the lower window.
4 On Wall Example 4, right, I show that I used the "Override Display
Configuration Cut Plane" on the Cut Plane tab of the
Wall Style Display Properties dialog box to set it low enough to include the
lower Window in the primary cut - see B4. By doing this I will no longer need the Manual Above and
Below Cut Plane Heights set for example 3 but they don't cause any problems either.
By reducing the Wall's cut plane height low enough to read the lower window as running
through the cut, all other windows are seen as above and we have already addressed the
linework settings for those windows.
This option may produce the most desirable results for some
situations but sets an override on the global cut plane height. If you make this
change as a standard setting for all Plan Display Representations of the Wall Style, for
example, it will affect the whole drawing and you may not like the lower cut plane results
for other conditions. Therefore, if you truly must have this result, I recommend
using an Object Display Property Override on just those Walls that have unique
requirements. |
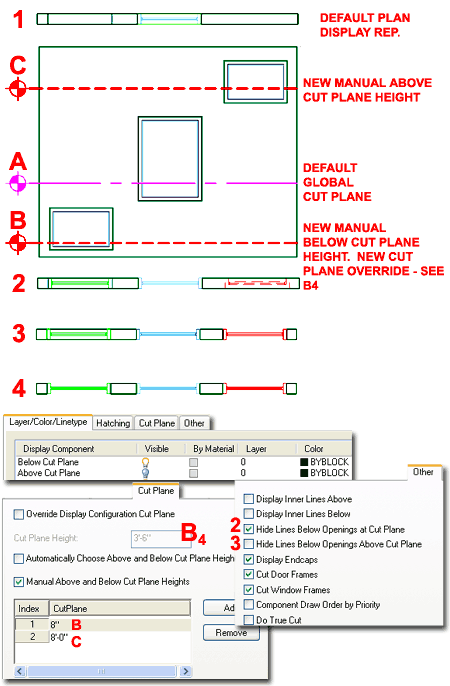 Note:
These steps do not represent the only way to achieve similar results but attempt to
produce the best results with the least amount of effect on the whole drawing.
Avoiding overriding the global cut plane should be a high priority as is true of all
global settings since they provide the greatest option for global change.
Also, though you may use one of these
solutions for your project, keep in mind that this only addressed one Display
Configuration and thus you will need to repeat the settings for all other Display Representations
as they apply to other Display Configurations ( a tedious bit of work
indeed ). |
| Windows and Cut
Planes - Window Display Representations Illustrated
to the right I show the Window Style Display Properties that I used to
produce the cut plane results discussed above. If you work with a variety of Window
Heights there does not appear to be any detrimental reactions for turning all of the Above
and Below Display Components On for all
Windows so you may just want to set your defaults that way.
Also illustrated to the right I show that I have turned off
the Sill Plan Display Components to help clarify the linework produced in the discussion
above. Since Sill Plan Display is On by default, it can be rather confusing to
decipher the source of linework that you may or may not want in your plans. |
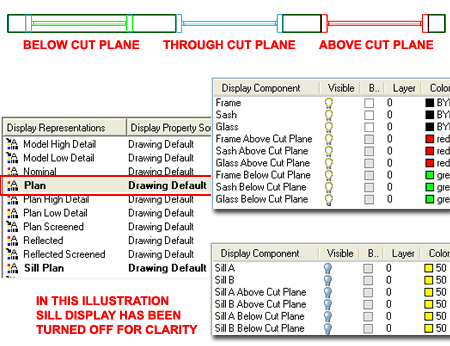 |