PART 9
ROOF SLAB TOOLSContents:
Roof Slab Tools Access ---- Roof Slab Edit - Trim, Extend, Miter and Cut ---- Roof Slabs Edit - Add and Remove Vertices ---- Roof Slabs Edit - Holes, Add, Subtract and Dormers ---- Customizing and Tricks
|
PART 9 ROOF SLAB TOOLSContents: Roof Slab Tools Access ---- Roof Slab Edit - Trim, Extend, Miter and Cut ---- Roof Slabs Edit - Add and Remove Vertices ---- Roof Slabs Edit - Holes, Add, Subtract and Dormers ---- Customizing and Tricks |
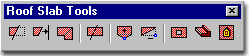
| 1Roof Slab Tools Access | 1-9 ROOF SLAB TOOLS | ||||||||||||
| How do I get this toolbar? You can only access these commands via the object-specific pop-up menu or by typing the commands; unless you use our PowerSTRIP menu. |
 |
||||||||||||
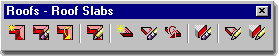
| Roofs - Roof Slabs Toolbar Don't forget about the Roof - Roof Slabs toolbar for access to all of the creation tools for Roofs and Roof Slabs. |
 |
||||||||||||
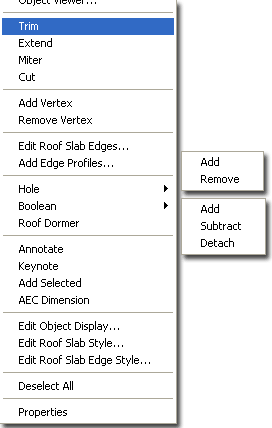
Roof Slab Tools Pop-up Menu
When it comes to the Roof Slab tools, the options for accessing them is pretty slim and it's easy to miss out on some very powerful tools. If you Browse the Content Browser, you won't even find default icons in there so you may find that you'll have to create your own or get used to the idea of using the object-specific pop-up menu illustrated to the right. Roof Slab tools are basically derived from Solid Modeling tools offering such functions as Boolean Add and Subtract but you may quickly find that it's a rather limited set of unintelligent offerings that leave you begging for smarter solutions. The Boolen Add, for example doesn't really Union Roofs into a sinlge Roof Slab but does a strange Addtion that allows you to select them as one but yet Move them independantly. On the command line, you can type "RoofSlabEdit" when you want access to many of the Roof Slab Editing options. For direct access to an option within the Roof Slab Edit command-line menu, you can type the primary command plus the option you want direct access to. For example, if you want to Trim a Roof Slab, you can type "RoofSlabTrim" Below is the command line read-out for "Roof Slab Edit": Command: RoofSlabEdit |
|
||||||||||||
| 2Roof Slab Edit - Trim, Extend, Miter and Cut | 2-9 ROOF SLAB TOOLS | ||||||||||||
Roof
Slab Trim
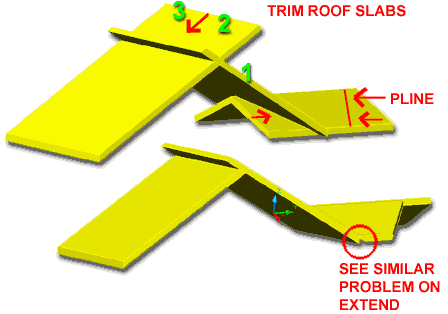
The Roof Slab Trim tool works much like AutoCAD's Trim command but not in exactly the same set of steps. If you read the command line sequence you will avoid having trouble with this routine. To Trim, first select the object that acts as the cutting edge, then select the Roof Slab to be Trimmed and then pick a point on the Roof Slab representing the side to be removed. Unlike AutoCAD's Trim command, you cannot skip any of these steps. You can Trim a Roof Slab to another Roof Slab, Wall or Pline. The Roof Slab Trim tool utilizes the slope and direction of the cutting object to trim with, so two objects do not need to pass through each other in 3D space. If you accidentally use AutoCAD's Trim command instead, the Roof Slab seems to Explode with disastrous results. It's too bad the regular Trim command couldn't be use here. Tip: |
 |
||||||||||||
Roof
Slab Extend
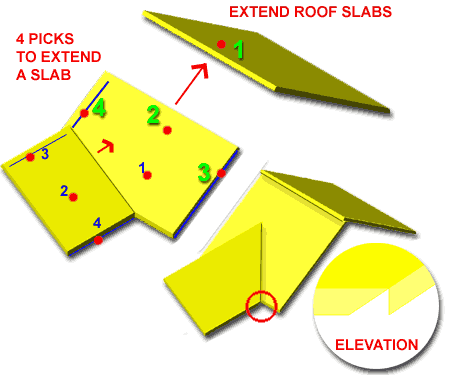
The Roof Slab Extend tool works much like AutoCAD's Extend command but not in exactly the same set of steps. If you read the command line sequence you will avoid having trouble with this routine. See comments Roof Slab Trim above. Also, if you are having trouble getting this routine to work, make sure that the objects you are attempting to extend to actually cross the planar path of the Roof Slab you want to Extend. The irritating part about the Roof Slab Extend routine are the added selections you have to make to specify the Edges you want lengthened. This seems unnecessary, especially since the Roof Slab Trim routine works in a much more intuitive way. Tip: Note: |
 |
||||||||||||
Roof
Slab Miter
The Roof Slab Miter tool works much like AutoCAD's Fillet or Chamfer command with a radius or distance set to zero. Knowing this, you may want to use the Roof Slab Miter tool instead of the Roof Slab Trim and Extend tools since you can effectively get the same results and often faster. There are two options when you use the Roof Slab Miter tool: Intersection and Edges. In many cases, both will produce the exact same results and it all depends on which one you find easier to use. If you are working with Roof Slabs that have many unique edges and you only want two different edges to miter, for example, then that's where the Edge option comes in handy. With the Edge option you can specify the edges that you want mitered. Illustrated to the right, you can see that selecting B1 and B2 Edges only Miters those two edges and leaves the rest of the Roof Slabs alone. |
 |
||||||||||||
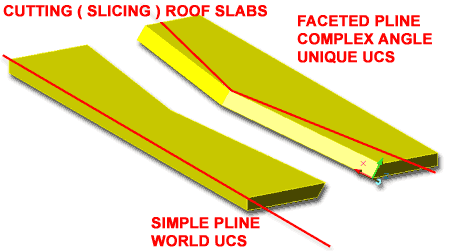
Roof
Slab Cut
The Roof Slab Cut tool works much like AutoCAD's Slice command ( from the Solids toolbar ). This is always an awesome tool to have when working with volumetric forms. What was surprising to discover, for me, was that you can use multifaced Plines and unique UCS angles to cut Roof Slab at very complex angles. Somehow this seems to contradict with the Roof Edge Style, but if you look at the Roof Slab Edges dialogue box, you should notice an Angle field for just this type of advance stuff - cool, huh! This means that if you have no idea what I am doing with the UCS icon, you can achieve the same complex angle cut by modifying the Roof Slab Edge and setting an Angle. |
 |
||||||||||||
| 3Roof Slabs Edit - Add and Remove Vertices | 3-9 ROOF SLAB TOOLS | ||||||||||||
Roof Slab Add Vertex
The Add Vertex routine is about as simple a routine as you can get, so I don't know what I should say about it. You should be aware that the control points or vertices are on the Roof Slab Baseline and not the perimeter edge where you might really want it at times. Once you Add a Vertex, you can use Grips to stretch the vertex in, out, up or down. If you have used the PEDIT command in AutoCAD for Plines, you shouldn't have any difficulty with this routine. I have had rather unusual and undesirable results when adjusting vertex points along gable ends, so there may be a bug with this routine. I will check with Autodesk at a later date and add comments here. |
 |
||||||||||||
Roof Slab Remove Vertex
The Remove Vertex routine is about as simple a routine as you can get, so I don't know what I should say about it. See comments for Add Roof Slab Vertex. Use this routine when you mess up on the Add Vertex routine <hah> |
As with the Add Vertex routine, I have found strange results when removing Vertex points; again, particularly on the Gable ends. |
||||||||||||
| 4Roof Slabs Edit - Holes, Add, Subtract and Dormers | 4-9 ROOF SLAB TOOLS | ||||||||||||
Roof
Slab Holes
The Roof Slab Hole routine is really just a Boolean subtraction where the 2D or 3D objects can be used as subtraction tools. In the illustration to the right, I show one of the more common architectural needs for cutting a hole in a roof; for a skylight. To cut a skylight hole properly in a sloped roof you should draw a rectangle or other 3D object at the same slope or you will get an inappropriate cut ( one perpendicular to the floor ). To achieve this result, it's difficult to escape the use of the UCS icon. Illustrated to the right, I show how the UCS icon was set to the roof slope using a 3-point pick-point technique ( pick an origin, one point along the fascia and one along the gable ). Once you have the UCS icon at the correct slope, you can draw simple rectangles for the skylight openings. You can read more about manipulating the UCS icon in the Architectural Desktop 3 Pre-Design Guide. The Roof Slab Hole routine will work on closed polylines and just about all other ADT object types. In some cases, like with polylines and Mass Elements, the cutting object and the Hole are not associative but in other cases, where there is already an association, like between Roof Slabs and Walls, the Hole will move with the cutting object ( in other words, as the Wall moves so does the Hole it cut ). With more complex objects, like Mass Elements with holes inside them, the Roof Slab Hole routine will make a queary about Subtracting based on the Inside or Outside of your selected cutting object. Outside will use a complex object's outer perimeter to cut a hole, while Inside will look for the smallest opening internal to the cutting object. In simple layman's terms, think of a Chimney - do you want the chimney hole subtracted or the whole exterior mass of the chimney. To Remove Holes, the Roof Slab Hole routine is as simple as it can get; simply specify that you want to remove and pick on the edge ( Face ) of a hole. Grip Editing of Roof Slab Holes is also quite impressive. You can stretch all of the corners of a Roof Slab Hole simultaneously or independently by activating multiple "hot spots" or working with only one at a time. Stretching in plan view is also a very practicaly way to adjust a Roof Hole, especially if you simply want to move a hole - simply stretch the whole Hole. |

Illustrated above, I allude to the insertion of a skylight ( reference "A" ), but it isn't as simply as that. Notice the result of a good looking skylight in isometric view versus one in plan view ( reference "B" - as per how we actually need to show it for construction documentation ). Window objects only appear as top-down rectangles in plan view, so if you want a true skylight, you'll have to define your own with some unique Attachement for plan view. I'll post something as soon as I have the time to solve this little problem. We should also have a diverse set of skylight options. |
||||||||||||
Roof
Slab Boolean
The Boolean Add, Subtract and Detach options are all based on the same tools found in AutoCAD's Solid Editing tools and Architectural Desktop's Mass Groups tools. In Architectural Desktop, you will find that using a Boolean Add or Subtract achieves two things: it affectively Adds or Subtracts matter to/from the Roof Slab and associates with the Boolean object so you have a reference object to work with. With Mass Elements, used as Boolean objects on a Roof Slab for esample, the Mass Element will not be removed, is associated with the Roof Slab, can be used to modify the proportions of your Addition or Subtraction and is stored on the A-Mass layer ( in default ADT ). Detach - will remove the association between the Boolean object and the Roof Slab and its effects on the Roof Slab; basically this is like an Undo for a Boolean operation. |
 |
||||||||||||
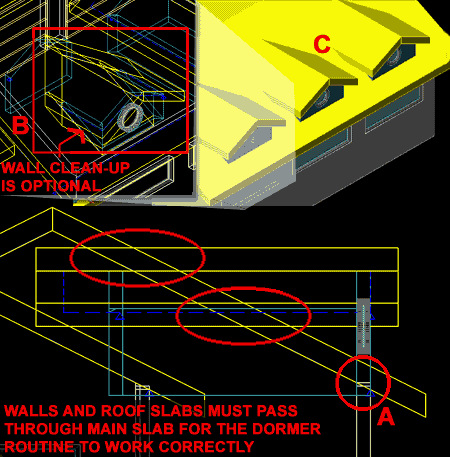
Roof
Slab Dormer
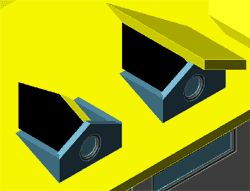
Creating Roof Slab Dormers is simple in concept but can prove to be rather tricky. One of the biggest obsticals I continually encounter is based on not getting the primary dormer defining objects to cross completely through the primary Roof Slab - see circle marked "A", right.
You may need to delete any unwanted Walls after completion of this routine - see item labeled "B", right. Unfortunately, if you want to create multiple Dormers, you have to create them one at a time; you cannot select them all in one operation. Command: RoofSlabDormer |
 |
||||||||||||
| 5Roof Slabs Edit - Customization and Tricks | 5-9 ROOF SLAB TOOLS | ||||||||||||
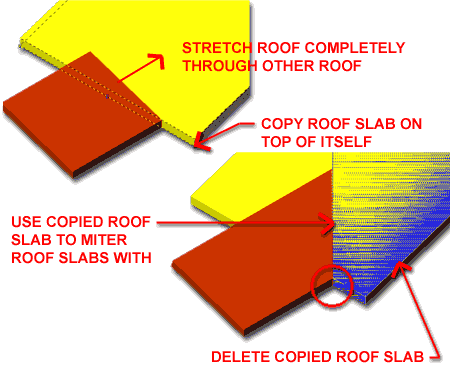
| California Framing In Section 2 on Roof Slab Edit - Trim, Extend, Miter and Cut above, we looked at some of the failures of the Trim and Extend commands. Though I have yet to find any tricks for making either of these commands produce the types of results that I seek when the Fascias are at the same elevation, I do have this trick from the days of Solid Modeling. The Miter Roof Slab routine can be used to create a "California Framing" roof solution by simply using it on a Copy of the main Roof Slab and then deleting it after the clean Miter has been made with the second Roof Slab. Make sure that the second Roof Slab ( brown ) has been Stretched all of the way through the main Roof Slab ( yellow ). Then copy the main Roof Slab on top of itself by using the same base point twice. Use the Miter Roof Slab routine and then Delete the copied Roof Slab, illustrated in blue to the right. |
 |
||||||||||||
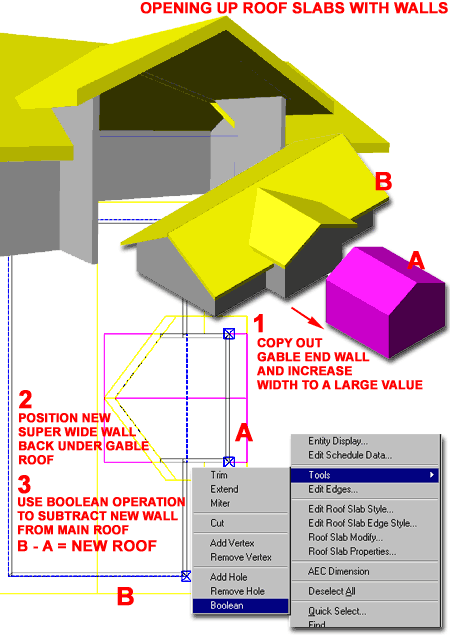
Open
Vaulted Ceilings
The Dormer routine for ADT is tedious and tricky to use for such a simple task as opening up a Roof Slab to accommodate another Roof and/or Walls. Over time, I have abandoned the use of this tool in favor of work-around solutions such as the one discussed below. Illustrated to the right I show a common scenario where two gable roofs come together with the intent of having an open vaulted ceiling joint between them. In this trick, I copied the gable wall out ( step 1 ) and changed the Width to something very large ( as is illustrated by the magenta object marked as 'A' ). The intent is to use a solution from Mass Elements and use the new super wide Wall as a tool for doing a Boolean Subtraction through the main Roof Slab. To use the super wide wall, push it back in through the main roof in which you want the open intersection ( step 2 ). For step 3, select the main Roof Slab to be modified, right-click on your mouse, cascade from Tools > to Boolean and follow the command line questions to complete this task. Command: RoofSlabBoolean Once you have completed the Boolean Subtraction task, you can place the wide wall on the A-Mass layer or equivalent and turn it Off. If you attempt to delete the super wide wall, it will also remove the changes made to the main roof slab. If you don't want this effect, read the comments below for an alternate solution. By having the wide wall as an object that acts as a subtraction agent on the main roof slab, changes can be managed by simply turning on the A-Mass layer and modifying the super wide wall object. Alternate Solution: |
 |
||||||||||||
Barrel
Vaults
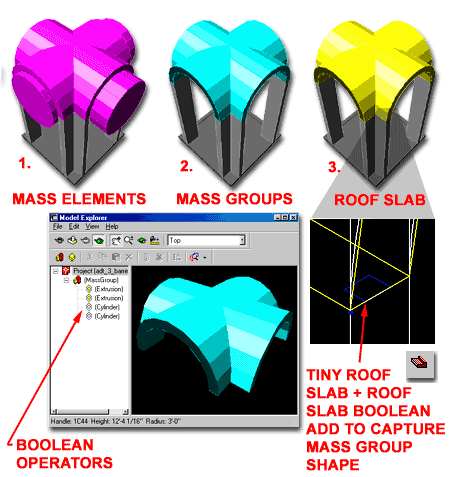
If you have come to this topic will real need instead of basic curiosity, you have my sympathy. This area of ADT's Roof tools could use a lot of improvement. Since there is no direct solution, you will be required to do extensive work-around problem solving. One of the important things to keep in mind at this juncture is a perspective on your project and how much actually needs to be modeled correctly. If you must have it in 3D then the next decision involves what type of 3D object must it be. You can solve the barrel vault or other forms of arched roofs with Solid Modeling, Mass Elements or in some cases other ADT objects. In the following example, I will illustrate how to get an actual Roof Slab Barrel Vault but you could stop along the way and say, "that's good enough for what I need". Mass Elements - Mass Groups - Roof Slab 1. The first phase of creating the Barrel Vaults as outlined to the right, is the hardest part. You will need to create the Mass Elements that form the Barrel Vault. In my illustration to the right, I show the actual Arches ( created from Profiles ) and two Cylinders that will act as the agents of subtraction through each arch. There are other ways to achieve this and you may have a smarter solution but it will involve some form of Mass Elements. 2. The second phase of creating the Barrel Vault, uses the Mass Elements to create a Mass Group where you make the Arches Additive and the Cylinders Subtractive. This can be done within the Model Explorer - as per illustration. 3. The third and final phase of creating the Barrel Vault involves a big of trickery. Using a very small Roof Slab somewhere within the the final Barrel Vault, you can use it as a base for another Boolean operation, the RoofSlabBoolean Add routine. By Adding, you are substituting for an option that doesn't work the way we wish it would: RoofSlabConvert. Since the Roof Slab Convert routine only works on Plines, Roofs and Walls, it will not convert a Mass Group into a Roof Slab. Ironically, the RoofSlab Boolean with the Add option does capture the Mass Group shape and thereby creates a converted version. You can use this trick in many ways that go beyond this example. You can read up on Mass Elements and Mass Groups in our Architectural Desktop 4 Pre-Design Guide. |
 |
© Copyright 2001- 2003 ARCHIdigm. All rights reserved.
 To create a Dormer, the Dormer Roof and main body must be Roof
Slabs. The Dormer must also be defined by 4 enclosing Walls. When you are
ready to use the RoofSlabDormer tool, you first select the main body and then all of the
objects that define the Dormer. After selecting all of these pieces, you will be provided
with the option to "Slice" your Walls.
To create a Dormer, the Dormer Roof and main body must be Roof
Slabs. The Dormer must also be defined by 4 enclosing Walls. When you are
ready to use the RoofSlabDormer tool, you first select the main body and then all of the
objects that define the Dormer. After selecting all of these pieces, you will be provided
with the option to "Slice" your Walls.