|
1Spaces
- Access |
1-11 SPACES |
Spaces
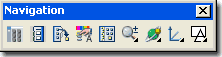
Toolbar
How do I get
this toolbar?
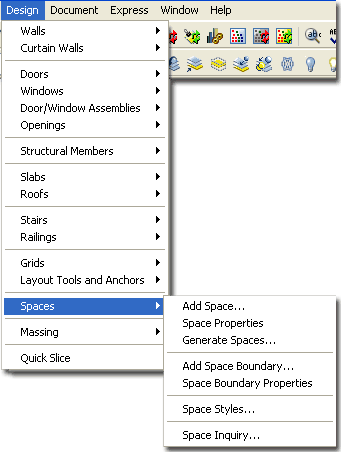
You can also acquire access to these commands from the
Alternate Design pull-down menu. From the Design
pull-down menu, pick Spaces >
and cascade to their respective command options - see image below, right. |
 |
|
Spaces pull-down menu
From the beginning I have always found the
Space Object enigmatic; serving a functioning somewhere between a Slab and
an Area Object. In earlier releases
 of ADT,
before there was a Slab Object or an Area Object, the Space Object had a
very practical and necessary application but with the introduction of these
other two Object Families, I now find that I rarely work with the Space Object.
At present, I see this Object more as a pre-design tool that offers a path
from controlled schematic diagrams to Walls but I have included it here in
the Development eGuide because I can't predict how you might want to employ
this Object in your work. of ADT,
before there was a Slab Object or an Area Object, the Space Object had a
very practical and necessary application but with the introduction of these
other two Object Families, I now find that I rarely work with the Space Object.
At present, I see this Object more as a pre-design tool that offers a path
from controlled schematic diagrams to Walls but I have included it here in
the Development eGuide because I can't predict how you might want to employ
this Object in your work.
The Theoretical Process:
The general overview of how the Space Object plays into the bigger
picture of Architectural Desktop runs along the following lines.
Mass Elements are used in conjunction with Mass Groups to produce
a massing study model. The AecSlice tool is used to cut a floor
plate through the massing study model which produces a simple outline form.
The Slice Object can be used to create a Polyline or Space Boundary.
The Polyline can be used to create Space Objects but the Space Boundary not
only contains Space Objects but also provides a direct path to Walls.
Spaces can converted to Space Boundaries at any time.
In discussion below I will cover how Space
Objects can be used on their own and how you can convert them to Space
Boundaries with the intent to go straight to Walls as part of the
Development design process. |
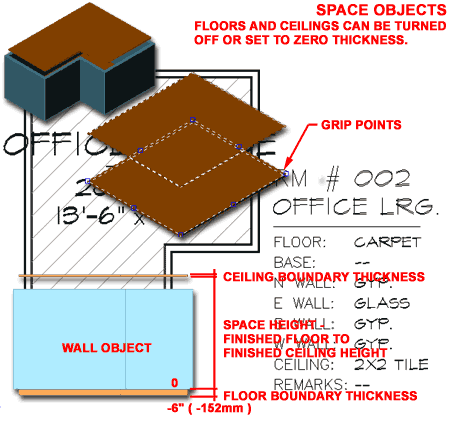
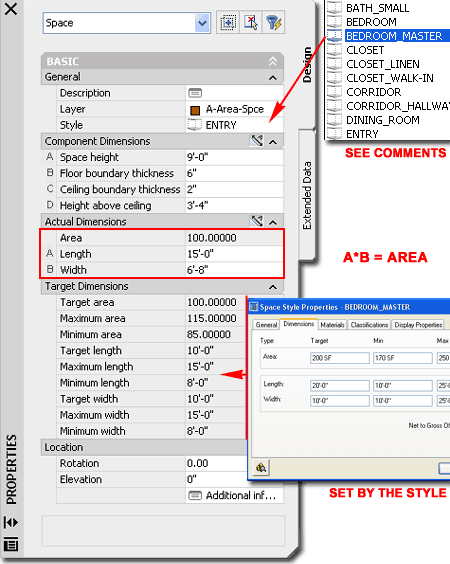
Space Objects are 3D Objects comprised of a Floor and Ceiling Component that
always have the same perimeter shape. They are managed by Styles that
can be used to Constrain Areas, Lengths and Widths. ADT comes with
default Tag Objects that you can use to Label Spaces and to report Areas and
Dimensions.
Below is the main command line
read-out for this tool:
Command: Space
Space [Add/Convert/Properties/STyles/Join/Divide/SWap/Query/Interference]:
You can also specify the option
that you want; such as
SpaceAdd
or SpaceStyle |
|
Space Boundaries Toolbar
Illustrated to the right is the toolbar that
you would use if you were going to work with Spaces from a Pre-Design
standpoint. In the Pre-Design Guide we look at Spaces as both tools in
themselves for conceptual design study and as part of the process in
converting Mass Elements into floor plans. |
 |
|
2Loading
Space Styles |
2-11 SPACES |
|
Opening Space Styles in the Style Manager
C
On a local installation of
ADT you should find, within the ADT folder, the following sub-folder
structure ( see image below left ).
 Both
the Imperial and Metric folders contain
similar Styles
folders within which you will find three Spaces Style template drawing
files. Both
the Imperial and Metric folders contain
similar Styles
folders within which you will find three Spaces Style template drawing
files.
On a Network based installation of ADT, these
Space Styles should be on a captured drive (like "G:\offices standards") or
similar location with a similar folder structure to that illustrated left
(Content >> Imperial >> Styles >> Spaces - Commercial (Imperial).dwg,
Spaces - Educational (Imperial).dwg,
Spaces - Medical (Imperial).dwg and Spaces -
Residential (Imperial).dwg or (Content >> Metric >> Styles >>
Spaces - Commercial (Metric).dwg, Spaces - Educational
(Metric).dwg Spaces - Medical (Metric).dwg and
Spaces - Residential (Metric).dwg). In a very customized office
scenario, these files may not even be present and others may have been
designed for the Space Styles your office prefers (in this case, see your
CAD manager). |
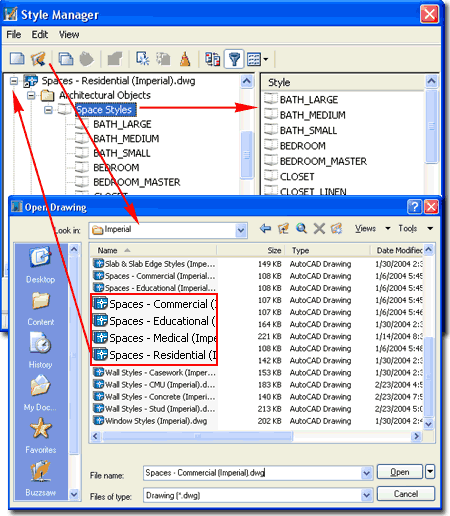
ADT comes with Commercial, Educational,
Medical
and Residential Space Style Files that each contain
numerous pre-configured Space Styles. On the list above you can see a
few of the Space Styles that come with the "Spaces - Residential
(Imperial).dwg" file |
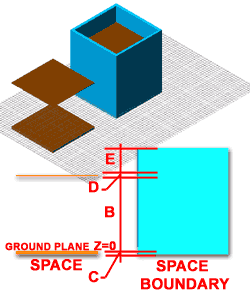
|
Spaces - Overview of
Structure Space
objects were the first solution for creating floor plates or slabs
but also come with ceilings and database
information that make them one of the most useful objects for
managing construction estimates.
Illustrated to the right are some of the
basic components of a Space object. Space objects have a Floor
and Ceiling
that you can turn on or off or even assign a zero value for thickness.
The height between the Floor and Ceiling can also be controlled before or
after creation by working with an individual Space object or by working with
a Space object's Style.
When you create a Space object, either by
Adding or by Converting, the Floor grows or
extends from the ground plane down in the negative Z-axis
direction making it ideally matched for use after Walls
have already been added. Slabs, on the other hand, do not do
this and must be moved down manually after creation.
In addition to their 3D geometric features,
Space objects have been designed to work with several Annotation
Tags and database Property Sets so you can easily
attach such things as Room Numbers, Areas
or Finish Lists. You can Export a
huge amount of data into a common Microsoft Access MDB file format for use
in other programs; even if you don't have Access. |
 |
|
3Adding
Spaces |
3-11 SPACES |
Add Space Properties Palette
| Alt.Menu |
Design> Spaces> Add Space... |
 |
 |
| Keyboard |
SpaceAdd |
Though you are not required to create or load
Space Styles, chances are that if you intend to utilize this Object type to
its fullest, you will be working with predefined Styles ( for the
Constraints and Style Names).
 GENERAL GENERAL
Style - a drop-down list offering access to any pre-defined
Space Style loaded in your current drawing or the default "Standard".
Create type - a drop-down list
offering three choices: Insert, Rectangle and Polygon.
If you expect to work with rule-based Space Styles you must use the Insert
option because neither Rectangle nor Polygon allow you to "Constrain"
your Space Object. Rectangle and Polygon allow you to draw shapes of
any size even if a specific Style has been set.
COMPONENT DIMENSIONS
A - Space Height - usually the height from finished floor to
finished ceiling
B - Floor Boundary
Thickness - use this value field to set a massing thickness for your
floor. By default, this "thickness" projects in the negative Z-axis
direction. Negative values are allowed but appear to produce the same
results as setting this value to zero. Think of this as a Floor Slab.
C- Ceiling Boundary
Thickness - use this value field to set a ceiling massing thickness much
like you may have done for the Floor Boundary. In commercial projects
you might use this value to define a suspended ceiling ( T-bar ). Think of
this as the finished ceiling ( suspended or other ), but not as a Roof Slab.
D - Height Above Ceiling
- use this value field to set the Space Boundary Height ( can also be
thought of as Wall Height) if it is higher than the Ceiling Boundary Height.
You won't see any physical evidence of this value but if you convert a Space
to a Space Boundary (type "SpaceBoundary" and use Convert ) that acts as a
"Solid Type", the Boundary will extend up to this value. Solid
Space Boundaries are practically Walls and
can be Converted to Walls as part of a multi-phased pre-design process.
ACTUAL DIMENSIONS
This section of the Properties Palette is not available when using
the Rectangle or Polygon "Create Type" options.
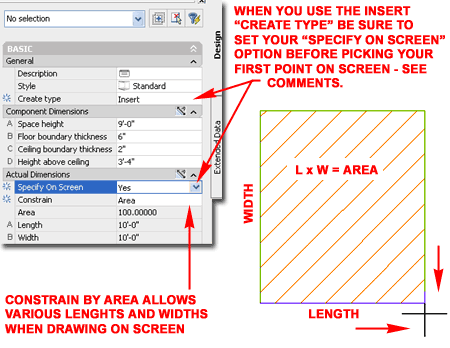
Specify On Screen - use this drop-down list to select between a "Yes"
or "No" option. Selecting "Yes" will lock the Area, Length and
Width value fields. |
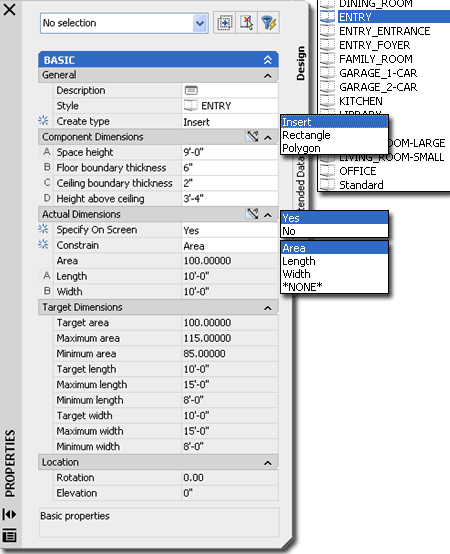
Constrain -
use this drop-down list to select one of four options: Area, Length,
Width or *None*. If Specify On Screen
has been set to "No", you will see the results of selecting any of
these four options in the value fields directly below. If Specify
On Screen has been set to "Yes", you will notice the type of
Constraint when drawing the Space Object on Screen. Using the Area
Constraint, for example, allows you to draw numerous different Space Sizes
as long as they result in the same Area total.
Area, A - Length
and B- Width are controlled by the Specify On Screen and
Constrain settings. If you have Specify On Screen set, you will not be
able to input values for any of these fields. If Specify On Screen is
set to "No" then the Constrain setting can be used to Constrain one or
*None* of these value fields; i.e., no constraint thus allowing any size and
area. TARGET DIMENSIONS
This section of the Properties Palette is not available when
using the Rectangle or Polygon "Create Type" options.
The information displayed under this section is controlled by the
Space Style and cannot be
modified here. It is just for reference purposes.
LOCATION
This section of the Properties
Palette is only available for direct input when Modifying Space
Objects. |
| Adding Spaces -
Examples
If you decide to create free-from Spaces by
using the Rectangle or Polygon Create type options, there
really isn't much to discuss with respect to Constraints. When you use
the "Insert" Create Type option, you can utilize the Constrain options to
help create Spaces that fall within logical ranges for Areas or Lengths and
Widths.
SPECIFY ON SCREEN - YES:
Illustrated to the right I show that
I have set the Create type option to "Insert". Be sure
to set your "Specify On Screen" option before picking your first
point on the screen because I found that if this option is set to "No" and
you begin creating your Space, that mode is locked in even though you can
change the option on the drop-down list.
When working with the Specify On Screen
option, you can Constrain by Area to allow more free-form
Length and Width Dimensions while keeping the Area locked.
Using the Length or Width Constrain option, you can draw your Space along
the X-axis or Y-axis to see how your cursor position affects the final
proportions of the Space.
Using the *None* Constrain option
produces a Space that is square in dimensions but can vary between the
Maximum or Minimum Areas depending upon length your second cursor point is
from the base insertion point.
SPECIFY ON SCREEN - NO:
When you set the Specify On Screen option to "No", you are
actually using the most liberal option for Inserted Space Styles.
Despite the inability to draw
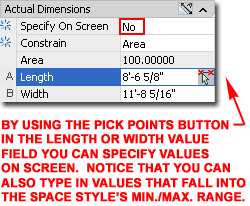 the
Space directly on Screen, you can actually pick points on the Screen for
Length and/or Width if you wish to. This is the only option that
allows you to specify an Area other than the Target Area; i.e., as
long as the current Space Style has a Minimum and Maximum Target Area that
are not the same, you can specify any value within the Area Range. To have
the greatest freedom within the Target Values of the Space Style, set the
Constrain option to *None* and type the Area, Length and/or Width
values that you prefer. the
Space directly on Screen, you can actually pick points on the Screen for
Length and/or Width if you wish to. This is the only option that
allows you to specify an Area other than the Target Area; i.e., as
long as the current Space Style has a Minimum and Maximum Target Area that
are not the same, you can specify any value within the Area Range. To have
the greatest freedom within the Target Values of the Space Style, set the
Constrain option to *None* and type the Area, Length and/or Width
values that you prefer. |
This technique does not always
produce Spaces that conform to the Space Style's Rules, as the *None* term
implies but you can monitor this by comparing the values to those under the
Target Dimensions section of the Properties Palette. The error
that is most likely to occur is that you may specify a Width or Length that
falls within the Range but produces an Area that is not within the Range.
Notice that when you type in values, they will automatically round up or
down the be with the Range specified by the Rules of the Space Style.
For even more fun with *None*
option, try using a Length and Width that produces an Area that is not in
the Range and then Constrain it by setting the Constrain to "Area"; now the
Length and Width must produce the erroneous Area. |
|
4Modifying
Spaces |
4-11 SPACES |
Modify Space Properties Palette
| Alt.Menu |
Design> Spaces> Space Properties |
 |
|
| Keyboard |
SpaceProps or -SpaceModify |
| Links |
Add Space Properties Palette - for
information on the settings and options available on this palette. |
 The
Modify Space
Properties Palette is almost identical to the Add Space Properties
Palette with the main exception that you cannot change the Constrain
options; Area is always locked but controlled by Length and Width. The
Modify Space
Properties Palette is almost identical to the Add Space Properties
Palette with the main exception that you cannot change the Constrain
options; Area is always locked but controlled by Length and Width.
Though you should find that the Length and Width value fields are
Constrained by the Min./Max. Range when you type in new values, this is not
the case when you use Grips to modify the Length and/or Width.
Should you accidentally Modify the Length and/or Width by Grip Stretching,
the Area is locked to the new value and there is no way to reset the
original Constraints. I guess the moral of this observation is "don't
use Grips on Spaces".
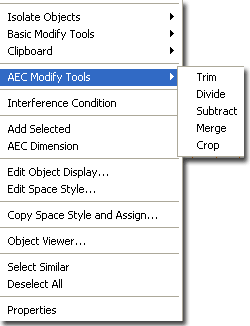
Illustrated above left I show the Context
menu activated by Selecting one or more Space Objects and right-clicking
on your mouse. For Space Objects, as with many other ADT Objects, you
can use the AEC Modify Tools> cascading menu to Trim, Divide,
Subtract, Merge and Crop Spaces. Though some of these terms, like
"Trim", may sound familiar to AutoCAD users, they are not the same commands.
To Trim a Space you must use the "LineworkTrim" command; the AutoCAD
"Trim" command will destroy the integrity of a Space Object. |
To learn about
how the AEC Modify Tools
work on Space Objects, read the sections below.
|
|
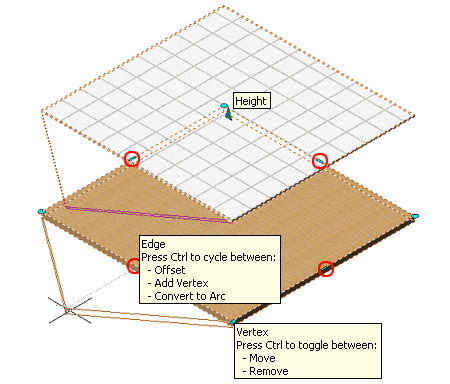
Using Grips to modify Spaces
Using Grips on Space Objects can be a very effective way to Modify
Space Lengths, Widths, Heights and even Shapes but there are no Constraints
to keep you tied to the Space Style's rules.
In the illustration to the right I show that
Space Objects always have Corner Grips, Edge Grips and a
Height Grip no matter what the shape, Style or size is. The Height
Grip is not available in Plan so you may need to view your work in Isometric
in order to take advantage of this option. The Corner Grips have two
options: Stretch or Remove depending on how you have cycled with the Ctrl
key.
The Edge Grips offer several
interesting options including Stretching, Adding a Vertex and Adding an Arc.
As with other Objects in ADT, simply Select the Grip to make it Hot and then
use the Ctrl key to cycle through the options. If you pull your cursor
out and away from the Grip position, you should find that you can see the
results of cycling through the options ( such as the Arc option ).
Once you have used the "Convert to Arc" option, you will find two new Ctrl
cycle options on the Edge Grip of the Arc: Stretch and
Convert to Line. The Stretch option allows you to Stretch the
Arc to a new shape while the Convert to Line will remove the Arc and replace
it with a straight edge.
CAUTION!
See comments on how using Grips on
Space Objects can be problematic when using Space Style rules
(Dimensions tab) to Constrain Dimensions and Areas. |
 |
Trim Spaces
| Keyboard |
LineworkTrim |
| Mouse |
Select a
Space Object, right-click and Select AEC Modify Tools > |
As with other ADT Objects that utilize the
AEC Modify Tools, you can Trim Space Objects with the LineworkTrim
command.
Illustrated to the right I show the default
approach to Trimming a Space Object where you specify a first point,
a second point for the trim line and a third point for the
side to trim away. If you hit the
Enter key for the first part of this command you will find that an
automatic Trim Line will appear whenever you hover your cursor near any
linear Object. This feature can make short work of trimming as long as
there is an object that will act as a direction vector for the Trim Line.
You cannot use OSNAPS, like Midpoint, to split an Object nor can you change
the direction of the Trim Line as it is generated from an Object. |
 |
Divide Spaces
| Alt.Menu |
N.A. |
 |
|
| Keyboard |
SpaceDivide
- old ADT command |
| |
LineworkDivide - better choice. |
| Mouse |
Select a
Space Object, right-click and Select AEC Modify Tools > |
As with other ADT Objects that utilize the
AEC Modify Tools, you can Divide Space Objects with the
LineworkDivide command. You can also use the SpaceDivide
command specifically designed for Spaces but I find that this older command
is basically archaic because it offers fewer options. One major
benefit of using the LineworkDivide command is that you can Divide multiple
Spaces at one time; e.g., Select many Spaces, then activate the
LineworkDivide command via the pop-up context menu.
Illustrated to the right I show the two
methods you can employ to Divide one or more Space Objects. You can
Pick two Points to define the Division Line or by hitting the Enter
key, you can allow ADT to automatically project a Vector Path off of any
Linear Object in your drawing.
To Divide several Space Objects by the same
Patch, Select the Objects first and then use the Linework Divide command via
the right-click pop-up menu. |
 |
Subtract from Spaces
| Keyboard |
LineworkSubtract |
| Mouse |
Select a
Space Object, right-click and Select AEC Modify Tools > |
As with other ADT Objects that utilize the
AEC Modify Tools, you can Subtract from Space Objects with the
LineworkSubtract command.
Illustrated to the right I show how a Circle
and regular Lines can be used to form the perimeter shape of a Subtractive
Operation on a Space Object. When Objects do not form a closed shape,
the open ends will automatically be connected in the resultant form.
The breadth of Objects that can be used to Subtract is amazing; even Xref's.
One drawback to using this tool is that there is
no simple way to fill in a hole or negative space. See the Merge
tool for a solution and be sure to consider using the Interference
tool when you know there are going to be a lot of changes. |
 |
Join Spaces and Merge Spaces
| Alt.Menu |
N.A. |
 |
|
| Keyboard |
SpaceJoin |
| |
LineworkMerge |
| Mouse |
Select a
Space Object, right-click and Select AEC Modify Tools > |
As with other ADT Objects that utilize the
AEC Modify Tools, you can Merge Space Objects with the LineworkMerge
command. You can also use the SpaceJoin command specifically
designed for Spaces but I find that this older command is basically archaic
because it offers fewer options.
Illustrated to the right I show a typical
scenario where two adjoining Spaces are Merged to form one larger Space.
I also show that you can use forms created with Lines, Arcs, Circles and
other Objects to Merge with as an option to expand or alter the shape of a
Space.
Be sure to reply with a "Yes" when
queried to "Erase selected linework? [Yes/No]" or you will end up
with redundant Spaces. |
Also Illustrated above as item "A", I
show that you can Merge Spaces that are not physically connected. This
may happen by accident but you can use the LineworkDivide to disconnect such
cases. |
Crop Spaces
| Keyboard |
LineworkCrop |
| Mouse |
Select a
Space Object, right-click and Select AEC Modify Tools > |
As with other ADT Objects that utilize the
AEC Modify Tools, you can Crop Space Objects with the LineworkCrop
command.
Illustrated to the right I show that you can
use Lines, Arcs and almost any other Object to loosely form an enclosed
shape that can be used as a Crop Boundary. The Crop tool is very
similar to the Trim tool with some interesting differences. If you
Trim to a Wall, for example, the Space will cut at the edge of a Wall but if
you Crop to a Wall, the Space will literally use the Wall's Shrinkwrap
outline as a boundary; I was really confused when I accidentally did this
and lost my Space to a sliver inside a Wall.
Tip:
Since the Crop tool only Trims a Space you may want to combine this tool
with the Merge tool to fully reshape a Space to a Boundary; i.e, first Crop
then Merge. |
 |
Interference Condition
| Alt.Menu |
N.A. |
 |
|
| Keyboard |
SpaceInterference |
With the Space Interference Condition
tool, you can introduce objects whose final dimensions are inconclusive at
the time that you are designing. Using something like a Rectangle for
a Mechanical Space will allow you to change this object easily without
having to be concerned about Space Styles or other related design issues.
The Space that is the recipient of this Interference will automatically
adjust as will the resulting Area calculations for schedules and Space Tags
( you can actually see the Area on a Space Tag change in live mode as you
adjust an Interference object.
Many different ADT objects, such as Mass
Elements, can be used as interference objects, so you are not limited
to Closed Polylines.
If an Interference object is Deleted,
the Space restores to its original dimensions. |
 |
Swap Spaces
| Alt.Menu |
N.A. |
 |
 |
| Keyboard |
SpaceSwap |
The SpaceSwap tool provides
an option for swapping the Properties of one Space with another but
unfortunatelyl only works with Space Objects that are confined within Space
Boundaries. I make reference to this command just for your information
though Part 11 is not about Space Boundaries. |
|
|
5Convert
to Spaces |
5-11 SPACES |
Converting Polylines to Spaces
| Alt.Menu |
N.A. |
 |
|
| Keyboard |
SpaceConvert |
| Palette |
Select
Space Style on Palette, right-click to Select
Apply Tool
Properties To and cascade over to Polyline. |
| Links |
Generate Spaces - to learn about a method
that may prove to be faster and easier. |
The SpaceConvert command only works on
closed Polylines, including Rectangles,
Polygons and AEC Polygons. You can type this
command or use the Apply Tool Properties To option via the Tool Palette.
One of the most significant problems with
Converting Objects to Spaces is that this operation does not apply any
Constraints; making is rather easy to use a Space Style designed for a
Closet on a Rectangle as large as a Stadium. There are no warnings nor
any tools to force a Space, created by this method, to adhere to the rules
set by the Dimensions tab. You will see erroneous numbers on the
Properties Palette but that's all you will have to let you know something is
off.
|
For some, Space Styles may not very important but for others the Styles are
the key to producing analysis. For such cases you may wish to avoid
using the SpaceConvert command or use it to create a single large form that
is then Divided and otherwise modified to create smaller Spaces that you
assign as specific Styles while monitoring the Areas, Lengths and Widths. |
|
Converting Polylines to Spaces - Space Properties Palette
When you select a Polyline to Convert into a
Space Object, you will be prompted to "Erase layout geometry?
[Yes/No] <N>:" and then you will see the Space Properties Palette
as illustrated to the right.
If you choose to "Erase layout geometry", it
simply means that the Polyline will be erased. In the case of using
Slices (used on Mass Elements and Mass Groups to cut Floors ), this is
probably a good idea since the Slice can be used to generate a new Polyline
at any time you want.
As illustrated to the right, the default
Space Style is always "Standard" and though you can Select any Space Style
you may have loaded, it will not change any of the Dimension values.
|
 |
|
6Generate
Spaces |
6-11 SPACES |
Generate Spaces dialog box
| Alt.Menu |
Design> Spaces> Generate Spaces... |
 |
|
| Keyboard |
SpaceAutoGenerate |
| Links |
Adding Room & Finish Tags
- for manually adding Tags to Spaces after creation. |
| Bug |
The
Max. Gap Size field did not work on any of my tests. If you
experience similar problems, set the HpGapTol system variable and ignore
this field. |
If you tend to design by first using simple
Linework or the more definitive Wall Objects and then start to focus on
Areas, Spaces and proportions, you are likely to find the Generate Spaces
tool the most useful in this suite. It functions much like the Hatch
tool where you specify a point within a Boundary to define a closed
perimeter.
Style - this drop-down list
is the same as that for Adding Spaces and
allows you to access any predefines Space Styles.
PROPERTY DATA
Property 1 -
this is a text field where you can manually write information for one or
more Space Objects. The Name of the Field and the function it has in
Tags and/or Schedules is determined by what you set on the Tag Setting
dialog under the Property 1
and Property 2 drop-down lists.
Property 2 - see comments
above. Tag Settings... -
this button brings you to the Tag Settings dialog box where you can
specify which tag you want to have automatically Added to your Space Objects
as you create them. You can use the DesignCenter to import any of the
predefined Tags that come with ADT - see
Adding Room and Finish Tags in Part 18 Schedules for more.
Though the action of Adding a Tag usually attaches Property Data Sets to
Objects, you can specify the same or other Property Sets. The
primary reason to specify the Property Data Set is to gain access to any of
the fields that allow Manual input so you can use the Property 1 and
2 fields back on the main Generate Spaces dialog.
Auto-Increment Numeric Properties - use
this checkbox and corresponding value field to set the numeric increment for
your Spaces. Typically this increment is used for Space Numbers but
you could create other custom Properties to take advantage of this feature.
BOUNDARY SET
Automatic - by using this option
you basically declare that all Objects currently visible on your screen are
candidates for Boundaries. If you Pan or Zoom to include more Objects,
for example, you will need to use the Update button to refresh the
potential Boundary Set. Manual
- by using this option you can
filter the Boundary or Selection Set used to create Spaces. The New
and Append buttons can be used to create a Selection Set and then Add
to it. Filter
- use this drop-down list with three options to further refine the filtering
of the Boundary or Selection Set. You can use this filter with
Automatic or Manual Selection Sets - see comments right. |
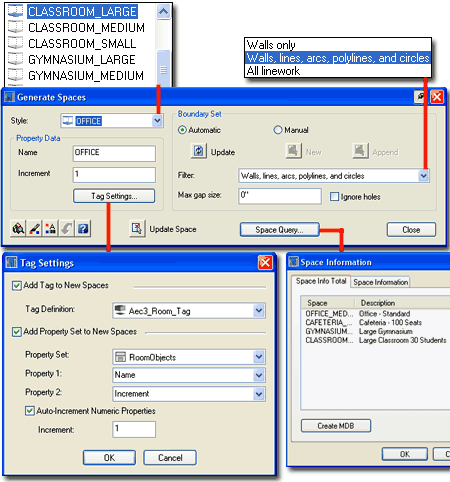
Walls only - filters out all objects except Walls and Curtain
Walls, though I have been able to select objects within Curtain Walls (
which you need to do to get a proper read on Curtain Walls with nested
entities).
Walls, lines, arcs, polylines, and circles - works like the
Wall only filter but includes the objects listed.
All linework - this finds just about everything and the
problem with that is that the resultant Spaces often don't make a lot of
sense because you get Spaces out of things like Mullions - use it as a last
resort.
Max gap size -
this value field is supposed to work
just like the Gap Tolerance under Hatch and Polyline Join but I found no
cases where it actually worked. I played with the HpGapTol
setting for the Hatch tool and found that it actually affected Spaces so try
that if you experience similar problems.
Ignore Holes
- using this checkbox allows you to
control whether shapes within shapes are read as Space Boundaries.
This is identical to the Island Detection option found under the Hatch tool.
Update Space -
use this button to redefine the Boundary of an
Existing Space Object; i.e. update it's Boundary. After Selecting this
button, Select a Space Object to Update and then Specify a point inside the
New Boundary. You can also use this as a means of Moving Spaces
around.
Space Query... -
this button brings you to the Space Information dialog box, where  you
can can acquire a basic tally of all the Spaces already created in the
current drawing. You can also acquire access to this dialog box via the
Space Inquiry button or type "SpaceQuery". you
can can acquire a basic tally of all the Spaces already created in the
current drawing. You can also acquire access to this dialog box via the
Space Inquiry button or type "SpaceQuery". |
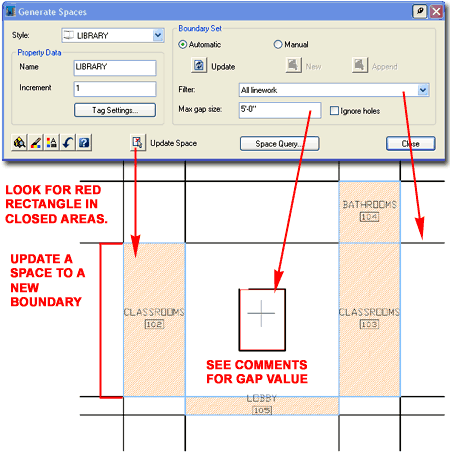
| Generate Spaces
- examples Illustrated to the right
I show an example of how the Generate Spaces tool can be employed to
create Spaces from a series of simple Lines. You can use
Automatic Boundary Set option to automatically read Closed or partially
Closed shapes as illustrated by the red rectangle in the center square to
the right. If you have a variety of different Objects on your screen
you may want to use the Filter drop-down list to help the Automatic
Boundary Set option read the shapes on your screen.
In my tests I found that the Max. gap size
did not work so I used the HpGapTol system variable instead and that
seemed to do the trick. This setting will assist in reading non-closed
shapes as closed much like the same setting assists with Hatch Patterns.
You can use the Update Space button to force
existing Space Objects to adjust to a new Boundary simply by Selecting the
Space and then the area within which the changed Boundary occurs.
As useful as the Property Data options may be, I
found them less than ideal for providing Names and Numbers to Space Objects.
The default Room Tags need to have Room Names specified manually so you
would need to fill this information out as part of the two Property Data
fields ( set by the Tag Settings dialog). In addition, when you use
this technique to Tag the Spaces, the Tags don't apply the current font as
they do when you Tag Spaces with this Tag after creation. If you use
Space Styles defined as Rooms you might as well label them by the Style Name
and the only default Tag that does that is the Space Tag. What you
might want to consider is to create a custom Tag that works like the Room
Tag but reads the Space Style Name as the Room Name. |
 |
|
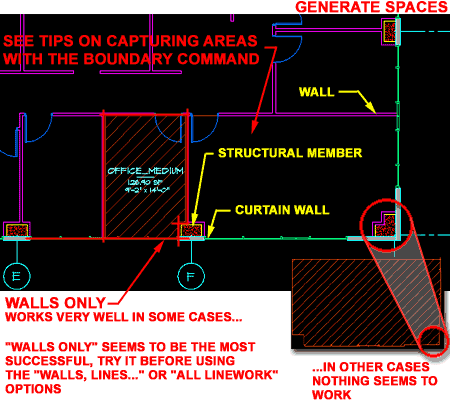
Generate Spaces - Wall Only examples
Illustrated to the right is an example of a commercial office space in a
high-rise or multi-floor building. This is the type of scenario
that really tests the usefulness of a tool like Generate Spaces.
The primary problem you are likely to face has to do with a mixture of
Object types and how they "close" the shape you are attempting to turn
into a Space. Doors, for example, may have their arc swing read unless
you set the Filter to Walls Only. Gaps between Object types may prove
to be problematic as well and in some cases insurmountable. If a
Column Object, for example, does not sit directly up against a Wall Object
the gap will not be filled regardless of the Max. gap size (or HpGapTol).
If you are working with something similar to
that illustrated to the right, experiment with different Display
Configurations to see if those will help. Sometimes the Reflected
Display Configuration is far better as a source for Generating Spaces
than Plan Low, for example.
Note:
For BOMA standards on Area calculations
you typically calculate Areas based on Wall Centerlines. Though the
Net to Gross Offset
value on the Dimensions Tab
of the Space Style Properties dialog can be used to produce an offset Gross
Boundary line (see Spaces in Plan) that runs
through the centerline of adjacent Walls, the resultant Area report does not
include the Gross Area; i.e, the only data you can extract is the Net Area.
|
 |
|
7Space
Styles |
7-11 SPACES |
Style Manager - Spaces
| Alt.Menu |
Design> Spaces> Space Styles... |
 |
|
| Keyboard |
SpaceStyle |
| Links |
Loading Space Styles
- for information on how to load predefined Styles that come with ADT. |
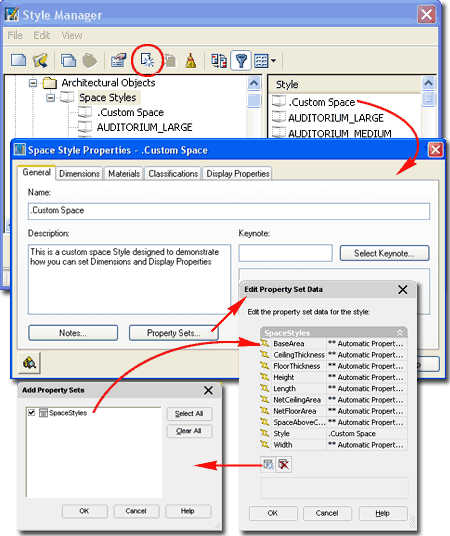
For Space Objects, you can use the
Style Manager
to load, modify, delete and create new Space Styles.
Illustrated to the right, I show the process
of creating a New
Space Style that I have Named "Custom Space". By
double-clicking on this new style, you will invoke the
Space Styles dialog box - as illustrated.
The General tab provides
access to the Name
and Description fields for a Style; plus access to the
attachment of Notes,
Property Sets
and a Keynote. If you plan to use some
form of a Schedule to manage Spaces, you may want to Add a Property Set(s)
at the Style level. In cases where you plan to Tag the Spaces, this
data can be added as part of the tagging process and thus may not be
necessary at the Style Level. Select
Keynote - you can use this button to Select a Keynote Category but I
can't think of any examples that would apply to Spaces since they aren't
really architectural Objects as much as mathematical data containers. |
 |
|
Style Properties - Dimensions tab
On the Dimensions
tab of the Space Style Properties dialog box, you define the rules by
setting value ranges for the Area, Length and Width.
Each of these value "Types" have a Target, Minimum and
Maximum setting where the Target is usually what you see, by default, on
the Properties Palette.
The optimum or Target Area must
equate to the formula Target Length x Target Width
and the Minimum Area must equate to no less than the
Min. Length
x Min. Width. The Maximum Area
cannot be less than either the Target Area or the
Min. Area, but can be as large as you want it to be regardless of
the Max. Length and Max. Width. In the illustration to the right, the
Max. Area is set to 400 SF which prevents the the Max. Length x Max. Width
from creating anything larger; though they could conceivably create a 900 SF
Area. Along the same line of thinking, if the Max. Area was set to
1000000 SF, you would not be able to reach this value because the Max.
achievable Area is still held by the 900 SF as set by the Max Length and
Width.
 The
ranges that you set on the Dimensions tab of the Space Style Properties
dialog box, have a direct impact on many of the options you will find on the
Properties Palette when Adding Spaces. As discussed
earlier, these "Dimensions" only apply when using the "Insert" Create
type. Regardless of how you have the Specify On Screen option
set, some form of Constraint will be applied. You can be specific
about which one, by locking it on the Constrain drop-down list. The
ranges that you set on the Dimensions tab of the Space Style Properties
dialog box, have a direct impact on many of the options you will find on the
Properties Palette when Adding Spaces. As discussed
earlier, these "Dimensions" only apply when using the "Insert" Create
type. Regardless of how you have the Specify On Screen option
set, some form of Constraint will be applied. You can be specific
about which one, by locking it on the Constrain drop-down list.
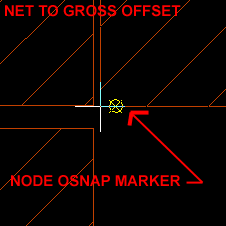
Net to Gross Offset - use this value
field to specify how much you want the Gross Boundary Display Component (see
Spaces in Plan) to extend beyond the
physical perimeter of the Space Object. This value field also affects
the placement of the Node OSNAP as illustrated above left. When
converting Spaces to Solid type Space Boundaries, Justification is relative
to the Offset position. Beyond these basic effects, the Net to Gross
Offset really does little and I find that rather disappointing considering
how it could have offered so much more to help calculate Areas. For
Property Data you will only find the BaseArea Definition which calculates
the actual Space Area. There is no Property Data for calculating the
Gross Area unless you create your own based on a formula. |
The reason I bring this point up is that the
Offset can be used with the Generate Spaces tool on designs where Walls have
already been placed to run the Spaces out to the centerline of the Walls.
That part is great but if the Area report can't measure the Gross Area this
capability has little value.
Constrain Comments:
If you spend a few minutes playing with the Constrain options you should
soon find that they really don't work that well. In ADT 3 - 3.3 this
feature actually worked better and literally sounded a warning beep when you
attempted to go beyond the rules. Now, you can easily use the Length,
Width or *None* options to input Maximum Values that push the Area Value
beyond its Maximum. Then, you can actually lock the new Area Value and
work the Length and Width Values so that all numbers are completely beyond
the rules. This means that though the Constraints can work for you,
you will need to keep a careful eye on the Target Dimensions section of the
Properties Palette to remain true to the rules. |
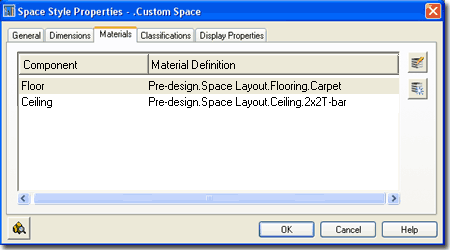
| Style
Properties - Materials tab
 Illustrated
to the right I show that all Space Styles offer two default Components under
the
Materials tab: Floor and Ceiling. None of the
Space Styles that come with ADT have pre-assigned Material Definitions so
you are likely to see "Standard" as the Material. The Standard
Material may prove to be okay for the work you do with Spaces but you can
also create your own Material Definition Styles to take advantage of this
feature that can be particularly appealing for 3D presentation images. Illustrated
to the right I show that all Space Styles offer two default Components under
the
Materials tab: Floor and Ceiling. None of the
Space Styles that come with ADT have pre-assigned Material Definitions so
you are likely to see "Standard" as the Material. The Standard
Material may prove to be okay for the work you do with Spaces but you can
also create your own Material Definition Styles to take advantage of this
feature that can be particularly appealing for 3D presentation images.
Illustrated to the right I show the I have created two Material
Definition Styles that I assigned for my Floor and Ceiling Components.
One quick way to create
|
Material Definition Styles for your Spaces is to
Load a Slab and Roof Slab Style that has the Materials you need, Copy the
Material Definition Styles, Rename them and then Assign them on the tab
illustrated to the right. |
| Style
Properties - Classifications tab
Space Styles have a Classifications tab that
is identical to that for most Object Styles. See discussion under
Doors and Windows for more on this subject. |
|
|
Style Properties - Display Properties tab
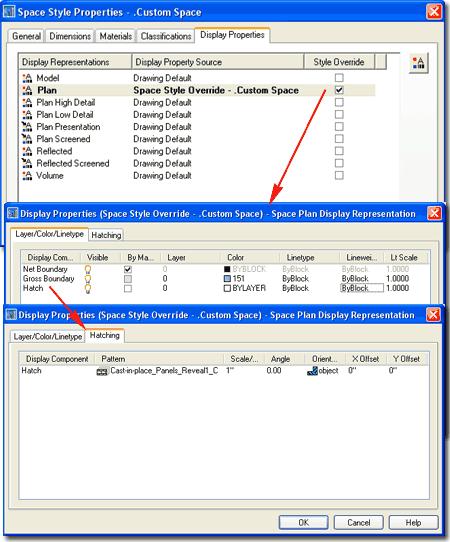
The Display Properties tab
of the Space Style Properties dialog box, illustrated right, provides access
to a set of Display Representations similar to those found for most Object
Styles. Since Spaces tend to be Objects used in Plan and Reflected
Plan Views, you may find that the Model and Volume Display
 Representations
are not a major concern. You may also find that since you can use the
Material Definition Styles to control the appearance of Space Styles, you
may never need to use Display Overrides as I show to the right. Representations
are not a major concern. You may also find that since you can use the
Material Definition Styles to control the appearance of Space Styles, you
may never need to use Display Overrides as I show to the right.
Illustrated to the right I show how you can
use a Display Override on the Plan Display Representation of
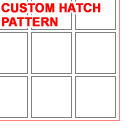
my example "Custom Space" Style to set a custom Hatch Pattern that is
not set by the Material Definition Style.
Illustrated to the left, is another 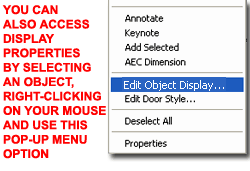 way
to access the Display Properties tab; select
the specific object, right click
on your mouse to invoke the object-specific pop-up menu and select
Edit Object Display... Just be aware that when you use this
approach, you can actually set an Object Override as opposed to a Style
Override. Object Overrides can be extremely useful because they allow
you change Hatch Patterns, for example, of any single Object within a Style
Family but they can also be problematic because they lock you out from more
centralized, Style level, controls. way
to access the Display Properties tab; select
the specific object, right click
on your mouse to invoke the object-specific pop-up menu and select
Edit Object Display... Just be aware that when you use this
approach, you can actually set an Object Override as opposed to a Style
Override. Object Overrides can be extremely useful because they allow
you change Hatch Patterns, for example, of any single Object within a Style
Family but they can also be problematic because they lock you out from more
centralized, Style level, controls. |
 |
|
6Spaces -
Display Properties |
6-11 SPACES |
|
Space Display Property Overview
The Display Properties of Space Objects
is fairly limited due to the simplicity of the Objects themselves.
There are only two components, the Floor and the Ceiling, but you can employ
Material Definition Styles to expand on the display options.
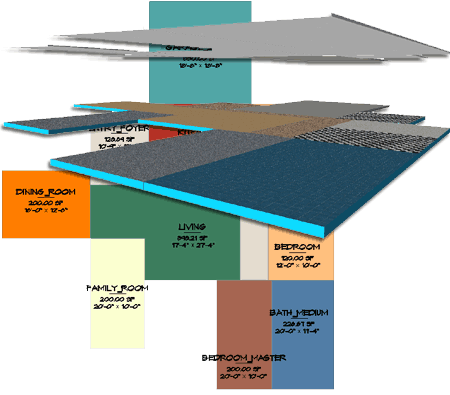
In the illustration to the right I show how you
can work with the Solid Hatch Pattern and Colors to create more attractive
schematic design plans. I also show how you can use Materials to
produce more attractive 3D presentation images. Below I discuss how to
produce these results and more. |
 |
|
Spaces in Plan
Spaces do not have a Cutting Plane so as far as Plan View goes, you can
basically think of them as two dimensional forms much like Area Objects.
This means that when you switch between Plan and Reflected
Display
Representations, you are simply changing how you want the same two
dimensional polygon to appear in Plan View.
If you
Subtract an Object, like a Rectangle from a Space Object it will affect
both the Plan and Reflected Display Representations because it reads the
whole Space as one Object ( you will see a full hole in Model ). If,
on the other hand, you Add an Interference
Object so that it only penetrates either the Floor or Ceiling
Components, the display will be correct in Plan and Reflected.
In the illustration to the right I show the
three Plan Display Components you will find for any of the Plan
Display Representations. I also show how the Gross Boundary
Display Component can be turned On to assist in working with the
Net to Gross Offset value
on the Space Style's Dimensions tab. |
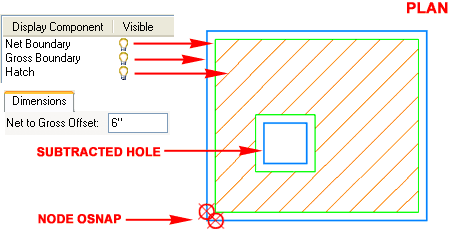
Unfortunately the Net to Gross Offset value is
all-inclusive affecting Subtracted Objects and Interference Objects that may
lie within the perimeter of the Space Object. In addition, there is no
Property Data to extract the Gross Boundary Area so though this line can be
offset, you cannot directly acquire its Area. |
| Spaces in
Model For Model Display
you have two Display Components to work with: Floor and Ceiling.
Should you wish to see your Spaces as Solid Forms you can also work with the
Volume Display Representation.
Illustrated to the right I show the Floor and Ceiling Display Components
with Materials as they would appear in in 3D under a Shaded Mode. By
working with the Material Definition Style's Display Properties, you can
control how the Material is applied to the Space; such at Top only, for
example. By default the Entity
Display Component for the Volume Display Representation is turned
Off but can be useful in Volumetric Studies as illustrated to the
right. The Solid form fills the volume between the top of the Floor
and the bottom of the Ceiling. See comments directly below for
information on how to activate the display of this Component. |
 |
| Spaces -
Volume Display Representation
In case you
find yourself interested in the Volume Display
Representation of Spaces, as
illustrated above, you may find it a bit tricky to see.
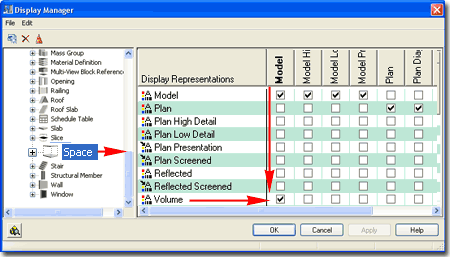
Illustrated
to the right I show the Display Manager Window
with the Space Representation by Object Selected. By default the
Volume Display Representation is not used for any Display Set or
Configuration so you will need to activate it as illustrated. |
 |
| Spaces in
2D Section
Because Space Objects don't have a specific
Display Representation for Sections and Elevations they generally use the
Model Display Representation
to project or cut 2D Sections. If you look at the Display Components
available on the Layer/ Color/ Linetype tab
under the Model Display Representation
( see above ) for any Space Style, you will find that there are only two,
Floor and Ceiling, with no options to control linework or hatch for
Sections. This means that if you want more options at the Style level,
you will need to work with Material Definition Styles
where you will find Display Components for 2D
Section/Elevation Linework,
3D Body,
Section Hatch and more -
see illustration right.
When you use
the
Generate Section tool to cut a
Space Object, you should find that it defaults to the "Section_Elev"
Display Set. I point to this
fact because it is important to know which Display Representation the
Section_Elev Display Set applies to for the Material Definition Styles you
use on your Space Object Styles. In other words, you may be using a
Tile Material Definition for the Floor Component of your Space Style and
that Material's "General Medium Detail Display
Representation" is the one you
will want to work with in order to produce results under the "Section_Elev"
Display Set. This may be a bit confusing but think of a 2D Section as
a new Object with its own Display Representation that derives its
information (linework) from the Material Definition that you attached to the
Space Object.
SPACE OBJECT
Illustrated to the right, upper corner, I show the "General
Medium Detail" Display
Representation for one of the two Material Definition Styles attached to my
example Space Object. The
"2D Section/Elevation
Linework"
Display Component
can be used to control the lines beyond the physical sectional cut ( be
aware that you can also use the 3D Body Display Component if this option is
checked on the Other tab of the 2D Section/Elevation Style's Display
Properties dialog ). The
"Section Hatch"
Display Component
can be used to set a unique Hatch Pattern wherever this Material Definition
is cut but there is a corresponding Display Component on the 2D
Section/Elevation Style's Display Properties ( see comments below).
Sectioned Boundary and Sectioned Body are Display Components for Live
Sections so they do not apply to this particular discussion.
|
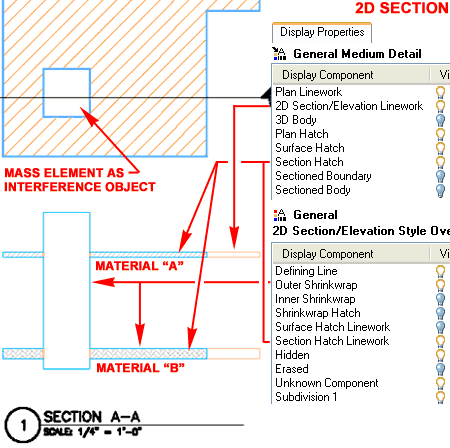
SECTION OBJECT
Illustrated above, lower right, I show the
"General"
Display Representation
for the example 2D Section.
Because I could find no way to display the Body of the Space Object without
the "Outer Shrinkwrap"
Display Component, I show that as being used to display the cut body of the
Space and the example Interference Object. The "Section
Hatch Linework" Display Component
can be used to turn On or Off any Section Hatch set on the Material
Definition (discussed left) and that is how I have two different Hatch
Patterns; one from Material
"A"
and one from Material
"B".
If you prefer to use the "Solid" Hatch Pattern, you will need to set it as
the "Shrinkwrap
Hatch" Display
Component which will affect both
the Ceiling and Floor Space Object Components. In my tests I attempted
to use the Solid Hatch Pattern at the Material Level only to find that this
does not work;
so it appears that if you want to use
the Solid Hatch Pattern it must be as part of the Section Style and over all
of the Space Object's Section. |
|
7Space
Database Information |
7-11
SPACES |
Space Inquiry
| Alt.Menu |
Design> Spaces> Space Inquiry... |
|
|
| Keyboard |
SpaceQuery |
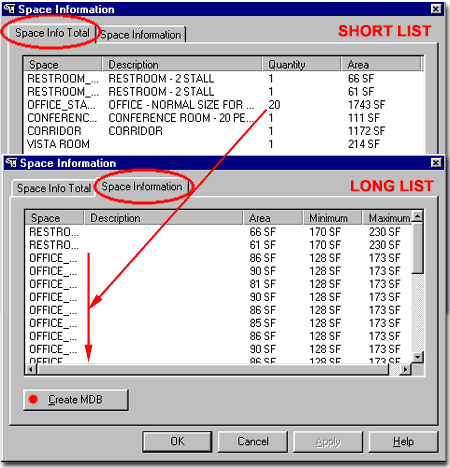
The Space Information dialog box,
illustrated to the right, offers two tabs to view some rather basic
information of all the Spaces in the current drawing file. You cannot
control the number of Space Objects this tool will display because it always
reads the entire list in the current drawing.
Space Info Total - this tab
consolidates Spaces with the same Style Name and provides a Quantity column.
This tab reports Area totals.
Space Information - this tab displays
all Spaces separately and includes Minimum and Maximum Area ranges as set by
their Styles. You can use this information to evaluate designs and
check for possible errors.
You can find any Space Object(s) on your
screen by Selecting the Space Style Name under either of these two Tabs.
To use this feature make sure that the Spaces you want to find are on the
current Screen and not off beyond the current Zoom range. Then, Select
a Space Name and look for the Space or Spaces on your screen in a
highlighted (dashed) mode much like when Selected for Editing.
Create MDB
button - see comments directly below. |
 |
| Space Data and
Excel As you may have noticed,
there is a "Create MDB" button under both the Space Info
Total and
Space Information tabs of the Space Information dialog (illustrated
above right). As you might expect, the type of data and the formatting
of that data is different depending on which "Create MDB" button you use.
Though both options produce completely accurate data, the spread sheet I
acquired from the Space Info Total tab did not include a "Quantity" column
and thus I had no indication of how many Spaces I had for the total Areas
reported. Therefore, the example illustrated here is based on the
Space Information tab.
Illustrated to the right I show how you can
use the Data pull-down menu in Excel to access the Import
External Data cascading menu option to import a Space based
.mdb
(Microsoft Data Base) file.
The "SPACEAREAQUERY" table provides a
list similar to the one found under the Space Information tab of the Space
Information dialog.
The "SPACEFLATTENDB" table provides a
large list of information similar to the SPACEAREAQUERY and including
Lengths, Widths and all Constraint values.
The "groups" table provides a list of
groups. I believe this refers to table groups and since those are not
automatically created with the database you won't find anything under this
category.
The "spaces" table provides a list
similar to the "SPACEFLATTENDB" table but without the GROUPNAME category.
This list includes the Space ID category which relates the handle name in
Architectural Desktop and a number of other odd categories that I don't
recognize. |
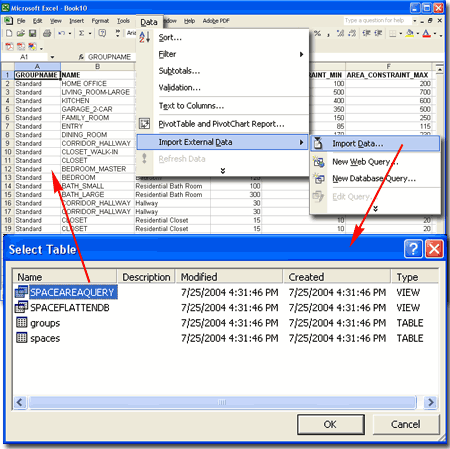
In my tests of this approach to importing Space
Information into Excel I did not find any simple way to organize the columns
by any specific order. |
|
8Space
Boundaries - the next step |
8-11
SPACES |
|
Converting Spaces to Space Boundaries
Depending on how you employ Space Objects in your pre-design or development
work, you may eventually find that you want to surround them with Walls.
In the pre-design guide I discuss numerous phases and approaches you can
take to go from diagrammatic sketch to Massing Model and on to Slices, Space
Boundaries and Walls. For this discussion, as part of the development
phase, I will provide a more abbreviated overview of how you can employ the
Space Boundary Object to turn Spaces into Spaces with Walls around them.
Architectural Desktop does not provide a tool
to convert or create Wall Objects directly from Space Objects so you must go
through the Space Boundary Object in order to produce Walls. In my own
experience I have not found this process very satisfactory and often riddled
with annoying problems (like segments in Walls where Boundaries connect).
Working with Spaces bound by Solid Space Boundaries, however, can prove to
be a very useful option in refining designs so I recommend that you explore
the possibilities discussed below.
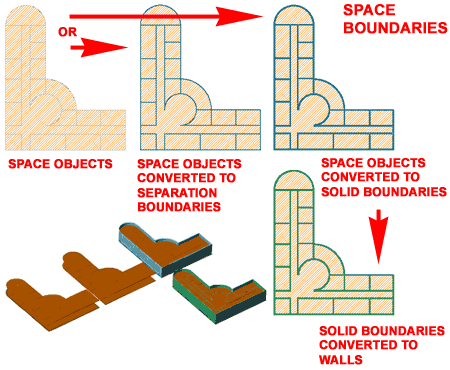
Illustrated to the right I show the two Space
Boundary Object Types that you can create from Space Objects: Separation and
Solid Space Boundaries. The Separation Space Boundary Type
cannot be used to create Walls despite what the context menu suggests and is
only two-dimensional while the Solid Space Boundary Type is
practically a Wall with Width and Height.
Read Architectural Desktop 3
Pre-design eGuide
-
Part 5 - Space Planning - Boundaries for more. |
 |
Space Boundary
Properties Palette
| Menu |
N.A. |
 |
|
| Keyboard |
SpaceBoundaryConvertSpace |
When converting Space Objects to Space
Boundaries with the SpaceBoundaryConvertSpace command, you should
find that the Space Boundary Properties Palette appears as
illustrated to the right. By setting the Boundary Type to "Solid"
you should find that the options that appear on the Properties Palette look
suspiciously similar to those for Wall Objects and if you plan to Convert
these Objects to Walls, you should think of them as Walls.
GENERAL
Boundary Type:
Solid - this option produces a 3D form around the edge of a Space
that represents a boundary between adjacent Spaces much like a Wall Object.
Solid Boundary types offer the only option to convert Spaces to Walls.
Separation - this option produces a 2D line around the edge of a
Space that represents a Space's Edge. It can be changed into an Solid
type later if desired.
DIMENSIONS
A - Base Height
- this option is only available when the Ceiling condition is not
set to "Automatic". When the Space Boundary Height is not
determined by the Space Object's Properties, you can use this value to set
the physical height of the Boundary but be aware that if you use the
"Ceiling stops at boundary" the "C -
Upper Extension" value adds to the physical height.
B- Width - use this option
to specify how wide you want the Solid Boundary type. Think of this as
the Width you are likely to want for your final Walls when you convert the
Space Boundaries to Wall Objects.
Justify - this option is
only available for the Solid Boundary type. When converting Spaces to
Space Boundaries be careful to make the right choice for Left, Center, Right
justification in order to produce the desired results. Right
Justification typically shrinks the actual Space Area because it uses the
outer edge as the outer edge of the Solid Boundary but for interior
conditions you will need to confirm results by visual inspection.
Manage Contained Spaces - use this option to connect the Space
Object with the Boundary Object in such a way that the Boundary Conditions
work as expected. If you toggle this option On and Off on it will
create new and possibly redundant Space Objects that you may need to delete.
For best results, keep this setting on "Yes"; you can always come back and
change it to "No".
BOUNDARY CONDITIONS
Though you can change the
Ceiling Condition and Floor Condition under the Separation Boundary Type,
these options really only apply to the Solid Boundary Type.
Ceiling Condition:
Automatic - use this option to
govern the Space Boundary Ceiling condition by the Space Properties Palette;
i.e., use the Space Object to alter the Boundary Object. This option
also attempts to determine the difference between Exterior and Interior
Boundary conditions by setting exterior Boundaries to match the Space's "Height
Above Ceiling" value but the interior Boundaries to "stop at Ceiling".
Use this option if you want interaction between the Space Object and
Boundary Object.
Ceiling stops at
Boundary - use this option to
gain access to the "C - Upper Extension" value (see below) for manual
control over the height of the Boundary relative to the Space's Ceiling
Height. Setting "C - Upper Extension" zero is equivalent
to using "Boundary stops at Ceiling" except in cases where a bug
occurs - see comments above. Using this option prevents the Space
Object from affecting the Boundary Object. If you ask me, the
implication of the terminology used for this option is that the Space
Boundary governs the Space's Ceiling Height but that's not what happens here
making the option below redundant to some extent.
C - Upper Extension -
this value field is only available if
you use the "Ceiling stops at
Boundary" option. The
extension height is measured from the bottom of the Space's Ceiling boundary
Thickness.
Boundary stops at
Ceiling - use this option
to set the Height of the Boundary to the bottom of the Space's Ceiling
Height regardless of what the Boundary Height is set to. This option
is similar to the Ceiling stops at Boundary option, above, but without the "C
- Upper Extension" value. This option has a peculiar affect on
Spaces that is only observable in 3D Views: the Space will adjust to the
Boundary Justification ( Left, Right and Center ). Using this option
prevents the Space Object from affecting the Boundary Object.
|
Floor Condition:
Automatic - use this option to govern the Space Boundary Floor
condition by the Space Properties Palette; i.e., use the Space Object to
alter the Boundary Object. As with the Automatic Ceiling Condition,
this option attempts to determine the difference between Exterior and
Interior and projects Exterior Boundaries down to the bottom of the Space's
Floor Boundary Thickness while
stopping all Interior Boundaries at the top of the Space's Floor Boundary
Thickness. Use this option if you want interaction between the Space
Object and Boundary Object.
Floor Stops at Boundary -
use this option to gain access to the "D - Lower Extension" value
(see below) for manual control over the lower extension of the Boundary
relative to the Space's Floor Boundary. This option has a peculiar
affect on Spaces that is only observable in 3D Views: the Space will adjust
to the Boundary Justification ( Left, Right and Center ). Using this option
prevents the Space Object from affecting the Boundary Object.
D
- Lower Extension - this value field is only available if you use
the "Floor stops at Boundary"
option. The extension value is measured from the top of the Space's
Floor Boundary Thickness. Though this feature may be appealing at
times, it can have dire consequences later on in a project. By
extending a Boundary below a Floor, you end up with 3D geometry below your
Doors. In the case of Converting Space Boundaries to Walls, you will
end up will Walls that do not stop at the ground plane and this can often
lead to some confusion regarding where the Finished Floor/Slab actually
sits. Based on reality or not, it has been a long tradition
among 2D AutoCAD drafters to see Z = 0 ( UCS = World) as the base of all
geometry. It is therefore my recommendation that you exercise
extreme caution in working with this option. For Walls, like
Footings or other Concrete work below a Stud Wall, simply use another Wall
Style. Better yet, create such work in a different file altogether and
use Xref's to combine the work for a proper model.
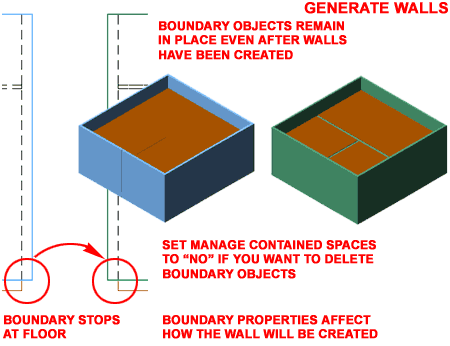
Wall Stops at Floor -
This is my preferred option because of the reasons stated for "D - Lower
Extension". If anything, it is preferable to have a Floor Slab extend
out to support the Space Boundary ( which will eventually become Walls ).
In the case of Curtain Walls, where the Slab does not extend out to support
the Curtain Wall, you will probably remove/delete the exterior Space
Boundaries and begin designing a true Curtain Wall. How the Curtain
wall relates to the Finished Floor will be determined by how you want to
assemble the entire project via Xref's. |
Converting
Space Boundaries to Walls
| Menu |
N.A. |
 |
|
| Keyboard |
SpaceBoundaryGenerateWalls |
| Mouse |
Select
Space Boundary, right-click on mouse and Select Generate Walls |
When you use a Space Boundary Object to
Generate Wall Objects, you will find that the process does not activate
the Properties Palette and thus you have no options about the Wall you
receive. The process is referred to as "Generate" because it is not a
conversion and thus you will find that the resultant Wall Objects are
directly on top of the Boundary Objects.
If you wish to Delete the Boundary Objects
you will need to change the "Manage contained Spaces" setting on the
Properties Palette to "No" so the Space Objects are not Deleted as
well. Another approach is to simply turn Off the Space Boundary
Layer but I find keeping this Object around when working with Walls is
rather cumbersome.
The primary reason to keep the Space Boundary
Object is to keep the connection it has with the Space Objects. You
see, the unfortunate aspect of going from Space Boundaries to Walls is that
you cannot transfer the "Manage contained Spaces" feature over to Wall
Objects. |
Wall Objects never have any connection or
control over Spaces unless you attempt to work with Anchors (such as the
ObjectAnchorAttach) and those only offer very limited control. |
|
9Spaces - Customizing and Tricks |
9-11 SPACES |
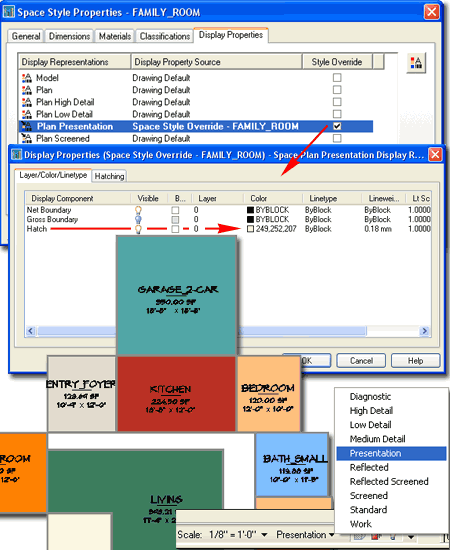
| Setting Space Style Display Properties
By working specifically with the Presentation Display Configuration,
you can utilize each Space Style's Plan Presentation Display
Representation to produce unique Colors for superior presentations.
Illustrated to the right I show an example of
how I have used a Style Override under the Display Properties tab
on the Space Style Properties dialog to access the Hatch Display
Component on the Layer/ Color/ Linetype tab on the Display
Properties dialog. I used an Override to keep the Color setting
unique for this particular Space Style.
By isolating this type of Override to the
Plan Presentation Display Representation for each Space Style, I avoid
creating display problems for the normal Plan Representations that may need
to managed differently. Also, the Plan Presentation Display Property
will only display when I set the Presentation Display Configuration active
as illustrated below right. By default, you may find that all of your
Space Style appear as Orange (Color 30). You can also use the Net or
Gross Boundary Display Components to create uniquely colored borders.
By default the Hatch Pattern is set to Solid
for Space Styles in Plan Presentation but you can obviously use different
Patterns to create more exciting illustrations.
Tip:
You can set your Tags to a color very close to White to make it appear as if
the labels were written in White but you will need to make sure that all
labels remain within the Space shapes if printing on white paper ( obviously
).
You can also create lighter looking text by
using the TextFill system variable in AutoCAD/ADT to remove the fill from
fonts like Arial; leaving only an outline form when printed.
|
 |
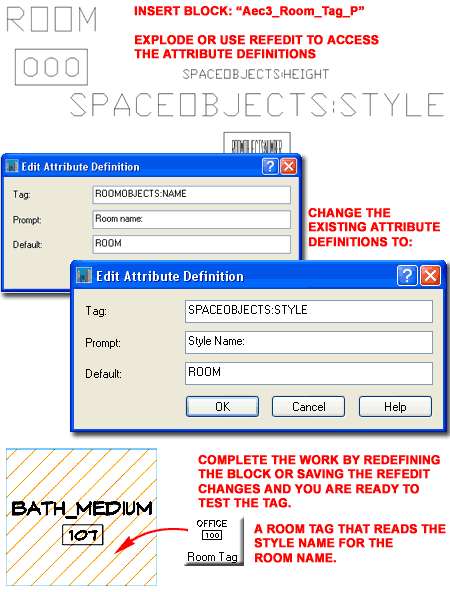
| Space and Room Tags
If you have used Space and Room Tags to
label Space Objects you may have noticed that Room Tags don't read the Space
Style for the Room Name. This may make sense in situations where Space
Styles do not differentiate for Room Labels but in many design situations,
such as residential architecture, the Space Style is the Room Name.
You can modify the default Room Tag to read the
Space Style Name by changing the Attribute Tag.
Illustrated to the right I show a quick fix for
this issue but you should go through the proper steps of creating a custom
Tag Object for your Content Library if time permits. This example will
only work in the current drawing. From
the DesignCenter or Tool Palette Insert the Room Tag.
After you have brought this symbol into your current drawing file you should
find that it also introduced a new Block. Use the Insert
command to insert the "Aec3_Room_Tag_P" Block. Do not scale
or otherwise modify this Block; simply insert it somewhere in your drawing.
It should prove to be fairly small. If
your Refedit skills are up to snuff, set the Refedit dialog to
include Attributes and use it to Modify the Attribute Definitions as
outlined to the right. If your Refedit
skills are not good enough to understand what I just stated, use the
Explode command to release the Attribute definitions for editing.
Edit the Attribute Definitions as outlined to the right.
The key thing to edit for the Attribute
Definitions is the Tag statement and what I am showing is
a trick to make the Attribute Definition read the SpaceObject Property Data
Set instead of the RoomObject Property Data Set (notice that I changed the
word "Room..." to "Space..." and the word "..:Name" to "...:Style").
After you have completed the Attribute
Definition modifications be sure to save the Refedit work or create the
Block using the same Name and Insertion Point as a means of Redefining it.
Look for the Redefine Block alert dialog to be sure you are on track.
For the final step, you should now find that if
you insert the Room Tag from the DesignCenter or Tool Palette and Attach it
to your Space Objects, it will report the Style Name instead of the Room
Name. |
 |