| 1Structural Members - Access |
1-13 STRUCTURAL MEMBERS |
Structural
Members toolbar
How do I get this
toolbar?
You can also acquire access to these commands from the Alternate Design pull-down
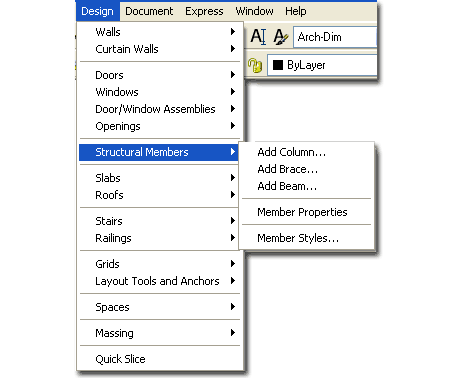
menu. From the Design pull-down menu, pick Structural
Members > and cascade to their respective command options - see image below,
right.Also illustrated to the right, I show the
Grids
toolbar and the Layout Tools toolbar
because you can, and most likely will, use either of these in conjunction
with Structural Members; particularly Columns. The Grid tools were not
only designed to assist in managing the spacing of Columns but were also
designed to be a part of your Construction Documentation by offering
Labeling options. Layout Tools, on the other hand, were designed more
for acting as an Anchoring Grid than something you would print. Both
tools use Nodes that you can Anchor Structural Members to and
consequentially control their spacing and position in 3D space.
Grids offer the option to
automatically populate all of the Nodes with a Structural Member as you Add
the Grid and therefore this tool is most likely your best choice. |
 |
 |
 |
| Structural Members pull-down menu
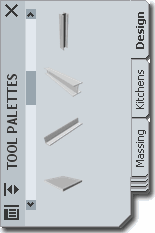 Whenever
I focus on the subject of Structural Members in ADT I always find a
smile surfacing on my face because this subject has to be treated with some
humor; i.e., they are funny. In my classes structural engineers always
get excited about this topic imagining fantastic features for details,
connectors, analysis and so forth and invariably they become disheartened in
no time at all. You see, these objects are little more than Profile
shapes extruded along paths with a sprinkle of ADT-like options and display
controls. There's nothing fancy about them at all but with each
release they improve a little. Whenever
I focus on the subject of Structural Members in ADT I always find a
smile surfacing on my face because this subject has to be treated with some
humor; i.e., they are funny. In my classes structural engineers always
get excited about this topic imagining fantastic features for details,
connectors, analysis and so forth and invariably they become disheartened in
no time at all. You see, these objects are little more than Profile
shapes extruded along paths with a sprinkle of ADT-like options and display
controls. There's nothing fancy about them at all but with each
release they improve a little.
Now that I have taken all of your excitement
and crushed it, lets take a realistic look at some of the neat things you
can do with these Objects.
Like most other ADT Objects, you can access predefined Styles by Loading them
from the Style Library but unlike most other ADT Objects, Structural Member
Styles can be created on-the-fly by using a special
Catalog of predefined sizes and
shapes that conform to industry standards for Wood, Metal and Concrete
members.
|
On the command line, you can type "Member"
when you want access to many of the Structural Member creation options. For direct access
to an option within the Member command-line menu, you can type the primary command plus
the option you want direct access to. For example, if you want to Add a Column, you
can type "ColumnAdd". To modify the Structural Members,
you only have one option to type on the command line: "MemberProps".
Below is the command line read-out for "Member":
Command: MEMBER
Member [Add/Convert/Properties/Styles]: |
| 2Loading Structural Member Styles |
2-13 STRUCTURAL MEMBERS |
| Opening
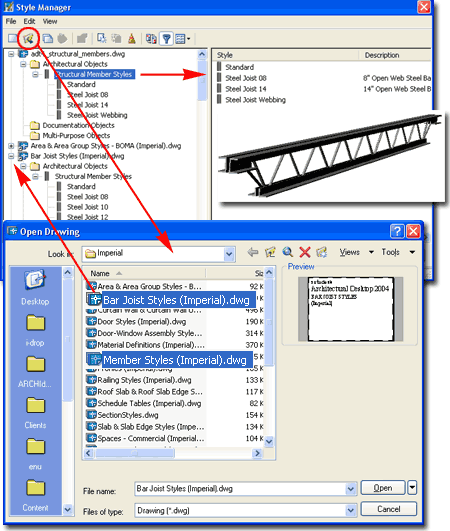
Structural Member Styles in the Style Manager
For Structural Members the
primary method for adding Styles is through the use of the Structural Member
Catalog but there are two library files that come with ADT that you may want
to investigate. Illustrated to the right I show that the default
Imperial Style folder contains the "Bar Joist Styles (Imperial).dwg"
and "Member Styles (Imperial).dwg" library files. Metric users
do not have the Bar Joist Styles but they do have the Member Styles.
You can also access these library styles through the
Content Browser
Window >> Architectural Desktop Design Tool Catalog >> Structural.
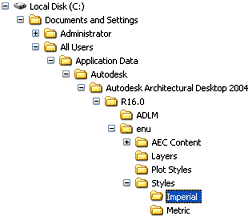 For local installations of ADT, you are likely to find the Imperial
or Metric Bar Joist and Member Styles in the Styles
Folder as illustrated to the left. The full path to this location may vary
but typically it is as illustrated. On a Network based installation of ADT, these
Styles should be on a captured drive (like "G:\office standards") or similar
location with a folder name that indicates Styles. Consult your CAD or IT manager if
you cannot locate the Styles Folder. For local installations of ADT, you are likely to find the Imperial
or Metric Bar Joist and Member Styles in the Styles
Folder as illustrated to the left. The full path to this location may vary
but typically it is as illustrated. On a Network based installation of ADT, these
Styles should be on a captured drive (like "G:\office standards") or similar
location with a folder name that indicates Styles. Consult your CAD or IT manager if
you cannot locate the Styles Folder.
For information on how to copy
styles from the template file to the current drawing file, see discussion on Wall Styles.
|
 |
| 3Adding Structural Members |
3-13 STRUCTURAL MEMBERS |
Add Column
Properties Palette
| Alt.Menu |
Design>Structural
Members>Add Column... |
 |
 |
| Keyboard |
ColumnAdd |
When adding Columns, the Properties
Palette offers a fairly simple list of options and features that
should be easy to comprehend. Since a Column is basically a Profile
shape extruded vertically, all you need to do is think about it as a vector
that follows the Z-axis of your UCS icon.
GENERAL
Style - a drop-down list offering a list of currently loaded Member
Styles; all of them!
Type "MemberStyle" or use the Content Browser to load other Styles.
Illustrated to the right I show that all Member Styles are listed for
Columns, Braces and Beams so Names become rather important if you plan to
Tag and/or Schedule these Objects.
DIMENSIONS
Start Offset - a Z-axis
distance relative to the UCS and Justification. In typical cases, plan view, this is
an offset above the ground. This value does not affect the Logical Length
value but it does affect the physical length as observed on your screen.
Positive numbers represent a distance up from the base point thus shortening
the member while a negative number extends it below the base point.
End Offset - a Z-axis
distance relative to the UCS and Justification. In typical cases, plan view, this is
an offset below a ceiling. This value does not affect the Logical Length
value but it does affect the physical length as observed on your screen..
Positive numbers represent a distance up from the end or top point and thus
lengthen the member while negative numbers reduce its length.
Logical Length - this is actually the height of
your column and thus a more appropriate term for Beams. With Offsets, the Logical Length may not be the Physical
Length observed in your drawing.
 Specify Roll on Screen - a drop-down
list offering a Yes or No option to controlling Roll with the Cursor as you
Add the Column. This is basically identical to Rotating Objects when
Inserting them. Specify Roll on Screen - a drop-down
list offering a Yes or No option to controlling Roll with the Cursor as you
Add the Column. This is basically identical to Rotating Objects when
Inserting them.
Roll - tilt or rotation of
column relative to the UCS icon. The UCS icon is usually in plan or World view, so
Roll is simply the insertion rotation of the column ( in the XY-plane
through the Z-axis ).
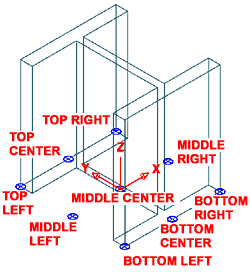
Justify - a drop-down list
offering ten different positions relative
to the column base; this means that Middle Center does not justify to the three
dimensional centroid, but rather the absolute center of the column's base.
Complex columns with multiple components are affected by the "Justify using
overall Extents" setting. Baseline uses the original Base Point set by
the Profile Definition and thus provides you with an option to create a very
unique Justification Point should you need that.
|
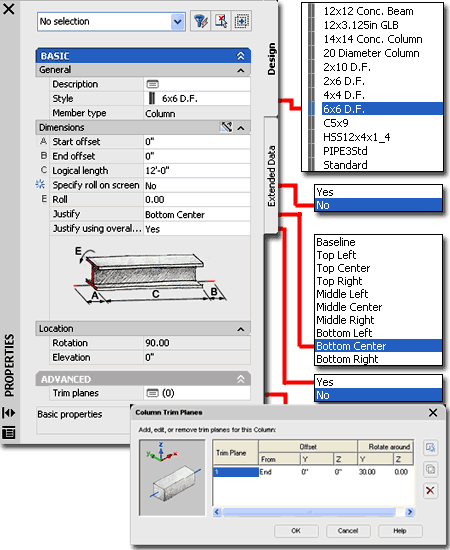
Justify using overall Extents - a
drop-down list offering a Yes or No option that affects the results of the
Justify settings if the Member has more than one component such as Steel
I-Beams encased in Concrete Columns. In most cases where you are
working with simple members this setting should not be an issue and will
produce the same results whether set to Yes or No. For complex members
with multiple components there is a
priority rating for each Profile shape
and the highest priority would rule the Justification if this setting is set
to No; if set to Yes, the overall exterior extents of the shape will be used as
the Justification reference.
ADVANCED
Trim Planes - activates the Column Trim Planes dialog
where you can Chamfer your Column based on Angle and Offset Values.
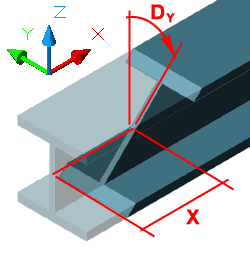
The main thing to observe is that Structural Members have their own
coordinate system that always reads the X-axis as the "logical length"
instead of the UCS Z-axis. Just look at the graphic to avoid getting
confused.
|
| Adding
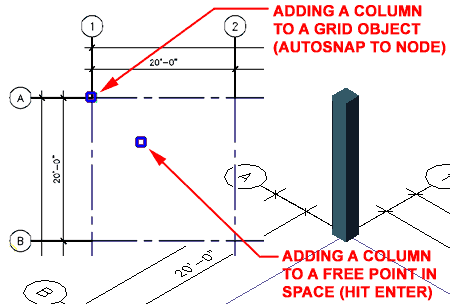
Columns When you Add
Columns, notice that on the command line you will be queried to "Select grid or RETURN:"
to place a column freely in space (un-anchored). If you select a Column
Grid or Layout
Grid object, you should find your Column automatically Anchoring to Nodes within the
selected Grid.
The position a Column takes relative to a Grid Anchor Node
depends upon the Justification choice and the Offset values set on the Add Columns
Properties Palette.
Once you have selected a Grid, you can place numerous
Column very rapidly by picking near every Anchor Node along the Grid object; the
Autosnap
to Node will place the Columns accurately. If you wish to populate
other Nodes on a Grid at a later time, all you have to do is Copy one
Anchored Column to a position near a Node on the Grid and it will
automatically "snap" into position.
To populate your entire Grid with Columns, you can either
do this as part of Adding
your Grid or by using the Node Anchor tool.
|
 |
Add Brace
Properties Palette
| Alt.Menu |
Design> Structural
Members> Add Brace... |
 |
 |
| Keyboard |
BraceAdd |
| Links |
Add Column Properties Palette -
for more information on the options not illustrated or discussed here. |
When adding Braces, the Properties
Palette offers nearly the same set of options as those for Columns.
You may notice that the "Logical Length" value field is locked out but you
now have a Rise value field to work with. Braces are basically Columns
with slope that you control with a Rise over Run input. Given this
structure for input of Braces, you may find them a bit difficult to draw (
at least I do ) but keep in mind that they are Objects and as long as you
have the Slope correct, you can Move and Stretch them later. I have
also found that converting a Line to a Brace
is often an easier approach to creating this Object type.
DIMENSIONS
See Columns for other options.
Logical Length - this value field is
not available for Braces because the value is determined by the Rise and Run
you specify. Ironically, once you place a Beam the Modify Properties
Palette does provide the option to set the Length while removing the Rise
option ( it becomes a Z-axis Location value field ). My recommendation
is to focus on getting the Slope right and then adjust the Length later with
Grips.
|
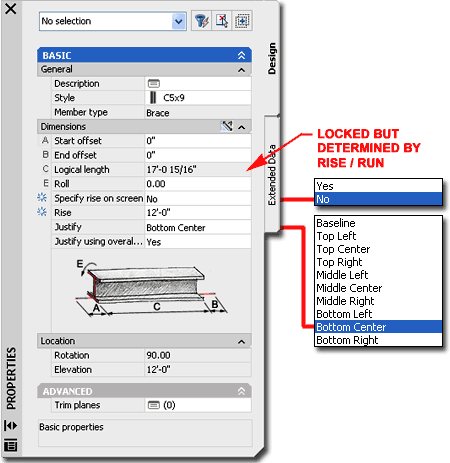 Specify Rise on Screen -
a drop-down list offering a Yes
or No option to set the Rise value on-screen or through the Rise
value field.
Rise -
use this value field to specify the vertical height of a Brace relative to
the first point of placement and the full run as specified on-screen by
typing a distance or by picking a specific point. |
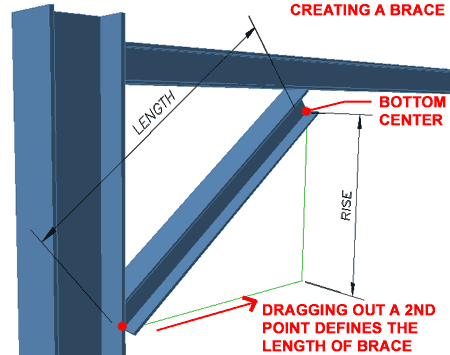
| Adding
Braces Braces can be difficult to Add
but there are several ways to tackle this problem. If you can draw a Line in the
correct position, then you can can simply Snap to the Endpoints of that Line or use the Convert
to Brace tool to do the same thing. The main problem is that you are really
forced into comprehending quite a bit about AutoCAD's 3D modeling tools in order to make
this work smoothly. Obviously, you will have to work in an Isometric view and you
will have to calculate Intersection points on other 3D objects in 3D space. This
often requires great dexterity and sometimes UCS icon manipulation.
You may want to focus on just creating a Brace at the right
slope and then move it into place later. Using Grips and Trim Planes, you can adjust
the Length and cut angles after you have positioned it correctly - as per illustration to
the right. |
 |
Add Beam
Properties Palette
| Alt.Menu |
Design> Structural
Members> Add Beam... |
 |
 |
| Keyboard |
BeamAdd |
| Links |
Add Column Properties Palette -
for more information on the options not illustrated or discussed here. |
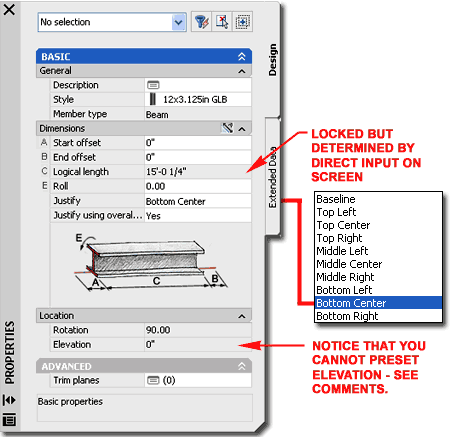
When adding Beams, the Properties
Palette offers the shortest list of options among the three Member
Types. Logical Length is now the actual length of the Member so this
value is set by specifying a distance or by picking points on-screen.
Beams are relatively simple to add and comprehend but the one missing option
is a height control. Because of this missing option, you will either
find that all of your Beams end up on the ground or at whatever Elevation
you Snapped to. If you Move your UCS icon to a New Z-axis value and
don't Osnap to any 3D Geometry, you will be able to Add Beams at the
adjusted Elevation height. Generally, I find that I don't have the time
or patience for a lot of nonsense so I just draw the Beam in Plan and Move
it up as needed later. Then, I simply Array or Copy that modified
Beam. I am sure you will develop your own tricks for things like this.
DIMENSIONS
See Columns for other options.
Logical Length - this value field is
not available for Beams because the value is determined by the points or
values you specify on-screen. You can adjust this value using the
Properties Palette after you have placed the Beam. |
 |
| Adding
Beams
Beams are probably the
easiest objects, of the three, to create. Since you don't have a
Length value field on the Properties Palette, the process is much like
drawing a Line.
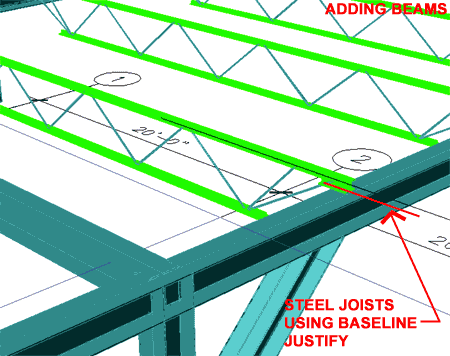
In the illustration to the right, I show two type of Beams:
a Steel Joist from the Bar Joist Styles (Imperial).dwg
file and another Wide Flange Beam from the standard Structural Member Style Catalog.
With
Beams, you may find the Baseline Justification option one of the better
choices, as illustrated to the right with the Steel Joists. Baseline for the Steel
Joists has been set to be right where you would want to weld the joist to another beam. |
 |
| 4Modifying Structural Members |
4-13 STRUCTURAL MEMBERS |
Modify Structural Members Properties
Palette
| Alt.Menu |
Design> Structural
Members> Member Properties |
 |
 |
| Keyboard |
MemberProps |
| Links |
Add Column Properties Palette -
for more information on the options not illustrated or discussed here. |
When
Modifying
Structural Members, the Properties Palette
offers much of what you would expect but there are a couple of surprises to
note. My favorite surprise is the the bizarre option to change the
Member Types without actually changing more than the Display
Representations ( Braces, for example,
don't stand up straight when changed to Columns ).
DIMENSIONS
See Columns or other Member Types for other information on options not
discussed here.
Since Braces and Beams don't have a
Logical Length option when these Objects are Added, it is nice to find
that you can Modify them later with this value field.
LOCATION
By working with the X,Y and Z coordinates for
the Start and End Points of your Structural Members you
can control quite a bit that you may not have been able to do otherwise.
For Braces, the "End point Z" value field replaces the Rise value
field when Adding.
|
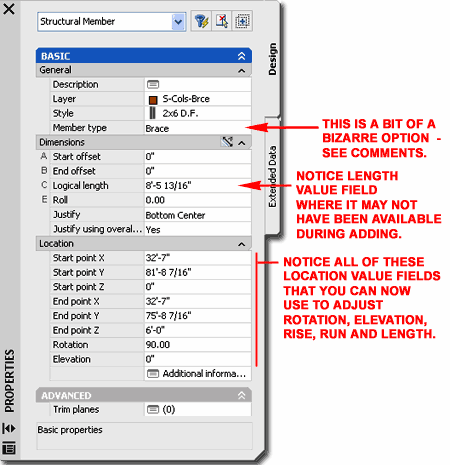
Rotation - be careful with this value
field since it is not necessarily the same thing as using the Rotate
Command. A Brace, for example, will Rotate through its own Z-axis
relative to its slope; in fact, it will Roll as you change the Rotation
Value Field. For Columns, Rotation will rotate through the World UCS's
X or Y Plane so you will most likely want to use the Roll option to turn it
in Plan. For Beams, the Rotate Value Field is more of what you would
expect for regular Objects since it uses the World UCS's Z-axis to Rotate
around. |
| Structural Members Properties - Trim Planes
dialog Trim Planes
provide the option to slice through Structural Members at one or more angles
to create end conditions for connections or other needs. Though the
concept is rather simple, getting the results you seek in a hurry can often
prove frustrating and that typically has to do with comprehending the logic
of the Offset Values and Axis of Rotation. My favorite element of
disgust here is that you have to do your own trigonometry in order to
calculate just how far back you have to Offset a Rotation in order to get it
to meet a corner perfectly. If you take the attitude that you will
just overshoot the Offset then you pay the price in not knowing what the
actual length is. Okay, that's enough of my complaining; let's get an
overview of this subject and then you can start complaining.
 When you Add a Trim Plane,
one of the first things you have to determine is which end of your Structural Member is
the Start and which is the End. This, of course,
was determined when you created it but you may have forgotten. When you Add a Trim Plane,
one of the first things you have to determine is which end of your Structural Member is
the Start and which is the End. This, of course,
was determined when you created it but you may have forgotten.
Trim Plane - numbered sequentially and
unfortunately don't read multiple component Structural Members so a cut is a cut all of
the way through. You can apply multiple Trim Planes to one end for stepped chamfers.
These begin from the Start or End Member centerline and not the justification
point.
Offset
From - the From column has a drop-down list that allows you to choose
between Start and End points on the Member.
Pick under each column to see the graphic change to assist you in
determining what you will get as a result. |
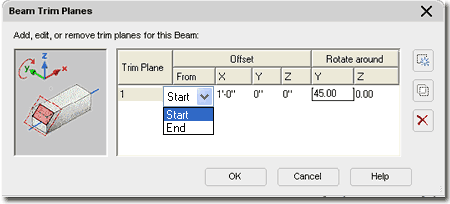 X, Y, Z - you can specify exactly where you want
your Trim Plane positioned relative to the Start or End of your Member by typing in
distance values for X, Y and Z. By default, the Trim Plane begins at the centerline
so you can push it back with a positive X-axis value or forward with a negative X-axis
value, for example. In many cases, Y is non-sense since you are working with an
infinite plane but Z can be worked against X to push the plane around. For most
simple cases, you only need to work with either X or Z and not both.
Rotate around
Y, Z - these are polar values and refer to the angle of the Trim Plane
based upon the Offset position. You have two planes to choose from: one that
chamfers the top and bottom of a member and one that chamfers the left and right sides.
By combining the two, you can create compound Trim Planes. |
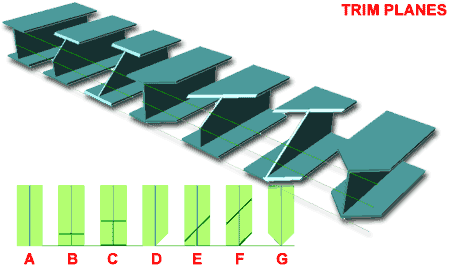
Structural
Members Properties - Trim Planes Examples
| |
Trim Plane |
Offset |
Rotate around |
| From |
X |
Y |
Z |
Y |
Z |
| A |
1 |
Start |
|
|
|
|
|
| B |
1 |
Start |
|
|
|
45 |
|
| C |
1 |
Start |
4 |
|
|
45 |
|
| D |
1 |
Start |
|
|
|
|
45 |
| E |
1 |
Start |
|
|
|
45 |
45 |
| F |
1 |
Start |
5.5 |
|
|
45 |
45 |
| G |
1 |
Start |
|
|
|
45 |
|
| |
2 |
Start |
|
|
|
315 |
|
|
 |
|
Edit Trim
Planes In the previous examples I
discussed how to set and control Trim Planes through the Trim Planes dialog
box but you can also Edit
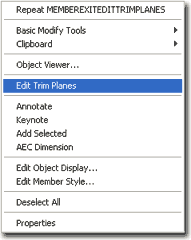 Trim
Planes right in place by using the right-click object-specific ( context
) menu. To use the Edit Trim Planes in-place mode, Select one
Structural Member, right-click to Select the Edit Trim Plane pop-up menu
option as illustrated to the left. Though I have an illustration
showing this mode while Shaded, I found that this is not an optimum setting
to work in so I recommend working in Wireframe. Trim
Planes right in place by using the right-click object-specific ( context
) menu. To use the Edit Trim Planes in-place mode, Select one
Structural Member, right-click to Select the Edit Trim Plane pop-up menu
option as illustrated to the left. Though I have an illustration
showing this mode while Shaded, I found that this is not an optimum setting
to work in so I recommend working in Wireframe.
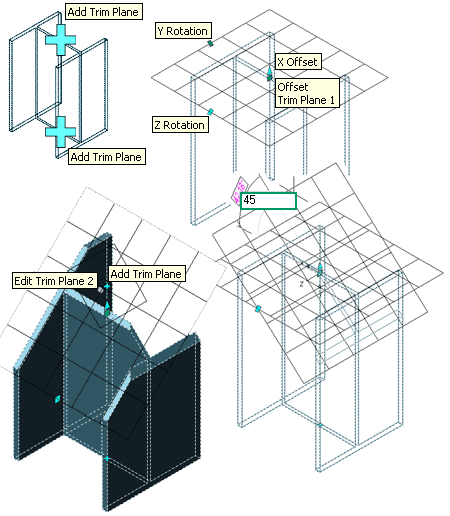
Illustrated to the right I show several
phases of working with the Edit Trim Planes mode active; from adding the
first Trim Plane to adding a second Trim Plane. Remember that you can
type in accurate values when working with one of the Grip points. When
you have two or more Trim Planes you can toggle between them by picking on
the round gray maker.
To Remove a Trim Plane use the
Properties Palette and look for the Trim Planes dialog under the
Advanced section. |
 |
|
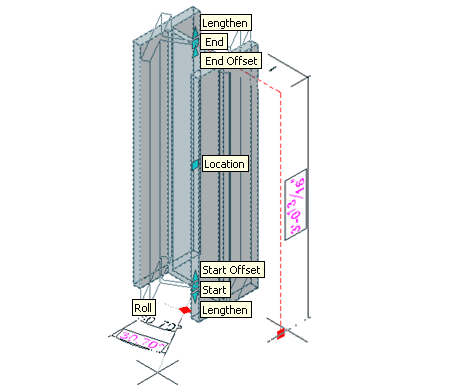
Structural Member Grip Points
All Structural Members have the same set
of Grip Points and of the whole set I find that the Lengthen Grip is
my favorite since is maintains slope no matter what View Direction you work
in ( even Plan ). Illustrated to the
right I show a simple Column and all of the various Grip Points that you can
use to Modify it. As with other Objects, you can use the Tab key to
cycle through the temporary dimensions and angles when they appear.
This will allow you to type in a value for more exact input.
One interesting aspect of working with Grips
is that you can, for example, alter the Start or End Position of a Column
and make it slope much like a Beam - notice the Rise and Run temporary
dimensions illustrated to the right.
The Lengthen Grip locks the Slope of the Member so you can Osnap to any
point in your drawing without altering the slope of the Member. |
 |
|
General Editing
Commands for Structural Members
Most ADT users are well versed in AutoCAD commands and techniques so we also
tend to try our old tricks for Lines, Arcs, Circles and Polylines on ADT
Objects. With other Objects in ADT I have not discussed commands such
as Trim, Extend and Stretch but with Structural Members I thought it would
be a good idea to point out a few things.
Trim and Extend are great tools
to use on Structural Members because they keep the Integrity of the Object
in tact while Extending or Trimming to other Objects in Space. A
Brace, for example can be Extended to a Line in Space to Lengthen either end
at whatever slope the Brace is set to.
The Stretch command must be used with
caution on Structural Members because it does not maintain Slope or Position
of Member Ends and can thus not only change the Direction but also the Slope;
turning Columns and Beams into Members that look like Braces. The key
to using Stretch successfully on Structural Members has to do with
monitoring the UCS icon so the X or Y-axis match the direction and slope of
the Member. Combining the use of Osnaps with Stretch on Members can
prove to be disastrous since the Stretch command can actually translate the
Start or End Points of a Member across the Z-plane.
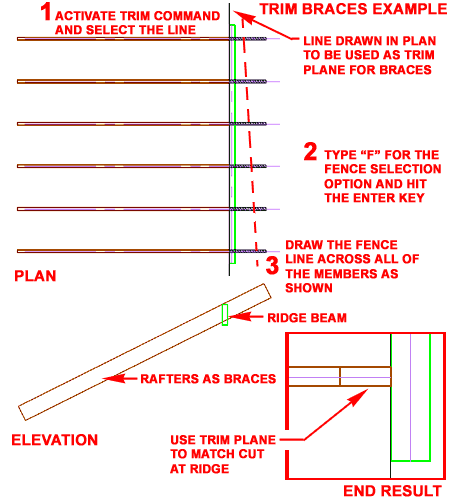
Illustrated to the right I show an example of
how you might illustrate a simple Roof Framing system with a Ridge Beam and
some Rafters. I have drawn the Rafters or Braces well beyond the Ridge
Beam but show that by using a Line as a Trimming Edge, I can Trim all of the
Braces back in one action using the "Fence" Selection option. This is
the exact same technique many AutoCAD users have been practicing for years
with conventional Linework. The use of the Line as a Trimming Edge was
necessary because the Beam is only recognized by its centerline so Trimming
to it would cut the Braces at the midpoint of the Beam instead of its outer
edge ( Walls have the same problem, have you noticed? ). |
 |
| 5Converting to Structural Members |
5-13 STRUCTURAL MEMBERS |
Overview:
For complicated structural systems you may find that drawing some of the
Structural Members directly is a bit tricky, particularly Braces. In
cases like this I find that using linework to more accurately calculate and
position points in space makes framing easier. After drawing a Line or
Polyline in space, you can use any of the three Convert options for Columns,
Braces and Beams. For some Structural Members, Converting Plines is
almost a necessity - see comments under Convert to Beams.
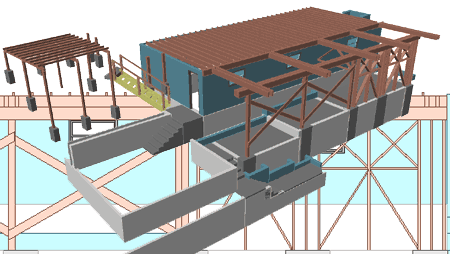
In the illustration
to the right ( work I had to survey from an existing residence on a steep
hill ), I had to use Lines to place my diagonal Braces exactly how I needed
them. After Converting the diagonal lines to Braces, I had to use Trim
Planes to chamfer the ends to match the members they were nailed or bolted
to. By using the Lines again, I could determine the exact angles more
efficiently to help determine the proper Trim Plane Angles. |
Though you can convert any Line or Pline to
any of the three Member Types, the Display Representations will be different
so it is best to use the BraceConvert when creating diagonal
brace-like members. |
| Convert
to Column
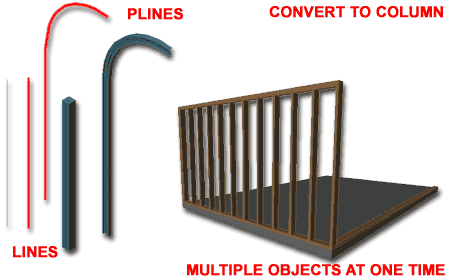
Converting Linework to Columns
is about as simple as it sounds. You can convert Lines, Arcs
and non-closed Polylines into Columns, Braces and Beams. You cannot
convert Splines or Splined Polylines. When converting, you can select many objects,
like Lines, at one time and create a set of Columns in one quick set - as illustrated with
the wood studs, right.
|
 |
| Convert
to Brace
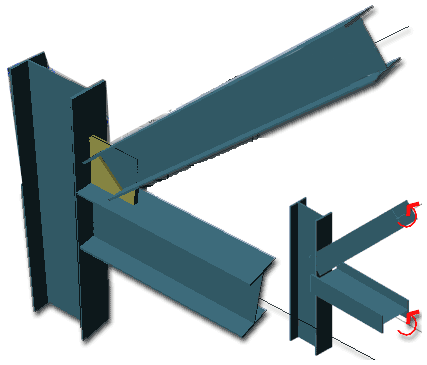
Converting Linework to a Brace
is no different than converting Linework to a Column or Beam but you may find that when
you want Braces, they don't come out rotated correctly - as illustrated to the right.
Illustrated to the right, I show one way to quickly solve a
Structural Member rotation problem: Using the Structural Member Properties
Palette, you can change the E - Roll value under the Dimensions
section.
|
 |
| Convert
to Beam
Converting Linework to a Beam
is no different than converting Linework to a Column or Brace but you may find that as
with Braces, the members don't come out rotated correctly. Under Braces, discussed
above, I illustrate one way to change the rotation (Roll) after Converting but in some
cases you may want to create a Structural Member Style that is already Rotated correctly.
On the Design Rules tab of the Structural Member Style Properties
dialog box, you can change the Shape Rotation for the Start and End
positions to match your desired outcome. Be aware that this will affect all members
based on this style, so you may want to create a new Structural Member Style to match the
one you want but with a different Rotation.
Illustrated to the right I show an advanced Structural
Member Style used for a Rigid Steel Frame. It was created by converting a 4 sided
Polyline into a "Rigid Frame - Single Gable Span" Style from the Member Styles (Imperial).dwg or Member
Styles (Metric).dwg files.
|
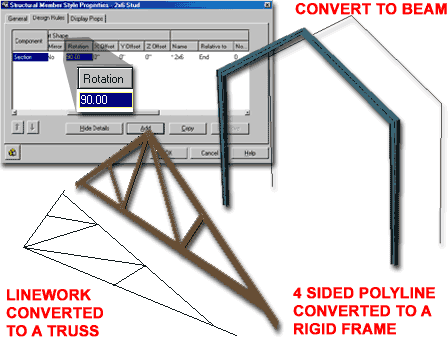 The
Truss is actually more of an experimental solution that I have not yet perfected, but it
can get the concept out quickly. The main gable shape was drawn as a Pline
but the rest of the lines are Lines. The main problem is that this
object does not behave as a single entity nor does it clean up correctly. |
| 6Structural Member Styles |
6-13 STRUCTURAL MEMBERS |
Style Manager - Structural Member Style Properties
| Alt.Menu |
Design> Structural
Members> Member Styles... |
 |
 |
| Keyboard |
MemberStyle |
| Links |
Structural Member Catalog - for how to create
Industry Standard Structural Member Styles. |
| |
-MemberShapeDefine
- for how to define your own Structural Member Shapes |
For Structural Member Styles, you can use the Style Manager
to load, modify, delete and create new Structural Member Styles. You
can also use the Structural Member Catalog to Load an industry
standard Structural Member Style instead of trying to create one from
Scratch. Therefore, in the case of Structural Member Styles, this is
usually not the place you start when wanting a New Member but rather the
place you go to Modify or create permutations.
Illustrated to the right, I show the process of creating a New
Structural Member Style that I have Named "Custom Member".
By double-clicking on this new style, you will invoke the Structural
Member Style Properties dialog box - as illustrated.
|
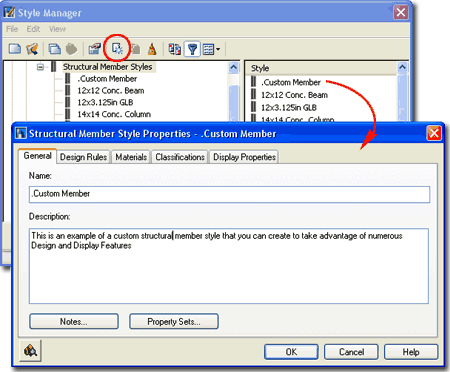 The General tab provides
access to the Name and Description fields for a Style;
plus access to the attachment of Notes and Property Sets. |
| Structural
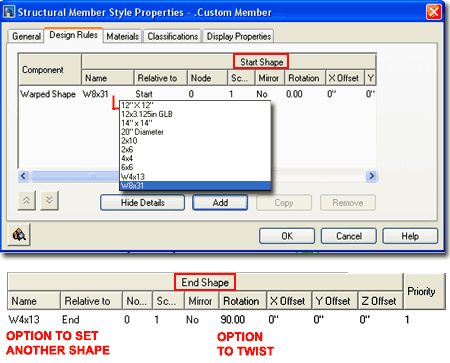
Member Styles - Design Rules tab 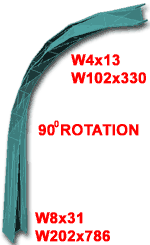 On the Design Rules tab of the Structural
Member Style Properties dialog box, illustrated to the right, you will find an
amazing set of control options such as that illustrated to the left. Make sure to
pick on the Show Details button so you can see the whole set of options
including the fact that you can specify one Shape for the Start and another for the
End.
You can also add multiple structural components together for composite forms such
as steel columns wrapped by concrete. On the Design Rules tab of the Structural
Member Style Properties dialog box, illustrated to the right, you will find an
amazing set of control options such as that illustrated to the left. Make sure to
pick on the Show Details button so you can see the whole set of options
including the fact that you can specify one Shape for the Start and another for the
End.
You can also add multiple structural components together for composite forms such
as steel columns wrapped by concrete.
The Design Rules list is quite long and
repeats
all of the options for the Start Shape again for the End Shape. In the
discussion below I will cover some of the amazing things you can do with
these options.
The Priority setting can be used to assist with
Justifications for Member
Styles that have multiple Components; particularly those with off-center
Components; higher priority equates to the source of Justification unless
"Justify using overall extents" is chosen on the Properties Palette. |
 |
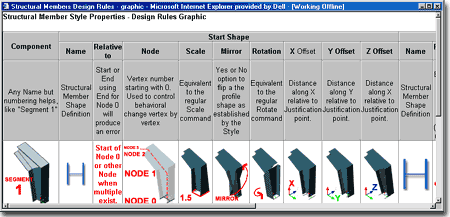
| Design Rules tab - Explained
 Most of the options on the Design Rules tab should
be easy to comprehend but you may have to do a lot of trial and error work to figure out
exactly how different values affect your Structural Members. In the illustration to
the right, expanded by picking on it, hopefully you will be able to reduce your trial and
error time by looking at my trial and error graphics. Most of the options on the Design Rules tab should
be easy to comprehend but you may have to do a lot of trial and error work to figure out
exactly how different values affect your Structural Members. In the illustration to
the right, expanded by picking on it, hopefully you will be able to reduce your trial and
error time by looking at my trial and error graphics.
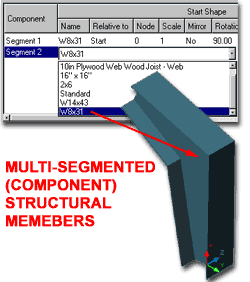
Comprehending the Node concept is probably the more
difficult feature. It can be used to achieve strange results, like a multi-segmented
Beam where you only see one or more segments along any portion of the beam. |
 To use successfully, you will need to use a Pline
and one of the Convert to... commands, like Convert to Beam.
If you try to use one of these Styles by Adding, picking several points,
the segments just start over at each point you pick. |
|
Structural
Member Styles - Materials tab
The subject of Materials is one of the
most expansive and confusing topics in Architectural Desktop because it requires a
complete comprehension of the product in order to take full advantage of this feature;
from object styles to display representations. This subject will be discussed under Part 1 - Display
and in the Presentation eGuide.
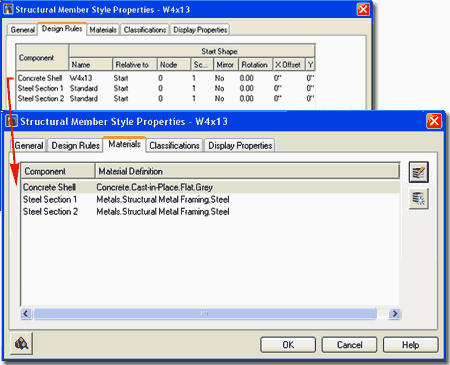
Illustrated to the right I show that Structural
Members will offer
as many Components as are defined under the Design Rules tab (by
default you should see one labeled as "Section"). If you have imported any of the Architectural Desktop Structural
Member Styles from the
Object Style Library, you should find that you will be able to use the Material
Definitions that come with those objects - as illustrated to the right where I
have selected Concrete.Cast-in-Place.Flat.Grey and Metals.Structural Metal
Framing.Steel.
Materials and Structural Members will
probably have a different relationship for many ADT users than with other
Object Styles because of how framing plans are generally presented.
Most Structural Engineers I have consulted for over the years not only don't
care about Rendering but they don't care about 3D Models. If you plan
to use Structural Members for framing plans you may want to look into how
you can adjust the Display Representations more so than the Materials since
there are options there that cannot be set to "By Material". |
For designers wanting to emphasize exposed
Structural Members, Rendering Materials should prove to be a valued asset. |
|
Structural
Member Styles - Classifications tab
The subject of Classifications is
thankfully no where near as complicated as that of Materials so the only real question you
will need to consider is if you need to use them. Classifications offer another way
to separate Object Styles into categories that can be used in Schedules
and even in Display Representation Sets ( as "Show"
or "Hide" ).
Since I am not a Structural Engineer I don't
have a lot of experience with large scale framing systems where you might
need classifications for various Structural Members so I can't come up with
any examples. I can think of how I would like to differentiate
Structural Members, particularly in remodeling work, but I would hate to
create numerous sets of redundant Member Styles when I can just create
separate drawing files. Should you have a good example, I would love
to hear about it. |
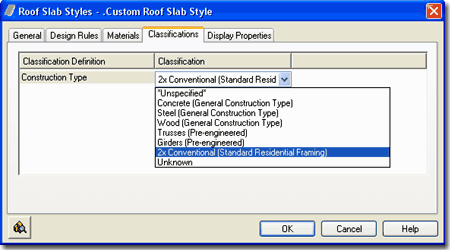
To create a Classification Definition
Style for Structural Members, use the Format pull-down. Create
a Classification Name, "Apply To" Structural Members and add
Classification items. You
can also read a bit more about how to create Classification Definitions in Part 1 -
Display. |
|
Structural
Member Styles -
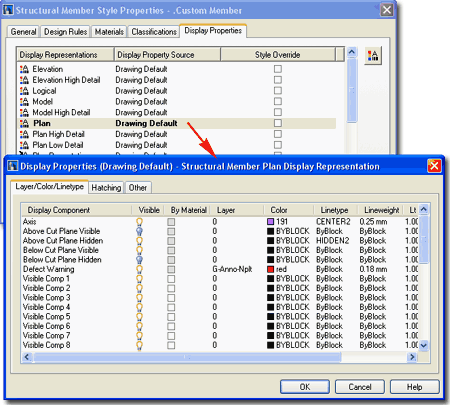
Display Properties tab
The Display Properties tab of the
Structural Member
Styles dialog box, illustrated right, provides access to the display
characteristics of the components of your Structural Member objects; from Visibility to Cut Plane
Height overrides. This is also where you would go to have Members change color or
Materials, for example, when you switch from one Display Configuration to another.
See the discussion on Structural Member Display Properties below for more information on this subject.
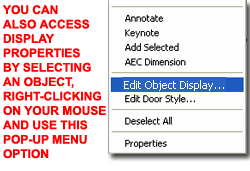 Illustrated
to the left, is another way to access the Display Properties tab; select
the specific object, right click on your mouse
to invoke the object-specific pop-up menu and select Edit Object Display... Just
be aware that when you use this approach, you can actually set an Object Override as
opposed to a Style Override. Object Overrides can be extremely useful because they
allow you to add hatch patterns or change colors of any single object within a Style
Family but they can also be problematic because they lock you out from more centralized,
Style level, controls. Illustrated
to the left, is another way to access the Display Properties tab; select
the specific object, right click on your mouse
to invoke the object-specific pop-up menu and select Edit Object Display... Just
be aware that when you use this approach, you can actually set an Object Override as
opposed to a Style Override. Object Overrides can be extremely useful because they
allow you to add hatch patterns or change colors of any single object within a Style
Family but they can also be problematic because they lock you out from more centralized,
Style level, controls.
|
 |
|
Structural Members - Display Properties - Component Layers
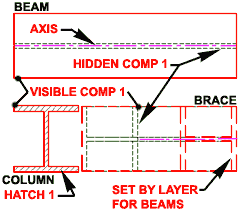 Illustrated
to the right and left I show the basic list of Display Components for
Structural Member Styles in Plan. Though there are different
Display Representations for Plan, the list is virtually identical for each
one ( Plan Low Detail has less Components ). The difference you
may see between these Display Representations really has to do with how the
same set of Display Components are configured. This actually makes it
easier to understand since more detail may just mean that more Components
are Visible. Illustrated
to the right and left I show the basic list of Display Components for
Structural Member Styles in Plan. Though there are different
Display Representations for Plan, the list is virtually identical for each
one ( Plan Low Detail has less Components ). The difference you
may see between these Display Representations really has to do with how the
same set of Display Components are configured. This actually makes it
easier to understand since more detail may just mean that more Components
are Visible.
If you intend to do a bit of work with
Structural Members, I suggest you invest a little time in creating some
standard Member Styles with Display Properties that rise above the defaults
( from the ADT Template Files ) as illustrated to the right. Notice
that the By Material checkboxes are not checked and you could certainly
employ the Material Definitions to better manage some of the linework and
hatch patterns; not to mention Rendering Materials.
|
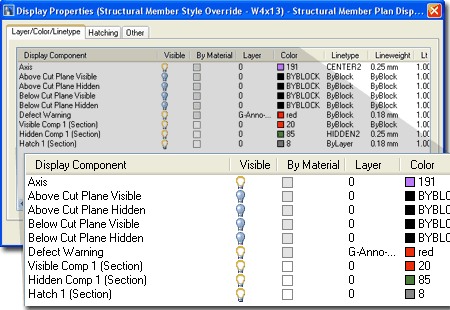
As with most other default Object Styles, the
Display Components are set to specific Colors and you may want to set things
like the Visible Comp's to "By Material" or at least "ByBlock"
for greater display options. |
| 7Structural Member Display Properties |
7-13 STRUCTURAL MEMBERS |
| Most people take
the appearance of Structural Members for granted and accept what they see
for Columns, Beams and Braces but the reality is that you can create a
multitude of unique Display Representations for Structural Members. If
you look at the default template files that come with ADT, you should find
that none of the Structural Members utilize unique Display Property
Overrides and though this can make life easier, it also limits your options.
In the case of Braces, for example, you can actually control where they are
cut with the Cut Plane and how the lines above and below this Cut Plane are
displayed. In the example immediately below I show how you can use
these Display Representation options to work with tapered Members.
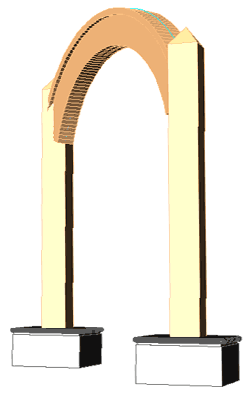
In the illustration to the right I show an
example of an arch and post design I had to resolve for a project that used
dozens of these around the base of a building. The arched beam shape
uses a custom
shape that I defined from a Polyline. The vertical Column Shape
Dimensions were created with the
Structural Member Style Wizard and the base and cap were assigned as
Custom Blocks
through the Display Properties tab of the Style. |
 |
Structural
Members in
Plan - Above and Below Cut Plane
| Menu |
Format> Display
Manager... |
 |
 |
| Keyboard |
DisplayManager |
| Keyboard |
DisplayProps [Attach] |
| Mouse |
Select Object, right-click,
select Edit Door Style... or Edit Window Style... or Edit Object Display... |
| Links |
Part 1 - Display - Object
Display Properties Overview - for more information on how to access the Display
Properties of this Object. |
Depending on how detailed your Structural
Members need to be in your construction documents, you may find the need to
delve deeply into the Display Representations to control how individual
Components appear. For this discussion I will focus on the Plan View
for Structural Members.
In the example illustrations to the right I
used a custom Member Style that tapers to better clarify the Above and
Below
Display Components.
For the Column, example #1,
reading all of the Display Components is actually more difficult than
understanding their function on the Display Component list. In this
example I did not change the default Body Cut so what you are seeing is the
base of the tapered beam despite the fact that I moved the Cut Plane
Elevation up to about the midpoint of this Column. Using the True Cut
Body would help to read the Plan View but may not be ideal for Plan View
Construction Documents since you may want to indicate the floor level
footprint of the member. Personally, I would not use any of the Above
or Below Display Component unless I was working on a detail.
For the Beam, example #2, the
Above and Below Cut Plane Display Components don't do anything and what's
even more interesting is that the Cut Plane Elevation Override doesn't do
anything either. And finally, I show the "Hidden Comp 1 (Warped
Shape)" Display Component because that is actually what controls the fin in
my example Beam. I played around with the Materials trying to figure
out how to control the linetype only to discover that though there is a
Material option, it too does nothing so you can set your preferences
directly rather than By Material.
|
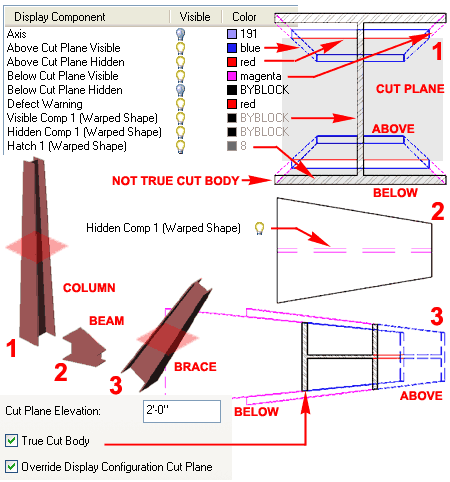
For the Brace, example #3, all
of the Display Components discussed for the Column apply in the same way but
in this example I show that I changed the Cut Plane Elevation and used the
True Cut Body option to clarify where the beam is actually being cut.
You can find these options on the "Other" tab of the Display Properties
dialog box.
|
| Structural
Members - Logical
Structural Members have a unique Display
Representation called "Logical" and though I personally don't
find that it offers much,
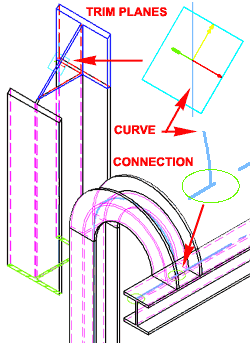 you
may find that interesting graphical markers appear when using the default "Diagnostic"
Display Configuration. The Display Component that really has my
attention is the "Connection" which may well hint at things to come
in the future for Structural Members. For now, the Connection Display
Component is just a circular Marker that displays where ever the Curve
Display Component of two or more Members connect in space. you
may find that interesting graphical markers appear when using the default "Diagnostic"
Display Configuration. The Display Component that really has my
attention is the "Connection" which may well hint at things to come
in the future for Structural Members. For now, the Connection Display
Component is just a circular Marker that displays where ever the Curve
Display Component of two or more Members connect in space.
The Trim Planes Display Component is
basically redundant given what you can work with using the
MemberEditTrimPlanes command but it is a nice option. I could not
find any way to control the size of this Marker. |
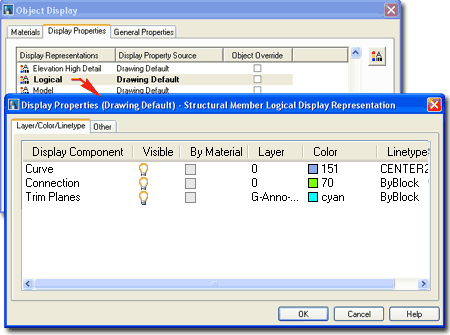
The Curve Display Component is similar to
the Axis Display Component found under the Plan Display Representation.
It matches the Justification and Length but not Axis Offsets so you can
easily identify Offsets.
If you investigate the use of
the Diagnostic Display Configuration, be aware that it also uses the Plan
Display Representation. In the illustration to the right I turned On
the Above and Below Display Components. |
| Structural
Members in
Model
The
Model Display Representations
for Structural Members are quite simple
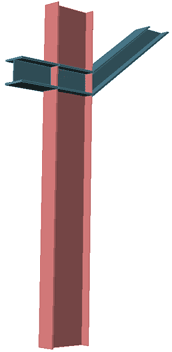 whether
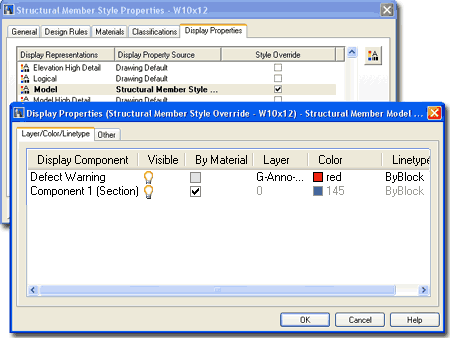
you use Style Overrides or the default settings. Illustrated to the
left I show a Column that is controlled By Material and a Beam and Brace
that are left in default mode ( using Color 145 ). whether
you use Style Overrides or the default settings. Illustrated to the
left I show a Column that is controlled By Material and a Beam and Brace
that are left in default mode ( using Color 145 ).
If you do not use a Style Override, the list
will simply be a lot longer than what I illustrate to the right.
For 3D Details, such as those in Isometric
form, you can actually use the Plan Display Representations instead of the
Model. In order to do this, you will first have to create a special
Display Configuration, Set and Representation by Object in which the Model
View uses the Plan Display Representation instead of Model. This may
sound complicated but it's rather impressive once you get it to work. |
 |
|
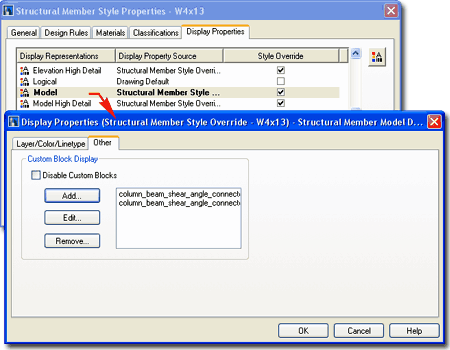
Display
Properties - Structural
Members - Other tab Most, if
not all, of the Display Representations for Structural Members have the
option to add custom Components by Attaching Blocks. To access this
feature use the "Other" tab as illustrated to the right for
the Model Display
 Representation. Representation.
In the illustration to the right notice that
I have used a Style Override for all of the Display Representations that I
have decided to add a custom Block to. If you don't use a Style
Override, you will end up with your custom Block as a default and that is
probably not something you will want.
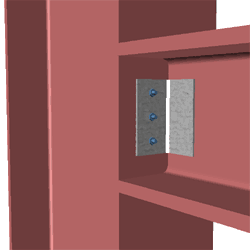
On the Other tab, illustrated to the right, I show that I have Added
the same Block twice and this would be for cases where you expect to have
more than one copy of the Block on your Structural Member. One example
of such a condition is a simple shear connector between a steel beam and a
steel column; since there is one plate on each side you can attach the Block
for one side and then again for the Mirrored side. |
 |
|
Structural
Members - Custom Blocks
 Once
you get to the point where you are looking at the Custom Block dialog
for a Structural Member Style, you should find that the options are
relatively self-explanatory and that it's not Attaching a Block that is the
problem but creating one that produces the results you seek. Once
you get to the point where you are looking at the Custom Block dialog
for a Structural Member Style, you should find that the options are
relatively self-explanatory and that it's not Attaching a Block that is the
problem but creating one that produces the results you seek.
Since you have three primary Positions
Along (x) to choose from and the option to move the Block relative to
those three positions, you should plan ahead for this when creating the
Block Insertion Point.
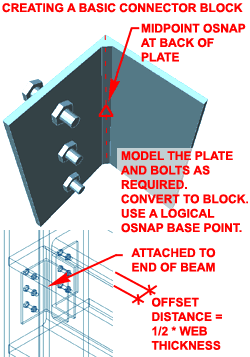
In the illustration to the left I show a
simple shear connector and Bolts that I created out of Mass Elements
to take advantage of Materials and Display Representations. It was
basically Modeled in place so I could see how it should be placed but you
can model these anywhere. I find it best to Extrude in the direction of
intended application ( vertically in this case ). For this connector,
using the Midpoint OSNAP, at the back corner of the angle plate, as the
Block Insertion Base Point works really well. Over on the
Custom Block dialog box you can see that all I had to do is calculate the
Y-axis Insertion Offset value to push the plate out of the Beam's Web (
Offset = 1/2 * Web Width ). To have this Block appear on the opposite
side of the Beam, I Added it again and used the "Mirror Y" checkbox
to flip it over to the other side. |
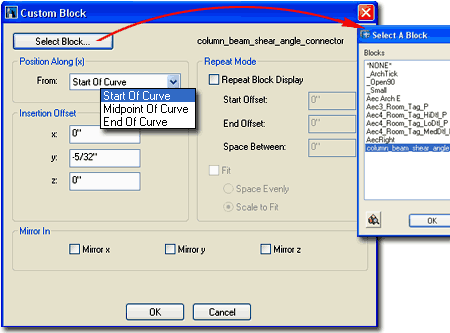
On the Custom Block dialog box you can use the
Repeat Mode to Array a Block along a Structural Member ( if Space
Between is set to zero, only one Block is used). This
option prevents you from having to Add the same Block several times when you
just want copies along one axis. The Fit option can Space
Evenly regardless of the actual Member Length and can thus produce
results where your Custom Block repeats beyond the Member. Scale to
Fit simply stretches one Custom Block and ignores the Space Between
Repeat setting.
Keep in mind that Adding a
Custom Block for one Display Representation only produces results whenever
the current Display Configuration uses that Display. This means that
you have to repeat the work for all other Display Representations in which
you want the Custom Block to Appear - now how frustrating is that?
Where's the "Apply to all Display Representations" check box like the one we
have for Muntins? Tip:
For Custom Blocks that you want to match the length of the Member such
as decorative classical columns, use the Repeat Block Display, leave all
values at zero but use the Fit with Scale to Fit option. |
|
8Structural Member
Shapes |
8-13 STRUCTURAL MEMBERS |
Structural Member Catalog
| Menu |
Format> Structural Member Catalog... |
 |
 |
| Keyboard |
MemberCatalog |
Creating or Importing New
Structural Members is relatively easy and even fun as long as the Member you
need is listed in the Structural Member Catalog. This catalog
is actually an .xml (eXtensive Markup Language) file that uses a
browser-like interface as illustrated to the right. This means that
all of the sizes and images are written in a code similar to .html and thus
opens the door for customization. The hope was probably that some day
we could point our Catalog Browser to manufacturer websites for up-to-date
framing member specifications but I have yet to see any evidence of this
manifesting anywhere. If you are a hacker, you can create your own or
customize the existing catalog which I have done simply to add missing
member sizes under the Timber category. You can open the .xml files
with Notepad but introducing new categories, sizes and images takes a bit of
knowledge about writing code.
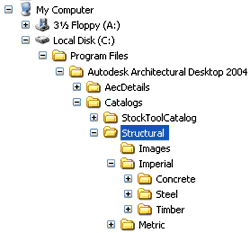 Ironically,
given the strict adherence to user profiles in most of ADT, the
Structural Member Catalog is stored, by default, under the Autodesk
Architectural Desktop 2004 sub-directory as illustrated to the right.
CAD or IT Managers may have or may want to relocate this catalog to the
office server and then all you have to do is point the browser to the new
location and it will remember it for the next use. Ironically,
given the strict adherence to user profiles in most of ADT, the
Structural Member Catalog is stored, by default, under the Autodesk
Architectural Desktop 2004 sub-directory as illustrated to the right.
CAD or IT Managers may have or may want to relocate this catalog to the
office server and then all you have to do is point the browser to the new
location and it will remember it for the next use.
|
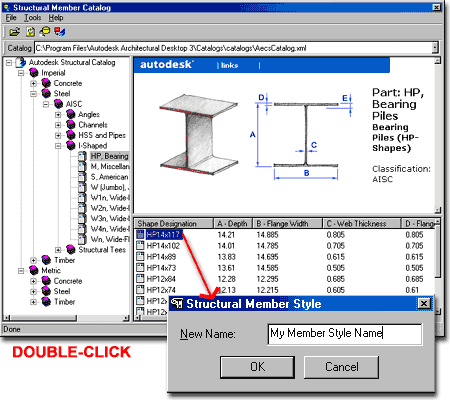
Once you have navigated your way to a Structural Member Shape that you want
to Import, you can double-pick,
right-click or use the Generate Member Style... button to activate the Structural
Member Style text box, illustrated to the above. You can
accept the default Name or Name your Member as you see fit for use in
your project. Since all Structural Member Shapes are equally
accessible under Columns, Beams and Braces, you may want to include
nomenclature to designate how it is to be used so you or someone else does
not accidentally use a Concrete Column as a Beam, for example. |
| Structural Member Catalog - basic concept. XML (eXtensive Markup Language) was developed by the World Wide Web
Consortium (W3C) and is a permutation of the ISO's SGML (Standard Generalized Markup
Language), used for large databases.
 Since I am not a database person, this is not one of my strong areas
but as I see the integration of XML in CAD, it offers a number of interesting and valuable
by-products. Since I am not a database person, this is not one of my strong areas
but as I see the integration of XML in CAD, it offers a number of interesting and valuable
by-products.
The first, and most important, is a common language that
spans the great divide between CAD to CAD and CAD to non-CAD. XML is an object based
language so information can be called in query fashion allowing non CAD programs to
utilize data for such things as Cost, Size, Manufacturer and Type.
The second by-product, part of the first, is that we are
working with a data language easily translated through the internet. This means that
it should be fairly easy to acquire data from manufactures for use in our CAD files.
I-drop, for example, uses .xml to allow us to drag blocks from manufacturer
sites such as Herman Miller.
If this all sounds like something we dreamed of in the past
with Blocks and Attributes, you are right. What makes this more likely to live up to
the hype is that it is not isolated to AutoCAD but is used by many other products. What
makes this questionable is that it hasn't become the "industry standard" yet and
like so many other languages, could be supplanted by yet another language.
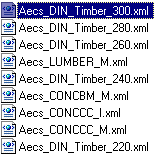
Illustrated to the right, is one of the Structural Member
Catalog files opened in Internet Explorer: "Aecs_DIN_Timber_300.xml"
You can open an XML file in either a browser or with Notepad. Within the file
is a lot of information to classify this particular object, including WC3 classification.
If you look carefully at one of these files, though, even a non-programmer can read
the data. |
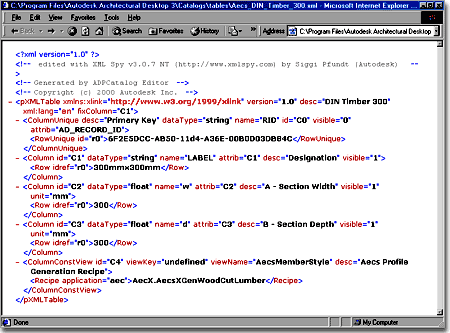 Illustrated below, I show a couple of lines
that provide the data for how Wide this wood member is: 300. Above,
after the word "unit", you can see that the width is defined in
Milimeters ( "mm" ).
<Column
id="C2" dataType="float" name="w" attrib="C2"
desc="A - Section Width" visible="1" unit="mm">
<Row idref="r0">300</Row>
You can learn more and even begin writing your
own XML code by visiting http://www.xmlspy.com |
Structural
Member Style Wizard
| Menu |
Format> Structural Member
Style Wizard... |
| |
|
| Keyboard |
MemberStyleWizard |
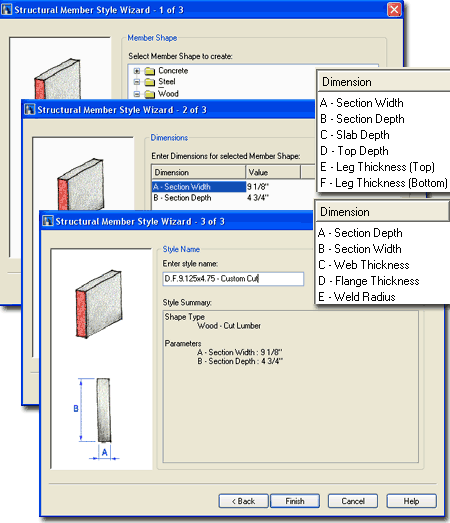
If the Structural Member Catalog does not
have the specific dimensions for a Member Shape that you need, you can use
the Structural Member Style Wizard to solve this problem.
Illustrated to the right I show how I have
used the Structural Member Style Wizard to create a custom
Cut Lumber (something I do more often than any of the
other options). I also show that under other Shapes you will find
different Dimensional options as they relate to the Shape.
Once you have run through the 3-step process,
the result is identical to having Imported a Structural Member Style from
the Catalog. You can add your new shape immediately by using the Add
Column, Add Beam or Add Brace tools. |
 |
Structural
Member
Shape
Define
| Menu |
Format>
Define Custom Member Shape |
| |
|
| Keyboard |
-MemberShapeDefine
(notice the dash) |
| Links |
Structural Member Styles - for working with Styles |
To create your own Member
Shape when it does
not fall into any of the predefined shape categories under the Structural
Member Style Wizard, you will need to use a Polyline and draw the
cross-sectional shape. For hollow shapes, you can use concentric
Polylines or off-center outlines as long as one is inside the other.
For Structural Member Shapes you have to use
the "-MemberShapeDefine" command (not the Profile command) which uses
no dialog box options and is entirely command line oriented as illustrated
in the steps below:
Command: _-AecsMemberShapeDefine
Shape [New/Copy/Edit/Purge/?]: N
New style name or [?]: Ionic_Column
New style Ionic_Column created.
Shape definition [Name/Description/Graphics]: G
Shape [plan Low detail/Plan/plan High detail]: P
Erase polyline? [Yes/No] <No>:
Select a closed polyline:
<Select Polyline>
Add another ring? [Yes/No] <No>:
Insertion Point or <Centroid>:
Shape [plan Low detail/Plan/plan High detail]: H
<See Comments>
Erase polyline? [Yes/No] <No>:
Select a closed polyline:
<Select Polyline>
Add another ring? [Yes/No] <No>:
Insertion Point or <Centroid>:
Shape [plan Low detail/Plan/plan High detail]: l
<See
Comments>
Base Point for Sketch Representation:
<Select Base Point to match
others>
Select lines, arcs, or polylines for Sketch Representation:
<Select Polyline>
Select lines, arcs, or polylines for Sketch Representation:
Shape [plan Low detail/Plan/plan High detail]:
Shape definition [Name/Description/Graphics]:
Shape [New/Copy/Edit/Purge/?]:
Command:
|
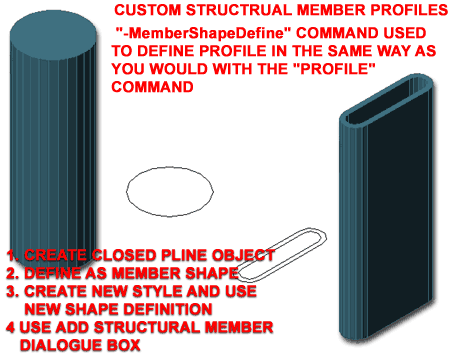
When going through the list of options within
the MemberShapeDefine command, the objective is fairly logical and
follows at listed below.
1. Use the New option to create a New Shape and Name it.
2. Use the Graphics option to assign or Select your Polyline(s).
3. Go through each of the "plan Low detail", "Plan" and "plan
High
detail" display representations and assign the Polyline(s) you want
displayed for each representation. If you are in a hurry, simply
reselect the same Polyline(s) for each.
4. The insertion point may need to be carefully chosen but I typically
default to "Centroid".
After Defining your custom Member Shape, you
will need to assign it as a Component to an existing or new Structural
Member Style. See the discussion directly below for information on
where to assign the Shape Name as a Component within a Structural Member
Style. |
Structural Member
Shape Assignment
| Alt.Menu |
Design> Structural
Members> Member Styles... |
 |
 |
| Keyboard |
MemberStyle |
| Links |
Structural Member Styles - for working with Styles |
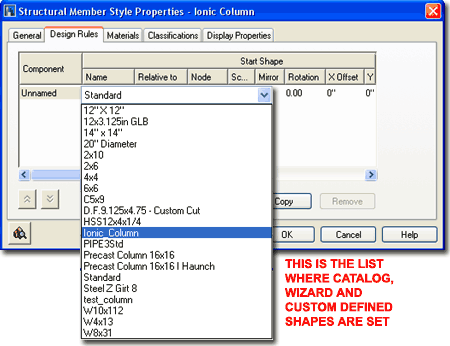
For all of the Shapes discussed in
this section, you will find that they only work if they are listed as a
Component in the Name drop-down list on the Design Rules tab
of the Structural Member Style Properties dialog as illustrated to
the right.
When using the Structural Member Catalog or
Style Wizard, you should find that not only do you Import a new Shape but
also a new Style where the Shape is automatically assigned for the Start and
End position.
When using the -MemberShapeDefine
command, however, nothing is created for you automatically and thus you have
to manually set the new Shape Name as a Component.
Since Structural Member Style Names
are not necessarily tied to the Shape Name, you can have several
different Style Names that all use the same Shape Name. This might be
advantageous for unique Materials, Classifications or Display Property
settings.
|
Be aware that when you create new Shapes, even
when you Import Member Shapes from
the Structural Catalog, no unique Materials, Classifications or Display
Properties are assigned and you may need to run through the Styles and
adjust these settings. If you find that you need all sorts of custom
Style Settings, you may find that using the Catalog just doesn't do the
trick and this will force you into creating a Structural Member Style file
similar to all of the other Style files for Doors, Windows, Slabs and so on.
You can then create a Structural Member Tool Palette. |
|
9Structural Members -
Customizing and Tricks |
9-13 STRUCTURAL MEMBERS |
Structural Member Tags
| Alt.Menu |
Document>
Scheduling> Data Format Styles... |
| Keyboard |
PropertyFormatDefine |
| Links |
Property
Set Definition Styles - for more on Property Set Definition Styles
and how they apply to Objects and Tags. |
I can't believe that I actually need to
discuss this topic but apparently someone left some important information
out of of the Structural Member Style Property Set Definition
that is required to produce results in the Structural Member Tag. You
should also be aware that when I dragged in my Structural Member Tag, it
inserted the Plan 1-100 Display Configuration which comes from ADT 3 - 3.3
and should be Purged out of the Tag Drawing File.
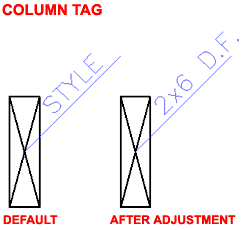 Illustrated
to the left I show what you are likely to get when you use any of the three
default Structural Member Tags and what is supposed to happen. The Tag
is supposed to extract the Style Name. Illustrated
to the left I show what you are likely to get when you use any of the three
default Structural Member Tags and what is supposed to happen. The Tag
is supposed to extract the Style Name.
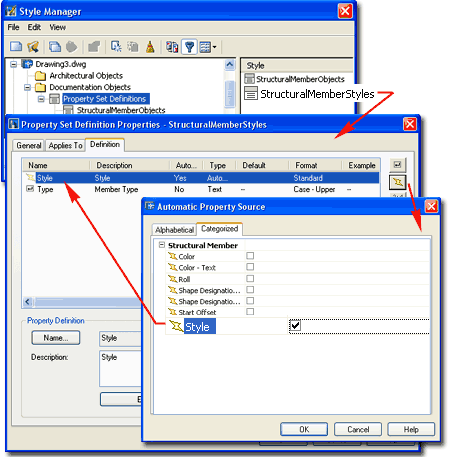
Illustrated to the right I show how you can
fix the problem. From the Property Set Definitions folder in
the Style Manager, locate the "StructuralMemberStyles"
Property Set and go to the Definition tab. Use the "Add
Automatic Property Definition" button to add the "Style" Property
Source as illustrated. The Format should be fine as the default
"Standard" so all you have to do is OK out and try tagging a
Structural Member. |
 |


 Whenever
I focus on the subject of Structural Members in ADT I always find a
smile surfacing on my face because this subject has to be treated with some
humor; i.e., they are funny. In my classes structural engineers always
get excited about this topic imagining fantastic features for details,
connectors, analysis and so forth and invariably they become disheartened in
no time at all. You see, these objects are little more than Profile
shapes extruded along paths with a sprinkle of ADT-like options and display
controls. There's nothing fancy about them at all but with each
release they improve a little.
 For local installations of ADT, you are likely to find the Imperial
or Metric Bar Joist and Member Styles in the Styles
Folder as illustrated to the left. The full path to this location may vary
but typically it is as illustrated. On a Network based installation of ADT, these
Styles should be on a captured drive (like "G:\office standards") or similar
location with a folder name that indicates Styles. Consult your CAD or IT manager if
you cannot locate the Styles Folder.
 Specify Roll on Screen - a drop-down
list offering a Yes or No option to controlling Roll with the Cursor as you
Add the Column. This is basically identical to Rotating Objects when
Inserting them.


 When you Add a Trim Plane,
one of the first things you have to determine is which end of your Structural Member is
the Start and which is the End. This, of course,
was determined when you created it but you may have forgotten.

 Trim
Planes right in place by using the right-click object-specific ( context
) menu. To use the Edit Trim Planes in-place mode, Select one
Structural Member, right-click to Select the Edit Trim Plane pop-up menu
option as illustrated to the left. Though I have an illustration
showing this mode while Shaded, I found that this is not an optimum setting
to work in so I recommend working in Wireframe.


 On the Design Rules tab of the Structural
Member Style Properties dialog box, illustrated to the right, you will find an
amazing set of control options such as that illustrated to the left. Make sure to
pick on the Show Details button so you can see the whole set of options
including the fact that you can specify one Shape for the Start and another for the
End.
You can also add multiple structural components together for composite forms such
as steel columns wrapped by concrete.
 Most of the options on the Design Rules tab should
be easy to comprehend but you may have to do a lot of trial and error work to figure out
exactly how different values affect your Structural Members. In the illustration to
the right, expanded by picking on it, hopefully you will be able to reduce your trial and
error time by looking at my trial and error graphics.


 Illustrated
to the left, is another way to access the Display Properties tab; select
the specific object, right click on your mouse
to invoke the object-specific pop-up menu and select Edit Object Display... Just
be aware that when you use this approach, you can actually set an Object Override as
opposed to a Style Override. Object Overrides can be extremely useful because they
allow you to add hatch patterns or change colors of any single object within a Style
Family but they can also be problematic because they lock you out from more centralized,
Style level, controls.
 Illustrated
to the right and left I show the basic list of Display Components for
Structural Member Styles in Plan. Though there are different
Display Representations for Plan, the list is virtually identical for each
one ( Plan Low Detail has less Components ). The difference you
may see between these Display Representations really has to do with how the
same set of Display Components are configured. This actually makes it
easier to understand since more detail may just mean that more Components
are Visible.


 you
may find that interesting graphical markers appear when using the default "Diagnostic"
Display Configuration. The Display Component that really has my
attention is the "Connection" which may well hint at things to come
in the future for Structural Members. For now, the Connection Display
Component is just a circular Marker that displays where ever the Curve
Display Component of two or more Members connect in space.
 whether
you use Style Overrides or the default settings. Illustrated to the
left I show a Column that is controlled By Material and a Beam and Brace
that are left in default mode ( using Color 145 ).
 Representation.

 Once
you get to the point where you are looking at the Custom Block dialog
for a Structural Member Style, you should find that the options are
relatively self-explanatory and that it's not Attaching a Block that is the
problem but creating one that produces the results you seek.
 Ironically,
given the strict adherence to user profiles in most of ADT, the
Structural Member Catalog is stored, by default, under the Autodesk
Architectural Desktop 2004 sub-directory as illustrated to the right.
CAD or IT Managers may have or may want to relocate this catalog to the
office server and then all you have to do is point the browser to the new
location and it will remember it for the next use.
 Since I am not a database person, this is not one of my strong areas
but as I see the integration of XML in CAD, it offers a number of interesting and valuable
by-products.


 Illustrated
to the left I show what you are likely to get when you use any of the three
default Structural Member Tags and what is supposed to happen. The Tag
is supposed to extract the Style Name.