PART 16
DESIGN CONTENT
Contents:
Design
Content - Access ---- Adding Design Content ---- Modifying Design Content ---- Design Content - Display ---- Design Content - Customizing and Tricks
|
|
PART 16 DESIGN CONTENT
Contents: |
| 1Design Content - Access | .1-16 DESIGN CONTENT | ||||||||||||
| Design Content Toolbar How do I get this toolbar? For most of the other Objects in ADT there is a rather logical path to accessing them but ironically when it comes to one of the most obvious sources of Content, the access is somewhat vague. There are no alternate pull-down menus and obviously no toolbars ( though you can use our PowerSTRIP to get the old ones back as per illustration right). The new Tool Palette is obviously going to replace the DesignCenter so that probably explains why accessing these Objects is a little out of the way right now - see comments below. |
 |
||||||||||||
 |
|||||||||||||
Design
Content Menus
As with Object Styles, Design Content can be found as separate folders under the Imperial or Metric folders in the DesignCenter. If you have trouble getting your DesignCenter to find these Objects, make sure the Custom tab is set and that the top item reads "Custom Applications" with a sub-category of "Architectural Desktop". See comment below for more on the location of Design Content. Once you find a symbol you like, simply drag-n-drop it into your drawing from the main list, NOT the Preview Pane. Need more help; see DesignCenter for Fixtures and Symbols below. |
 |
||||||||||||
Design
Content pull-down menu -
Content Path
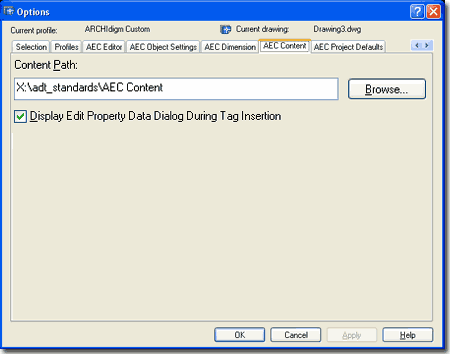
Illustrated to the right is the Options ( type "OP" ) dialog box with the AEC Content tab active. For offices that work off of a Network Server, it is fairly typical to have all of the Content located in a common folder on the Server so everyone has access to identical Design Content. Content Path - this is where you can set your ADT to see a common folder on an office's network server. By keeping all of the Content in one place, it's growth and change can be managed much better ( just like a block library ). Once changed, the icons will automatically look for this Path. This Path is Profile Specific so you can actually have different paths under different Profiles. Display Edit Schedule Data Dialog During Tag Insertion - this is one of those options that you wind up living with though you can turn it off so easily. Unchecking this option is much like making Attributes Preset upon insertion. To see what this thing does, try attaching a Window or Door tag to a Window or Door and look for the Edit Schedule Data dialogue box. Uncheck this and repeat the exercise. Then, decide which option is better. Unchecked, right? I leave it unchecked. |
 |
||||||||||||
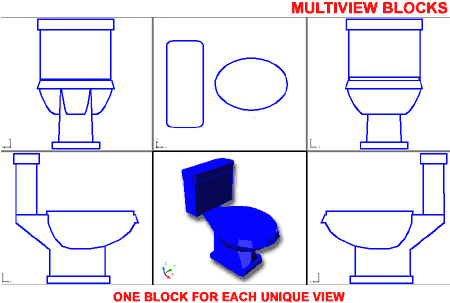
Design Content - Multi-View Blocks
Most of the Design Content in ADT involves using Multi-View
Blocks. For those familiar with the traditional AutoCAD Blocks, Multi-View
Blocks act as containers of many blocks in a fashion similar to nested blocks ( blocks
with other blocks in them ). The cool thing about Multi-View Blocks is that they can be designed to react based upon The part about Multi-View Blocks that is not so great is that since they are made up of multiple blocks, there are multiple places for mistakes when you make them. The file size for these objects is also much larger than just one 3D object. They are also not an "industry standard" making translation weak and finding libraries unlikely. |
 My personal hope is that we move away from this type of AutoCAD based logic and work with smarter objects much like ADT's native Walls, Doors, Windows and so forth that are controlled internally by the system. If we can get to that level, then we can rely on one object that not only adjusts correctly for various views, but can be used for many different scales ( more detail for scales near 1:1 and far less detail for scales near 1:100 ). Currently, you can add many blocks to your Multi-View blocks so that you not only have the various views but various Display Representations ( like Plan 1:50 and Plan 1:100 ) - that's a lot of blocks to keep track of. |
||||||||||||
| 2Adding Design Content | 2-16 DESIGN CONTENT | ||||||||||||
| DIVISION 1 | |||||||||||||
General
|
Illustrated to the left I show an example of how the Imperial based People can take advantage of the AecPolygon Style Display Properties to Solid Hatch across the surface and cover linework behind them. Unfortunately, whoever made the decision to use AecPolygons did not create a unique AecPolygon Style for these Objects and thus you must work with the Standard Style - which affects all other Objects using the Standard AecPolygon Style. I have not found that many ADT users actually use AecPolygons so you probably won't find this to be much of a problem. Maybe now you will become an AecPolygon user but you should also look into Mask Blocks that can be used to Hide or "Wipeout" ADT Objects. |
||||||||||||
| DIVISION 2 | |||||||||||||
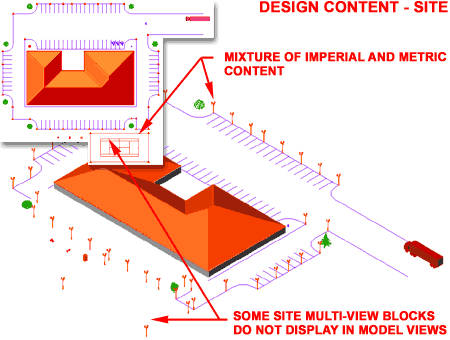
Site
On the topic of a more serious set of offerings, the parking solution is atrocious with no options to control or adjust sizes nor any options for labeling and counting. A better solution may be to use the the Area objects and then Anchor them to Layout Grids. Note: Even if your project is in Imperial
units, you may want to look in the Metric folder for other Site objects that may be of use
to you. The Metric folder has a variety of other objects that are actually better. |
|
||||||||||||
| DIVISION 11 | |||||||||||||
Equipment
For those few MvBlocks that have Attributes, you can use the Attributes dialog on the Properties Palette to make changes to the text. With exception of a handful of Objects, these are all 3D and will display different View Blocks for the primary view directions.
|
 To make these MvBlocks a little more presentable, I like to use fixed Color assignments on the 3D Model View Block which will not affect the other View Blocks that can remain as "ByBlock". you can read more about this trick under "Modifying Multi-View Blocks without Exploding" For more options on kitchen cabinetry and custom MvBlocks or much higher quality, you can look into getting our Kitchen Cabinets 4 eKit. |
||||||||||||
| DIVISION 12 | |||||||||||||
Casework -
12300
These objects are Multi-view blocks and will display differently for Plan, Reflected Ceiling and Elevation views. For information on the Custom Wall Styles use for the Casework, read more under Walls.
|
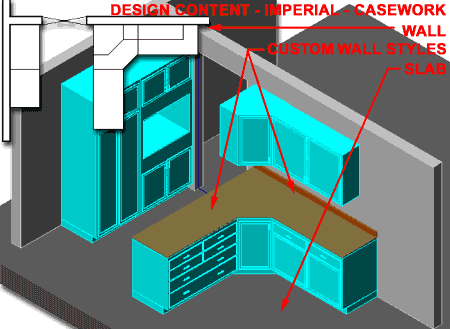
|
||||||||||||
Furniture
- 12500
Unfortunately, for those seeking other furniture or similar furniture with slight modifications, the choir is a beast to bear and you may find that Exploding once is actually your best alternative. In some cases you may be able to use an X, Y or Z scale value, via the Properties dialogue box, to make a piece of furniture longer, shorter and/or taller. On many of these objects, you may not be able to distinguish the front from the back in Plan View. The insertion point ( also displayed by the Grip ) is usually at the back for alignment with other objects like Walls. |
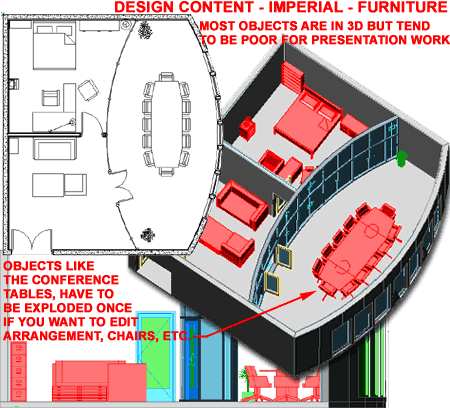
To create your own Multi-View furniture, read Creating Multi-View Blocks |
||||||||||||
| DIVISION 14 | |||||||||||||
Conveying
When you import one of these 3D Elevators, you also acquire new Objects Styles that you can assign Materials to to improve the presentation quality. If you need to modify either of these two Objects, you can use the Explode command repeatedly until you get down to the basic Objects ( this is typically three times for MvBlocks ). Of course you can also use the Refedit command on the 3D Model View Block as discussed below. Note: You can create your own ladders using a Curtain Wall Style. |
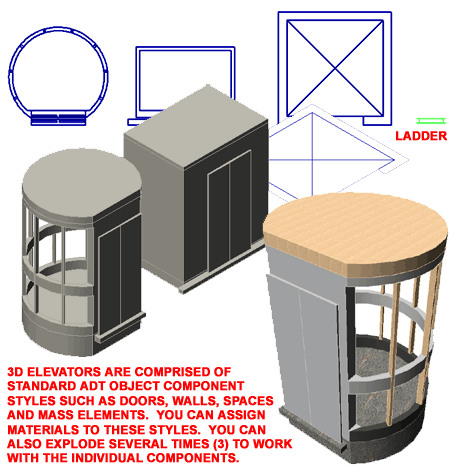 |
||||||||||||
| DIVISION 15 Mechanical | |||||||||||||
Plumbing Fixtures
- 15400
The Plumbing Fixtures include common items for residential Kitchens and Bathrooms as well as ADA compliant Layouts for commercial, hospitality and other public bathroom designs. The assortment is fairly extensive with a diverse list of offerings but there are numerous problems with many of these Multi-View Blocks. One of the more surprising aspects of these objects is that, despite the Plumbing (2D) folder, many of the Multi-View Blocks are actually not 3D at all and can cause quite a bit of frustration when you expect 3D results; an example is the |
 Lavatory selection which is mostly 2D and these objects end up on the floor rather than at typical counter top height. By using the Properties dialogue box you can quickly set an accurate Z-axis Value for these objects. On more serious objects, such as Tubs and Showers for custom residential design, not only are the options quite poor but inflexible for designers. I recommend using Slabs and Walls for Showers and Slabs or Mass Elements for custom tubs ( use Boolean Subtraction for negative tub space ). Creating custom Multi-View blocks is always an option but tends to consume a tremendous amount of time. Note: for a fairly good 3D Lavatory, you may want to use one from the Metric "Basin" folder under Bathroom. For information on Fixture Layouts, see comments below under Adding Bathroom Fittings - metric. |
||||||||||||
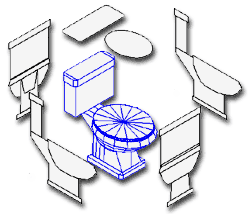
Bathroom
Layouts
The Layouts folder contains a short but useful variety of Commercial fixtures; including ADA (disabled) compliant toilet stalls, an assortment of lavatories and urinals. Illustrated to the right are a few of the fixtures that you can use. Some of these fixtures have some unexpected surprises; the lavatories, for example, do not employ 3D sinks but 2D sinks on top of 3D countertops. |
 To correct some of the Fixture Layout design flaws and to allow for object rearrangement, you can Explode the Fixture block to gain access to the individual Multi-View blocks within it. In other words, the Fixture Layouts are Blocks with Multi-View blocks nested inside. Exploding these, just once, will not harm the product. |
||||||||||||
Air
Distribution - 15800
The ceiling fixtures will come in at whatever Z-axis elevation your current UCS icon is set to so if you want them at the correct ceiling heights, you may want to use a Ceiling Grid that has been set to the right elevation and then OSNAP to it. |
 Tip: If you turn off all OSNAPS except Node, working with Ceiling Grid Fixtures can prove to go a lot faster than by using Intersection. |
||||||||||||
Piped and Ducted Service - metric only
|
 |
||||||||||||
| DIVISION 16 | |||||||||||||
Electrical
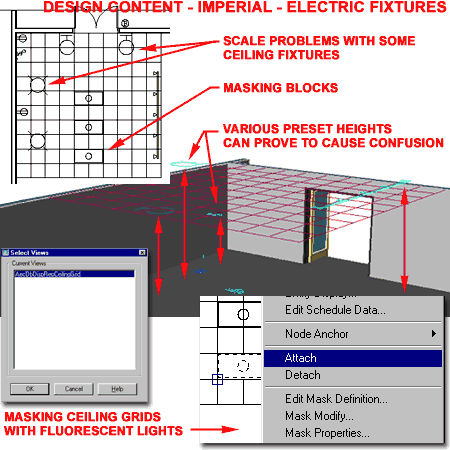
There are a few aspects of these symbols that may cause some confusion and irritation. Most are not in 3D form and in cases where you may want a 3D representation, it comes as a separate object rather than as a Multi-View Block with a proper representation for plan view. Some of these objects come in at pre-specified heights that may not be right for your design needs. The scale of these objects is based upon the Drawing Scale and seems dramatically different for Ceiling objects and Plan objects ( compare Switch symbols with a Ceiling Light fixture, for example ). The Electric Services folder ( Metric ) is very similar to that for the Imperial users. See comments above for Electric Fixtures ( Imperial ). An interesting aspect of the Metric symbols is that there are a lot more to choose from resulting in a more developed library; a case that is echoed for many of the symbol folders. |
|
||||||||||||
| 3Modifying Design Content | 3-16 DESIGN CONTENT | ||||||||||||
Modify Multi-View Blocks
Properties Palette
Illustrated to the right I show the Properties Palette and the basic list of options and settings that all Multi-View Blocks offer.
SCALE
LOCATION |
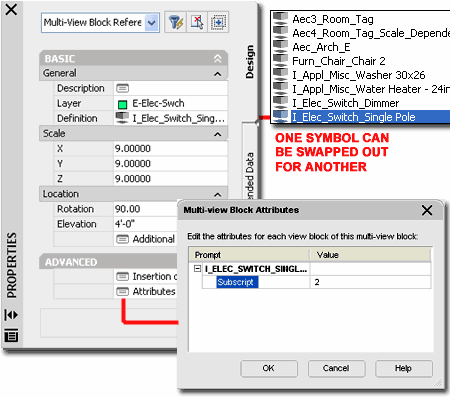
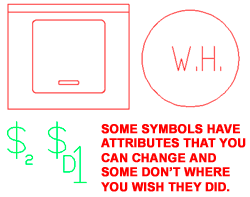
ADVANCED Attributes - All Multi-View Blocks will offer this dialog box but not all MvBlocks have Attributes associated with them. Illustrated above and to the left I show that the default Single Switch can actually be set to display as a 3 way or have other Subscripts. On the other hand, the Dimmer Switch seems to have a scale problem with its Subscript offering. I recommend that make a habit of checking for Attributes whenever you find that you could use one. If you don't find any, you can add your own Attributes as discussed in Part 25 - AEC Blocks - Profiles -> Creating Attributed Multi-View Blocks. |
||||||||||||
| Multi-View
Block Properties Palette - Location dialog
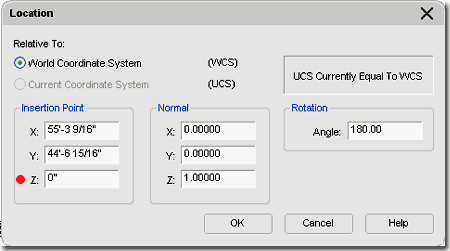
Illustrated to the left, I show how some 3D Design Content objects come in sitting on the floor plane when they should sit at a more appropriate height to match where and what they are used for. Left, I show how a common kitchen sink can be set to the correct counter top height by using the Z-axis Insertion Point value on the Location tab of the Multi-View Block Reference Properties dialogue box, illustrated right. |
 |
||||||||||||
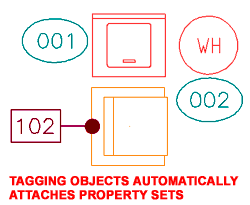
Multi-View Block - Extended Data
If you already intend to Tag your Multi-View Blocks, then some Property Sets are automatically Attached for you but this does not mean you can't Attach other Sets for use in your Schedules. |
 |
||||||||||||
|
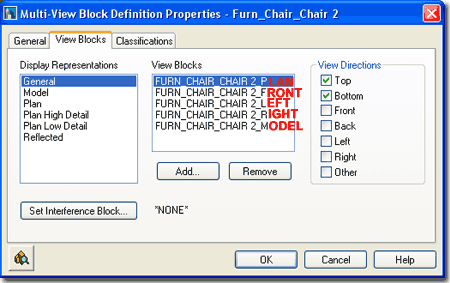
Multi-View Block - Definition Properties
dialog
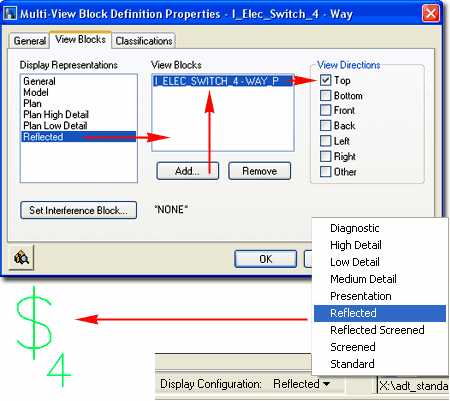
Beyond using the Classifications for advanced organization, the primary purpose of working with the View Blocks tab would be to adjust the Blocks that you see under different Display Representations. A great example of what I am referring to here is how the default Electrical Switch Multi-View Blocks do not display under the Reflected Display Configuration - see discussion below. |
 |
||||||||||||
| Display & Behavior Changes to ADT Multi-view Blocks If you like to show your Electrical Switch Multi-View Blocks on your Reflected Ceiling Plans, as I do, you will need to make this modification to ADT's default Multi-View blocks because they are set to not display in RCP's. By using the same block ADT uses for Plan View on the General Display Representation, you can Add it to the Reflected Display Representation and orient it for Top View. The blocks for the various view directions will have names that are very similar with exception of the last letter which indicates view direction; such as "P" for Plan and "L" for Left and Right view and "M" for Model. In the case of the dimmer switch or regular switch you should see a block name such as "I_ELEC_SWITCH_DIMMER_P" or "I_ELEC_SWITCH_4-WAY_P". If you want to make this a permanent change for the DesignCenter, you can edit the source Multi-View block by opening it directly. It's just a drawing file residing in the folder you see in the DesignCenter. Once you have it opened, you can repeat this example and save the file. Another change you might want to make, is to Add... the 3D switch Block, from the same directory, on all your Switch Multi-view blocks. |
 |
||||||||||||
Modifying Multi-View Blocks without Exploding
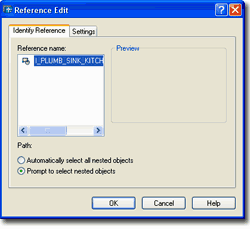
Illustrated to the right I show a default Kitchen Range from the Design Content Library in ADT. As with most MvBlocks in ADT, the 3D Model View is completely monotone and acquires its colors from the "ByBlock" Property option but that typically looks pretty bad in presentation drawings. If you use the Insert command and look for the Model View Block for this or similar MvBlocks, you can insert it off to the side of your drawing file and make changes, like Color settings, using the RefEdit command. Such changes only affect the Model View of the MvBlock and will not affect the other View Blocks so your Construction Documents should be fine because they typically use the Top (Plan) and Side (Front, Right, etc.) 2D Blocks. If you decide that an MvBlock needs more editing than Color settings, you will probably need to Insert all View Blocks and modify each one one-at-a-time. In the illustration to the right I show that I have decided to lower the back panel of my example Kitchen Range. In order to make this modification work for all View Directions on the MvBlock, I have to RefEdit all of the View Blocks associated with the MvBlock. The names are usually fairly easy to distinguish; such as: "I_Appl_Range_Range 30x26_M" for the Model View Block. When Inserting the various View Blocks, you should find that they stand up from the World Plane and face the direction of the intended view orientation. The only problem you may face with the orientation of the various View Blocks is when you attempt to modify them. Typically, it is best to orient the UCS icon to match the object you are modifying. |
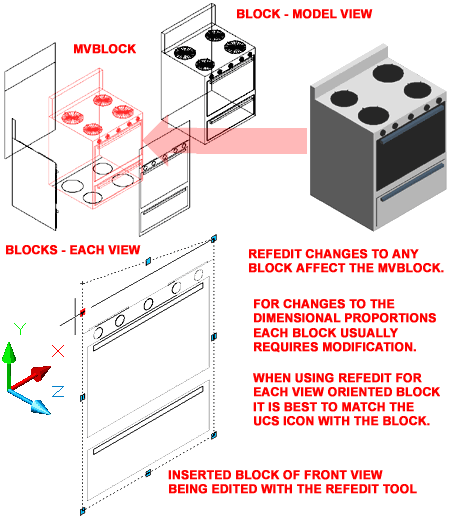
To RefEdit a Block, simply double-pick on a Block to invoke the Reference Edit dialog ( illustrated above left ). Select the OK button on the Reference Edit dialog and you should find that you may now modify the Objects within the Block. Use the RefClose command or button on the Refedit toolbar to end your session and when the AutoCAD alert dialog pops up to warn you about "All reference edits will be saved", respond by Selecting the OK button. This action will modify the View Block inside the associated MvBlock and if you view that MvBlock from the direction the View Block was design for, you should see the changes. |
||||||||||||
| 4Design Content - Display | 4-16 DESIGN CONTENT | ||||||||||||
|
Multi-View Blocks
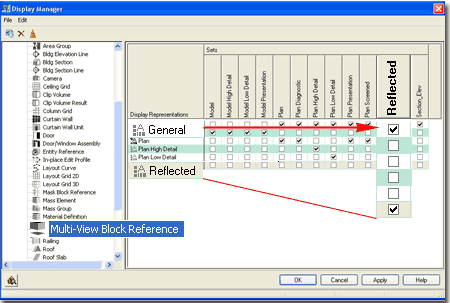
- Display Manager As discussed earlier, Multi-View Blocks do not have a lot of options to work with on the Properties dialog and that is because they don't utilize Styles. Without Styles, you don't have much to work with in the Display System so when you Open the Display Manager Window and look under Multi-View Block Reference, as illustrated to the right, you will find that you cannot Modify any of the Display Representations. If you look carefully at the list of Display Representations and then compare that list to the one for any Multi-View Block on the Properties dialog ( see above right), you should find that the list is identical. Therefore, the way MvBlocks use these pseudo-Display Representations is by having Associated View Blocks for each one. By the way, by Duplicating any of the existing Display Representations, you can actually create your own should you want to introduce new pseudo-Display Representations for your MvBlocks. Illustrated to the left I show how you can use the Display Manager Window to access the Representation by Object Folder and find the Multi-View Block Reference category. To turn on All Multi-View Blocks in your Reflected Display Configuration, for example, you can check the General column for the Reflected Set. Knowing this trick can be quite useful when designing things like lighting that relates to furniture or other MvBlock Objects. |
 |
||||||||||||
| 5Design Content - Customizing and Tricks | 5-16 DESIGN CONTENT | ||||||||||||
DesignCenter for Fixtures and Symbols
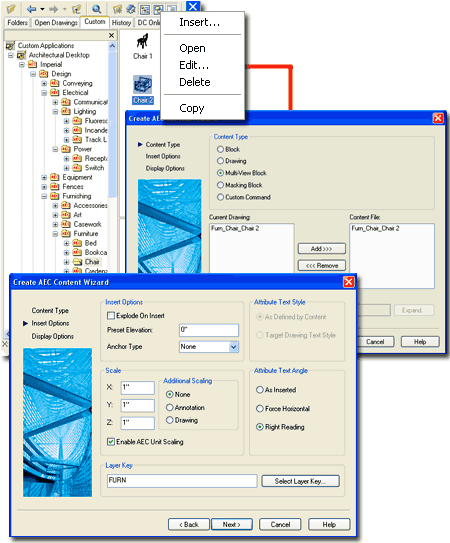
Though you can use Tools on the Tool Palette to Insert Design Content, those tools may not prove to be as effective or as flexible as working with the DesignCenter. The reason why Objects brought in through the DesignCenter offer more features has to do with the AEC Content Wizard and how it was designed to program unique properties into the Content. Illustrated to the right I show the DesignCenter and how a right-click over and Object with the mouse activates a pop-up menu that offers two rather useful options: Open and Edit. In the illustration to the right I show that I have Selected the Edit... menu option for a Multi-View Block of a Chair. On the second dialog of the "Create AEC Content Wizard", you can see some of the special properties that it can assign to Objects like Multi-View Blocks. One of the most useful options on this dialog is the Layer Key setting that you can use to pre-assign or "key" your Multi-View Block to a specific Layer upon Insertion. Another very useful option is related to Annotation where you can scale according to the Annotation Plot Size or Drawing Scale as set on the Drawing Setup dialog. Notice that you can also force Attributes within Multi-View Blocks to remain Horizontal. You can read more about these features in Part 25 - AEC Blocks - Profiles. |
 |
||||||||||||
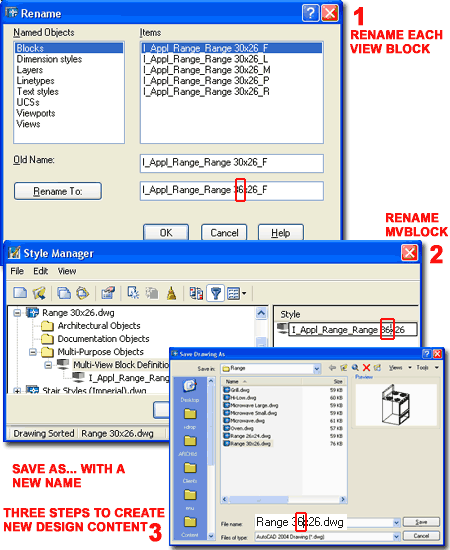
Creating
New Design Content from Existing Content
Illustrated to the right I show the three steps required to make New Design Content out of Existing Design Content. After Opening a specific Design Content File such as a Range, use the Rename command to change all of the Block Names to something unique. In the illustration to the right I show that I intend to create a new Range that is 36" Wide instead of the default 30" Wide so I am changing the "30"'s to "36"'s for each Block Name ( Copy Paste works really well for this type of work ). After Renaming all of the View Blocks, use the MvBlockDefine command to access the Style Manager as illustrated in Step 2, right. Rename the Style Name to something unique. The final step in creating new Content is to use the Save As... option to save the new Object to the same Folder as the original but with a unique Name. Okay, I lied, that's not all you have to do to create New Design Content. You have to make it different by Modifying it but I thought that was obvious. So, to continue with this example, you can now use the RefEdit command to make changes to each of the View Blocks as discussed under Modifying MvBlocks without Exploding. |
 |
© Copyright 2001- 2004 ARCHIdigm. All rights reserved.

 the view orientation. This is why you will notice that
many change
appearance when viewed from the Top, Left, Right, Back, Front, Bottom and in Isometric.
One of the reasons this technique was employed in ADT was to satisfy the desire of
architects and designers to represent one object differently in different types of
drawings; in Floor Plans we often simplify objects for easier reading while in Interior
Elevations we show more detail.
the view orientation. This is why you will notice that
many change
appearance when viewed from the Top, Left, Right, Back, Front, Bottom and in Isometric.
One of the reasons this technique was employed in ADT was to satisfy the desire of
architects and designers to represent one object differently in different types of
drawings; in Floor Plans we often simplify objects for easier reading while in Interior
Elevations we show more detail.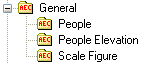 Under
the CSI Division 01 - General category, you will find some folders
with confusing titles that all appear to refer to the same thing: People.
Illustrated to the right I show a few samples of what you can expect to find
within these three folders and one example of the Metric equivalent which,
by the way, was defective and didn't work until I fixed it ( girl with
umbrella 2D Human (6) ).
Under
the CSI Division 01 - General category, you will find some folders
with confusing titles that all appear to refer to the same thing: People.
Illustrated to the right I show a few samples of what you can expect to find
within these three folders and one example of the Metric equivalent which,
by the way, was defective and didn't work until I fixed it ( girl with
umbrella 2D Human (6) ). Not
to start this overview of the Design Content on a bad note but it is a bit
unfortunate that I had to start with the Division 01 Content since it is
fairly poor in scope and quality. The 3D Figures amount to two and the
wheelchair has no figure in it when viewed in 3D but does when viewed from
Plan. Generally, the 2D High and Low Detail People/Figures are
acceptable. Metric users need to be aware that their "Humans" were not
created with AecPolyline Objects and thus do not have the option to Fill in
when Shaded or have Hatch Patterns in them for normal display.
Not
to start this overview of the Design Content on a bad note but it is a bit
unfortunate that I had to start with the Division 01 Content since it is
fairly poor in scope and quality. The 3D Figures amount to two and the
wheelchair has no figure in it when viewed in 3D but does when viewed from
Plan. Generally, the 2D High and Low Detail People/Figures are
acceptable. Metric users need to be aware that their "Humans" were not
created with AecPolyline Objects and thus do not have the option to Fill in
when Shaded or have Hatch Patterns in them for normal display.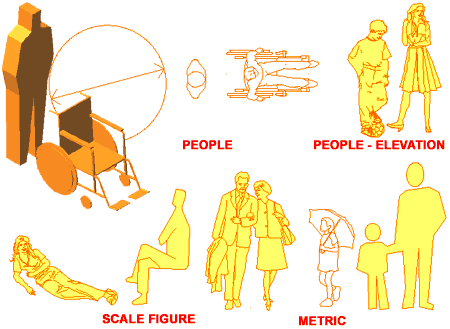
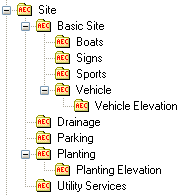 Both
the Imperial and Metric Design Content folders have a Site sub-folder
but the type and quality of the MvBlocks hardly warrant our time to discuss
this topic. If you happen to find something you need in these folders
then you are fortunate, but the obvious sloppy efforts really should be
exposed for what they are. If you look under the Metric Boats,
for example, you will only find two boats but they happen to be in 3D while the Imperial
folder has many more boats but they are all in 2D. The Imperial folders offer no
street lights but the Metric folder does and they are fairly good; as are the street
furniture offerings.
Both
the Imperial and Metric Design Content folders have a Site sub-folder
but the type and quality of the MvBlocks hardly warrant our time to discuss
this topic. If you happen to find something you need in these folders
then you are fortunate, but the obvious sloppy efforts really should be
exposed for what they are. If you look under the Metric Boats,
for example, you will only find two boats but they happen to be in 3D while the Imperial
folder has many more boats but they are all in 2D. The Imperial folders offer no
street lights but the Metric folder does and they are fairly good; as are the street
furniture offerings.
 When you view the Parking Multi-View Blocks, they don't behave like Multi-View
Blocks at all and thus if you want to at least see the linework in a 3D View, you have to
add the Block yourself - Select a Parking object, right-click and select "
When you view the Parking Multi-View Blocks, they don't behave like Multi-View
Blocks at all and thus if you want to at least see the linework in a 3D View, you have to
add the Block yourself - Select a Parking object, right-click and select " The
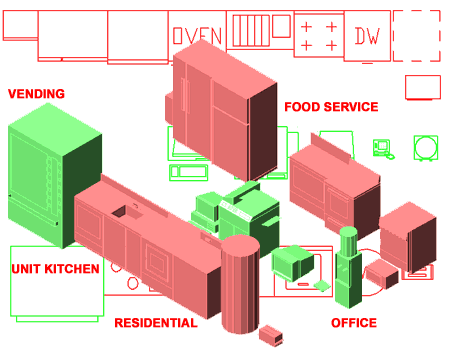
Equipment folder ( Imperial )
has a group of sub-folders for Vending - 11120, Food Services - 11400,
Residential - 11450, Unit Kitchens - 11460 and Office - 11680. The
content of these folders is rather light in variety and appears to provide
the bare minimum one would expect. Most of these old Softdesk Blocks
are outdated and embarrassing to to use in presentation work. They
tend to be okay for Plan and Section/Elevation drawings.
The
Equipment folder ( Imperial )
has a group of sub-folders for Vending - 11120, Food Services - 11400,
Residential - 11450, Unit Kitchens - 11460 and Office - 11680. The
content of these folders is rather light in variety and appears to provide
the bare minimum one would expect. Most of these old Softdesk Blocks
are outdated and embarrassing to to use in presentation work. They
tend to be okay for Plan and Section/Elevation drawings. The Kitchen Fittings
folder ( Metric ) offers a less extensive set of objects under the
Appliances folder than what you will find in the Imperial equivalent.
In addition to Appliances this Metric folder also contains other objects
used for common Kitchen layouts such as Sinks and Cabinetry
The Kitchen Fittings
folder ( Metric ) offers a less extensive set of objects under the
Appliances folder than what you will find in the Imperial equivalent.
In addition to Appliances this Metric folder also contains other objects
used for common Kitchen layouts such as Sinks and Cabinetry The Casework folder ( Imperial ) offers a
fairly
large set of cabinetry options but most designers will soon discover how basic these
options really are. And this has a lot to do with how vast the world of cabinetry
really is. This is why we like Sweets and numerous other Catalog sources so you will
probably have to use these as schematic examples and do the details in the traditional linework way. Creating your own is a good, but time consuming, option.
The Casework folder ( Imperial ) offers a
fairly
large set of cabinetry options but most designers will soon discover how basic these
options really are. And this has a lot to do with how vast the world of cabinetry
really is. This is why we like Sweets and numerous other Catalog sources so you will
probably have to use these as schematic examples and do the details in the traditional linework way. Creating your own is a good, but time consuming, option.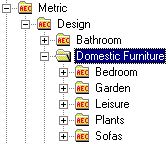 The Domestic Furniture folder ( Metric ) offers
objects similar to those found for Furniture ( Imperial ). See comments for the
Imperial objects.
The Domestic Furniture folder ( Metric ) offers
objects similar to those found for Furniture ( Imperial ). See comments for the
Imperial objects.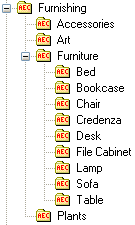 The Furniture folder is a parent folder for a whole
suite of sub-folders that include everything from Beds to Plants. This whole
library appears to be straight from the Softdesk Block library and will thus offer no
major surprises to users of Auto-Architect. Overall these Multi-View Blocks
are okay and function well with insertion points on the floor and good simple views for
interior elevations and sections ( see lower right ).
The Furniture folder is a parent folder for a whole
suite of sub-folders that include everything from Beds to Plants. This whole
library appears to be straight from the Softdesk Block library and will thus offer no
major surprises to users of Auto-Architect. Overall these Multi-View Blocks
are okay and function well with insertion points on the floor and good simple views for
interior elevations and sections ( see lower right ).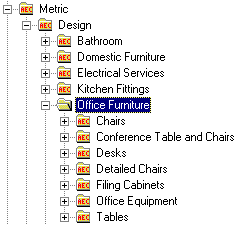 If you have old Blocks from past libraries, don't
hesitate to use them. Though they may not be as fancy, have multiple views and
adhere to Display Characteristics, they may just save you hours of labor while someone
else can focus on making cool 3D furniture.
If you have old Blocks from past libraries, don't
hesitate to use them. Though they may not be as fancy, have multiple views and
adhere to Display Characteristics, they may just save you hours of labor while someone
else can focus on making cool 3D furniture.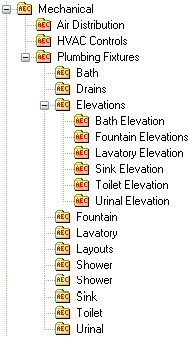 The Plumbing Fixtures folder ( Imperial ) is
a sub-folder of the Mechanical folder but includes quite an extensive list
its own sub-folders for Content that ranges from 3D Bathtubs to 2D
Elevations of drinking Fountains.
The Plumbing Fixtures folder ( Imperial ) is
a sub-folder of the Mechanical folder but includes quite an extensive list
its own sub-folders for Content that ranges from 3D Bathtubs to 2D
Elevations of drinking Fountains.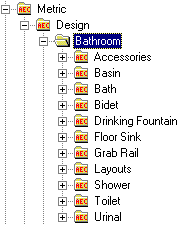 Both
the Imperial and Metric Design Content Folders have a sub-folder for
Bathroom Layouts. You will find this section under the Mechanical CSI
Division for the Imperial Content but under the Bathroom folder for Metric
Design Content ( as illustrated to the left ). See comments above for information on residential fixtures.
Both
the Imperial and Metric Design Content Folders have a sub-folder for
Bathroom Layouts. You will find this section under the Mechanical CSI
Division for the Imperial Content but under the Bathroom folder for Metric
Design Content ( as illustrated to the left ). See comments above for information on residential fixtures.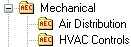 The
Air Distribution and HVAC Controls folders are sub-folders of the Mechanical
CSI Division. Within these two folders there are a sum total of six Objects
including 3D Ceiling Fans. All of these objects are
Multi-View Blocks that are set to display in Reflected Plans and thus
will not show up when inserted in Views that are currently set to Display Representations
like Standard or Medium Detail.
The
Air Distribution and HVAC Controls folders are sub-folders of the Mechanical
CSI Division. Within these two folders there are a sum total of six Objects
including 3D Ceiling Fans. All of these objects are
Multi-View Blocks that are set to display in Reflected Plans and thus
will not show up when inserted in Views that are currently set to Display Representations
like Standard or Medium Detail.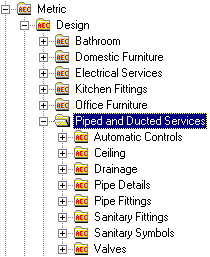 The
Metric Piped and Ducted Services folder contains most of the Objects from
the Air Distribution folder, discussed above, but the rest of the Content is
mostly comprised of 2D symbols that related to the various folder titles.
These symbols are unique to the Metric Content.
The
Metric Piped and Ducted Services folder contains most of the Objects from
the Air Distribution folder, discussed above, but the rest of the Content is
mostly comprised of 2D symbols that related to the various folder titles.
These symbols are unique to the Metric Content.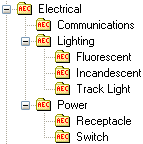 The
Electrical folder (Imperial) has two sub-folders for Power
- 16200, Lighting - 16500 and Communications - 16700. Within these
folders you will find more folders for specific Content such as Fluorescent
lights. Because many of these fixtures, like the Incandescent and
Track Lights are designed for Reflected Ceiling Plans, they will only display
when the current Display Configuration uses their Reflected Display
Representations. Other fixtures, like Switches, only display
in non-reflected Display Configurations.
The
Electrical folder (Imperial) has two sub-folders for Power
- 16200, Lighting - 16500 and Communications - 16700. Within these
folders you will find more folders for specific Content such as Fluorescent
lights. Because many of these fixtures, like the Incandescent and
Track Lights are designed for Reflected Ceiling Plans, they will only display
when the current Display Configuration uses their Reflected Display
Representations. Other fixtures, like Switches, only display
in non-reflected Display Configurations.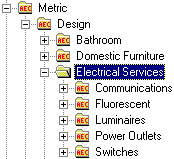 Note: When Electric Fixtures, like the
Fluorescent Lights, are dragged in from the DesignCenter, make sure to use the "Select
Layout Node" option to Anchor the fixture to the Ceiling Grid object.
You should find this comment stated on the command line once the fixture has been dragged
in. If you ignore this option, you will not be able to Mask with the fixture nor
take advantage of the Anchoring features that save a lot of time in labor. To repair
a lost Anchor use the Node Anchor tool - see Node
Note: When Electric Fixtures, like the
Fluorescent Lights, are dragged in from the DesignCenter, make sure to use the "Select
Layout Node" option to Anchor the fixture to the Ceiling Grid object.
You should find this comment stated on the command line once the fixture has been dragged
in. If you ignore this option, you will not be able to Mask with the fixture nor
take advantage of the Anchoring features that save a lot of time in labor. To repair
a lost Anchor use the Node Anchor tool - see Node 
 Most
Design Content is in the form of Multi-View Blocks so we can defer the
discussion of Modifying these items to
Most
Design Content is in the form of Multi-View Blocks so we can defer the
discussion of Modifying these items to 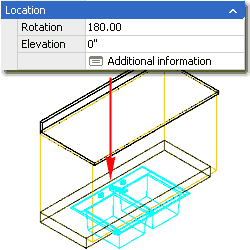 On the Location tab of the Multi-View Block
Reference Properties dialogue box, you will find Insertion Point value fields
that you can use to adjust the position of a Multi-View block should its default Insertion
Point prove to be undesirable.
On the Location tab of the Multi-View Block
Reference Properties dialogue box, you will find Insertion Point value fields
that you can use to adjust the position of a Multi-View block should its default Insertion
Point prove to be undesirable.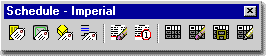
 To
get a little more return on your investment in using Multi-View Blocks, you
can take advantage of the option to attach Property Sets via the Extended
Data tab on the Properties Palette. In some respects you can think of
this as the next generation of Attributes where the data can be linked to
symbols such as Tags or Schedule Tables.
To
get a little more return on your investment in using Multi-View Blocks, you
can take advantage of the option to attach Property Sets via the Extended
Data tab on the Properties Palette. In some respects you can think of
this as the next generation of Attributes where the data can be linked to
symbols such as Tags or Schedule Tables. 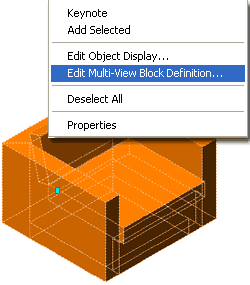 When
you Select a Multi-View Block and activate the Context pop-up menu,
illustrated left, you won't find much to work with. The "Edit
Multi-View Block Definition..." menu option activates the Properties dialog
illustrated to the right where you can work with the View Blocks and/or
Classifications.
When
you Select a Multi-View Block and activate the Context pop-up menu,
illustrated left, you won't find much to work with. The "Edit
Multi-View Block Definition..." menu option activates the Properties dialog
illustrated to the right where you can work with the View Blocks and/or
Classifications.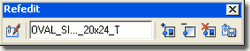
 At
times you may find that the default Design Content in ADT lacks a bit of
design quality or is a bit off dimensionally. By using the RefEdit
tool, you can make fairly short work of modifying Multi-View Blocks.
You can employ this technique to any MvBlock in your current drawing or Open
the original source file, RefEdit it and then save it for a permanent change
to your library.
At
times you may find that the default Design Content in ADT lacks a bit of
design quality or is a bit off dimensionally. By using the RefEdit
tool, you can make fairly short work of modifying Multi-View Blocks.
You can employ this technique to any MvBlock in your current drawing or Open
the original source file, RefEdit it and then save it for a permanent change
to your library.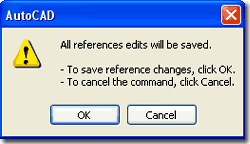 Hopefully you know how to rotate your UCS icon but just in case you don't,
type "UCS" on the command line followed by the letter of the Axis you
want to Rotate about ( such as "X" ) and then conclude by specifying
the angle of rotation ( such as "90" ). To put the UCS icon
back to its default orientation, type "UCS" and then "W".
Hopefully you know how to rotate your UCS icon but just in case you don't,
type "UCS" on the command line followed by the letter of the Axis you
want to Rotate about ( such as "X" ) and then conclude by specifying
the angle of rotation ( such as "90" ). To put the UCS icon
back to its default orientation, type "UCS" and then "W". Sometimes
existing Design Content is well suited to become New Design Content much
like some drawings are well suited to be modified and Saved As... a new
file.
Sometimes
existing Design Content is well suited to become New Design Content much
like some drawings are well suited to be modified and Saved As... a new
file.