There are a few basic concepts that must be understood in order to create successful Wall Endcap Style and they are as follows:
Endcap Styles can only be created from non-closed Pline shapes.
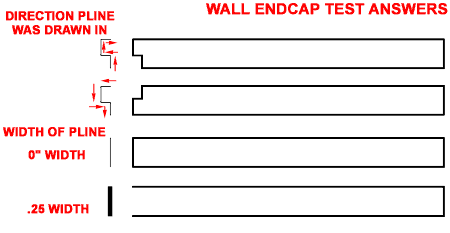
Endcap Styles read the direction in which the Pline shape was drawn to determine the direction in which to apply the Endcap to a Wall.
In many cases, you will need separate Pline shapes for each component within one Wall Style.
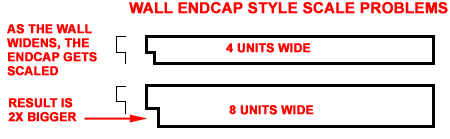
Wall Endcaps Styles scale proportionally to the Component Index Width they are associated with so it is not always possible to make one Endcap Style work for variable width Wall Styles.
Adding a Width value to any portion of a Pline segment being used as a Wall Endcap Style will result in an invisible segment on the Wall.
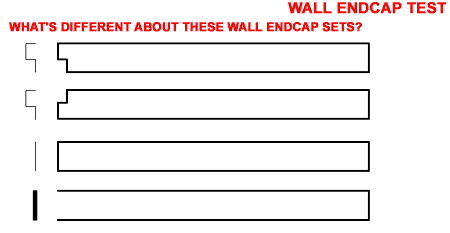
Illustrated to the right I show that in many cases a Wall Endcap Style will not always produce the same results.
Typically you will probably find yourself drawing the exact unique Wall Endcap right on the Wall where you need it; keeping all segments proportional. This works well and if you have the Wall Auto-Endcap Productivity Enhancement Extension, it is exactly what's recommended. However, if you change the Width of the Wall or attempt to apply this custom Wall Endcap Style to a new Wider Wall, the results may not be what you desire and that's because the Pline gets scaled.
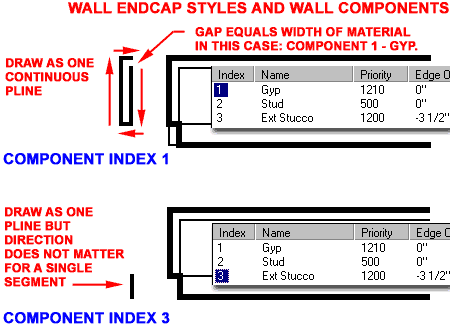
Illustrated to the right are a couple of examples of how Plines can be used to create Wall Endcap results. The Wall Style in this scenario has Gyp. Board on one side and Stucco on the other so the trick becomes that of controlling how the two materials wrap around on the end of a terminated wall.
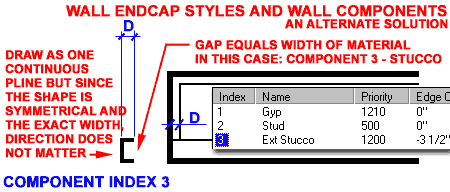
The Wall Style in this scenario has three components:Gyp., Stud and Stucco. Since the two components on the exterior are what need to be wrapped around the Stud, those are the components that need to be worked on and not the necessary the Stud portion. In this case, the Stud portion will simply terminate squarely into the adjusted endcap of either exterior component so it will not need a Pline.
Notice that for the Pline that defines the wrap, the direction in which it is drawn reflects on how it is applied to the Wall Style Component.
Illustrated to the right is an adjustment to the results of the Wall Endcap Style created above. For the Stucco, the Straight Pline was replaced with a "U" shape that will bring the Stucco out to the same depth as that of the Gyp.
If you experiment with changing the proportions, direction or other aspects of the Plines in a Wall Endcap Style, you may find that seeing the results on an existing Wall Style may not automatically occur. I have found that Wall Style tend to get stuck on old Endcap Styles and if this happens to you, simply set the Wall Endcap Style of a Wall to something else, like Standard, and then set it back to the original Wall Endcap Style; the results should now reflect any current changes you may have made.
The answer to the first question is the direction of the Pline used for the Wall Endcap Style.
The answer to the second question is the fact that a Pline with Width will result in an invisible Wall Endcap; useful in breaking plans or simply running a wall to a undefined point.