| Wall Surface
Modifications You can use numerous techniques to modify the surface of an ADT Wall object. There are elegant Wall Modifier Styles where you tediously massage a polyline shape into position and hard-core Massing solutions where you literally force a wall to accept another element as an interference object. The examples below on scratch the surface (pun intended). You can also work with endcaps and Wall components to modify the surface of a Wall object.
|
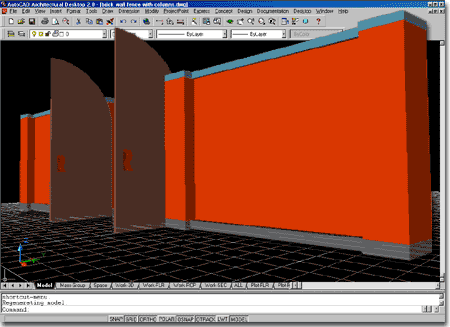 |
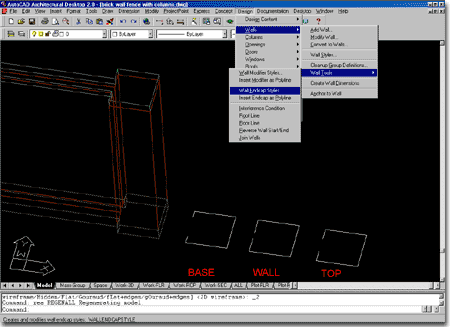
| Creating Wall Endcaps In this example, the wall for the fence has columns at the ends so unique Wall Endcaps need to be designed. You can create Wall Endcaps by drawing Pline profiles of what the ends of the wall should look like. In the illustration, right, I show three Pline shapes because I want one that matches the thickness of the base, yet has the same width and length as the column. I also show one for the middle section of the wall that has a thinner opening to match the width of the wall. And finally, I have a third Pline shape for the top that matches the width of the concrete cap over the top of the wall. From the Design pull-down menu, select Walls and cascade down to Wall Tools. From Wall Tools, cascade down to Wall Endcap Styles...
|
 |
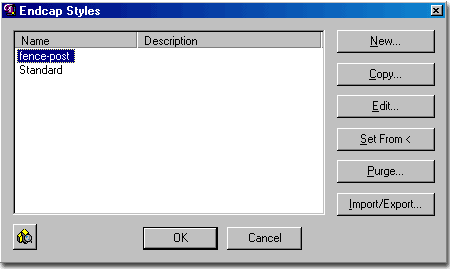
| On the Wall Endcap Style dialogue box, pick
on the New... button and type in the name for your endcap style. In
this example, I used the name "fence-post". After you have named your Endcap Style, pick on the Set From< button and select each polyline shape in the order you plan to work on your wall; i.e., from top to bottom or bottom to top. In this example, I am working from top to bottom. Command: |
 |
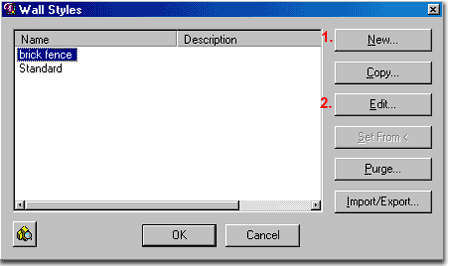
| Creating a New Wall Style From the Design pull-down menu, select Wall and cascade down to Wall Styles... Create a New... Wall Style and name it something like "brick-fence". Use the Edit... button to begin designing the Wall Style.
|
 |
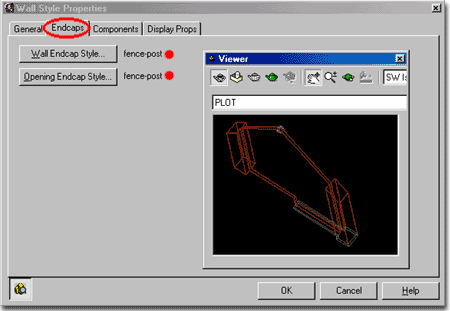
| Assigning Wall Endcaps to a Wall
Style On the Endcaps tab of the Wall Style Properties dialogue box, pick the Wall Endcap Style... button and assign the endcap style we just created above. On the Opening Endcap Style... button, select the same endcap style. |
 |
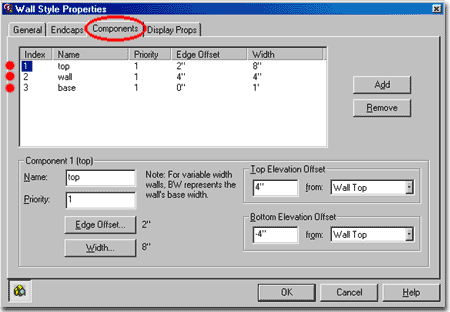
| Designing the individual Components
of a Wall On the Components tab of the Wall Style Properties dialogue box, modify the default component to match the illustration to the right. Add two other components as per the illustration to the right. |
 |
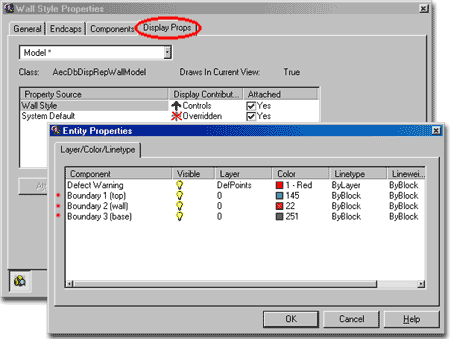
| Assigning unique colors to Wall
Components On the Display Props tab of the Wall Style Properties dialogue box, set the display to Model, Attach an override on the Wall Style and assign unique colors to the new components. This part is not essential but will help to see the 3 components better and if you plan to link this work to Viz, this will make it rather easy. |
 |