PART 2
LAYER MANAGEMENTContents:
Layer Management Access ---- Layer Manager and Layer Keys - Overview ---- Objects and Layers ---- Layer Manager ---- Layer Standards ---- Layer Key Styles ---- Customizing and Tricks
|
PART 2 LAYER MANAGEMENTContents: Layer Management Access ---- Layer Manager and Layer Keys - Overview ---- Objects and Layers ---- Layer Manager ---- Layer Standards ---- Layer Key Styles ---- Customizing and Tricks |
| 1Layer Management Access | 1-2 LAYER MANAGEMENT | ||||||||||||||
Layer
Management Toolbar |
 |
||||||||||||||
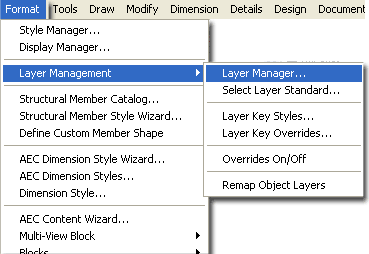
| Layer
Management Pull-down Menu Starting in Architectural Desktop 2005 the AutoCAD and Architectural Desktop Layer Tools have been merged into one Layer Properties Window. You cannot run the AutoCAD Layer Properties Window independently of the Architectural Desktop one as in the past. The difference between the two really only amounts to the extra tools available along the top tool bar and how they affect the Layer organization. To access the Layer Manager, you can also type "Layer" or "La" on the command line. If you want to access many of the Layer Tools without using the Layer Properties Window, you can type "-Layer" or "-La". Type AecDwgLayerSetup to set the current Layer Standard. |
 |
||||||||||||||
| 2Layer Manager and Layer Keys - Overview | 2-2 LAYER MANAGEMENT | ||||||||||||||
Drawing Setup - Layering tab
Before you start working on mastering the subject of Layer Management, you should be
aware that Architectural Desktop, unlike AutoCAD, uses a Layer Standard
with guidelines and rules to help standardize and automate Layer
organization.
From the Drawing Setup dialog box, illustrated to the right, you use the Layer Standards/Key File to Auto-Import: text box to specify the source drawing file for the current Layer Key Style. Ironically, this is not where you specify the Layer Standard so it is entirely possible to accidentally have a Layer Standard that does not match the current Layer Key Style. To verify that the current Layer Key Style matches the current Layer Standard, read the "Based on Layer Standard" text field and compare that to the Layer Standard specified within the Layer Manager - see comments below. From the Layer Key Style: drop-down list you can choose from among several industry layering standards including Building Standard (BS1192), American Institute of Architects (AIA), German DIN 276 and more depending on how you installed ADT. You can also choose to have ADT ignore these standards and keys by choosing <Current Layer>, which will put every object on the current layer. Under the Layer Standards/Key File to Auto-Import field you can revert back to an older Layer Standard file ( "AecLayerStdADT3.dwg" ) that has a Standard named "Standard" which will key the ADT objects to layers by their object name; e.g., Door, Wall, Wind, etc. Always Import Layer Key Style when first used in drawing - by checking this option, ADT will compare the date of the current Layer Key Style with the source drawing file and re-import if the source file is more recent. This option is okay if you know that you want to continue improving and don't care how it affects existing projects; but it is not a good idea if you want to keep a set consistent regardless of improvements for future projects; e.g., Doors could be blue in one file and red in the next if the standard changed between the 1st and 2nd floor work was done. |
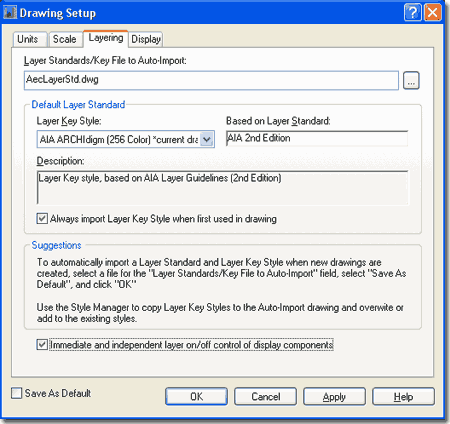 Immediate and independent layer on/off control of display components - this option appears to be more for those who work with ADT 2004 or older files than for new files where the box should be checked. For files that are older, the box needs to be unchecked in order to simulate layer on/off behavior of the past. I never really noticed much of a problem with component display issues under On/Off settings but then I generally Freeze layers. Save as Default - by checking this option you override any Layer Standard settings for New Drawings regardless of what they have been set to use. In some respects this insures that one Standard and one Layer Key Style is used but it also prevents users from working with different Standards as might be necessary on different projects. Much of this guide and examples will be based on the default AIA Long Format Layer Standard and Layer Key Style. You can create your own custom Layer Key Style in a matter of minutes as discussed under Creating your own custom Layer Key Style. By taking this step you can tinker with the Settings as you learn about the options you have while keeping a clean copy around.
Note: |
||||||||||||||
Layer Manager
- Standards
As discussed above, there are two primary tools in ADT that define the layering system and illustrated to the right I show how you can access the Layer Standards dialog. The Layer Standard provides the rules and structure for the Names of your Layers but does not provide the Properties such as Colors, Linetypes and so forth. Once a drawing has been configured properly, the primary function of the current Layer Standard is to assist users in creating New Layers based on these rules and thus maintain compliance with an office standard. |
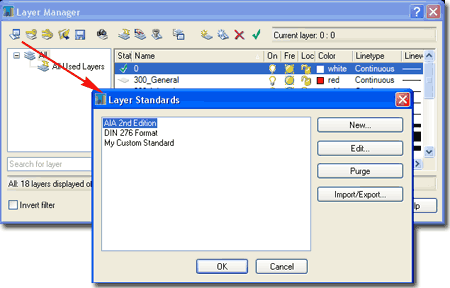 Typically, though not required, the current Layer Key is based on the current Layer Standard. |
||||||||||||||
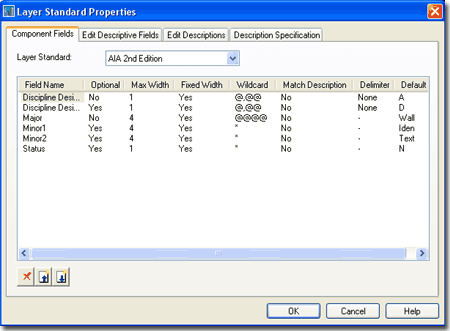
| Layer Standard Properties From the Layer Standards dialog, illustrated above right, you can access the layer matrix by going to the Layer Standard Properties dialog as illustrated to the right. The information presented here represents the heart of the Layering System by defining the rules for Layer Names. Conceptually this is incredibly simple, just names, but logistically it requires a series of rules covering everything from what letters are allowed to be first to when separators need to be introduced before other letters are allowed.
|
 |
||||||||||||||
Layer Key Styles
Architectural Desktop currently has somewhere around one hundred cases where Objects need to be keyed. Some of the more obvious cases are the Object Families such as Doors, Windows, Walls and so on while other cases involve Tags, Dimensions, and Linework in Details. You cannot Delete these Keys nor change the Objects so they will not Key, but you can alter the Properties of the Keys to produce nearly any result you may desire from a Layer. As humorous as it may be, you can for example, set each Key to the same Layer with the same Layer Properties and essentially remove all of the unique functionality of this system. A Layer Key Style is usually built on a Layer Standard so all of the Names conform to a specific set of rules. You can also Add Layer Keys for use as part of Object Component Layers or as part of an MvBlock as defined by the Aec Content Wizard. |
Since the Style Manager is a Window, you can use Window based techniques to work within it; try right-clicking on your mouse for access to options. To copy a Layer Key Style, try holding down the Ctrl key while dragging and dropping a Layer Key Style icon in the right pane ( look for the familiar plus sign in the lower left of the icon ). |
||||||||||||||
| Accessing Layer Key Style Properties
A Layer Key name is not the Layer Name but rather a placeholder indicating the Object Type the Key is for. By using the ellipsis ( ... ) button you can choose to create a Layer Name based on the current Layer Standard as illustrated right. Hopefully, you can now see how simple it would be to have multiple Layer Key Styles for different projects. These Layer Keys could all be controlled by one Layer Standard or you could also have multiple Layer Standards. My advice is to keep things as simple as possible. |
 |
||||||||||||||
| 3Objects and Layers | 3-2 LAYER MANAGEMENT | ||||||||||||||
|
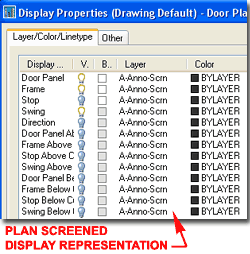
Component Layers As discussed above, Layer Keys define how most Objects are assigned or "keyed" to Layers upon Insertion. As long as some form of a Layer Key Style is active, Architectural Desktop Objects will be keyed accordingly no matter what you do. Of course there are things that you can do to override the Layer Key Style but generally speaking, you must accept some form of keying. Later I will discuss overrides and other techniques that can affect keying. Within any given Object Style in Architectural Desktop you will find one or more internal Layers that are typically referred to as Display Components. I like to refer to them as internal layers but they often reside on one layer. In the illustration to the right I show how a common Door Style defers its Plan Display Representation to the Drawing Default Plan Display Representation and what this Display Representation offers in terms of Display Components. The reason I show how the Door Style's Plan Display Representation is governed by the Drawing's Default Plan Display Representation is to show why many Objects Styles in one Family appear the same. On the Display Properties dialog box for this example Door Style, notice how all of the Plan Display Components are set to Layer "0" (zero). As with AutoCAD Blocks, using Layer "0" is a way of designating no preset Layer assignment and thus all of these Display Components will reside on the same Layer as set by the Layer Key for this Object Type; i.e., A-Door, for example. If the Display Component is controlled "By Material" then you will have to look to the Material's Display Properties in order to figure out how the Component is managed. Usually Materials use Layer "0" as well but they often affect Linetypes, Colors and more. If the Display Component is set to a unique
Layer Name then you should find that you can control some of that
Component's Properties using the Layer
|
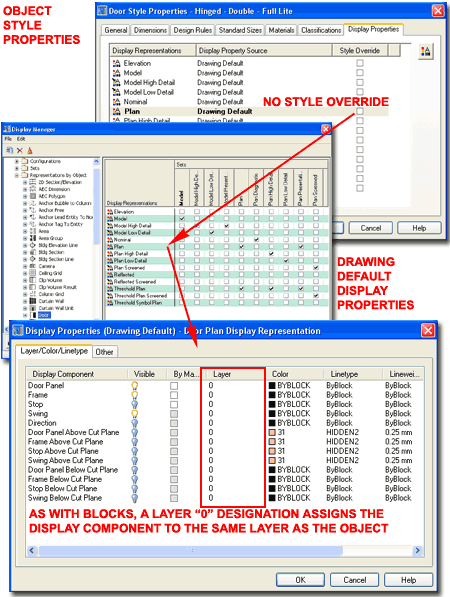 Illustrated to the left I show how the default Door Style uses pre-assigned Layer Names within the Screened Display Representations and why you get stuck with this Layer Name. Despite the fact that you have the option to set a unique Layer Name for one or all of the Display Components, you will still be affected by the Layer Key Style. In other words, even if you assign all of the Display Components to another Layer Name than that set by the current Layer Key, the Door Object will still be keyed. You can prove this fact to yourself by noticing how Freezing the Key Layer Name of any Object also turns Off all of the Display Components regardless of the Layer Names they have been set to. The good news is that it is only the Freeze setting that produces this result. |
||||||||||||||
|
Manually Assigning Objects to other Layers When Objects are inserted and Keyed to a specific Layer Name, there is no particular permanence about that Layer assignment. This means that you can Select any Architectural Desktop Object and manually assign it any other Layer Name you may want. You can drag-n-drop a Selection Set of Objects to a New Layer Name via the Layer Drop-down list or simply use the Properties Palette to reassign Objects to new Layer Names as you would with any Objects in AutoCAD or Architectural Desktop. If the Object has unique Layer Name assignments within the current Display Representation you may have some problems understanding the results of manually reassigning such Objects. When you assign an existing Object to a new Layer Name, you are really only setting a new Insertion Layer. If you Freeze this new Layer Name, you will see that the Object will disappear. However, if Display Component Layers have been manipulated and are not set to Layer "0", as discussed above, you cannot reassign those Display Components externally. This explains why some Objects refuse to change Color, for example, when Xref'd into other drawings. Be very careful about setting fixed Colors for Display Components. |
 |
||||||||||||||
Layer Key Overrides
and Layer Key
Override On/Off Switch
You can use a Layer Key Override as a means to bypass the current Layer Key Style or amend it . This action may be useful in cases where you want to insert identical Objects on different Layers such as in the case of using identical Wall Styles for Existing and Proposed work. If a user creates a Layer Key Override that matches a Layer Name in the Layer Key Style, the Properties of that Layer are automatically assigned to the Override. I find it particularly annoying that this "feature" is not true when using the Add Layer from Standard dialog.
|
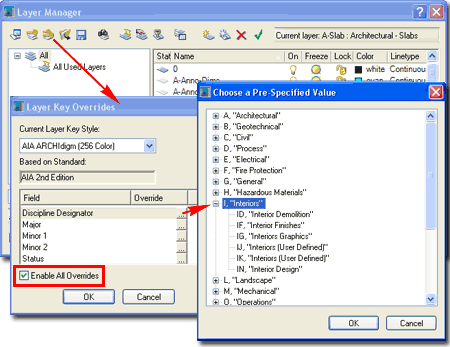 Illustrated above I show that I am setting a partial Layer Override that will place or key all new Objects I create on Layers that start with the letter "I" for interiors instead of "A". Because I have only changed the "Discipline Designator", all of the other Fields will still play a role in the keying of my Objects; i.e., I will get Walls on "I-Wall" and Doors on "I-Door", for example. |
||||||||||||||
|
Layers and Non-ADT Objects
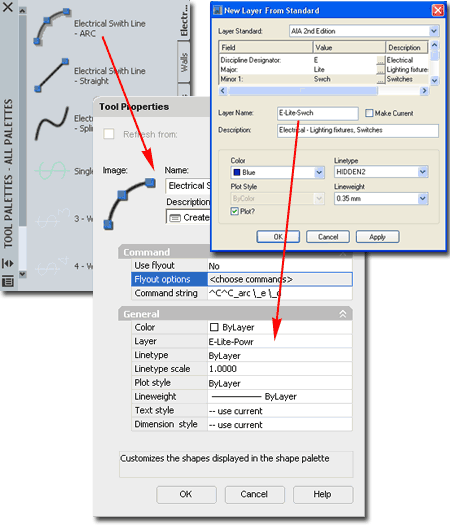
Once you get accustomed to auto-layering the subject of Layers starts to fade as a primary concern; but once you need to add simple things like Lines and Circles, the subject pops right up again. I must admit that my lack of interest in Layers and willingness to let ADT do most of it automatically has actually made my drawings more disorganized than ever and the reason is that I just don't pay attention to Layers until they bite me when I am assembling my sheets. With the introduction of the Tool Palettes in AutoCAD and Architectural Desktop 2004, you can now auto-Layer just about any Object. The problem is that the Layer option on the non-ADT Object tools, will not utilize the current Layer Key Style so the only way to set a conforming Layer is to set a fixed Layer Name that will not be flexible and adjust to other Layer Key Styles. This may not be a problem for many offices and thus I highly recommend that you explore this approach to auto-Layering simple Objects. Illustrated to the right I show how you can use the New Layer From Standard tool to create a conforming Layer Name to be used on the Tool Properties dialog. In other words, use the New Layer From Standard dialog to create a Layer Name that conforms to the current Layer Standard and then assign this Layer on the Layer drop-down list. In the example illustrated to the right I show how you might make Palette tools to auto-layer Power Lines for Electrical Plans using Arc's, Splines and/or Lines. |
|
||||||||||||||
Remap Object Layers Remapping Objects to Layers
For cases where ADT Objects do not fit the current Layer Key Style, you can use the ReMapLayers command to key some objects correctly. One of the more amazing advantages this tool offers is the ability to switch Layer Key Styles and update a file in seconds. If a user accidentally changed one or more ADT Objects to the wrong Layer, such as Layer "0", the ReMapLayers command will repair the damage. Be aware however, that this tool does not work on all ADT Objects and it certainly does not work on non-ADT Objects like Lines, Arcs, Circles and Test. MvBlocks, for example, will not ReMap. Command: _AecRemapLayers Enter a Layer Key name - you can use this option to type in a Layer Name as long as that name conforms to the current Layer Key Style. If you want to Select a Key and have your Objects Layer accordingly, use the "?" option and then Select the Key from the Text Window (hit F2 key) by using the Paste to CmdLine menu option. |
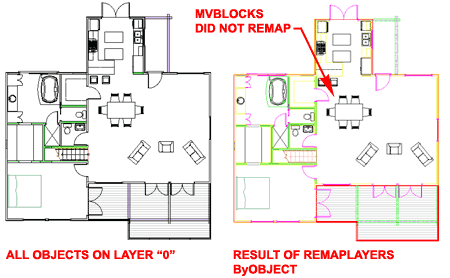 ? - provides you with a list of Layer Keys currently available. Hit the F2 key to see a larger Text Window of the full list. Highlight any Key in the list, right-click on your mouse and use the Paste to CmdLine to use a Key. byObject - maps selected objects to the new Layers as defined by the current Layer Key Style. Use this option to repair mistakes or to transfer all ADT Objects to a new Layer Key Style.
|
||||||||||||||
| 4Layer Manager | 4-2 LAYER MANAGEMENT | ||||||||||||||
Layer Manager Window
Right-Click pop-up menus
Beginning with Architectural Desktop 2005, AutoCAD and Architectural Desktop now share the same Layer Manager. AutoCAD 2005 users have a lighter version with less tools such as those related to Standards and Keys. Most users have discovered that the new Layer Manager runs slower than in the past and though Autodesk offers a "Hotfix" for Architectural Desktop, I find that it still runs poorly; especially upon first activation. You can improve the performance of the Layer Manager a little by having a small number of Filter Groups and by resizing the Window to hide the Description Cells. Illustrated to the right I show the primary context menus and some of the cascading menu options that you can work with while in the Layer Manager Window. For some tasks, such as working with existing Filters, you must use the context menu; for examples, see comments under Filters below. The display of Filters can be set to show as a Tree in a left pane, as illustrated, and/or as part of the main Layer List or not at at all. |
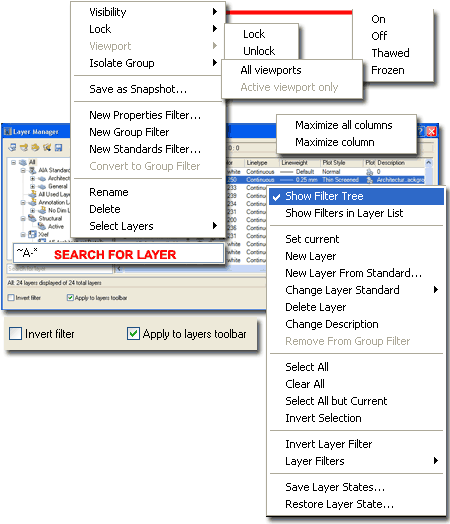 The Search For Layer field near the bottom left of the Layer Manager Window is easy to miss but quite powerful. This filter can be used for Layer Names and will accept all of the Wildcard Characters typically associated with the Named Layer Filter of the past.This filter can be applied to any Selected Filter and thus offers the option to Filter a Filter. You cannot save the Search For Layer Filter and it will automatically reset when you Select other items on the Layer Manager. |
||||||||||||||
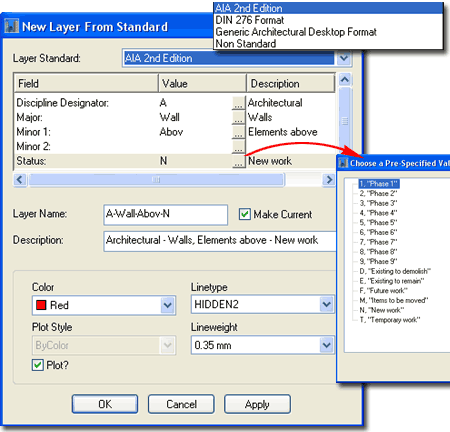
Layer Manager - New Layers
Only the Architectural Desktop version of the Layer Manager offers two buttons for creating New Layers but the trick is to get ADT users to use the right one. Illustrated to the right I show the New Layer From Standard dialog. If a drawing has more than one Layer Standard loaded, you can use the Layer Standard drop-down list to Select any one of them. The Selected Standard will define the Fields, Value options and Descriptions you can work with to create a Layer Name that conforms to this Standard. Layer Properties such as Color, Linetype and so on are not set by the Standard and must be defined by the user. |
 |
||||||||||||||
Layer Manager - Snapshots
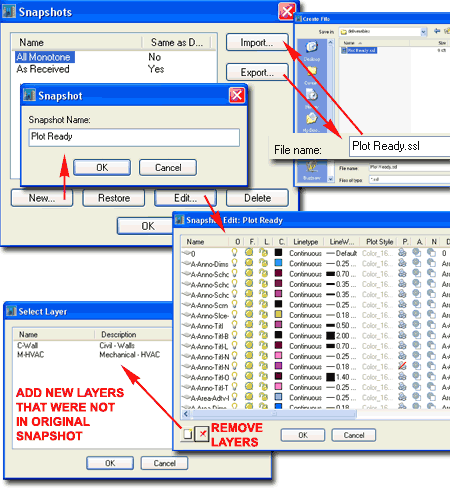
Snapshots, the fourth button from left on the Layer Manager toolbar, are similar to AutoCAD's Layer States or the Express Tools' Layer Manager. Snapshots offer a unique option that you will not find on these other layer tools; the ability to edit a Snapshot after it has been captured. Snapshots taken at one point in a drawing will only contain layers at that time and may not restore properly at a later time when numerous changes in layers may have occurred. The Edit... button opens the Snapshot Edit dialogue box which looks much like the Layer Manager dialogue box, but offers very limited selection capabilities; i.e. you cannot use Ctrl or Shift to select layers. Snapshots are similar to Layer States but differ dramatically in the way they simply capture the exact state of all Layers with no filter options. When creating a New Snapshot, be sure to set the Layer Properties as you want to capture them before entering the Snapshots dialog. As soon as you specify a Name for a Snapshot, the capture has occured. Though you can use the Edit... button to work with a captured set of Layer Properties, this dialog offers very limited editing capabilities; you can't even do a Select All. The two buttons at the bottom of this dialog offer the option to Add Layers created after the Snapshot was created or Delete Layers from the current Snapshot. |
 |
||||||||||||||
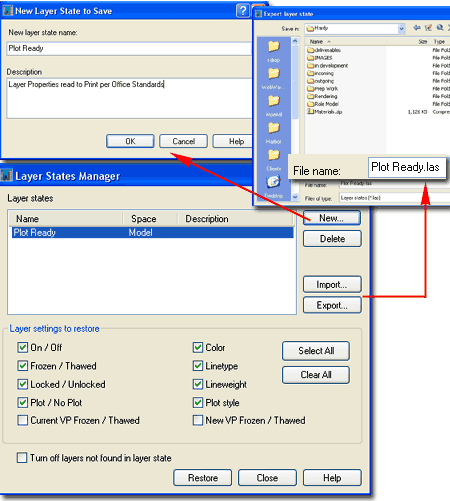
Layer Manager - States
Layer States have been around since before Architectural Desktop and continue to be AutoCAD user's equivalent of Snapshots. You may find that Layer States are superior to Snapshots given the numerous options for the Layer Properties that you can Save and Restore. Snapshots can only capture the State of Layers with all of their Properties. Layer States are not displayed graphically in the Filter Tree list so you must use the Layer States Manager to work with them. Layer States cannot be appended or modified but you can create New Layer States of identical Names to replace existing ones. You can Rename existing Layer States and change their Descriptions by Selecting twice in the Name or Description cell. Layer States can be Exported and Imported from a unique Layer State File that uses the .las file extension. |
 |
||||||||||||||
Layer Manager -
Property Filter
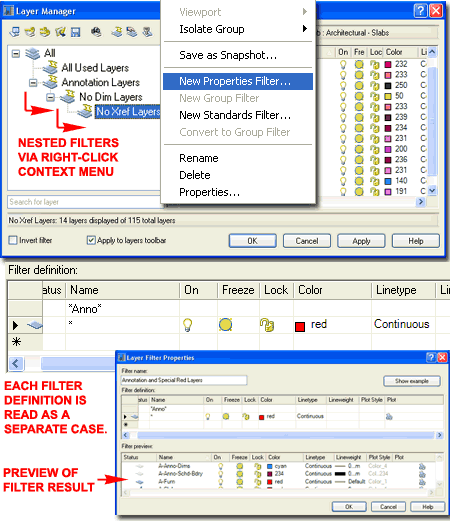
The Layer Properties Filter is a derivative of AutoCAD's Named Layer Filter and basically offers equivalent features. One fundamental difference is that this Filter does not use Boolean logic but reads each line as a separate filter statement. In order to create Boolean-like filters, you will need to create sub or nested filters as illustrated to the right. Illustrated below right I show two Filter Definitions under on Filter Group: one for "*Anno*" and one for a series of Properties including On, Thawed, Unlocked, Red and Continuous. The result of these two Filter Definitions finds all Layers that have the "anno" statement in them and all Layers that fit the Properties On, Thawed, Unlocked, Red and Continuous. It does not isolate the "anno" layers and look for On, Thawed, Unlocked, Red and Continuous Layer Properties within that set. To achieve such results you will need to create a Nested Filter. Illustrated above right I show a series of Nested Filters created by highlighting the Parent Filter and then using the Context pop-up menu to create a New Properties Filter. You cannot create a Nested Filter from the Layer Manager icon. For the first filter I show that I have created one for all "*Anno*" Layers. For the second, or first Nested Filter, I show that I ahve created one for All Layers without "*Dims*" in the Name and finally for the last Nested Layer, I show that I have created one for All Layers that are Not Xref'd. Because each Nested Filter Filters the previous or Parent Group, the results are Boolean-like meeting an "And" condition. Note: |
 |
||||||||||||||
Layer Manager - Groups
The Layer Group Filter was derived from an earlier version in Architectural Desktop 1.0 - 2004. It continues to be incredibly simple to use but now offers the ability to create sub or nested Groups much like the other Filter tools. Illustrated to the right I show that once a Layer Group Filter has been created, you can drag-n-drop one or more Layers into the Group icon on the Filter Tree List. Dragging Layers in this fashion to a Group will not Move or Delete them but simply adds them to a list. When you wish to Remove Layer Names from a Group use the "Remove from Group" context menu option ( do not use Delete ). One of the more interesting options for Layer Group Filters is the ability to Add or Replace Layers by Selecting them on the screen - see below right. You can only create Nested Layer Group Filters by highlighting a Group and then by using the New Group Filter option on the Context menu as illustrated to the right. Nesting Layer Filter Groups offers no special functionality but it does provide a means to visually organize your Layer Groups. |
 |
||||||||||||||
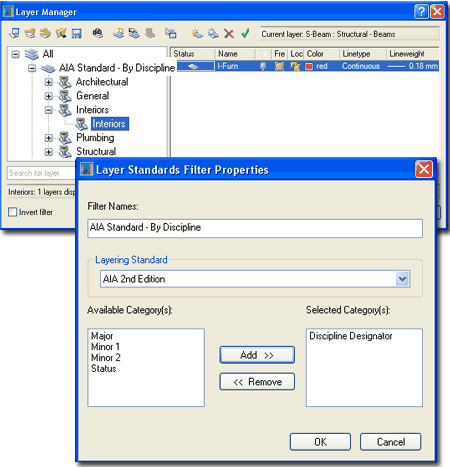
Layer Manager - Standards Filter
The Layer Standards Filter is similar to the Layer Properties Filter but only filters for Names that conform to a specific Layer Standard. Illustrated to the right I show an example of how I created a New Layer Standards Filter that I named "AIA Standard - By Discipline". For the Standard I select the current Layering Standard in my drawing file and used the Add >> button to import just the Discipline Designator. On the Layer Manager Filter Tree List you can see the results of the Discipline Designator. It created a large list of Filters that each look for Layers that start with a Discipline Specific Letter such as "A', or "I". The only complaint I have about this tool is that it brings in too many Filters when I may only want half or less. I suppose you could create a New Layer Standard that is more concise to remedy this problem - hey, that's an idea. |
 |
||||||||||||||
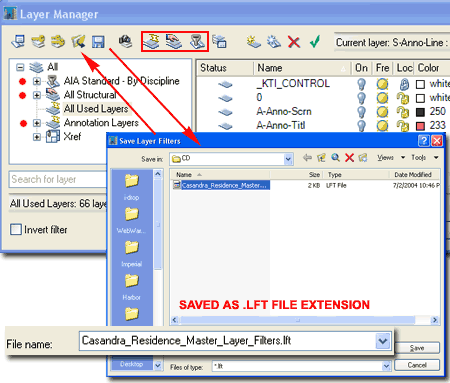
Layer Manager - Save
and Load Filter Groups
In addition to being able to Export and Import Snapshots and Layer States, you can also Save and Load the three Layer Filter types. This means that you may need to track three file extensions: .ssl (Snapshots), .las (States) and .lft (Filters). Illustrated to the right I show an example of the three Filter types that can be saved together in one .lft file. When a .lft file is loaded, all existing Layer Filters will be deleted even if the names are different than those in the Saved Filter File. |
 |
||||||||||||||
| 5Layer Standards | 5-2 LAYER MANAGEMENT | ||||||||||||||
Layer Standards dialog
As stated earlier, Layer Standards provide the rules and structure for how Layers will be Named but they do not provide the Properties for those Layers. Illustrated to the right I show the Layer Standards dialog accessed from within the Layer Manager Window. This tool is a bit of a relic going back to the first release of Architectural Desktop and thus functions in a way that is a bit different than with most Styles. Though Layer Standards are not called Styles, they really should be and it's my guess that future changes in ADT will restructure this part of the Layering System.
You can use the New... button on the Import/Export Layer Standards dialog to create a New Drawing File to act as a source for future Layer Standards. You can, for example, use the default Layer Standards file to Import >>one or more Standards, use the New... button to create a New Layer Standards file and then use the Export >> button to transfer the Imported Layer Standard(s). This means that basically any drawing file can act as a source of Layer Standards just as any drawing file can act as a source of Object Styles. |
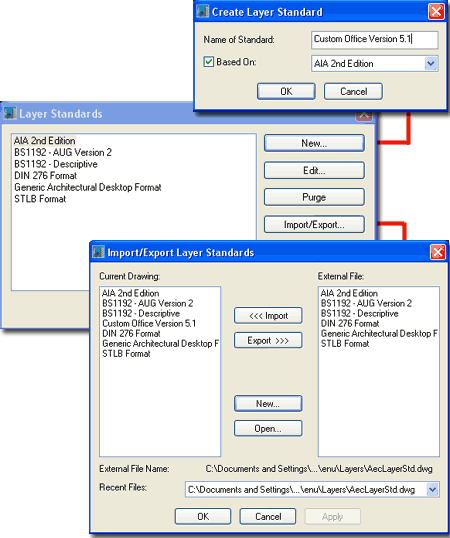 To create a New Custom Layer Standard, use the New... button on the Layer Standards dialog as illustrated above right. Just as you can create a New Dimension Style based on an existing one, you can create a New Layer Standard based on any existing ones you have Imported. Though you can create a New Layer Standard from Scratch I highly recommend that you start with one that already has most of the work done for you. Adding all of those Descriptive Fields can eat of a lot of time but Deleting or Renaming is far faster. |
||||||||||||||
|
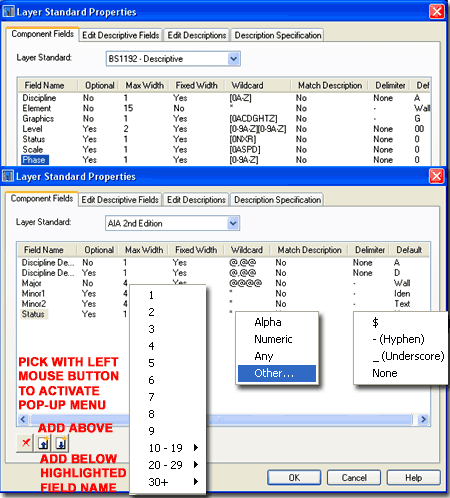
Layer Standards Properties - Component Fields Tab When Editing or developing a New Layer Standard, the most important information resides on the Component Fields tab of the Layer Standard Properties dialog - illustrated to the right. The Component Fields define the Layer Matrix by providing rules for Order, Width, Characters, Character Separators and Default Values. It is this information that forces a user to create Layers with the New Layer From Standard and Layer Override dialogs that follow a definitive structure. You can Add or Rename Field Names as you see fit (naming them whatever you please) but the order in the Field Name List will be reflected in the structure of Layer Names. This is why you find that "Discipline" is usually the first Field Name, not Optional, using one Alphabetical Character defaulting to the letter "A". Illustrated to the right show both the BS1192 and AIA Layer Standards and how some Column Values are set by using the right mouse button. |
 |
||||||||||||||
|
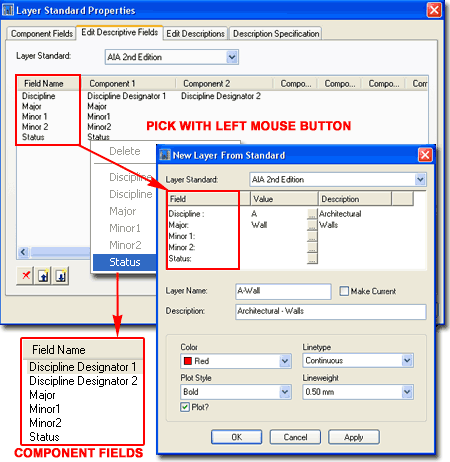
Layer Standards Properties - Edit Descriptive Fields Tab On the Edit Descriptive Fields tab of the Layer Standard Properties dialog, you can create new Field Names for display on the New Layer From Standard and Layer Override dialog boxes. This Field Name acts as a pseudonym for one or more actual Field Names and will also be the display name on the Edit Descriptions and Description Specification tabs. When Component Field Names are set as multiple Components of one Descriptive Field Name, they become sub-categories. You can see such sub-categories more clearly on the Edit Descriptions tab. |
 |
||||||||||||||
|
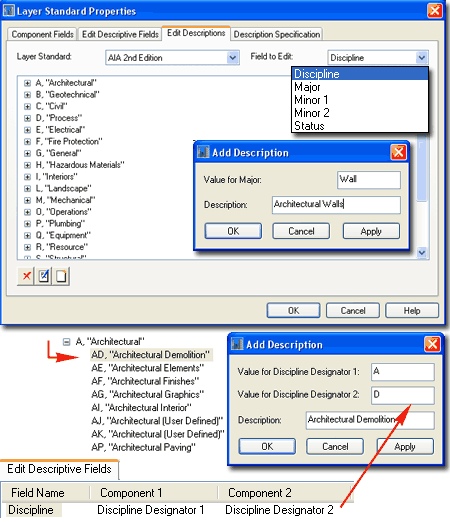
Layer Standards Properties - Edit Descriptions Tab On the Edit Descriptions tab of the Layer Standard Properties dialog, you create predefined field names for each of the Component Fields defined on the Component Fields tab. This can be a long and tedious task and you cannot import these from existing Layer Standard Properties. This is one of the main reasons why I recommend creating new Layer Standards from existing ones. Illustrated to the right I show how the A Layer Standard Properties dialog, will vary according to how the Component Fields are organized under the Edit Descriptive Fields tab. The number of characters you use for the Value field on the Add Description dialog is limited by the number of characters specified under the Component Fields tab. |
 |
||||||||||||||
|
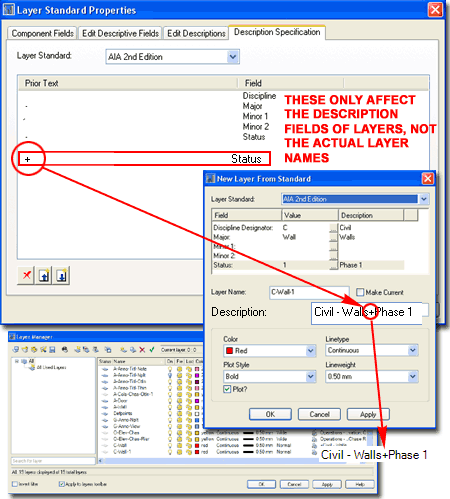
Layer Standards Properties - Description Specification Tab On the Description Specification tab of the Layer Standard Properties dialog, you can set the separator characters between the Layer Names as they appear under the "Description" Column of the Layer Manager. Since I never read the Description Field I have to admit that I don't find this feature particularly valuable. It may have some value to those planning to export this information and read it in some unique way in a spreadsheet or other software. The Description Field or cell for any Layer Name is open for editing in the Layer Manager so you can always change it at later date. |
 |
||||||||||||||
| 6Layer Key Styles | 6-2 LAYER MANAGEMENT | ||||||||||||||
Layer Key Style Properties dialog
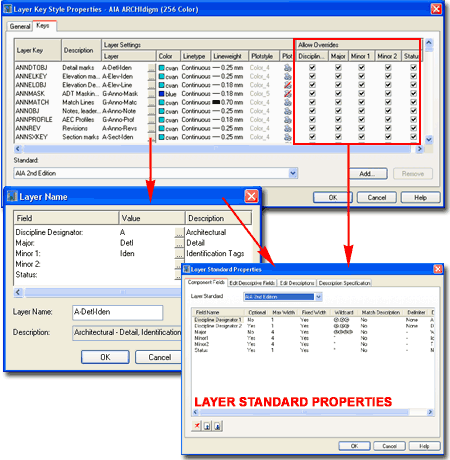
As stated earlier, Layer Key Styles provide a base of Layers for all of the Object Families in Architectural Desktop that have been designed to "key" to a specific and predefined Layer Key Name. For such Layer Key Names you will find that you cannot Remove (Delete) or Rename them but you can certainly change the Layer Name and that is essentially the same thing because Layer Key Names are really never seen anywhere except here. A Layer Key Style, such as the one I modified for my office and illustrate to the right, is tied to the current Layer Standard in the drawing file where it was created. The Layer Key Style acquires its Layer Names from the Layer Standard but you can set the remaining Layer Properties as you see fit. You can even have copies of similar Layer Key Styles that use the same Layer Standard but use Layer Properties that are Project or Client specific. Creating custom Layer Key Styles is one of the first things I recommend that most offices invest time in when configuring their Architectural Desktop. Here you can set Colors, Linetypes, Lineweights and other Properties to match your current office standards. Once you have a working version, simply use the Layering tab on the Drawing Setup dialog to make it a default in your office. |
Note: The Layer Key Override dialog will apply the Layer Properties of the current Layer Key Style if the Override Name matches a Key Style Layer Name. This is not true when using the Add Layer from Standard dialog. |
||||||||||||||
|
Layer Key Style Properties - Add After looking over a particular Layer Key Style you may wonder why you would Add... additional Layer Keys. If a Layer Key Style could be used to force users to accept certain Layer Properties when they created New Layer Names with the Add Layer from Standard dialog, they could be highly valuable. As it stands, Layer Key Styles can only be used to set Properties for Layer Key Overrides as long as the user happens to specify the same Layer Name as one of the Layer Names in the Layer Key Style. Looking beyond the Properties of New Layers, you might consider New Objects to see how Adding Layer Keys could be employed for greater automation. Anywhere you see the option to Select a "Layer Key" for an Object is a place where you can use a custom Key and consequentially, custom Layer Properties. The two primary places that I am aware of where you can Select a Layer Key for Objects is on the Tool Palettes and within the Create AEC Content Wizard. Illustrated to the right I show an example Tool that I created for one of my Palettes. To assist in changing existing Walls to a Demo Layer and take on unique Properties, I created a custom Layer Key called "WALLDEMO". I assigned this Key a Layer Name and set specific Properties to my preferences. I then created a basic Wall and set set its Properties as I would prefer for a Demolished Wall and transferred that Wall to my Tool Palette to make a Tool out of it. By Editing the Tool I set most of the Properties to defaults so the Wall Objects that I would Apply this tool to would remain the same. The Properties I did change were the Layer Key and Cleanup Group Definition. See Tool Palette in the Appendix for an overview of working with this tool. |
 |
||||||||||||||
| 7Customizing and Tricks | 7-2 LAYER MANAGEMENT | ||||||||||||||
Creating your own custom
Layer Key Style
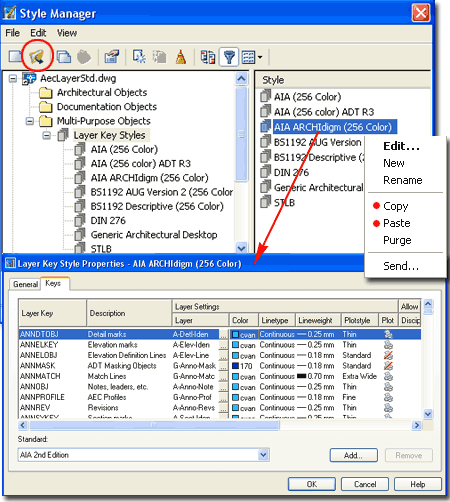
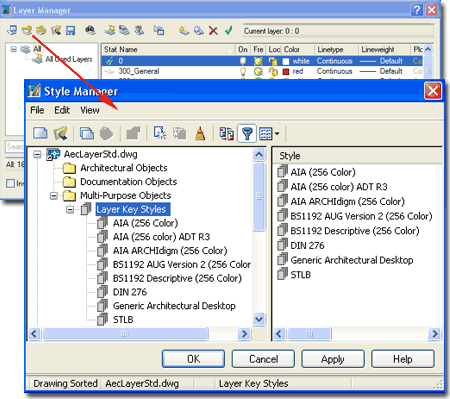
Though there are numerous ways to tackle the issue of creating your own custom Layering System, the easiest approach is to simply work with what ADT already provides. Illustrated to the right I show how you can use the Style Manager to Open the "AecLayerStd.dwg" file to access the Layer Key Styles. To create your own version, simply right-click and Copy one of the existing Styles such as "AIA ( 256 color)", Paste it and Rename it as you see fit. Once you have created your Copy of an existing Layer Key Style, Edit this new file and set the Layer Properties to meet your office standards. The most common change involves setting Colors and PlotStyles so printed work remains consistent with past work. When you have completed this work and exited the Style Manager, you should find that you will now be able to Select your Layer Key Style on the Drawing Setup dialog. To make this a more permanent setting for your office, make sure to set this new Layer Key Style current in any template files that you use for your ADT work. |
 |
© Copyright 2001- 2004 ARCHIdigm. All rights reserved.

 In
addition to these rules, you should also find a complementary Layer Key
Style that serves as a base of layers for all of the Object Families in
ADT. Together these two tools form the primary layer system in ADT but
there are other ways to automate layering (through tool Palettes, for
example).
In
addition to these rules, you should also find a complementary Layer Key
Style that serves as a base of layers for all of the Object Families in
ADT. Together these two tools form the primary layer system in ADT but
there are other ways to automate layering (through tool Palettes, for
example).
 Manager. A common example of
this feature is how some offices prefer to set the Swing Display Component
to a unique Layer so they can either change the Color or turn it Off without
having to work with the Object's Display Properties. You
should be aware, however, that setting unique Layer Names for Display
Components will introduce those Layer Names in all drawings where the Object
Style is inserted. This explains why many complain that they cannot
Purge unwanted Layer Names from their drawings; some Object or Object Style
is responsible for that Layer Name and as long as it remains in your drawing
so too must the Layer Name.
Manager. A common example of
this feature is how some offices prefer to set the Swing Display Component
to a unique Layer so they can either change the Color or turn it Off without
having to work with the Object's Display Properties. You
should be aware, however, that setting unique Layer Names for Display
Components will introduce those Layer Names in all drawings where the Object
Style is inserted. This explains why many complain that they cannot
Purge unwanted Layer Names from their drawings; some Object or Object Style
is responsible for that Layer Name and as long as it remains in your drawing
so too must the Layer Name. 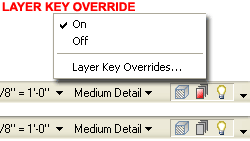 The
danger of using a Layer Key Override is that it is very easy to forget and
it will affect all Objects inserted while active. If you look at the
Architectural Desktop Drawing Window Status Bar ( illustrated left), you
should notice a layer icon to help with this problem. You can pick on the
icon to activate the Layer Key Overrides dialog, or right-click over the
icon to quickly toggle between On and Off.
The
danger of using a Layer Key Override is that it is very easy to forget and
it will affect all Objects inserted while active. If you look at the
Architectural Desktop Drawing Window Status Bar ( illustrated left), you
should notice a layer icon to help with this problem. You can pick on the
icon to activate the Layer Key Overrides dialog, or right-click over the
icon to quickly toggle between On and Off.