How do I get this toolbar?
You can also acquire access to these commands from the Documentation pull-down menu. From the Documentation pull-down menu, pick Area Groups > and cascade to their respective command options - see image below, right.
Illustrated to the right is the Area Groups toolbar and the Areas toolbar. Area Groups are basically just tools to manage Areas and thus can be thought of as a subset of Areas. Though I call them subsets, do not assume that you may not need them. Area Groups are very powerful and offer the ability to not only master control Areas but offer a master structure to start the process of building Areas from; i.e., Area Groups may be your starting point.


The Area Group object in ADT is designed to help manage ADT's Area objects. By relating to other software products, one might think of Area Groups as tools to use after having created Area Objects but you may want to begin with Area Groups.
Once you have experimented with Area Group Template files, you will probably find that having a master plan for your Area Groupings can dramatically improve your Area object creating process. Area objects can automatically be assigned to existing Area Groups and by doing so, you can also take advantage of the Area Name Definition List ( only accessible through the Area Groups ).
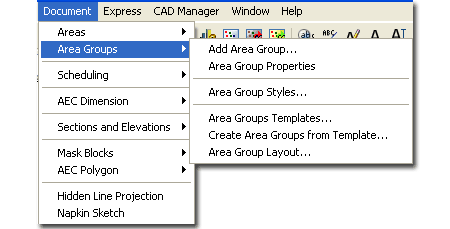
| Menu | Documentation> Area Groups> Add Area Group... |
 |
|
| Keyboard | AreaGroupAdd |
The Add Area Groups dialogue box offers two basic options: one for the Name of your Area Group and one for the Area Group Style.
Name - a user specified name typed with a limit somewhere around 255 characters ( I lost count after 150 ). This name is used to help distinguish and organize Groups of Areas that are associated with an Area Group Style.
Style - an Area Group Style can be created with the Style Manager to help distinguish Area Groups by such display features as hatching and color coding. This is very similar to what can be achieved with Area Styles and thus you can actually have two different forms of control for the display characteristics of Areas. You can, for example, have several different Areas with different Colors that, when Grouped, have one common Color / Hatch pattern.
![]() For more extensive editing options, see the
discussion on Area Group Properties under the Modifying
Area Groups section below.
For more extensive editing options, see the
discussion on Area Group Properties under the Modifying
Area Groups section below.
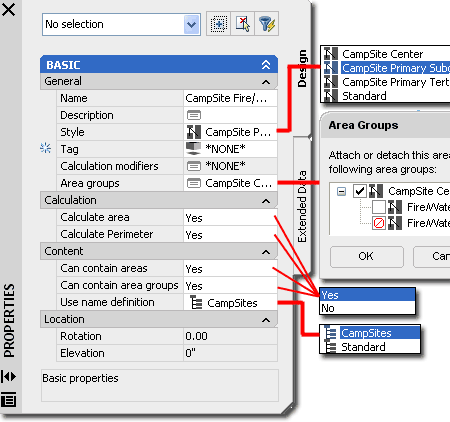
You do not have to specify a Name when adding Area Groups but it does help for organizational purposes. If you forgot or used the wrong Name, you can use the Area Group Modify tool to change the Name at any time.
If you don't see your Area Groups when adding them, make sure your current Display Configuration is set to something like Work or Standard.
The Area Group object is very simple and can be controlled by the Area Group Style settings; such options as Hatch, Color, Font and icon size. See comments under Area Group Styles below.
The Area Group icon and text are, by default, placed on the A-Area-Grps Layer if you are using the AIA Layer Standard and the A-AreaGroups-G Layer if you are using the BS1192 Layer Standard. Knowing this is valuable when you want a quick way to turn Groups or Area objects off.
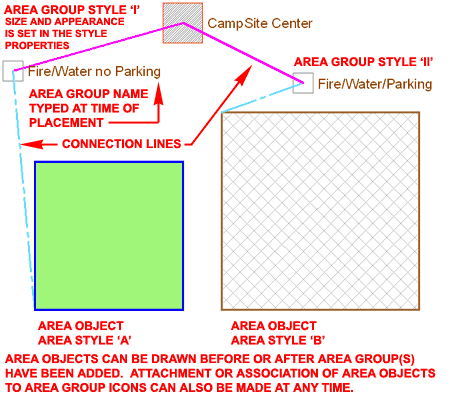
See Section 5 - Area Group Templates and Create Area Groups from Template dialogue box
| Menu | Documentation> Area Groups> Modify Area Group... |
 |
|
| Keyboard | AreaGroupModify |
The Area Group Modify dialogue box offers the same two options that you find on the Add Area Group dialogue box, but there are numerous and powerful features hidden within the Area Group Properties dialogue box.
Name - here you can add a name or change an existing name for your Area Group
Style - see comments above under Add Area Group dialogue box.
![]() For more extensive editing options, use the Properties
button on the Area Modify dialogue box - see illustration, right.
For more extensive editing options, use the Properties
button on the Area Modify dialogue box - see illustration, right.
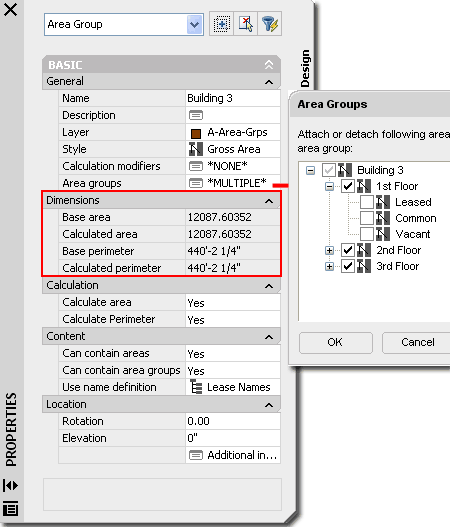
Area Name Def: - this drop-down list can be used to access any Area Name Definition Styles that you may have created with the Style Manager. You can use the "AreaNameDef "command to quickly create a Style and a list of common Area Names. You will find this command under Areas and on the Area toolbar.
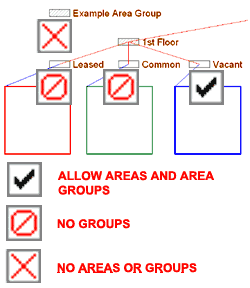
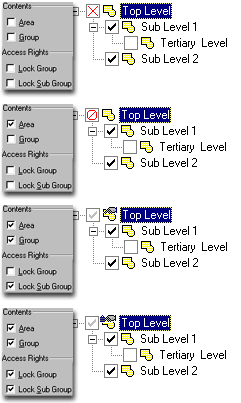 Illustrated to
the left, I show various checkbox settings and their consequent effects upon the icons on
the Area Group tab - see discussion below under Area Group tab.
Contents
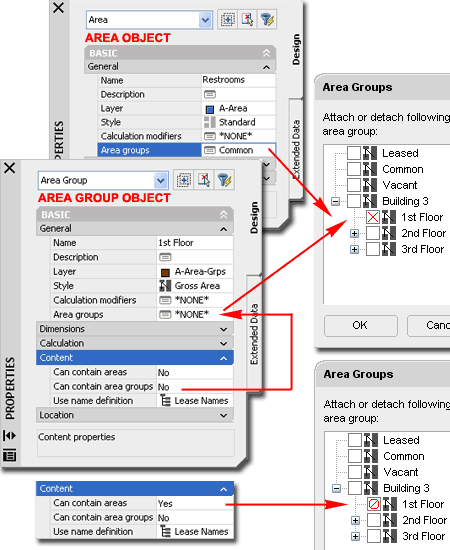
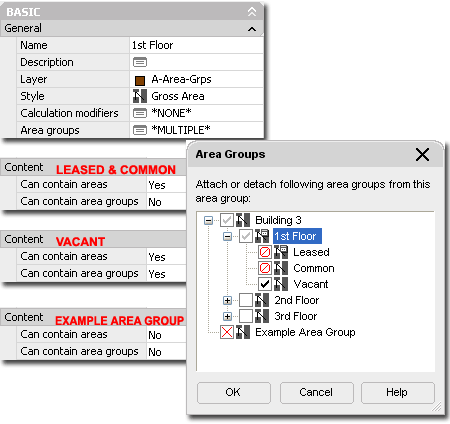
Area - if you uncheck this box, the current Area Group will not be able to accept
any new Area objects. This means that if you attempt to use the Attach Area/Group
tool to add Areas, the Group will not accept them. This might be a good option if
you are done creating primary Area Groups and are now focusing on creating Sub Groups.
Group - if you uncheck this box, the current Area Group will not be able to accept any new Area Groups. This means that if you attempt to use the Attach Area/Group tool to add Area Groups, the Group will not accept them. This might be a good option if you want to Attach a large number of Area objects without accidentally Attaching other Area Groups as Sub Groups.
Access Rights
Lock Group - if you check this box, you will find that you cannot Attach new
Groups to the current Group much like what happens when you uncheck Group Contents.
Lock Sub Group - if you check this box, you will find that you cannot Attach Sub Groups to the current Group much like what happens when you uncheck Group Contents. You should also find that when working under the Area Group tab of the Area Group Properties dialogue box, you will not be able to insert new Groups.
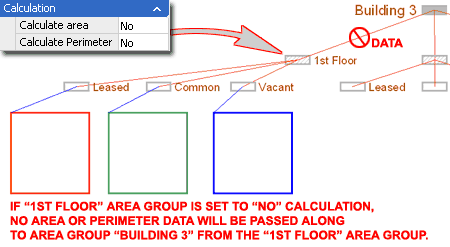
Though the Help menu suggests that you can specify whether or not you want Area and Perimeter calculations, I find that both are always calculated anyway.
At the time of this writing I see no reason why either one should be unchecked.
| Links | Area Calculation Modifier Styles - for more information and explanation of how to create/use these modifiers. |
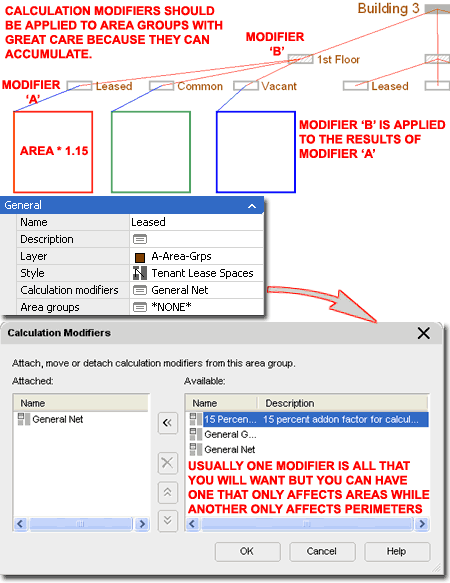
On the Evaluation tab of the Area Group Properties dialogue box, you can Attach or Detach Area Calculation Modifier Styles. Though that may sound a bit confusing, it is basically just a way of attaching a formula to assist you in reporting your Area Calculations so they conform to certain building or estimating standards.
In order to Attach an Area Calculation Modifier Style, you first need to create one with the Style Manager. This information is discussed in Part 20 - Areas.
 The Area Group tab offers the ability to manipulate
the organization and connectivity between all of the Area Groups in the current
drawing. The checkboxes offer another method of Attaching and Detaching Area Groups
and a more logical tree structure to keep track of the associations.
By selecting a particular Area Group you will find its relationship to all other Area Groups through this graphical representation and thus you can disassociate ( Detach ) or associate ( Attach ) it to other Area Groups by checking their boxes. If you find that you cannot put a checkmark in an Area Group box, either the Association already exists or settings on the Contents tab have been checked in such a way as to prevent such associations ( see discussion on Contents tab above ). To help see if any settings, such as locks, have been set on Area Groups, you should notice unique iconographic images next to the selected Area Group ( see discussion on Contents tab above ).
A Gray checkbox indicates that the Area Group has dependants.
A Black checkbox indicates the dependants of the selected ( or active ) Area Group which you are currently working with.
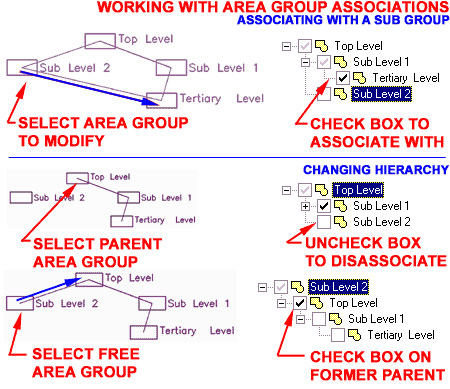
Illustrated to the right, I show a couple of examples of some of the types of tasks you can achieve using the Area Group tab of the Area Group Properties of an Area Group.
In the top example, I show how you can make a new association or link to any existing Area Group so long as there are no unique locks or other restrictions and that the existing Area Group is not already associated with the selected Area Group.
In the lower example, I show how you can shift the structure of the hierarchy by releasing one Sub Group and then associating it with its former parent; i.e, putting it at the top of the stack. Unfortunately, there are no simple drag-n-drop techniques for this type of operation as you may find in SQL type software so it may seem like tedious work for those familiar with programs such as Access.
| Menu | Documentation> Area Groups> Attach |
 |
|
| Keyboard | AreaGroupAttach |
The Attach to Area Group tool can be used to Attach Area objects to an Area Group or other Area Groups to form Sub Groups. The process involves first selecting the Area Group icon, hitting <enter> and then selecting Area objects and/or Area Groups.
For Group-to-Group relationships, make sure that you read up on the tools available within the Area Group Properties dialogue box - see Area Group Properties - Area Group tab
If you cannot Attach an Area object to an Area Group, check the Area Group Properties and look at the Contents tab for unchecked Area and/or Area Group boxes.
| Menu | Documentation> Area Groups> Detach |
 |
|
| Keyboard | AreaGroupDetach |
The Detach from Area Group tool can be used to Detach Area objects or Area Groups from an Area Group. The process involves first selecting the Area Group icon, hitting <enter> and then selecting Area objects and/or Area Groups.
For Group-to-Group relationships, make sure that you read up on the tools available within the Area Group Properties dialogue box - see Area Group Properties - Area Group tab
If you cannot Detach an Area object from an Area Group, check the Area Group Properties and look at the Contents tab for unchecked Lock Group and /or Lock Sub Groups.
| Menu | Documentation> Area Groups> Create Polyline |
 |
|
| Keyboard | AreaGroupCreatePline |
The Create Polyline from Area Group tool can be used to derive the Polylines needed to generate Walls ( WallConvert ) or other architectural objects in ADT. Since Walls cannot be Generated directly from Area or Area Group objects, this routine is highly useful. When you select your Area Group or Groups, you can choose "Create polylines from[All attached areas/Directly attached areas]<All>:"
Using the Directly attached option for Creating Polylines is great for Sub Groups but if you want to move quickly, just select the Group that you want Polylines from and use the default "All" option. The "All" option can be used on the top Parent Group to generate an entire building if you have all of the Areas mapped out.
If you get really excited about the prospect of Generating Walls from your Areas and Area Groups, I advise that you run a few test before "banking" on a smooth operation. You see, since each Area becomes a single continguous Polyline object, the resultant Wall from this continguous Polyline will also be a complete space in itself. That means that you will end up will double Wall objects whereever Areas meet ( which is most of the time ).
| Menu | Documentation> Area Groups> Area Group Layout... |
 |
|
| Keyboard | AreaGroupLayout |
| Links | Area Group Template Style Manager - for information on creating Groups with Subgroups that spread out over Rows and Columns. |
| Create Area Groups from Template dialogue box - for graphic example of the Rows and Columns layout |
The Area Group Layout dialogue box amused me for some time until I created a more sophisticated Area Group Template. If you are familiar with AutoCAD's Array command, you should see the similarity in the concept of distributing objects in Rows and Columns. By creating Groups with Sub Groups, you start to build a structure that can be spread out dimensionally with the Area Group Layout dialogue box. Think of this like the folders within Microsoft's Explorer.
Row Offset - the distance between your Area Group icons in the vertical direction as measured from centerline to centerline. A negative distance can be used to change the direction of distribution.
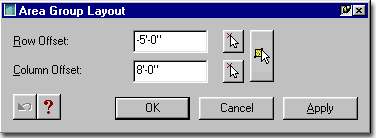
Column Offset - the distance between your Area Group icon in the horizontal direction as measured from centerline to centerline. A negative distance can be used to change the direction of distribution.
The Arrow buttons can be used to feed in a distance value by picking two points on the screen or you can use the rectangle arrow button to feed in both a Row and Column distance based on the two points of a rectangle.
| Menu | Documentation> Area Groups> Area Group Styles... |
 |
|
| Keyboard | AreaGroupStyle |
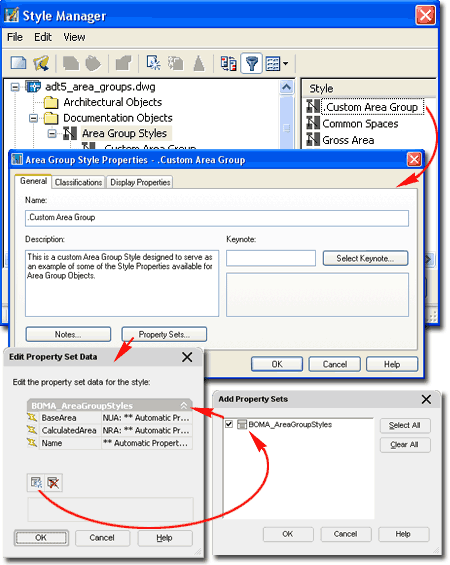
For Area objects, you can use the Style Manager to load, modify, delete and create new Area Styles.
Illustrated to the right, I show the process of creating a New Area Style that I have Named "Custom_Area". By double-clicking on this new style, you will invoke the Area Styles dialogue box - as illustrated.
The General tab provides access to the Name and Description fields for a Style; plus access to the attachment of Notes and Property Sets.
Since Area Styles are simply designed to provide you with Display Characteristic controls, you may be surprised by how limited this area is. For the more powerful stuff, like calculations, you will need to work with Area Properties or Area Groups.
| Links | Object Style Display Properties Overview |
The Display Props tab of the Area Style Properties dialogue box provides access to some simple display options. Space objects do not have many components so there is a very limited, though useful, set of controls. You should find on the Layer/Color/Linetype tabs of most of the display representations, the option to turn on/off Hatch and Boundary - as illustrated below.
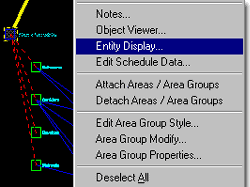 Illustrated to the left, is another way to access the Display Props
tab; select the specific object, right click
on your mouse to invoke the object-specific pop-up menu and select Entity
Display... See discussion directly below.
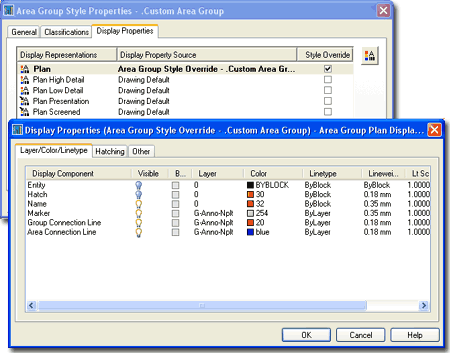
 From the Display Props tab, in Plan
view or other Representation Sets, you can use the Edit
Display Props... button to access the component's Layer/ Color/ Linetype
tab.
From this point, you can not only turn components on or off but change their layer, color and linetype. This is where, for example, you can create Spaces that have solid hatch patterns in unique colors.
Setting the Representation Set to Model, for example, and going to this Layer / Color / Linetype tab will allow you to change all of the Component colors so that they look more appropriate for 3D viewing and presentation. In cases where you plan to assign Rendering Material ByColor, this can also be of substantial advantage. For other unique options, take a look at the Component choices for the Section Representation.
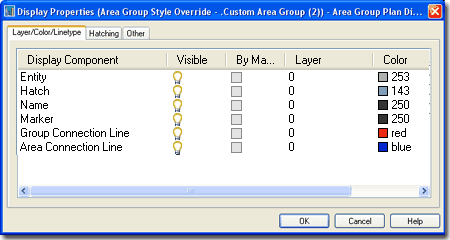
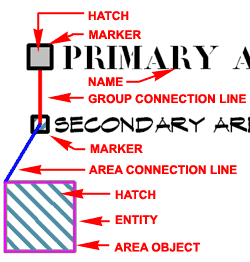
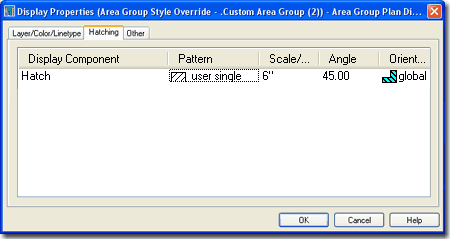
For Area Groups, you have one Hatch Component that not only determines the pattern within the Area Marker but also the Area object ( Entity ) attached to the Area Group. This may seem a little confusing at this time but once you have worked with most of the Area Group options, it will make more sense.
In short, an Area Group can override the Display Properties assigned to an Area that has been attached to the Area Group. By knowing this, you can take advantage of both Display options by having Hatch patterns and Colors for individual Area objects that can also be Displayed as having one common Hatch or Color according to the Area Group it belongs to. In some cases, all you have to do is turn the A-Area-Grps or A-Area Layers on and off to toggle between the two Displays. This is possible because the Displays are actually different and on top of each other: one for the Areas and one for the Area Groups. You may find that if both Displays or Layers are on at the same time, your graphics get a little strange at times.
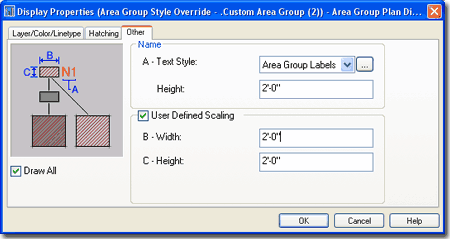
On the Other tab of the Area Group Entity Properties dialogue box, you will find some unique control options for how the Area Group Marker and Text appear.
Draw All Areas - if you check this display option, all sub groups of a parent using this Area Group Style, will appear the same regardless of their independent Area Group Style settings. In other words, use this option if you want all of the Area Groups in an Area Group family to look the same regardless of other settings.
General
A - Width - use this size input box to specify how wide you want your Area Group
Marker size.
B - Height - use this input box to specify how high you want your Area Group Marker size.
Use Display Scale - use this checkbox to deactivate the A - Width and B - Height controls for the Area Group marker and let ADT determine the size relative to the Drawing Scale and current magnification factor. This is useful on large projects where you zoom in and out a lot over a large drawing but this is very irritating on smaller projects where one fixed size can be read at most zoom factors.
Name
C - Text Style - use this drop-down list to select any existing Text
Style in your drawing our use the ...( dot-dot-dot ) button to access the Text Style
dialogue box to quickly create a unique style for your Area Groups. For Area Group
marker text, the Text Style height on the Text Style dialogue box does not matter; unlike
what happens with AutoCAD's Dimension text.
Height - use this input box to specify a fixed text height for your Area Group Markers.
| Menu | Documentation> Area Groups> Area Group Templates... |
 |
|
| Keyboard | AreaGroupTemplate |
Area Group Templates provide you with another Style that can be used to quickly produce a master Area layout. On a Commercial project, in early schematic design phase, you may want to explore numerous Area arrangements that are all based on the same Group structure; something like Entry, Lobby, Stairways, Offices, Bathrooms, etc. By creating an Area Group Template, you can define all of these Groups and Subgroups as a starting point before you start creating Areas. The Areas are then attached to the corresponding Groups or Subgroups at the time of creation.
For Area Group Templates, you can use the Style Manager to load, modify, delete and create new Area Group Template Styles.
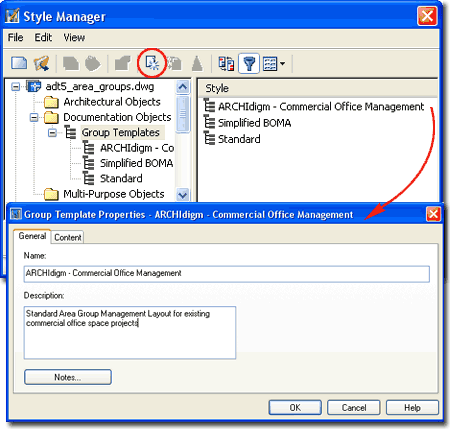
Illustrated to the right, I show the process of creating a New Area Group Style that I have Named "Custom Area Group Template". Obviously a more appropriate name should be used in your office; how about something like [ClientName or ClientProject_Number - Commercial - Scheme_1]. By double-clicking on this new style, you will invoke the Area Group Template Properties dialogue box - as illustrated.
The General tab provides access to the Name and Description fields for a Style; plus access to the attachment of Notes and Property Sets.
The Content tab of the Area Group Template Properties dialogue box holds all of the various settings you can apply to your Area Group Template. Once you have assigned the various properties to your template, you can use this template with the Add Area Group from Template tool instead of using the Add Area Group tool. The difference basically amounts to a savings in time. You can achieve the same results with the Add Area Group tool but all of these settings will have to be set through the Properties button.
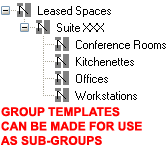 Group Template
In the Group Template pane you should find, by default, one
parent Area Group icon. By using the right-click mouse button, you
should also find that a pop-up menu appears offering the ability to add a New Sub
Group, Rename a Group or Delete a Group - as illustrated
to the left. You can also use drag-n-drop techniques to move Area
Groups around. By creating a fully articulated Area Group Template, you can set
yourself up very quickly for management and reporting of design work; all you have to do
now is Add Area objects to the pre-defined Area Groups.
General
Name - this option is the same as the Name option you get when Adding an
Area Group. You don't have to specify a Name but it seems rather odd to not use
something so obviously valuable. You can, for example, create several templates with
Names such as Gross, Net, Bathrooms, Mechanical and so on for the various types of Area
Groups you anticipate using in your project.
Description - this is just a way to elaborate on the Area Group Name and I have found no really practical use for it. It does not show up in reports but it does show up on the General tab when Modifying Area Groups.
Style - this drop-down list can be used to specify which Area Group Style to use so this is where you control most of the graphic display characteristics; things like color, hatch pattern, text style and size and Marker size.
Area Name Def: - this drop-down list can be used to specify which list of Area names you want accessible when Area objects have been associated with this Area Group. This may seem a little confusing but if you review the process of Adding Area Groups, notice that you can pre-specify which Area Group it should belong to before you Add it. By pre-specifying the Area Group, you also acquire access to the Area Name Definition List ( I know, it's a bit bizarre but that's how it works ).
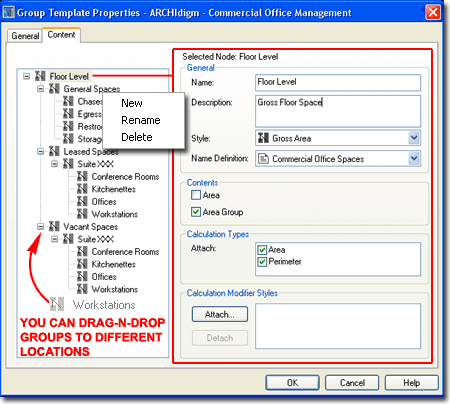
Contents
Area - checking this box will allow the Area Group to accept Area objects via Attachment.
The decision to uncheck has to do with a concern that a user might accidentally
attach something that should not be attached.
Area Group - checking this box will allow Area Groups to accept other Area Groups ( Sub Groups ) via Attachment. The decision to uncheck has to do with a concern that a user might accidentally attach something that should not be attached.
Access Rights
Lock Group - checking this box will prevent a user from Detaching
this Group from a Parent Group. Unfortunately, the Erase and Delete commands are not
affected by this Lock.
Lock Sub Group - checking this box will prevent a user from Detaching the Sub Groups off of this Group. Unfortunately, the Erase and Delete commands are not affected by this Lock.
Calculation Types
Area - check this box to have this Area Group report Areas.
Perimeter - check this box to have this Area Group report Perimeters.
Calculation Modifier Styles - use the Attach... or Detach button to work with Calculation Modifiers used in your Reports to compensate for such things as Gyp. Board, Plaster, etc.
| Menu | Documentation> Area Groups> Create Area Groups from Template... |
 |
|
| Keyboard | AreaGroupCreateFromTemplate |
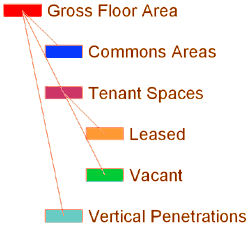 The Create Area Groups from Template dialogue box is not of
much use if you have not already created an Area Group Template Style ( see above ).
For those familiar with AutoCAD's Array command, the Row and Column Offset options
should be self-explanatory.
Group Template - use this drop-down list to select any Area Group Template Styles currently in your drawing. These are created with the Area Group Template tool which uses the Style Manager to store these settings. As is indicated by the other options on this dialogue box, a template is of particular value when it is complex in nature.
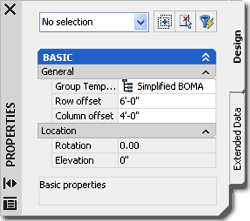
Row Offset - you can type in a value to be used as a centerline distance between the Area Group Marker icons in the vertical direction, use the arrow button to specify this distance on screen or use the rectangle arrow button to define both Row and Column offset simultaneously by picking on screen.
Column Offset - you can type in a value to be used as a centerline distance between the Area Group Marker icons in the horizontal direction, use the arrow button to specify this distance on screen or use the rectangle arrow button to define both Row and Column offset simultaneously by picking on screen.