In this article, I want to begin to dispel the myth that AutoCAD and it's flavors cannot produce artful work; that "CAD" is just for vector lines. This article is also to support a new class that I have created for San Francisco State University called "AutoCAD for Multimedia" and it will be held on November 6 - 7, 2001 - see www.archidigm.com/lounge for more details on this exciting class.
Recently a client asked me if it was possible to put some of their hand sketches into AutoCAD and use them as overlays for Elevations in much the same way we might draw by hand. This client had been informed by others, let's call them "gurus", that this couldn't be done and the only way to do this type of work was to use Photoshop® and/or Illustrator®. I am a true fan of both products and in awe of the people who can work with them the way most of us can work with AutoCAD, but what I cannot stand is snobbery. I do not believe in stereotypes and other such nonsense about people in firms who are the "3D guys and gals", the "Multimedia gals and guys", the "CAD gals and guys" and the "non Computer gals and guys". This is just ridiculous old school thinking and I hate to see it come around again because I went through it in the eighties when I was one of the CAD/Computer guys and nothing more.
The fact of the matter is that if you can use AutoCAD there really isn't any piece of software you can't figure out. And if you are a designer, then that is what you are and you can design with anything; even a rock in dirt. For you AutoCAD guys and gals out there worried about the Photoshop and illustrator guys and gals around you, forget them. Load that office copy of Photoshop and/or Illustrator and start your lessons and become that Wizard guy or gal who can use software to design cool stuff! And for you "multimedia" guys and gals snubbing CAD, check it out because you might be surprised; that's the impression I get every time I crank out a rapid 3D model.
The first thing you have to do is get your images into the digital realm and that involves getting your work scanned. There our plenty of scanning services and most of them scan things like old blueprints, civil and survey drawings that have never been converted into CAD. A simple $150.00 brand name scanner from your local computer superstore will do the job I am referring to here.
Once you have your image scanned, you will need something like Photoshop to modify it in a way that is appropriate for use in AutoCAD. AutoCAD can, in fact, take most image formats but if you want transparency it will have to be a bi-tonal image ( two tone / black and white ). These types of images are often called bitmaps but you can produce bi-tonal TIF's and other format that work as well but .BMP's will often do just fine.
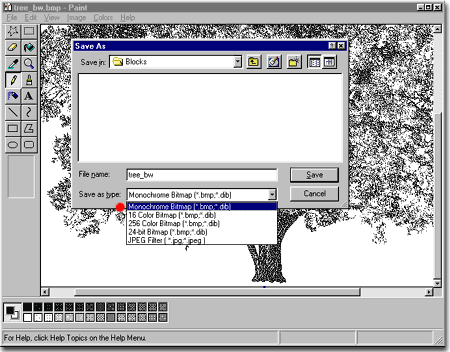
In the illustration to the right, I show that you can even prepare one of these images in Microsoft's included Paint program.
From Paint, just save your image with the Save as type: set to Monochrome Bitmap (*.bmp, *dib).
In Photoshop, you can work with the Image > Mode > Bitmap menu option to convert your image into a bi-tonal bitmap. With Photoshop you have a lot more control over the pixelation and dithering effect so with some trial and error runs you can find the cleanest look on your final AutoCAD prints. With Photoshop you have to be careful because it is very easy to create images that are too large to be practical for use; especially if you plan on using a lot of these images to dress up your AutoCAD drawing.
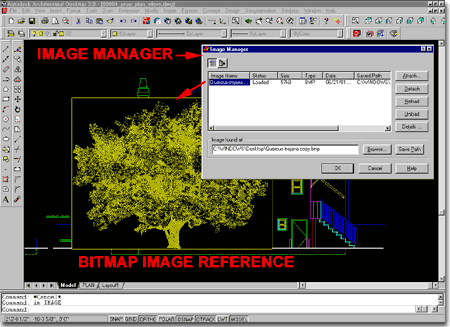
In AutoCAD, you can use the Image Manager to Attach your bi-tonal bitmap in the same fashion as you would Attach an Xref. You can type "im" on the command line to bring up the dialogue box illustrated to the right.
Once you bring in your image, you may have to work with the Scale of it by using the Scale command or Grips to Stretch it out. On Civil Survey drawings, I use this trick a lot and combine it with the Scale Reference option to scale the image based upon a known distance on the image.
The image will not be transparent by default so you should see something like that illustrated to the right. If you don't have a lot of black around your image, something went wrong when you converted it to a bi-tonal image and you will probably have to go back and try it again in your image editing program ( like Photoshop ).
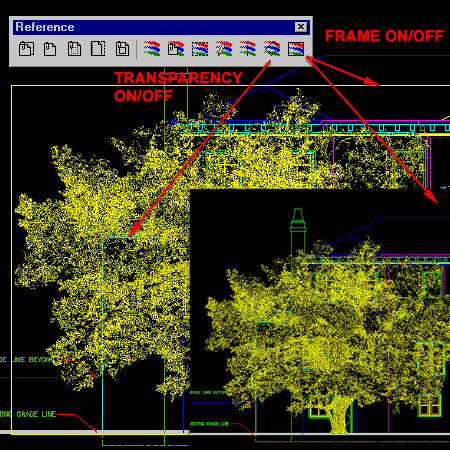
Activating Image Transparency and Deactivating the Image Frame
Illustrated to the right, I show how you make the bi-tonal bitmap transparent. You can use the Transparency button on the Reference toolbar or select the Image's frame, right mouse click, select Image off the object specific pop-up menu and cascade over to Transparency.
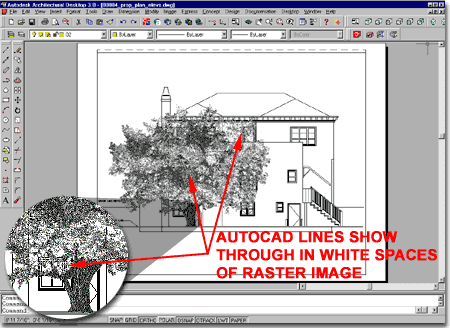
Once you type "On" in response to the "Transparency" command, your image should become transparent everywhere except where pixels exist - see illustrations, right.
The last thing you will probably want to do just before printing, is turn "Off" the Image Frame. To do this, you can use the Image Frame button on the Reference toolbar, use the object specific pop-up menu or simply type "ImageFrame".
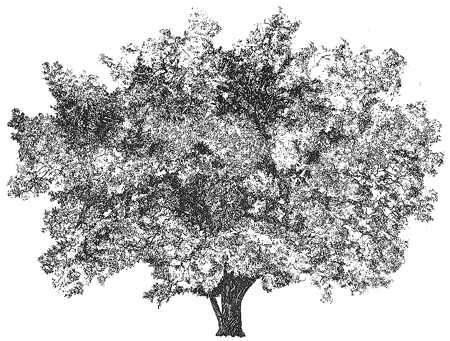
Illustrated to the right is what the print will look like. These types of images are pure black unless you use a Color that gets screened when you print. A grayscale does appear in some bi-tonal images because of pixel density; i.e., more pixels closer together appear black and fewer pixels spread farther appear can appear gray.
By using other Image tools, like Image Clip, you can begin combining raster and vector work in AutoCAD like the artist you truly are.
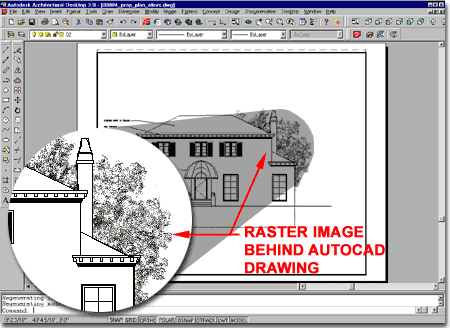
Now, let's see how good you have become. Look at the first image in this column and try to figure out how I got the tree to go behind the building. There are several possible answers but I didn't use Image Clip.