PART 3
OPTIONS DIALOG BOX - AUTOCAD SETTINGSContents:
Files Tab ---- Display Tab ---- Open and Save Tab ---- Plotting Tab ---- System Tab ---- User Preferences Tab ---- Drafting Tab ---- Selection Tab ---- Profiles Tab
| Architectural
Desktop 3 - Deployment eGuide PART 3 OPTIONS DIALOG BOX - AUTOCAD SETTINGSContents: Files Tab ---- Display Tab ---- Open and Save Tab ---- Plotting Tab ---- System Tab ---- User Preferences Tab ---- Drafting Tab ---- Selection Tab ---- Profiles Tab |
| 1Files Tab | 1-3 AUTOCAD SETTINGS |
||||||||
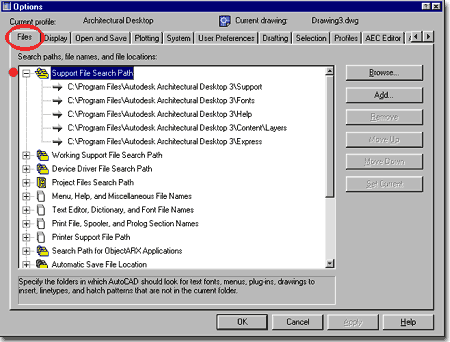
Search Paths
This tab provides access to all of the paths for the various folders that AutoCAD and Architectural Desktop need to run properly. When installed all of the default paths will be set to point to folders on the local drive and within the the program folder such as "C:\Program Files\Autodesk Architectural Desktop 3\Support", for example. For Network installations, many of these paths should be set to folders on the Server to allow for easier management and to consolidate shared resources such as Symbols Libraries. See Part 2 - Options Dialog Box - Search Paths for more information on this topic. Note: |
 |
||||||||
| 2Display Tab | 2-3 AUTOCAD SETTINGS |
||||||||
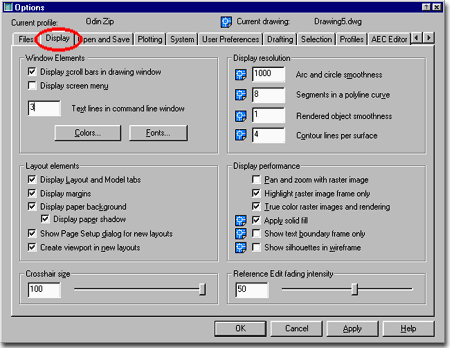
| Window
Elements Display scroll bars in drawing window - This controls the scroll bars on the bottom and right side of AutoCAD. Turning them off does gain a little bit of space on the right side but not the bottom because that scroll bar uses part of the Layout Tab space. Display screen menu - This feature brings up the old AutoCAD right-hand side menu from the days of DOS. Text lines in command line window - This basically controls the height of the command window at the bottom of AutoCAD. You can also just use your mouse and pull it up or push it down for more lines of text. Three lines is the default and for a good reason so you may want to leave it at this number.
|
 |
||||||||
| Layout
elements These settings control the Layout paper look. Display Layout and Model tabs - If you turn this off and Display scroll bars in drawing window you can reclaim a little bit of "real estate" on your screen but I don't think the loss of the tabs is worth it. Display Margins - the margins appear on the paper as dashed lines and should be on to help users realize whether or not their titleblocks or other work will actually get printed. Items outside the margins will not get printed even if the plotter has the capability to plot farther out. Display Paper background - this controls
the appearance of a sheet of paper and provides an option to shadow the paper. Show Page Setup dialog for new layouts - this option is also controlled by the Display when creating new layouts checkbox on the Page Setup dialog box. Having this checked forces users to look at the Page Setup dialog box each time they create a new Layout and pick on its tab. I think it is a good idea to leave this on. Create viewport in new layouts - This option can be the bigger pain of all these if you have a far different concept on Viewport configurations than a single centrally located viewport. Generally this option is not too bad and for those who don't remember how to create Viewports with the Mview command, this may be an essential reminder. Crosshair size Display resolution Segments in a polyline curve - SPLINESEGS - this variable affects Polylines only. It is best observed when using Pedit on Plines and using the Spline option to curve a jagged set of Plines. The range of values can be between -32767 and 32767. Rendered object smoothness - FACETRES - this variable affects Solid objects only and works in conjunction with the Viewres variable ( Facetres X Viewres ) to create the smoothness of curved surfaces on Solids. Though the User Guide claims that this affects the various Shademodes, I have not found that to be the case. However, it does affect Renderings and Exporting of Solids to other programs. The default value is 0.5 with a range between 0.01 and 10.0. Higher numbers increase smoothness. Contour lines per surface - ISOLINES - this variable affects Solid objects only. The number of isolines helps in visualizing curvature in Wireframe Mode but does not apply to Rendering ( despite what the on-line help suggests ). |
Display performance Highlight raster image frame only - IMAGEHLT - this variable is an interesting option that allows you to see the whole raster image area with a cross hatch pattern instead of just the frame. Make sure HIGHLIGHT is set on ( 1 ) for this to work. The problem with this option is that it makes it impossible to relate content on the image with any content on the screen so this is not an option I find particularly useful. True color raster images and rendering - VIEWRES - this variable is very important when Rendering images directly on the screen. True Color is 32bit and as long as your system is configured to display such a high level of color, you can see it on your screen and better judge the quality before committing to a super high quality File output. This variable affects Referenced Images as well and does degrade system performance. Apply solid fill - FILLMODE - this variable controls solid fills of Polylines with Width, Trace lines, objects created with the Solid command , old .shx Fonts that have fills and all Hatch patterns. When turned off, no fills or hatch patterns will show. This variable does not affect Rendering but does affect general display performance and is particularly useful on drawings with an enormous amount of hatch patterns. Show text boundary frame only - QTEXTMODE - this variable turns all text objects into rectangular outlines. It does improve general performance a lot, but the rectangles do not represent the true outline of the text and can thus be a bit misleading about the position, height and width of text. Show silhouettes in wireframe - DISPSILH - this variable only affects Solid objects by controlling the wires along the outer edge in 2D Wireframe Shademode and the faceted appearance when the HIDE command has been executed ( not Hide in Shademode ). Reference Edit fading intensity |
||||||||
| 3Open and Save Tab | 3-3 AUTOCAD SETTINGS |
||||||||
| The Open and Save tab
offers access to save and backup options along with one of the most important network
based options related to drawing linking. The Xref Demand load and Layer change
retention settings have a huge impact on how Xref'd files are managed locally and on the
server side. CAD and IT Managers must make sure they comprehend the three Demand
load Xref options and configure appropriately for their offices. File Save Save a thumbnail preview image - though this does add a little weight to a .dwg file, it is well worth the fat; particularly as we move forward with all sorts of tools to help us see our files without directly opening them in the parent application. Incremental save percentage - ISAVEPERCENT - this system variable can be used to enhance the performance of save time but at the cost of file size. Though it is not recommended by Autodesk, I tend to reduce this value to 0 for Architectural Desktop files to keep the already bloated file size down to a bare minimum. A user will notice the effects if they run the Automatic save frequently since it may cause lag time while working. Autodesk recommends a value of 50. File Safety Precautions |

Create backup copy with each save - this option is highly recommended because it offers the easiest way for users to recover from crashes. To recover, a user simply has to find the filename.bak with explorer and rename the filename.bak to something like "filename2.dwg" and open as a regular .dwg file. Full-time CRC validation - this system variable can be used to assist when file corruption becomes a recurrent problem. It will check all new data added to the drawing file to assure integrity. I have never actually needed this option but here it is. Maintain a log file - LOGFILEMODE - this system variable offers the activation of a log file during automatic saves with the contents of the command line. This option is usually only of significant value during file corruption problems and should thus be left unchecked. File Open Display full path in title - I really like this option when working on a large network so I can see where I am supposed to go if I want other files from the same folder or to save to the same folder ( drive e:, f:, g:, h:, ...x: - what drive now???) |
||||||||
| External
References (Xrefs) Demand load Xrefs: - XLOADCTL - The Demand load Xrefs drop-down list offers only two viable solutions, in my opinion: Enabled with copy or Disabled. The Enabled option is just too slow. Basically, you can boil it down to Xref behavior, particularly over a networked environment. In Enabled mode it tasks through the network, in Enabled with copy it puts a copy of the file in your Temp directory and with Disabled it does the same but doesn't attempt to save you speed with regens, etc. It's ironic but I find Disabled fairly fast when Enabled was designed to be the fastest. In all cases file locking is activated by the System if taken form a Server so others won't be able to edit it anyway. On a local use, the story is a little different where Enabled is the only option that will lock you out from saving over an actively used Xref while in use. Since I run my own show on my laptop, on the road, I run Disabled. This allows me to work on all of my files simultaneously, Xref'd or not and I have found that the Disabled mode is less likely to have problems reloading an Xref I just saved. Recommend Enabled with Copy first, then Disabled if req'd. Retain changes to Xref layers - VISRETAIN - this is a must for those who bring in drawings as base sheets but want all of the layers and/or linetypes different than the source file. By checking this option, the layers won't change for an Xref. Highly Recommend Allow other users to Refedit current drawing - XEDIT - This option hasn't worked for me anywhere. Once that Xref is pulled from a server, it's write protected and that's that no matter what you set in AutoCAD. ObjectARX Applications Disable Load on Demand - if you choose this option, a lot of tools will not work; even simple tools like the Units dialog and the Design Center. Not Recommended. Custom Object Detect - if you choose this option, applications are loaded based upon the needs of the objects detected. This may work to load Object based applications on an as needed basis, but many tools are not triggered in this fashion and thus the results are nearly as bad as the "Disable Load on demand" option. Not Recommended. |
Command Invoke - if you choose this option, applications are only loaded when the command is executed to work with them. This makes it tough for ADT users but sometimes great for those who are receiving proxies and don't want their enablers to activate ( due to performance degradation ). For ADT users who may have this option set, they will notice a slow down as soon as they execute an ADT-only command and often errors are reported on various objects. Not Recommended for ADT users. Okay to use for AutoCAD as a toggle for disabling Object Enablers from activating. Object detect and command Invoke - this is the default setting that does it all. When set, AutoCAD and Architectural Desktop loads and runs as designed but performance degradation may require using the Command Invoke option instead. Highly Recommend for ADT. Proxy images for custom objects - proxy graphics are unique representations of objects that were created with another "flavor" of AutoCAD that has programs for such things as Civil topographic information or Architectural Walls. Proxy graphics can be a huge source of frustration because users cannot work with them as native objects. I some cases attempts at editing only cause system crashes while in other cases, objects may disappear. By downloading Object Enablers from Autodesk's website significant improvements can be achieved because these enablers provide some of the code required to work with the objects in a native format. If a user does not have an Object Enabler, the choices are not so good. Do not show Proxy Graphics - if you choose to not show the proxies, the will not be a source of frustration but then data may also go unseen or unused. This can be really bad for drawings received by Civil Engineers using Land Development Desktop. Not Recommended Show Proxy Graphics - if you choose to show the proxies, as is the default setting, you will see representations of objects though editing is highly limited. Recommended. Show Proxy Bounding Box - if you choose to show only bounding boxes for areas where proxies reside, a user can thus more readily determine which objects are proxies and which are not. This option may not be so good for a default working mode, unless speed is an issue, but rather as a tool to help determine which objects are proxies. Rarely Recommended. |
||||||||
| 4Plotting Tab | 4-3 AUTOCAD SETTINGS |
||||||||
| The Plotting tab
offers several options and settings that are of extreme significance to CAD and IT
Managers and must be set properly before full deployment. A full understanding of
Layouts, Page Setups, Plotting, .pc3, .ctb's and .stb's is required to make the best
decisions on this dialog box. Default plot settings for new drawings Use last successful plot settings - This option will produce an effect similar to what AutoCAD R14 did where the last Plot Settings are recalled for new plots but since Tabs should be properly configured with the Page Setup dialog, this option could actually be counterproductive. Add or Configure Plotters... - use this button to access the Plotter Window - also accessed from the File pull-down menu via the Plotter Manager... menu option. You can use this to create .pc3 files. |
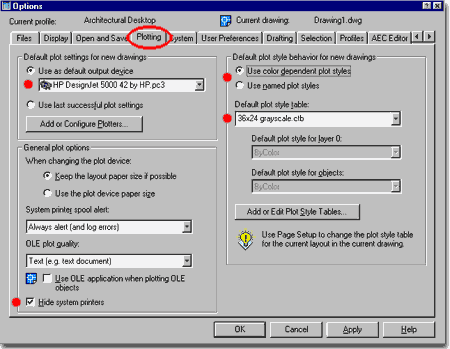 General
plot options Use the plot device paper size - this will happen anyway if, for example, you switch from a 750 c to an 8.5 x 11 LaserJet. System printer Spool alert - obviously we should know when something is not working properly in AutoCAD and particularly if it has to do with printing, but the error log files can be a pain to remember to delete and there's no option for alert without log files. I leave this set to the default "Always alert ( and log errors)". |
||||||||
OLE plot quality
- This is where you start tinkering if you are having trouble with those 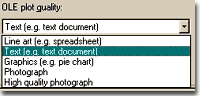 linked Excel or Word documents that are not printing well. If you do experience poor quality output, you can try these 5
various options which should be self-explanatory. You can also try using the Use
OLE application when plotting OLE objects ( OLESTARTUP ) check
box which will switch to the source application for the printing part of your OLE
document. In many cases, I have found none of these options satisfactory and have
had to work on the printer/plotter configuration (.pc3) instead. And, in some cases,
like with older LaserJet III's, you can just plain forget trying to get good output. linked Excel or Word documents that are not printing well. If you do experience poor quality output, you can try these 5
various options which should be self-explanatory. You can also try using the Use
OLE application when plotting OLE objects ( OLESTARTUP ) check
box which will switch to the source application for the printing part of your OLE
document. In many cases, I have found none of these options satisfactory and have
had to work on the printer/plotter configuration (.pc3) instead. And, in some cases,
like with older LaserJet III's, you can just plain forget trying to get good output.
|
Default
plot style behavior for new drawings
Default plot style table - This is where you get to specify the default .ctb or .stb file for use with your printers/plotters. You cannot specify .ctb's if the option above this drop-down list is set to Use named plot styles (.stb's). If you primarily print in black-n-white, I suggest creating and using a .ctb file that shows your Layouts in black-n-white, even if you actually use numerous other .ctb files: it just makes life easier to see Layouts in black-n-white by default. Add or Edit Plot Style Tables... - use this button to access the Plot Styles Window - also accessed from the File pull-down menu via the Plot Style Manager... menu option. Within the Plot Style Window, you should find a list of all the .ctb's and .stb's currently available for this installation. You can use the Add A Plot Style Wizard to create new ones or simply use an existing style, modify it and use the Save As... option to create a new one. |
||||||||
|
|||||||||
| 5System Tab | 5-3 AUTOCAD SETTINGS |
||||||||
| Current
3D Graphics Display On the Properties... button of the Current 3D Graphics Display option, you can access 3D graphics performance options for speed or heightened quality, drivers and material options - see Working in Transparent mode Current Pointing Device Layout Regen Options Cache model tab and last layout and Cache model tab an all layouts - are both options to increase the performance of switching between layouts. The more you cache, the more system resource you give up for other things that you might want them for, such as real-time orbiting or rendering, etc. The only way to know what's best is to try these options out. If you don't switch layouts very often, then leave this setting on Regen when switching layouts. dbConnect Options General Options Display OLE properties dialog - this option can be used to disable the OLE dialogue box when double clicking on OLE objects but I personally have not ever wanted to disable this option. Show all warning messages - should not be available anyway, as illustrated. If it is, you probably want it checked to know when something terrible has happened. Beep on error in user input - to beep or not to beep when you make a mistake? |
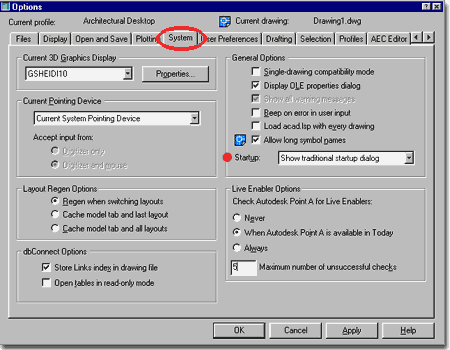 Load acad.lsp with every drawing - this option doesn't even really make sense to me since my last two releases of AutoCAD install without this legacy file. Programmers can take advantage of the call to load this file for custom routines and then decide whether or not to load it for every drawing. If you look in your AutoCAD 2000 Support directory, you'll see acad2000.lsp and acad2000doc.lsp now. These other .lsp files will still load if this checkbox is unchecked. Rarely check this option. Allow long symbol names (EXTNAMES) - this allows blocks, layers, Xrefs and a bunch of other name types to be up to 255 characters in length as opposed to 8 characters ( as in the good old DOS days). The only reason to deactivate this feature is for offices where backwards compatibility, of this nature, is really important. Recommend that this box be checked. Startup: - this drop-down list allows you to choose one of three startup dialogue box options: none, traditional and Today. The Today startup dialogue box can be a nuisance, especially on slower machines and thus you may find choosing "Show traditional startup dialog" a pleasant solution to a long start in the morning. Recommend "Show traditional startup dialog" option be used. Live Enabler Options |
||||||||
| 6User Preferences Tab | 6-3 AUTOCAD SETTINGS |
||||||||
| Windows Standard Behavior Windows standard accelerator keys - accelerator keys are written in the AutoCAD menu file and allow for such keyboard strokes as Ctrl+C for Cut. There is a list of very common keyboard strokes that many have now become accustomed to using outside of AutoCAD, so it was only a matter of time before they became part of AutoCAD. In some offices, using custom macro's, this may be something that is not desirable. Shortcut menus in drawing area - if turned off, the right mouse button will only act as a return or <enter> keystroke. I don't recommend passing up all of the amazing right-click menu items that are coming from Autodesk so it is better to work with the Right-click Customization... options than to completely bypass new features for the sake of habits.
|
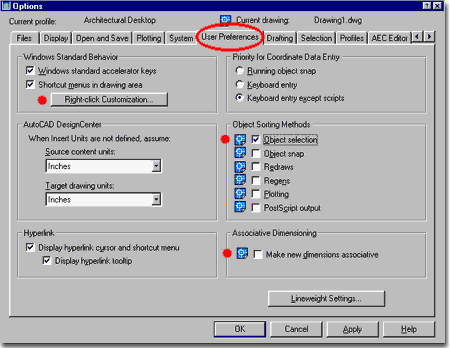 AutoCAD DesignCenter In most cases, you will want to set both unit values the same and either to Inches or Millimeters ( unless you use another metric base unit ). |
||||||||
| Hyperlink Display hyperlink cursor and shortcut menu - this box controls the activation of the hyperlink cursor marker when a user hovers over any object that has a hyperlink associated with it. When a user selects a hyperlinked object, right-clicks on the mouse to activate the object specific pop-up menu, the Hyperlink> option will appear at the bottom of this menu. From this menu, a user can go directly to the target of the hyperlink. Display hyperlink tooltip - this option is only available when the Display hyperlink cursor and shortcut menu is checked. The hyperlink tooltip will show the hyperlink target as a heads-up display. If you find that checking this does not appear to work, make sure that the Display AutoSnap tooltip option is also checked on the Drafting Tab. Priority for Coordinate Data Entry |
Object Sorting Methods Associative
Dimensioning Lineweight Settings |
||||||||
| 7Drafting Tab | 7-3 AUTOCAD SETTINGS |
||||||||
| AutoSnap
Settings Marker - the markers indicate when a user has approached the Endpoint, Midpoint, Center, Intersection and so forth of any object on the screen while creating or editing objects. The Markers do consume some video resources but working without them is not pleasant for most users. Always check this option. Magnet - the magnet option pulls the cursor into the marker space to assist in more accurate creation and editing. Always check this option. Display AutoSnap tooltip - the tooltip provides a head-up display of the OSNAP type currently being displayed. This option may be good for beginners who don't know the markers icons but generally all this does is add more drain on video resources. Rarely check this option. Display AutoSnap aperture box - the aperture comes from a time before markers existed and is basically no longer necessary. In cases where video performance is very slow, unchecking all of the AutoSnap options except for this option can improve performance ( may be useful on slow laptops ). If checked, the Aperture Size will need to be set appropriately for use as an OSNAP trapping tool. Rarely check this option. AutoSnap marker color drop-down list - the default color for the AutoSnap markers is yellow and very few seem to change this color. Yellow reads well against a black background but is one of the worst colors against a White background. Red, on the other hand, reads well on black Model Space backgrounds and White Layouts so this may be a good alternative color choice. AutoSnap Marker Size AutoTrack Settings Display full-screen tracking vector - This is a good option to turn off despite what my screen capture shows. If you turn it off, the OSNAP Tracking lines are actually easier to read because they only project off of the source OSNAP point and not beyond the cursor location. The only problem is that if users also work with the Extension OSNAP, the two tracking lines will look the same and it is thus difficult to distinguish them (personally, I do not find this a problem but others might ). Recommend that this box be unchecked. |
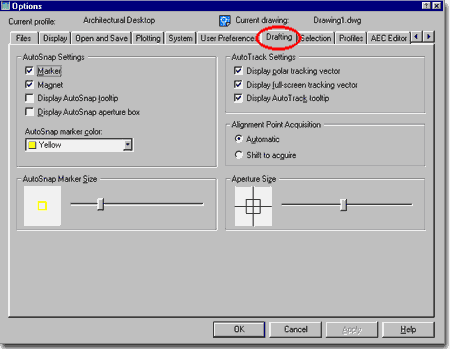 Display AutoTrack tooltip - This option provides a heads-up display with a distance value relative to where the AutoTracking line has been pulled from. This is a very useful feature because users can read how far or how close they are to other objects before locating points. Always check this option. Alignment Point
Acquisition Shift to acquire - This option is actually really cool and I often use it when I get frustrated with OSNAP Tracking. As you may have noticed, once you activate OTRACK, those little markers drop off everywhere you hover with an OSNAP causing OTRACK lines to come out from places you may not even want. Using the Shift to acquire option means that if you want to drop off a marker and have an OTRACK line come out from that point, you will need to hold the Shift Key down while "hovering" over an OSNAP point. Rarely check this option. Aperture Size |
||||||||
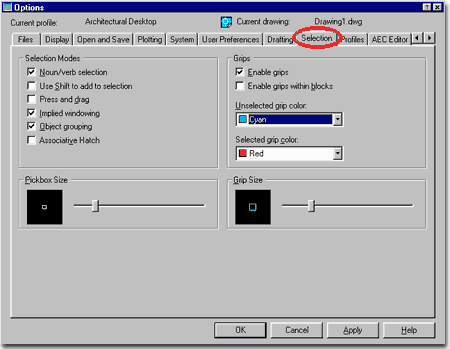
| 8Selection Tab | 8-3 AUTOCAD SETTINGS |
||||||||
| The Selection tab
offers access to some old features that have been around in AutoCAD for many years.
There is a generalized set of preferences that most users are content with but there are
also many users who have specific preferences on how these options are set. For the
Deployment portion, a CAD or IT Manager can only choose the best and most widely accepted
set and allow each user to do their own unique changes later. Illustrated to the right is the default set of settings which are fairly good. Selection Modes Use Shift to add to selection - this box controls the ability to add objects to a selection set. If checked, user must hold the shift key down in order to add objects to the selection sets. Never check this option. Press and drag - this box controls the way a user has to use the left mouse button in order to get automatic Crossing and Windows for selections. It is very unusual for users to use this option but some might. Never check this option. Implied windowing - this box controls the automatic window function for selecting objects. If unchecked, users must type in the options for Window, Crossing and so forth when selecting objects. Always check this option. Object Grouping - this box controls the grouping feature which many users don't even know exists. Checking this option will actually alert users to it's use and should thus be checked. Generally check this option. Associative Hatch - this box controls the the selection results when users choose to edit hatch patterns. If checked, selecting the hatch will also select the associated boundary and is thus often considered a very undesirable option. Rarely check this option. |
 Pickbox
Size Grips Enable grips within blocks - this box controls grip markers within Blocks and Xrefs. If checked, user will find a surprising number of grip markers when they select blocks or Xref's and thus this option is rarely used. Rarely check this option. Unselected Grip Color - the default color for cold and warm grips is blue but this color can often be difficult to read on a black background. Many users have opted for Cyan and this may well be a better color in your office. Selected Grip Color - the default color for hot grips is Red and should be left this color because it indicates that this grip is currently being edited. Grip Size |
© Copyright 2002 ARCHIdigm. All rights
reserved.
spell checked on Oct. 19, 2002
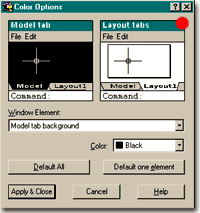 Colors and Fonts buttons
- For Fonts... button, you can only change the command line font.
To change the font of the pull-down menus and the dialog boxes, you will have to use
Windows settings. For the Colors... button (illustrated left), you
will find options to control the look of both the Model and Layout Tabs. Many R14 and
older AutoCAD users immediately turn off the White portion of the Layout Tabs so they can
read them in the same way Paper Space looked in the past: with colored vectors over a
black background. Though this may appear as a good solution it misses the point by a
mile and prevents users from working in near "plot preview" mode.
Colors and Fonts buttons
- For Fonts... button, you can only change the command line font.
To change the font of the pull-down menus and the dialog boxes, you will have to use
Windows settings. For the Colors... button (illustrated left), you
will find options to control the look of both the Model and Layout Tabs. Many R14 and
older AutoCAD users immediately turn off the White portion of the Layout Tabs so they can
read them in the same way Paper Space looked in the past: with colored vectors over a
black background. Though this may appear as a good solution it misses the point by a
mile and prevents users from working in near "plot preview" mode.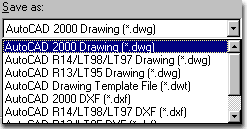 Save as: - The save as drop-down list
offers several options for automatic conversion to older versions of AutoCAD and for other
file formats such as .dxf. In the early years of AutoCAD 2000, saving back to R14 by
default prevented a lot of file exchange problems and may still prove to be a viable
solution but with Architectural Desktop, saving down does not convert the files to 2D nor
does it do a lot of good for the file integrity since eventually the
"round-tripping" effect does appear to deteriorate. Setting this to
anything but the default AutoCAD 2000 is thus not recommended.
Save as: - The save as drop-down list
offers several options for automatic conversion to older versions of AutoCAD and for other
file formats such as .dxf. In the early years of AutoCAD 2000, saving back to R14 by
default prevented a lot of file exchange problems and may still prove to be a viable
solution but with Architectural Desktop, saving down does not convert the files to 2D nor
does it do a lot of good for the file integrity since eventually the
"round-tripping" effect does appear to deteriorate. Setting this to
anything but the default AutoCAD 2000 is thus not recommended.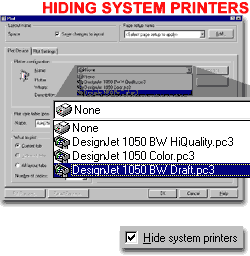 Hide system printers - This
option was almost certainly designed specifically for CAD and IT Managers so they could
create custom .pc3 files and then hide the standard system printers from the users so they
don't accidentally pick a poor configuration. By creating good .pc3 files that have
been named in such a way that describes their function and output type, users should find
this an easier approach to plotting. See also comments under
Hide system printers - This
option was almost certainly designed specifically for CAD and IT Managers so they could
create custom .pc3 files and then hide the standard system printers from the users so they
don't accidentally pick a poor configuration. By creating good .pc3 files that have
been named in such a way that describes their function and output type, users should find
this an easier approach to plotting. See also comments under 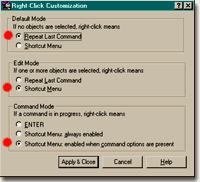 Right-click Customization... - This option
allows you to control some of the behavior of your right-mouse button. Basically it
provides past users with some flexibility on how much of the new features they want.
Illustrated to the left, I show my current favorite configuration ( red dots ). It
gives me Repeat last Command when none have been asked for, but provides
me with a Shortcut Menu if objects have been selected or while I am using
a command. Most older AutoCAD users prefer to have <ENTER> If
a command is in progress.
Right-click Customization... - This option
allows you to control some of the behavior of your right-mouse button. Basically it
provides past users with some flexibility on how much of the new features they want.
Illustrated to the left, I show my current favorite configuration ( red dots ). It
gives me Repeat last Command when none have been asked for, but provides
me with a Shortcut Menu if objects have been selected or while I am using
a command. Most older AutoCAD users prefer to have <ENTER> If
a command is in progress.