First Impressions...
Autodesk® Architectural Desktop™

First Impressions...
Comments by: Odin Cary
I am assuming that the majority of visitors to this page will be AutoCAD users (with or without a mixed bag of 3rd party applications) who are wondering if they should make the leap to Architectural Desktop.
So far I have a couple of clients who took it on immediately. Their comments have ranged from confused disapproval to enthusiastic acceptance and in one case, both. The ADT discussion group on the Autodesk.com Website seems to echo similar reactions but people are pushing and moving forward - the right attitude in my opinion. As I stated in my review last quarter, the new features of ADT are not imposed on the AutoCAD user in such a fashion as to force their adoption; you can run ADT as if it were simply AutoCAD R14. Four new pull-down menus, to the right of Modify and left of Help, are all that physically make ADT appear different. There are of course new palettes, aliases and keyboard commands too but the palettes, for example, are a component of a separate menu and thus are not imposed on the traditional AutoCAD user.
Migration to ADT is really not an issue of GUI layout and since ADT can continue to run your 3rd Party Applications and custom routines ( we tested ArchT and Softdesk 8 ), it really isn't an issue of down time. Running ADT is a "no brainer" but adopting it is a different matter. What I mean by this, is that in order to reap the true benefits of ADT, you have to really adopt its features: NO mixing of ArchT walls with personal door blocks and so on. When I attempted to create a roof that might be inspired by Alvar Aalto’s great work, for example, I could only do so by relying on ACIS based Solid commands and thus this new roof Solid, would not display in the automated elevation routine of ADT; i.e, if you want an ADT roof, you have to build it with the ADT roof routine.
Well, that seems fair enough - right? I agree, but when you want an Alvar Aalto inspired roof and your ADT roof routine cannot build it, what do you do? Here in lies the only problem I see, thus far, with this product: limitations to the objects. But it isn't a unique problem, all software products have limitations and there is probably some "work-around" solution that we haven't discovered yet; and that is what our Tips and Tricks directory is for. And if any of you find a way to build elliptic winding stairs, let me know.
Test 1
Basic plan drawing
| One of the first tests I did with ADT was to see how fast
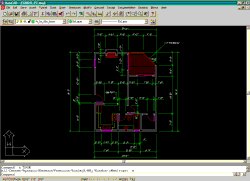
I could convert an existing AutoCAD R14 drawing into a new 3D ADT drawing. I carry one of my student projects around with me nearly everywhere I go and since it was conveniently available, that was what I used. I literally redrew this 2D drawing in minutes. I had all the walls, doors and windows done in under 10 minutes. ADT can automatically convert lines and polylines into walls but since I did not have a convenient outline to convert, it was faster to simply trace over the top by snapping to endpoints and intersections. |
 |
| Doors and Windows are lightning fast to insert and place. Since a new dialogue box is active while you are placing Doors or Windows, you can rapidly change your mind about a size, orientation and placement by interacting with the dialogue box in real time. A simple selection of your placed Door or Window and a consequent right-click allows you to Modify everything editable and not only on the selected object, but also that objects entire style family (thus affecting all objects of the same style). | 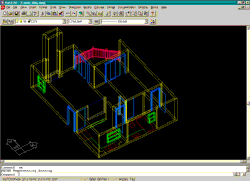 |
Test 2
Converting AutoCAD objects to Walls
| Lines | Yes |
| Polylines | Yes |
| Polylines Splined | No |
| Polylines Fit Curved | No |
| Splines | No |
| Arcs | Yes |
| Circles | Yes |
| Ellipses | No |
| Mlines | No |
| Objects Converted to Polylines | Yes |
Test 3
Importing Architectural Desktop objects
| Import / Open with: | Architectural Desktop export of new native ARX object types (walls, doors, windows, etc.): |
DWG |
SaveAs… R13 |
SaveAs… R12 |
DXFout |
DXFout R13 |
DXFout R12 |
3DSout |
ACISout |
PSout |
WMFout |
BMPout |
DWFout |
|
| Architectural DesktopTM | FULL | FULL | 2D lines | FAIL | FAIL | FAIL | NA*5 | FAIL | FULL | FULL | ||
| AutoCAD® R14 | FULL*1 | FULL*2 | 2D lines | FAIL | FAIL | FAIL | FAIL | FULL | FULL | |||
| AutoCAD® R13 | "Zombie"*3 | 2D lines | FAIL | FAIL | FAIL | FAIL | ||||||
| AutoCAD® R12 | 2D lines | FAIL | FAIL | FAIL | FAIL | |||||||
| 3D Studio® Max 2.5 | FAIL | FAIL | 2D lines | FAIL | FAIL | FAIL | FULL | FAIL | ||||
| CorelDRAWTM 7 | FAIL | FAIL | 90%*4 | FAIL | FULL | |||||||
| Photoshop® 5.0 | FAIL | FULL | ||||||||||
| IE 4.0 / Netscape with WhipTM Plug-in | Missing blocks |
*1AutoCAD R14 with AEC Object Enabler Plug-in installed.
*2Architectural
Desktop files Saved As AutoCAD R13 files reverted to "intelligent" objects when
opened in AutoCAD R14 with AEC Object Enabler Plug-in installed.
*3AutoCAD
R13 has support for "intelligent" objects but as "Zombie" objects. We
could not edit any ADT objects even though they were displayed correctly.
*4Importing
took two attempts: the first attempt was poor; the second attempt only had a few text
issues which is common with dxf.
*5Architectural
Desktop ARX objects are not ACIS based and thus cannot, currently, be exported into the
ACIS format.
Conclusions:
If you plan to send to an R13 user, convert the ADT drawing into AutoCAD R12
format by using SAVEAS… R12.
If you want a quick 2D elevation, set the elevation view, hide and then export the drawing to a WMF. Now import that wmf file and scale with the reference option in order to achieve the correct scalar ratio and then explode it. Now you have a quick 2D line based elevation. The layers will not come through, but the colors will so it should print just fine.
For more on ARX Object Translation see AutoCAD Tips + Trick and ADT Tips + Tricks.
The Layout
Four new pull-down menus have been added to
the regular AutoCAD R14.01 menu bar, between Modify and Help
( or Bonus if you have it installed ). These four menus fall into the
categories of Concept, Design, Documentation
and Desktop, in that order from left to right. After thinking about these
categories, I would rename the first three as Design, Build and Annotate but I am still
confused about the last one, Desktop.
Concept:
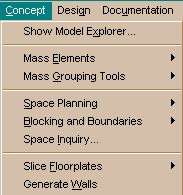 |
This is an amazing new design strategy from Autodesk. It
works on the idea that architects will eventually leave the pen and pad as the primary
medium for doing conceptual massing studies - I paraphrase from other sources here. Having
basically been raised on AutoCAD, I should be the poster child for such a transition and
yet I just went out and bought new pens, but I applaud this approach and am excited about
implementing it. The Concept category works on the principle of creating a design by Massing, Spaces, Boundaries or a combination of all three; one can create a Massing study and then easily convert the Masses into Spaces and/or proceed to the Generation of Walls. |
Design:
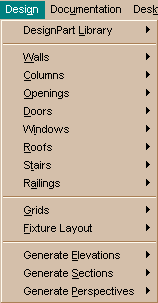 |
This is the traditional CAD toolkit consisting of the
components that make a building a building: Walls, Doors, Windows, Stairs, Roofs, etc. The commands within this Design category are both impressive and disappointing: Stairs, for example, are impressive by virtue of being easy to understand, adjust and implement but disappointing by virtue of design limitations (a variable tread width from floor to floor is not possible at this time so don't expect to make an elliptic winder just yet). Some of the other commands, like Roofs, have a Convert to Roof... option which may be the future solution for handling unique Stairs. Elevations and Sections are generated automatically by replicating the 3D model and then aligning it to a Paperspace viewport for the proper viewing angle. Changes that are made to the "parent" model are automatically reflected in the Elevations and Sections. |
Documentation:
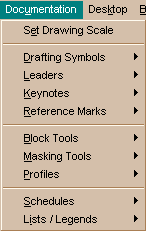 |
This category consists mainly of the standard
architectural annotation symbolism and structure. Notice that Dimensioning is not listed
here but remains on the Dimension pull-down menu. Profiles is an interesting solution to unusual shape needs: you can, for example, draw a polyline object and then convert it into a profile that can then be used as a shape or form for an opening in a wall. |
Desktop:
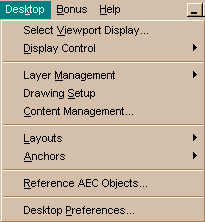 |
This Category has a little of everything in it but
consists mainly of preference settings for Architectural Desktop. I was surprised to find
Layouts in here because I did not think to go here before working on a Massing Study. The Layouts
fly-out menu provides you with adjustable grid systems that can be 3 dimensional. There are some very powerful settings in this category, such as automatic display set of how a project should be presented for plotting in a small scale vs. a defined larger scale or how an elevation should be presented ( what should show and what shouldn't). There are also default settings in Desktop Preferences, for example, on how stairs and railing should be constructed. There is so much here, that I must admit it will take some time for me to get a grip on it all. |
Basic Observations
Door + Windows:
A quick way to load several Door and Window Styles, is to insert ADT’s Style
drawings from the "../Content/Styles" directory.
Doors:
No Roll-up door types in library.
No added features like glass openings, hardware or trim.
Adding a door is a rather impressive task:
On the dialogue box, if you specify Automatic Offset/Center (say 6" ) then the
door will automatically read the adjacent wall to where you are dragging it and the swing
will automatically be towards that adjacent wall.
Windows:
Windows have a glazing layer for glass.
I was not able to create a skylight in a roof.
Roofs:
To make a round or cone type roof, you have to create a polygon perimeter shape and
use Convert to Roof command.
I was not able to create a dome roof using the method described above or by converting a mass object into a roof: the mass object, when converted, became a polymorphous blob.
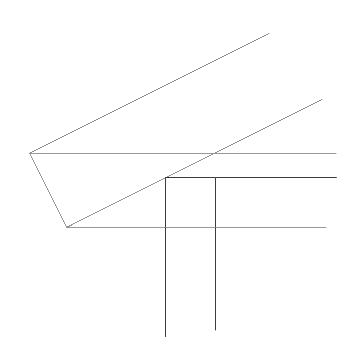
"I was not able to adjust the fascia of my roof and was forced to have a fascia that was not flush with the exterior wall but perpendicular to the roof slope itself; i.e, the fascia is always the same width as the roof envelope." - I discovered later that you can actually produce a flush fascia by selecting your roof, after creation, pick Roof Properties..., go to Dimensions tab and check Floor at the Measure Normal to: prompt - more to come on this subject in our next publication Qrtr. 2.
Openings:
This routine performed rather impressively. To create a "Chinese Moon Gate"
opening, you can simply specify a circular type of opening and then adjust either the
height off of the floor to the base of opening or top (header). If you seek a custom shape
for an opening, you can use any profile you can define with the Profile command.
Symbol Library:
This is definitely a weak component of ADT and needs to be improved. The symbols
appear to be the same old symbols from Softdesk’s past. The interface could use a
make-over with, among other things, the ability to see all the objects as they would look
in 3D.
UCS:
The UCS Entity option does not recognize all of the new object types.
Object Viewer:
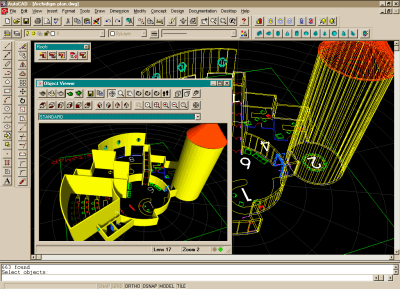
This is a rather cool tool providing the ability to view your 3D building rendered in
real time. The trick I found was to simply select what you want to view and then
right-click away from any objects (avoid the grips) and request the Object Viewer…
option.
For more reviews on specific topics see Autodesk® Architectural Desktop, in use...
For more information, go to Architectural Desktop
For information about working with objects created on ADT when you don't have ADT go to Autodesk - AEC Object Enabler - Product Overview
For a review of the Object Enabler and more go to our Lounge and look under Tips + Tricks.