Using Solid Modeling to create a Slice-able building (Part 3 of 3).
3D Modeling in AutoCAD R14
Using Solid Modeling to create a Slice-able
building (Part 3 of 3).
Comments by: Odin Cary
Contents:
Preparing your drawing for Solid
Modeling ---- Creating Extrudable Polygons
---- Extruding Polygons to create
a Building Mass ---- Subtracting Mass to
create Spaces ---- Extruding
Polygons to create a Roof Mass ---- Extruding Circles to create a
Tapered Chimney Mass ----
Revolving a Polygon to create a Chimney Cap ---- Extruding Polygons to create a Window
Mass ---- Creating Detailed Objects ---- Wrapping it up ----
Cutting a 3D Solid Section ---- Cutting a 3D Solid
Slice
For my last Chapter in this series on architectural modeling in AutoCAD, I attempt to convey the complete strategy for success beyond modeling. The final product in this exercise will translate very easily into a 3D Studio MAX file thus allowing for such exciting work as texture mapping, lighting and animation.
| 10Preparing your drawing for Solid Modeling | |
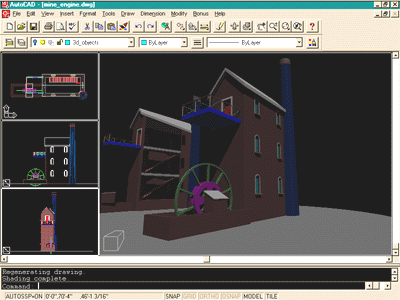
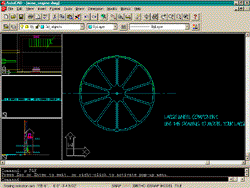
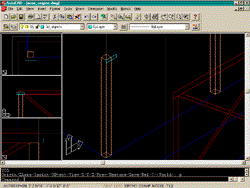
| To follow the exercise as per this page, you may download
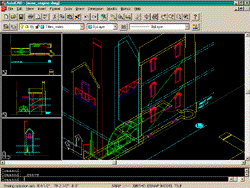
the following drawing file from the ARCHIdigm site: mine_engine.dwg. Once you have downloaded this drawing file, move it to a project folder of your creation and open the file with AutoCAD. The drawing should look like the image to the right. |
 |
| In this exercise, I have attempted to recreate a common
office scenario where a plan and a couple of elevations have been drawn in normal 2D
fashion; but now the client wants to see the building in 3D. If you want to build the 3D model without having the elevations, it is entirely feasible. In this example, though, I will demonstrate how to use elevation information to help the process along. Simply knowing what the heights of important components, like windows and floors, would allow one to work without the elevations. |
|
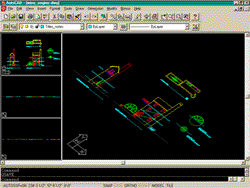
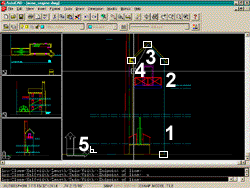
| 1STEP: In the right-hand (largest) viewport, Copy and Paste the two elevations as shown to the right. Notice that the Copy command we are using is from the Edit pull-down menu. When you Paste the copied elevation, place it anywhere you have some blank space in and make sure that you don’t accidentally scale or rotate the elevation when you paste it. This is a simple and quick way of making a Block out of the elevations and will thus allow us to position them with greater ease. |
 |
| 2STEP: In the right-hand viewport, Zoom in to provide yourself with a clear view of the West Elevation (longer one) and the corresponding edge of the floor plan. Turn off the "Ar_wall_fill" layer so that the stone work does not interfere with object snapping. |
 |
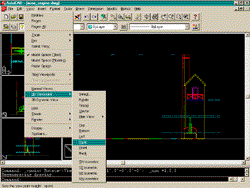
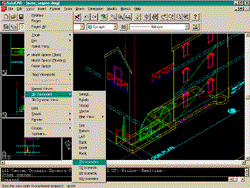
| 3STEP: We will now use the Align command to position the Copy and Pasted elevations against the edges of the floor plan. From the Modify pull-down menu, select 3D Operation and then select Align. |
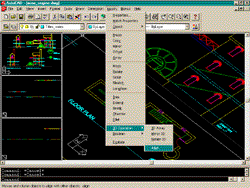 |
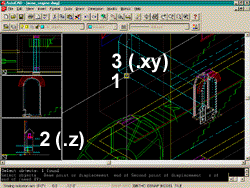
| Now, using the diagram to the right and your object snap, endpoint,
Align the west elevation to the base of the floor plan. Notice that for the 6th point, we will use the .XY point filter and endpoint snap to the same point as the 4th point. This allows us to type any value for the .Z point: try 3’ (but any positive integer will do the trick). |
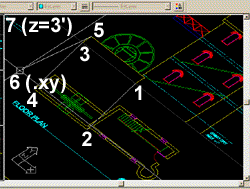 |
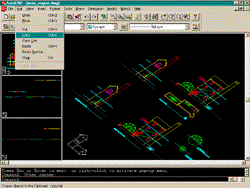
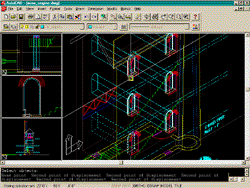
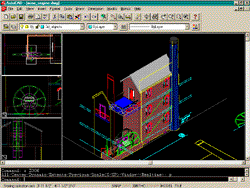
| The end result of Step 3 should look like the image to the
right. If you have trouble with the Align command, you can also simply move the elevation from the 3rd point to the 4th point and then use the Rotate3D command to tilt the elevation up. You can also rotate the UCS icon and use the regular rotate command (see Part 2). |
 |
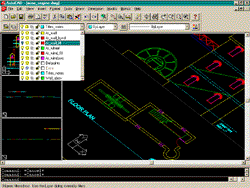
| 4STEP: Repeat the process, outlined in Step 3, on the North Elevation. To the right, I have provided the object snap points for the Align command. Notice that since we have the first elevation up, the 6th point is easy since we can snap to the top edge of the similar structure. |
 |
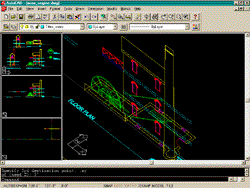
| The end result of Steps 3 and 4 should look like the image to the right. |  |
| 11Creating Extrudable Polygons | |
| 5STEP: Set the large right-hand viewport to match the North Elevation: from the View pull-down menu select 3D viewpoint and then select Right. Set the UCS icon to View. Tools pull-down to UCS to View. (Trouble with this? Read Part 2 of this series on 3D modeling). |
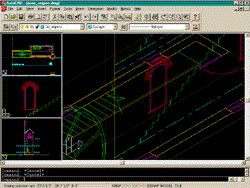
 |
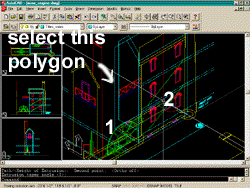
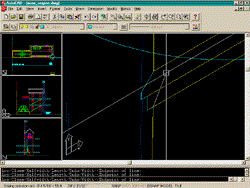
| 6STEP: Now we will trace the North Elevation with the Polyline command so that we have a clean polygon shape of the elevation to extrude. This can prove to be a little tricky, so I labeled where I pick along the wall. Notice that, in white, I have shown the Osnap markers that you should look for when picking along the wall. If you pick directly on the endpoint or intersection of a corner, you risk finding a point in space beyond. For my 5th point, I used Perpendicular and picked on the gray ground plane. Make sure you Close your polygon after the 5th point has been selected. |
 |
| 7STEP: Change the viewpoint of your large viewport to Southwest Isometric. View to 3D viewpoint to SW Isometric. Move the Last object we created (the polygon) to the face of the north side of the floor plan. |
 |
| 8STEP: Offset the polygon, we just moved, by the thickness of our walls: 12". Make sure you Offset to the inside of the polygon or your building will become bigger than mine. If AutoCAD gives you an error on the Offset command due to the "viewing angle" you can either exit the Offset command and try again or use the Plan command to orient the view with your current UCS. |
 |
 |
|
| 9STEP: Move the inner polygon up so that its bottom matches the floor line (indicated by cyan centerlines) of our building. If you have trouble, simply move the rectangle up exactly 3’-0" and you’ll have it. |
|
| Now we need to move the same inner polygon in to the
building by the thickness of the walls: 12". One trick I often use is to move an object by selecting it and then for First Base Point, I type "0,0,0" and then for the Second Point, I type "0,0,?" to move it on the Z-axis. In this example, the Z value would be 12"; so for the Second Point, type "0,0,12". Command:move Base point or displacement: 0,0,0 Second point of displacement: 0,0,12
|
This works because our UCS icon has been
rotated and thus if you look at it, you should see that the Z-axis is now left-to-right
and not up-and-down. Of course if you have changed your UCS icon or missed a step, you will have to think the problem out and apply the 12" value for a different axis. |
 |
|
| 12Extruding Polygons to create a Building Mass | |
| 10STEP: Now we get to the fun part. From the Draw pull-down menu, select Solids and then select Extrude. Now select the first Polygon we created, the one that represents the outside elevation. For Path/<Height of Extrusion>: Pick two points on the Floor Plan that represent the length of the outside walls or type in the numeric value of that length; which is 24’-6". For Extrusion taper angle <0>: hit enter. |
 |
| 11STEP: Repeat this procedure for the inner polygon, the one representing the inside of our walls. Its extrusion length should be 2’ less than the previous extrusion length because our walls are 12" thick; so the extrusion length is 22’-6". Just to make sure we are on track, I typed in Shade on the command line to see what my two Solids look like. Yours should look the same. |
 |
| 13Subtracting Mass to create Spaces | |
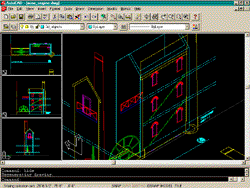
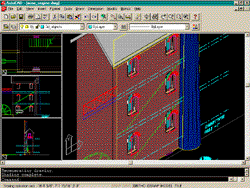
| 12STEP: Now we will subtract the inner Solid from the outer solid so that we have an actual space within. From the Modify pull-down menu, select Boolean and then select Subtract. Command: SUBTRACT Select solids and regions to subtract from... Select objects: select the outer wall Solid <Hit enter> Select solids and regions to subtract... Select objects: select the inner wall Solid <Hit enter> You should now see a single Solid with an inside space. I typed "Hide" on the command line to provide the image to the right. |
 |
| 14Extruding Polygons to create a Roof Mass | |
| 13STEP: To create the roof, all we have to do is trace the North Elevation’s Gable end fascia and Extrude it. Use the Polyline command and object snap to either endpoints or intersections, as shown in the illustration to the right and make sure to Close the polygon after the 6th point. To Extrude the roof polygon, use the technique discussed in Step 10. Since our West Elevation indicates that the roof has a 12" overhang (typical), we need to extrude the polygon the full length of our building plus 2’-0"; the total is thus 26’-6". |
 |
 |
|
| 15Extruding Circles to create a Tapered Chimney Mass | |
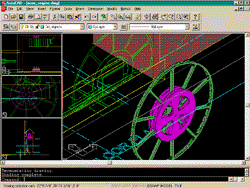
| 14STEP: Now we can address the Chimney situation. The Chimney is round, hollow, it tapers at the top, it collides with the walls and it enters the interior space. Ready? Using the right-hand viewport, zoom in to the chimney base on the floor plan. Set your UCS icon to World. |
 |
| 15STEP: Since we want the chimney to be completely round, we have to draw two new circles over the existing yellow ones on our plan. Side note: For those seeking "extra credit", this is a perfect opportunity to also create the shape required to make the (negative) solid required to make the chimney’s opening as shown in plan view. If you trace the shape of the opening plus enough to remove the wall of the chimney, you should be able to make a nice opening later on. |
 |
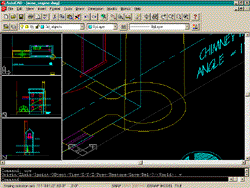
| 16STEP: Use the Extrude command and select both the inner and outer circles. The height of extrusion is 53’-0" and the taper angle is 1 degree. |
 |
| 17STEP: This next part requires a little bit of strategic planning before proceeding along. Since the roof and the walls of our building should realistically stop at the chimney wall, we should, in Boolean terms, subtract the mass of the chimney from the roof and the building walls. However, if you subtract one Solid from another in AutoCAD, the resultant object becomes one unique Solid. Since we are making a building, it would be best to keep the roof, the building walls and the chimney as separate objects. How do we manage this problem then? |
Well, if we think of Solids as tools can’t we simply make a copy of the chimney and subtract that copy from the roof, for example. The resultant object, a roof minus a chimney, would still be a separate object from the actual chimney. Okay, if you can follow that bit of Boolean logic, we should hold off on subtracting the inner chimney space from the outer until we have subtracted copies of the outer chimney Solid from the roof and the building walls. |
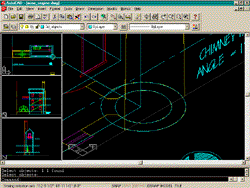
| If you Zoomed out to check your chimney, as I did in my
previous image, zoom back down to the chimney base. Copy the outer chimney Solid on top of itself two times. I do this by snapping to the center for the base point and for the second point. |
 |
| 18STEP: Now, Zoom out and Subtract one of the chimneys from the roof Solid. Repeat this procedure for the walls of our building. |
 |
| 19STEP: Repeat this procedure for the walls of our building. At this point I suggest creating some layers for your 3D model. I often use the same name as my normal 2D layers but with the term "3d_" to distinguish the model from the 2D plans. In this exercise I will make 3 new layers: 3d_wall………color 17 3d_roof……….color 253 3d_chimney….color 166 I also try to pick colors that are distinguishable from those I used to build my 2D drawings. Having done all of that we can get back to business. |
 |
| 20STEP: We can now turn the Chimney into an actual hollow tapered cylinder. Zoom in to either the top or the bottom of our chimney and Subtract from the outer Solid, the inner Solid. Shade. |
 |
| 16Revolving a Polygon to create a Chimney Cap | |
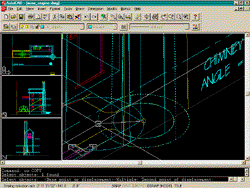
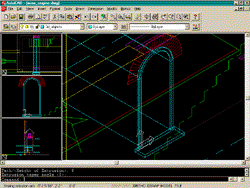
| 21STEP: We can now turn our attention to the details of the chimney top. Though we can solve the modeling of the chimney cap and trim by several means, I would like to do the trim with a Solid revolution simply to demonstrate the power of that command. Zoom to the top of the chimney. To make the chimney cap, simply draw a new circle at the top of our 3D chimney and input its radius by snapping to a quadrant on the outer edge. To extrude this circle, for Path/<Height of Extrusion>: (on the 2D West Elevation) endpoint snap to the point where the tapered chimney walls hit the bottom of the trim. Second point: (also on the 2D West Elevation) perpendicular snap to the top of the chimney cap. If you have trouble with this, the height is 2’-5". |
 |
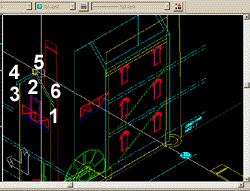
| 22STEP: To make the trim at the base of the chimney cap, we will trace the 2D silhouette of the trim. Since we are going to use the Revolve command, we will only need a small portion of the trim. To trace the trim, we will need to adjust the UCS icon to align with the 2D elevation. The easiest way to do this is to use the UCS Entity option and select the 2D elevation Command: UCS Origin/ZAxis/3point/OBject/ View/X/Y/Z/ Prev/Restore/ Save/Del/?/<World>: e <Hit Enter> Select object to align UCS: pick on the 2D elevation On the 2D West Elevation, use the Polyline command and trace the trim’s edge as shown in the illustration to the left. Remember to Close the polygon after the 6th point. |
 |
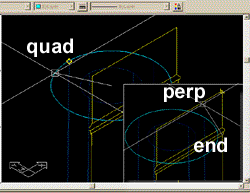
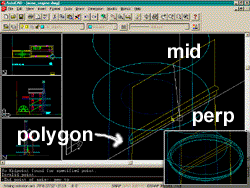
| 23STEP: On the Draw pull-down menu, select Solids and then select Revolve. Command: REVOLVE Select objects: Select the polygon we just created Select objects: <Hit Enter> Axis of revolution - Object/X/Y/<Start point of axis>: object snap to the midpoint of the top of the 2D chimney cap (as illustrated with" mid") <End point of axis>: object snap to a point perpendicular below the midpoint selected above (as illustrated with "perp") Angle of revolution <full circle>: <Hit Enter> The resultant object should look like the object shown in the smaller insert (left). Now you simply move this Solid round object into the proper position by object snapping to the center of its base and then object snap to the top of our chimney or base of our chimney cap. |
 |
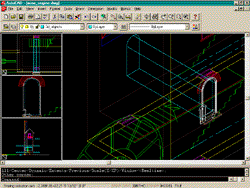
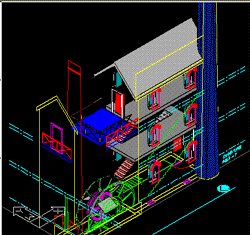
| Here’s what all the hard work should look like. Top
create a hole in the chimney, simply draw a circle at the very top and extrude it down
into the chimney a distance of "-2’-6" and then subtract this new object
from the chimney cap. We could also make new layers with new colors for these two new objects. 3d_chimney_cap…..color 250 3d_chimney_trim…..color 12 |
 |
| 17Extruding Polygons to create a Window Mass | |
| 24STEP: Creating Solid windows usually involves a great deal of redundancy and if we don’t plan our steps carefully, the work can also feel redundant. If we can build one window with all of the parts that we need to make the rest, then we can avoid redundancy and save time. In the right-hand viewport, Zoom in on the lower West Elevation window. In the center left-hand viewport, Zoom in on the same window (as shown). |
 |
| 25STEP: Make sure that your UCS icon is correctly aligned with this elevation. If it is not’t, remember to set the UCS icon by typing; "UCS" <enter> "E" <enter> select the 2D elevation. Set the origin of the UCS icon to the lower left-hand corner of our window. Command: UCS Origin/ZAxis/3point/ OBject/View/X/Y/Z/ Prev/Restore/ Save/Del/?/<World>: or Origin point <0,0,0>: object snap to window’s lower left corner. To make sure we are on track, set the UCSicon so that it will display the new origin: Command: ucsicon ON/OFF/All/Noorigin/ORigin <ON>: all ON/OFF/Noorigin/ORigin <ON>: or |
 |
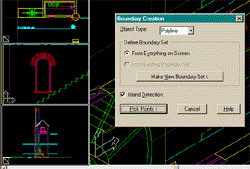
| 26STEP: In the center left-hand viewport, we will use a fantastic time saving command called Boundary to capture the shape of the window. From the Draw pull-down menu, select Boundary… On the Boundary Creation dialogue box set the Object type to Polyline, leave Define Boundary Set as "From everything on screen", leave Island detection on and then Pick on the Pick Points button. Pick a spot inside the window object using the center left-hand viewport. There should now be a 2D polyline object exactly matching the shape of our window. |
 |
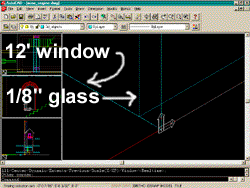
| 27STEP: Copy the 2D polygon we just created and place it exactly on top of itself. I often do this by typing "0,0,0" as the base point and "0,0,0" as the second point too. Extrude one of the polygons by: -1/8" Extrude the other polygon by: -12’-0" Create a new layer: 3d_window_glass…..color Put the –1/8" extruded polygon on our new layer. |
 |
| 28STEP: Go back to the center left-hand viewport and create a Boundary of the trim (defined by the red outline). Extrude this polygon by: 1" Repeat this process for the sill at the bottom of the window. Extrude this polygon by: 8" Side note: For those seeking "extra credit", you can create the brickwork over the arched window. Create a new layer: 3d_window_trim…color white 3d_window_sill.….color 33 Put the last two objects on the appropriate layers. |
 |
| 29STEP: In the right-hand view port, Zoom down to a bottom corner of our window. Turn off the "3d_window_trim" layer. Move the Glass object we created earlier, back by 6". Turn on the "3d_window_trim" layer. |
 |
| 30STEP: Now we need to take all of our window work and make sure it is aligned correctly with the out model. Zoom out to a point where you can see all of the window items we have and the lower left corner of the floor plan. |
 |
| Select all of the window objects, the window,
glass, trim and sill and move the whole group as per the illustration on the right; from
endpoint (1) to .Z of endpoint (2) with .XY back at endpoint (1). If this becomes too difficult, you can simply set the UCS icon to World and move the group of objects back 1’-3" along the Y-axis. |
 |
| 31STEP: Now we can Copy this last selection set to all of the window positions. Copy the last set of objects and use the Multiple option. For the base point of your copy, pick the lower left corner of the 2D window and then pick on the lower left corner of all the other 2D elevation windows. |
 |
| 32STEP: Subtract, from the 3D wall object, all of the window objects. Mirror the glass, trim and sill over to the opposite wall. The roof ridge line is a good source to snap to for a mirror line axis. |
 |
| 18Creating Detailed Objects | |
| 32STEP: Set
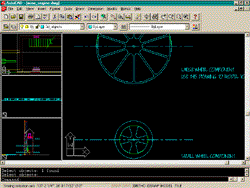
the UCS icon to World and set the right-hand viewport to Plan. Command: UCS Origin/ZAxis/3point/ OBject/View/X/Y/Z/ Prev/Restore/ Save/Del/?/<World>: w Command: plan <Current UCS>/Ucs/World: Zoom in on the larger of the two 2D wheels to the right middle of our drawing |
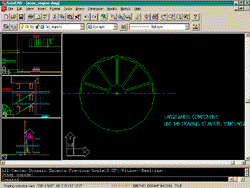 |
| 33STEP: Use the Boundary command to create closed polyline polygons out of each space inside the wheel; include the half spaces that are cut by the cyan centerline. Mirror all six of these objects across the centerline. Extrude all 12 objects and include the outer wheel circle and the little one in the center; extrude these 14 objects by: 6" Subtract, from the outer wheel circle, the remaining 13 inner objects. |
 |
| 34STEP: In the right-hand viewport, pan down to view the smaller wheel. Repeat the steps outlined in Step 33. Use the Boundary command for the four spaces inside the wheel. Extrude the outer wheel circle, the four spaces and the inner circle by: 6" Subtract, from the outer wheel circle, all of the inner objects. |
 |
| 35STEP: Create two new layers: 3d_wheel_big……color 95 3d_wheel_small…color 212 Put the last two objects on the appropriate layers. Restore the viewport to SW Isometric. |
 |
| 36STEP: Move the two wheels to the left side of the viewport near the 2D elevation that will assist us in placing these two wheels. Zoom on the two Wheels and the North side of our 3D Model. Move the little wheel to the top center of the large wheel. Copy the little wheel down to the other side of the large wheel. |
 |
| 37STEP: From the Modify pull-down menu, select 3D Operation and then select 3D Rotate. Command: _rotate3d Select objects: select the three wheel objects <Hit Enter> Axis by Object/Last/View/ Xaxis/Yaxis/Zaxis/ <2points>: x Point on X axis <0,0,0>: <Rotation angle>/Reference: 90 |
 |
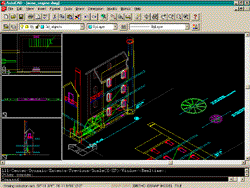
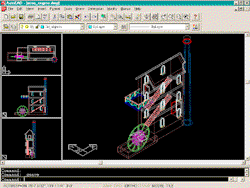
| Move the three wheels into the correct position with respect to the 3D model. Object snap to the center of the large 3D wheel and then object snap to the .XZ of the center of the 2D elevation wheel and the .Y of the endpoint of the 2D North Elevation wheel. | 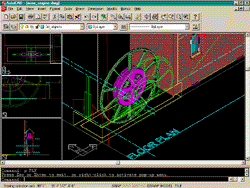 |
| 19Wrapping it up | |
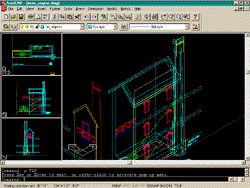
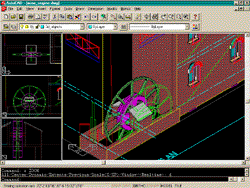
| 39STEP: Use the techniques we have already practiced to create the walls around the wheels. Use the same technique we used to create the main building walls and roof, to create the sheds on both sides of the wheel axles.
|
 |
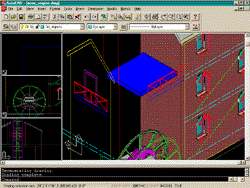
| 40STEP: Align the UCS icon to the North Elevation. Create the deck by tracing the North Elevation deck (blue rectangle) and then Extrude it by the length of the West Elevation deck; use object snapping to acquire this length. Position it up against the 3D model we are building.
|
 |
| 41STEP: For the railing, we can use a 2" x 2" rectangle for a column and then Extrude it up 35". For the handrail, we can use a 1" x 4" rectangle and Extrude it to the length of the deck plus 2" to provide a 1" overhang on each end. Side note: For those seeking "extra credit", you can create diagonal pipe braces between the columns. My trick for this is to draw a diagonal line from the midpoint of the inside face at the base of one column up to the midpoint of the inside face at the top of the other column. Then, I align the UCS icon to the diagonal line and flip the UCS icon by 90 degrees to allow for a circle to be drawn at a perpendicular to the line. Once I have the circle in place, admittedly the hardest part, I Extrude it to the Path of the line. For more information on the creation of railings, see the previous chapter. |
 |
| 42STEP: Create the door openings using the same technique we used to create the window openings. In the illustration to the right, I used the door opening to create a 12" extrude shape to subtract from my building wall. I also used a copy of that same door opening shape to create a 1" extrude shape for the actual door itself (just like the way we made the window glass earlier). I used the Boundary command to capture the shape of the door trim and extruded it by 1" to match the trim we created for the windows. Note: since there are two doors, remember that you can save yourself a lot of work if you copy the completed work for one door into position for the second door before you make your Subtractions. |
 |
| 43STEP: Now we can take a moment to inspect our work and decide on how much more detail will be required to suite the situation. If we decide that we will need interior perspective shots or cross sections, then we need to model the interior floor slabs, floor openings, stairs and handrails. In the illustration to the right, I turned off my "3d_wall" layer to show the two floor slabs and the interior stairs. To make the floor slabs, simply use the polyline command to trace the base floor on the 3D model and then Extrude the close polyline polygon 12". Position it by using the cyan centerlines and then copy the slab up to the next floor line. To make the stair openings in the floor slabs, trace the stair shape from the floor plan with the Polyline command (or use Rectangle). Extrude this polygon by any number greater than the 12" thickness of our floor slabs. Position the new 3D object so that it can be Subtracted from the 3D floor slab correctly. Before Subtracting, copy this 3D object up for use on the top floor slab. To make the stairs, use the dashed stair lines from the original 2D elevation. Offset that polyline, clean up the top and bottom ends, use Pedit to join the whole thing together (or use Boundary) and Extrude the polygon by 3’-0". Position it with the Align command (or use Move and Rotate3d). |
 |
| 44STEP: Now we can prepare the 3D model for the next phase of this journey: cutting a section. Turn off all non-3D_* layers; in other words, turn off the 2D line layers that we used as guides to build this model. Now would be a good time to make sure that every type of 3D object has a unique layer for that object type. |
 |
| 20Cutting a 3D Solid Section | |
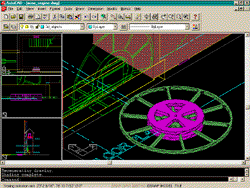
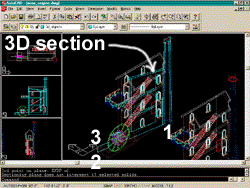
| 45STEP: Copy the 3D model to another position out and away from the original. From the Draw pull-down menu select Solids and then select Section. Command:_section Select objects: Pick the copied model Section plane by Object/Zaxis/ View/XY/YZ/ZX/ <3points>: 3 1st point on plane: CEN of 2nd point on plane: ENDP of 3rd point on plane: ENDP of We can pick any 3 points that we want to define a plane that cuts through our building. In my example, I picked at the center of the chimney, at the endpoint of the bottom outer left wheel wall and then at the endpoint of the top outer left wheel wall (see illustration). |
 |
| 21Cutting a 3D Solid Slice | |
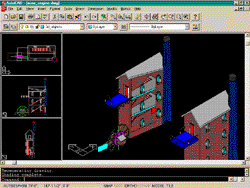
| 46STEP: As you can see from the example above, the Section command may work well for the physical matter that it cuts through (great in mechanical modeling situations), but leaves a bit of emptiness for architects. To cut a true section, we can use the Slice command and physically slice the building in half. From the Draw pull-down menu, select Solids and then select Slice. Command: _slice Select objects: Pick the copied model Slicing plane by Object/Zaxis/ View/XY/YZ/ZX/<3points>: 3 1st point on plane: CEN of 2nd point on plane: ENDP of 3rd point on plane: ENDP of Both sides/<Point on desired side of the plane>: Pick an ENDP of something at the back of the 3D building (like the roof). We can pick any 3 points that we want to define a plane that cuts through our building. In the illustration to the right, I used the same three points shown in Step 45. Notice that the objects that lie outside of the slicing plane, the window trim and sill, are not removed, so we must erase them if we want those objects out of our section. I chose an unusual angle for a sectional cut to demonstrate the potential behind the Section and Slice commands; a traditional uniform cut through a model is of course quite easy to achieve. |
 |
|
|
| You can download the completed project -> 3D Solid model of a mine engine building (400Kb Winzipped). |