Model Space and Paper Space
Advanced (part 2 of 2)
Comments by: Odin Cary
This is part two of our Model Space and Paper Space series and will require some preliminary preparation work. It will also require strong familiarity with AutoCAD and some basic knowledge of Layers, Xref's, Blocks and Attributes. To best explain the more advanced concepts of Paper Space, we created an exercise that takes the student through the process of setting up a floor plan on a bordered sheet and presenting both a basic floor plan and part of an electrical plan in two viewports. This exercise is broken up into 20 steps.
Contents:
Setting up a plan in PS with Titleblock and
Border----Creating Viewports and setting the Zoom XP
factor----Controlling Viewport Layers----Controlling Viewport Linetype Scales----Controlling Viewport Plan Orientation----Summation
and Comments----Diagrammatic Strategies for small projects----Diagrammatic Strategies for large projects
1Setting up a plan in Paper Space with Titleblock and Border
To follow the exercise as per this page, you should download the following self-extracting file from the ARCHIdigm site: MSPS_ex2.exe.
Once you have downloaded this file, move it to a project folder of your creation and decompress the file by double clicking on it.
You should find the following files:
If you wish to utilizing your own material, you will need the following:
1STEP:
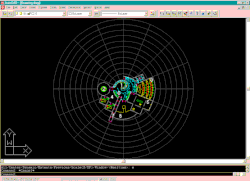
Load AutoCAD and begin a new drawing from scratch; set units
to architectural and limits to 256’,256’.
Xref attach Arch_a1.dwg with insertion point at 0,0 and no scaling or rotation. [for those using their own plan, simply Xref attach your own plan drawing].
Zoom extents and make sure you see a drawing. If you don’t see anything, try Xref attach again.

2STEP:
Double click on Tilemode on your status bar and look for the
Paper Space icon in the lower left corner.
3STEP:
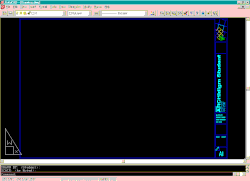
Xref attach Arch_bdr.dwg with insertion point
at 0,0 and no scaling or rotation.
Zoom extents and make sure you see a border and titleblock.
4STEP:
Insert File Arch_inf.dwg with insertion point
at 0,0 and no scaling or rotation.
Notice that this block has attributes and you will thus be
prompted for information on your command line.
2Creating Viewports and setting the Zoom XP factor
5STEP:
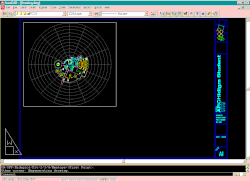
From the View pull-down menu, go to Floating Viewports and
select 1 Viewport. Create the Viewport as if you were
drawing a rectangle; by selecting two diagonally opposing
corners. In this Viewport, you should now see your plan.
6STEP:
Double click on Paper on your status bar and notice that you are
now working only within the Viewport you just created.
To set the scale, as in ¼" = 1’-0" or 1/8" = 1’-0", you will need to set a Zoom XP value that fits this situation. We should probably use 1/8" = 1’-0" for this drawing thus allowing for two Viewports, side-by-side.
7STEP:
To set the Zoom XP value for 1/8" = 1’-0",
type "z" or "zoom" on the
command line, press enter and then type "1/96xp".
Command: zoom enter
All/Center/Dynamic/Extents/Previous/Scale(X/XP)/Window/<Realtime>: 1/96xp enter
The value "1/96" comes from converting the scale 1/8" = 1’-0" into a ratio based upon inches; i.e., from 1/8" = 1’-0" to 1" = 8’-0" to 1"=96".
Now you should see your drawing at the correct scale, relative to the sheet of paper and assuming that we print from paper space at a ratio of 1:1.
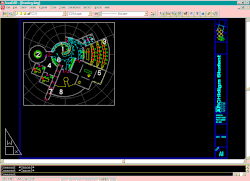
To make adjustments, you can Pan the drawing around inside of the Viewport frame or you can make the Viewport frame larger or smaller by double clicking on Model (see status bar) and stretching a corner of the Viewport frame.
8STEP:
Now we will Copy our first Viewport and align the two
side-by-side. To do this, make sure you have Paper active
on your status bar and then simply copy the Viewport by using the
Copy command and select the Viewport edge.
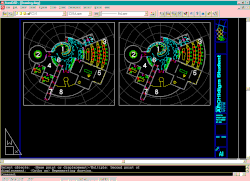
Now that we have two identical plans side-by-side, we can control what one Viewport displays and what the other does not display.
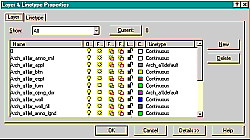
If you turn OFF layers in one Viewport, you will discover that they turn off in both, so what we need to use is a special type of layer freezing designed just for viewports.
The 3rd icon over from the light bulb has a picture of a sun with a frame next to it. This special type of Freeze works only on the active Viewport.
![]()
9STEP:
Make the left Viewport active by double clicking on Paper
on your status bar and then click inside of the Viewport.
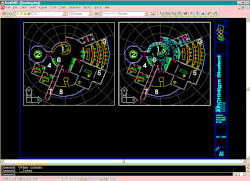
To Freeze the electrical layout, the symbols and lines, open the Layer & Linetype Properties dialogue box and then scroll down until you see the layers Arch_a1|el_symb and Arch_a1|el_line. Once you see them move your mouse to the appropriate Viewport freeze icon and freeze both layers.

At this point, you should not see the electrical information in the left-hand Viewport but you should see it in the right-hand Viewport.
10STEP:
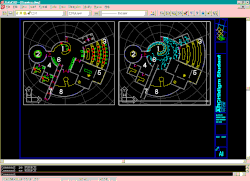
Click on the right-hand Viewport, making it current and open the
Layer & Linetype Properties dialogue box. Now you can freeze
non-essential layers for an electrical plan; such as furniture
and computer equipment.
11STEP:
To make sure that these Layer changes remain and do not
revert back to the original settings, as per when we started this
exercise, we need to make sure that the system variable,
VISRETAIN is set to ON (1). If you set this variable to Off (0)
then when the drawing is reloaded (re-opened) all of the layer
changes will revert to original settings as per the source
drawing. This variable can be changed by typing VISRETAIN or
simply by picking on the Details button in the Layer &
Linetype Properties dialogue box.
4 Controlling Viewport Linetype Scales
The next item we need to address is getting the electrical lines to look right. The lines were originally created with a "Hidden2" linetype and with a Linetype scale factor (LTSCALE) of 96.
12STEP:
In Paper Space, you can use a new linetype scale command called,
PSLTSCALE (paper space linetype scale). This system variable,
when turned on (1), automatically adjusts all Viewports so that
the linetype scale factor is the same no matter how close or how
distant the magnification factor (Zoom XP).
AutoCAD’s default value for PSLTSCALE is usually 1 (on) and thus the linetype of the electrical lines should be noticeable.
If you attempt to set LTSCALE now, you should find that the linetype changes dramatically just by setting it to 2.
If you want to revert back to the normal model space method of dealing with the linetype scale, simply turn off PSLTSCALE and then set LTSCALE to the value you normally use in model space (in this example, the value would be 96 +/-). By doing this, it also means that if you create a Viewport that magnifies an area like the bathrooms, the linetype scale may look too large.
5 Controlling Viewport Plan Orientation
To go to the next phase of our project, let’s resize the electrical plan Viewport so that it displays only the area where work has been done.
13STEP:
Make sure the status bar is set to Paper and then you can
simply pick on the Viewport frame and use your Grips to resize
it. With Ortho off, you can resize the Viewport diagonally;
altering both length and width simultaneously.
14STEP:
In the Layer & Linetype Properties dialogue box, thaw
the Ar_anno_dim layer.
15STEP:
Resize the left-hand Viewport so that it can clearly display the
plan and its dimensions.
16STEP:
Set Paper to Model on the status bar and pan the
floor plan over so that it is approximately centered.
17STEP:
Now activate the electrical plan Viewport and "Current
Viewport Freeze" the Ar_anno_dim layer.
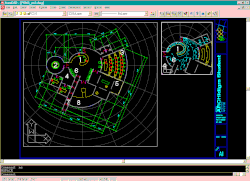
In some cases, it becomes desirable to orient the drawing in one Viewport differently than any other even when the Viewports basically show the same plans.
18STEP:
To re-orient the dimensioned plan in the left-hand Viewport,
activate the Viewport by picking on it and then rotate the UCS
icon about the Z-axis –23 degrees. Type: UCS
(enter) Z (enter) –23 (enter).
Command: UCS enter
Origin/ZAxis/3point/OBject/View/X/Y/Z/Prev/Restore/Save/Del/?/<World>:
z enter
Rotation angle about Z axis <0>: -23 enter
This orientation can also be achieved by using the 3point option under UCS; Snap to 2 points on the X-axis and press enter on the last point request.
19STEP:
Now that you have the UCS icon aligned with the plan, you
can align the Viewport to the UCS by typing PLAN.
Command: plan enter
The Plan command forces a change to the Zoom XP (basically a Zoom extents) so you will need to reset your zoom magnification factor: Type: Zoom (enter) 96xp (enter).
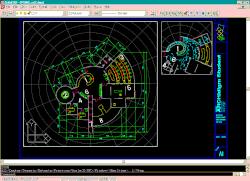
20STEP:
Now that everything is set up the way we want, the last thing to
consider before printing is whether or not you want the actual
Viewport frame to print.
A common trick among veteran AutoCAD users is to put Viewport frames on a layer called DEFPOINTS. The DEFPOINTS layer is automatically created when you begin a dimension and it is the only native AutoCAD layer that does not print. You can create this layer by simply defining a layer with the name DEFPOINTS or by making a single dimension (though we already have dimensions, these are Xref’d dimensions and we cannot use the Arch_a1|defpoints layer).
You can now print from Paper Space at an output scale of 1:1 (for more information on printing from Paper Space, see section 4 of Part 1 on Model Space and Paper Space).
The dimensions will print correctly for this magnification scale, but only because they were originally created for an anticipated output scale of 1:96 (1/8" = 1’-0"). If you want to change the zoom magnification factor and keep the dimensions proportionally correct, it is not possible with this particular type of layout. Xref’d dimensions cannot be modified; i.e., you cannot change the "overall scale" in the Dimension Style dialogue box nor set the "Scale to Paper Space" variable.
These settings are adjustable if the drawing is native to your Model Space environment and not Xref’d as demonstrated in this exercise.
The other drawback is that you cannot change layer or object color nor linetype individually for objects common to multiple Viewports; e.g., the walls in this example cannot be dark in the left-hand Viewport and light in the right-hand (electrical) Viewport. Of course, it is usually not the norm to have both the floor plan and an electrical plan on the same sheet and thus this would not be an issue.
To add more information, such as other drawings (a detail for example), you can simply return to Model Space, Pan off to the side and Xref Attach any other drawing you desire. Then, return to Paper Space, create another Viewport, Pan and Zoom over the new drawing and finally set a Zoom XP scale factor for it. This is how detail sheets are often created.
7 Diagrammatic Strategies for small projects
Small projects with few people involved may utilize a scenario such as the one diagramed in the sketch bellow. Most offices have a unique twist and my vary the strategic implementation according to how they organize their work and those who do it.
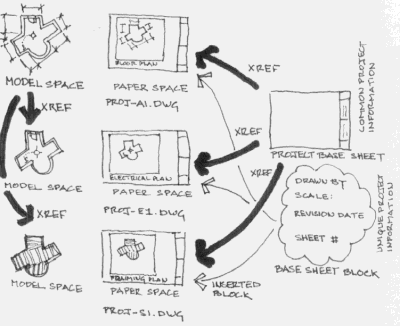
In this diagram, the primary floor plan contains all common information and possibly other items like electrical symbols, furniture, plumbing, etc.That plan is then utilized as a master reference model. In the case of an electrical plan, the plan is simply Xref’d to a new drawing (Proj-E1.dwg) where, in Paper Space, it is set up to show only the appropriate layers for an electrical plan. With this technique, the wall layers can easily be changed to a lighter printing color without affecting the original plan.
For the framing plan, the master floor plan is used as a base sheet over which the framing and structural items are drawn. In this case, the new drawing (Proj-S1.dwg) not only contains the Xref’d master plan but also unique information. The draw back is that if the architect is also producing the structural plan and recognizes a need to make a plan change, the master plan must be worked on separately.
I have attempted to put buildings together completely in one drawing using layers to separate the plan from foundation, framing, roof, etc., but found that it requires a great deal of effort in terms of organization and is completely ineffective in a non-autonomous working environment. If you are all by yourself, it may work.
8 Diagrammatic Strategies for large projects
Large projects with many people involved may utilize another scenario such as the one diagramed in the sketch bellow.
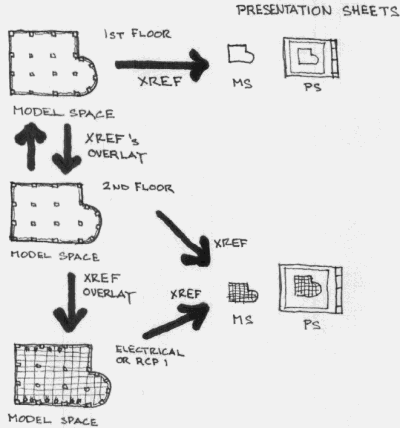
In this diagram, plans are treated like as drawings separate from presentation drawings. This concept makes the plans more like models and when a final presentation sheet is called for, such as an electrical plan or reflected ceiling plan, it is comprised of the different plans.
For example, an electrical engineer works over an Xref of a floor plan. This makes the electrical drawing somewhat independent of the actual floor plan; i.e., the electrical engineer cannot change the floor plan nor can the architect change the electrical plan.
Since AutoCAD now supports bilateral (called Overlay) Xref’s, it is entirely feasible for anyone working on any plan to request an Xref update of anyone else’s plan. On extremely large projects, Xref’s begin to resemble layers. With this type of structure, one person can manage the project’s development as "quality control monitor" by working with a drawing that has all plans Xref’d into it.