AutoCAD Architecture was never designed to specifically address renovation (or TI) work. In ACA 2010 the Renovation Extension, issued as a subscriber update for 2009 users, was integrated as a core feature but continues to suffer from, in my opinion, poor integration. However, it does provide specific solutions for creating and managing renovation work in ACA and if you wed yourself to its system, you may find it extremely useful.
The problem I have with it is that I don't like the system it employs and I can't alter it to work the way I want it to manage existing, to be demolished and proposed work. For example, when I demolish an existing door in an existing wall, I like to show a new wall in its place. The renovation tools fills in the gap with Mass Elements that do a great job of mimicking the wall but I really don't want to work with Mass Elements; especially if I change something in the Wall Style.
I also don't like all of the new Display Representations it introduces. I really just want to keep my renovation plans as simple as possible and in this article I will discuss some of the things you can do in ACA to build your own renovation system.
In renovation work there are obviously three primary categories and when you design your own renovation system you will need to define how you want to manage them. For example, do you want special layers for each category, data designations, and unique display characteristics?
Let's start by examining what you can do to create a demolition tool.
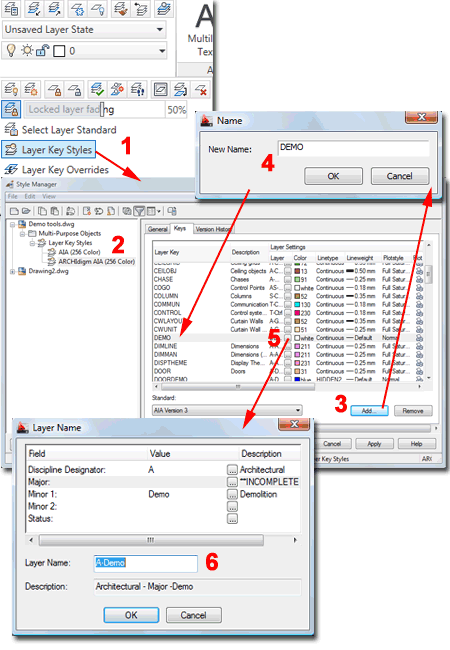
In the illustration to the right I show the steps required to create a new Layer Key for use in AutoCAD Architecture. You can find the Layer Key Styles button on the Layer Ribbon Panel. When you activate the Style Manager, you may want to make a Copy of the Layer Key Style you are currently using so you can make your modifications in a new file; item marked as "2" shows that I have created "ARCHIdigm AIA (256 Color)". Ideally you will do this work in a custom Layer Standard file or the default "AecLayerStd.dwg" that comes with ACA in order to be able to use this work in all other files. You can also copy the new Layer Key Style to the "AecLayerStd.dwg" file later if you wish.
To create a new Layer Key, use the Add... button labeled "3" and then type in a Layer Key name that makes sense. For this example I am going to create a totally generic demolition Layer Key so I have just named it "DEMO". After providing a name, use the ellipses button (#5) to access the Layer Name dialog (#6). For this example I have used the Layer Name dialog to create a layer named "A-Demo". After completing this work, be sure to set all of the Layer Properties as you prefer for general demolition linework.
Note:
Remember that this work only resides in the current drawing file. See
http://www.archidigm.com/ classroom/adt_4_development_guide/
adt_5_dg_part_2.htm for more information on this subject.
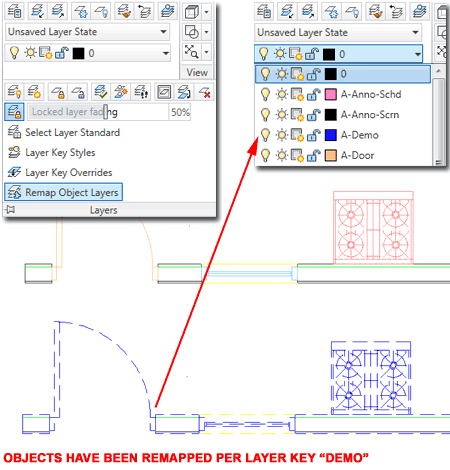
AutoCAD Architecture has a pretty neat command for reassigning Objects to a new Layer based on a Layer Key. You can access the "Remap Object Layers" button on the fly-out panel under the Layers Panel or by typing "RemapLayers" on the command line.
In the illustration to the right I show how I used the Remap Object Layers button to send a bunch of different Objects to the "A-Demo" layer created in the steps outlined above. When you execute this command, you will be prompted to "Enter a Layer Key". In this example the typed response would be "demo".
Command: _AecRemapLayers
Select objects to re-layer: 1 found
Select objects to re-layer:
Enter a Layer Key or [?/byObject]: demo
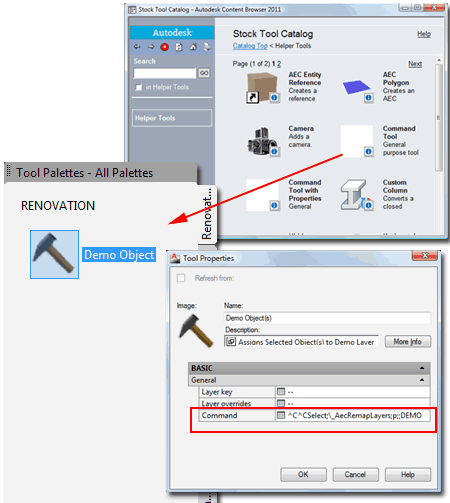
After creating a new Layer Key and using the "AecRemapLayers" command, you can build a new Tool for your "Renovation" Tool Palette that makes the work of remapping one step easier.
In the illustration to the right I show that I have created a new custom Tool Palette that I named "RENOVATION". I used the "Stock Tool Catalog" to access the "Command Tool" and drag it over to my new Tool Palette. After dragging over the stock tool, I used the Tool Properties dialog box to set a custom command that reads as follows: ^C^CSelect;\_AecRemapLayers;p;;DEMO
I created the icon with Photoshop. You can create your own using a 64x64 pixel canvas and saving the file as a PNG-24 with transparency.
Once completed, this new tool should remap anything, including basic AutoCAD entities, to to "A-Demo" Layer.
If you wanted to, you could expand on this work and create more Layer Keys and more Tools for actions such as remapping to "A-Door-Demo", "A-Wall-Demo" and so on. If you choose to use the "Status" Field in the default AIA Layer Key Style, you can remap to layers such as "A-Wall-E", "A-Wall-N", "A-Wall-D" and so on.
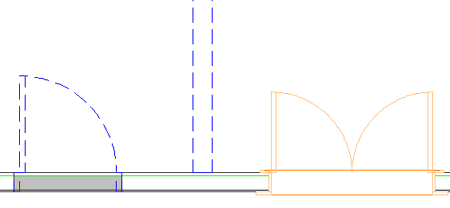
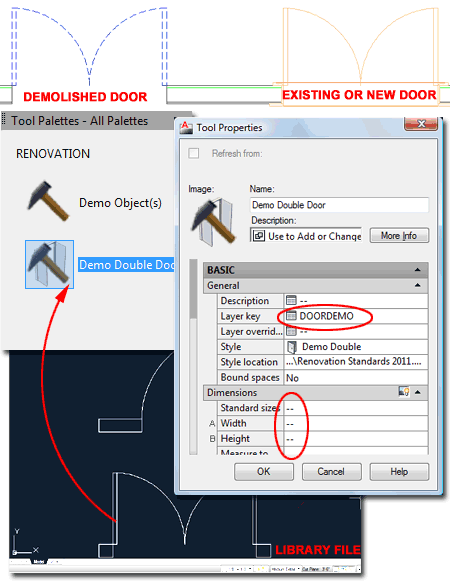
One of my preferences, when creating renovation plans, is to modify the display of my primary Objects beyond the basic linetype change. With Doors, Windows and Walls, for example, I prefer them to be very simple when designated to be demolished; all that extra detail only adds confusion to 2D documents.
Illustrated to the right I show that I have created a library file with a single and a double door to be used to represent demolished doors. From this file I created a new Tool on my renovation Tool Palette and set the Tool Properties as shown. I also created a custom button icon.
For the Tool Properties notice that I set the Layer Key to a new one I created called "DOORDEMO". For all other settings except the Style and Style Location, I set the default value to "--" so existing door dimensions will not change when I apply this tool's properties to them.
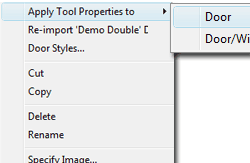
When using this Tool, right-click over it and select the "Apply Tool Properties to > Door" context menu option. Then, select an existing Double Door Object.
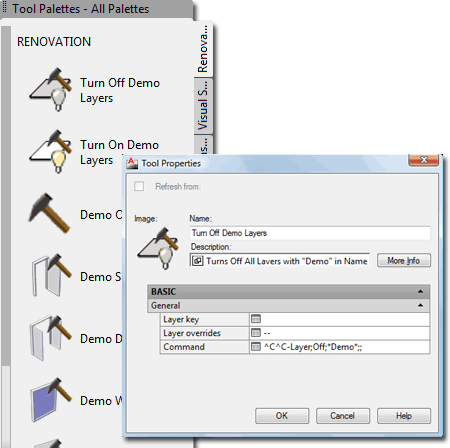
If you decide to manage your renovation work with Layers, you can create a couple of tools that will make it easy to turn one or more layers on or off.
In the illustration to the right I show that I have created two new tools for my Tool Palette; one turns all layers with the word "demo" in the name off and the other turns all of those same layers back on. The code is very simple and you can expand on it to turn more layers on or off if you wish.
The code to turn all "Demo" Layers Off is as follows: ^C^C-Layer;Off;*Demo*;;
Capitols are not necessary but just make it easier to read. If you decide to use the Status method where a suffix of "D", "E", or "N" is used, you can set the filter to read as "*-D" instead of "*Demo*".
Another interesting thing you can add to your own Renovation System is Classification. By using the Classification Definitions in ACA specifically for Renovation work, you can set your Objects to "New", "Existing" or "Demolish". You can add this information to your Object Styles in your Renovation Styles template file, discussed above, so that when you set a Door, for example, to be demolished, it will not only change the style and appearance but classification.
 In
the illustration to the right I show that I have accessed the Style Manager
and expanded the "Multi-Purpose Objects" category to reveal the
"Classification Definitions" Styles. You can type "ClassificationDefinition"
to access this spot in the Style Manager. If you go through the
Ribbon, you can only get to this spot using the Style Manager button.
In
the illustration to the right I show that I have accessed the Style Manager
and expanded the "Multi-Purpose Objects" category to reveal the
"Classification Definitions" Styles. You can type "ClassificationDefinition"
to access this spot in the Style Manager. If you go through the
Ribbon, you can only get to this spot using the Style Manager button.
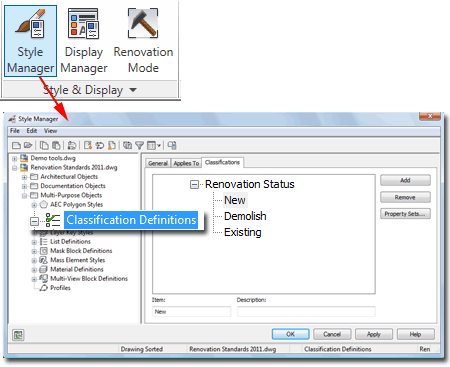
Under the Classification Definitions, I added a New Classification that I named "Renovation Status" and under this classification, I added three definitions: "New", "Demolish" and "Existing". Notice that the order in which you add them remains and cannot be altered unless you remove or rename them.
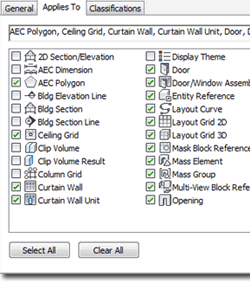
Illustrated to the left I show that I have used the Applies To tab to set the Object Styles that I want this Classification Definition Style to be available for. Unfortunately you cannot apply Classification Definitions to basic AutoCAD entities - this would be useful when combining these with Display Configurations (see below).
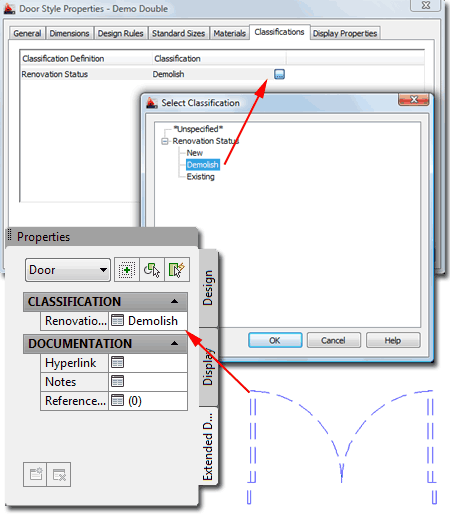
Once you have created a Classification Definition Style you can go to any AecObject Style and use the Classifications tab to assign a Definition Style. If you don't see the Classification Definition Style listed, go back to the Classification Definition Style and check your settings under the "Applies To" tab.
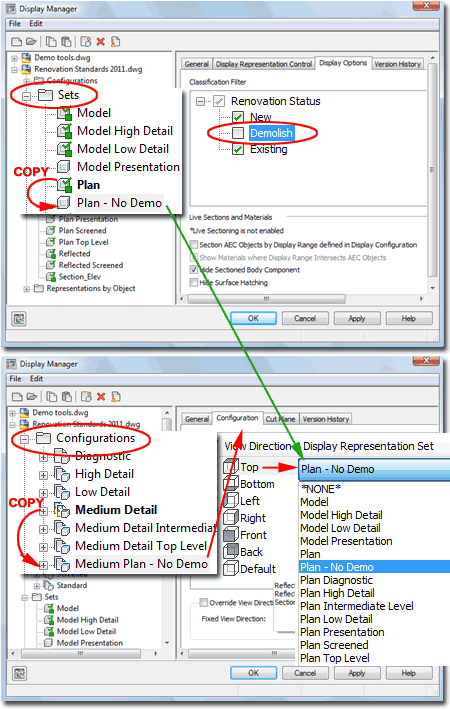
Classification Definition Styles have all sorts of useful applications but one of the least discussed is how they can be used to affect the Display Configurations. In this example I show that you can create a custom Display Configuration that turns off all AecObjects set to a Classification Definition of "Demolish".
To product this effect, first go to your Display Manager and expand the "Sets" folder. Under the Sets folder Select a Display Set that you like and make a Copy of it. Then, rename it as something like "Plan - No Demo" and use the Display Options tab to uncheck the "Demolish" Classification Definition.
After creating the new Display Set, go to the Configurations folder and repeat the process of making a Copy of a Display Configuration you like and renaming it. In my example I renamed my Display Configuration "Medium Plan - No Demo". On the Configuration tab for you new Display Configuration, go to the Top View Direction and set the Display Representation Set to your new Set; e.g., "Plan - No Demo".
 Once
complete, you should find that you now have a new Display Configuration that
you can use in AutoCAD Architecture and when set current, all AecObjects
designated as "Demolish" should disappear.
Once
complete, you should find that you now have a new Display Configuration that
you can use in AutoCAD Architecture and when set current, all AecObjects
designated as "Demolish" should disappear.
Note:
In this example I only addressed the Top View Direction. You can, of
course, continue this work and create solutions for side and 3D views.
If you you find that the renovation tools in AutoCAD Architecture 2009 (subscribers only) and up don't meet your needs, hopefully you can employ some basic customization work, such as discussed in this article, to create tools that will make your life easier.