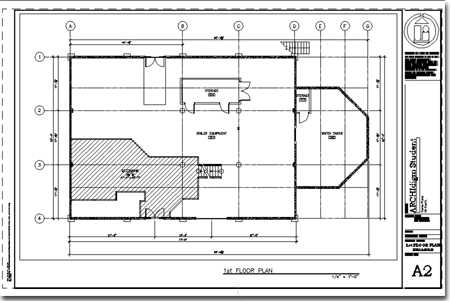
The main guide in this series will provide supporting information and extensive explanations of why some of the steps have been taken on this exercise. For supporting information and more in-depth material, refer back to the main guide.
Load and work with Wall
Styles.
Define and use Wall Modifiers.
Create Openings.
Load, Add and Modify Doors and Windows.
Profile and Add Columns.
Create a Mezzanine out of a Space object.
Load, Add and Modify Stairs.
Add and Modify Railings.
Creating a Ramp
Adding Dimensions
Adding Tags
To follow this exercise:
Create a New project Folder on your computer or use the
folder from Exercise 1.
![]()
Download the following files to your project folder or use your own completed exercise work:
| Download | Description |
| ADT_demo_floor_1_finished.dwg | Completed Sample to reverse engineer, etc. |
| ADT_ex_floor_1.dwg | Exercise Base Sheet - required |
| e_1_pln.dwg | Same as file from Exercise 1, 2D R14 Xref file - required |
| project_titleblock.dwg | Same as file from Exercise 1, Layout Xref Titleblock - not required but helpful. |
| project_style_standards.dwg | Same as file from Exercise 1, Layer Standard - not required. |
| ADT_demo_foundation_finished.dwg | Completed Sample of foundation from Exercise 1 - not required. |
| Trouble downloading, try this Zip set. Complete set of exercise files Zipped |
Load Architectural Desktop 2.0 and open "ADT_ex_floor_1.dwg".
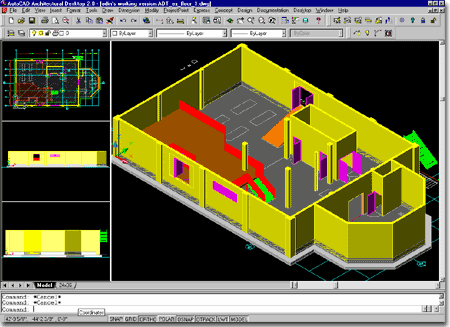
Illustrated to the right and above, right, are what you will get if you open the completed exercise file.

This drawing has been set to 1/4" = 1'-0" scale. The Layering Standard has been left to default to the AIA Long Format. If you want to review changing these settings or just to keep the color table simple, use the same settings and files as per Exercise 1 - creating a foundation plan.
The first thing we should do is draft the basic walls around the exterior shell. In exercise 1 we learned how to create a custom wall to unique specifications; now we will take the easy route and load a predefined Wall Style from Architectural Desktop's library.
![]() From the Design pull-down menu,
select Walls > and cascade down to Wall Styles... or
use the Wall Styles button.
From the Design pull-down menu,
select Walls > and cascade down to Wall Styles... or
use the Wall Styles button.
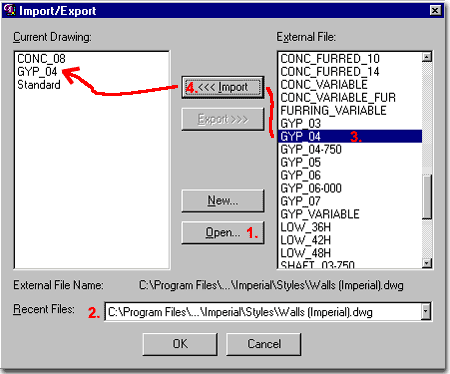
On the Wall Styles dialogue box, pick the Import/Export... button. On the Import/Export dialogue box, pick on the Open... button and hope that you are automatically taken to the right folder. The folder we want is called Styles and resides under the Imperial or Metric folder of Architectural Desktop. If you have any trouble with this part, read up on Loading Wall Styles in Part 2 of this Guide.
In the Styles folder, select Walls (Imperial).dwg and then pick on the Open button on the File to Import From dialogue box.
Once you have selected a master Style file, you should find yourself back on the Import/Export dialogue box. On the Import/Export dialogue box, select Conc_08 and use the <<< Import button to bring it into the Current Drawing list. And while we are at it, let us also bring in Gyp_04 so we can create some interior walls later on.
![]() From
the Design pull-down menu, select Walls > and cascade
over to Add Wall... or use the Add Wall button.
From
the Design pull-down menu, select Walls > and cascade
over to Add Wall... or use the Add Wall button.
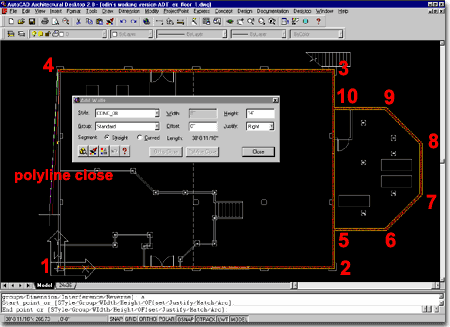
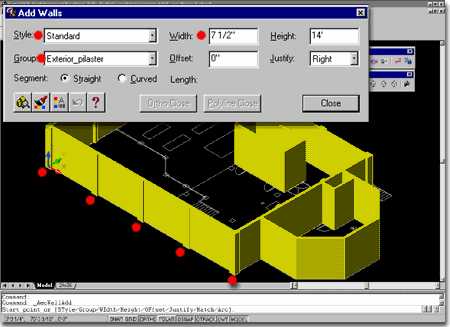
On the Add Walls dialogue box, set the Style drop-down list to Conc_08, set Height to 14'-0" ( yes, fourteen feet ) and set Justify to Right ( or left if you prefer ).
Now, simply trace the perimeter of this Xref'd plan as illustrated. I have a few odd pilaster protrusions just to make the exercise a pain ( we'll get to those later ).
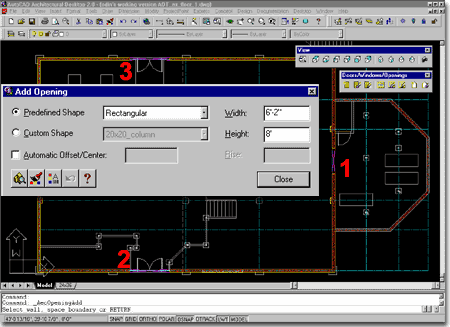
Since this plan is basically a rectangle with a partial octagon attached, that is exactly how I traced it; first the rectangle and then the partial octagon. We will come back and add an opening through the wall between points 2 and 3 - in the illustration, right.
In the illustration below, I show my attempt at Adding the Gyp_04 Wall Style only to discover that it isn't the right size or width and the connection to the perimeter concrete wall isn't quite the way I would normally show it on a set of construction documents.
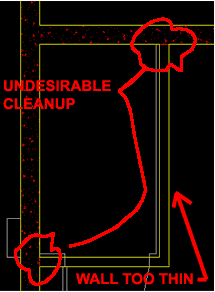
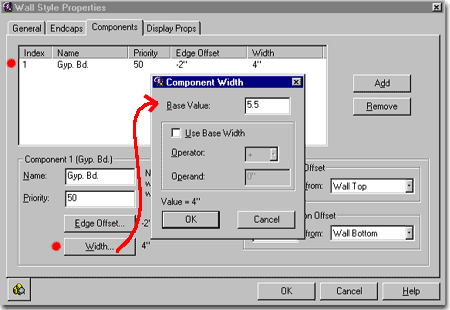
Since ADT doesn't have a Gyp_5-5 Wall Style we might as well edit the this one and turn it into one.
![]() On the Wall Styles dialogue box,
highlight Gyp_04 and pick on the Edit...
button.
On the Wall Styles dialogue box,
highlight Gyp_04 and pick on the Edit...
button.
On the Wall Style Properties dialogue box for the Gyp_04 Wall Style, go to the General tab and change the Name: to GYP_05-5 and make any other changes under Description that you might think are necessary (at minimum, change the 4" to 5-1/2" ).
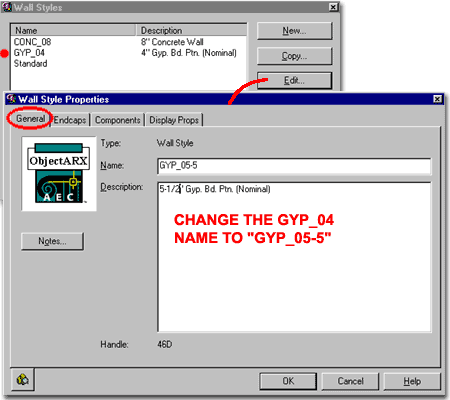
Now OK your way out and if you already have any of the previous 4" walls drawn, you will see them magically update automatically - I really like this part.
That should take care of half the problem discussed above. The other half of our problem is that the cleanup look weird relative to a solid concrete wall.
For this type of problem I like to use Cleanup Group definitions and separate the two Wall Styles completely.
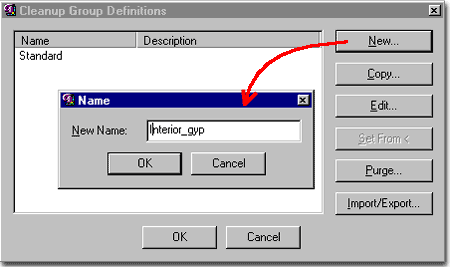
From the Design pull-down menu, select Walls > and cascade down to Cleanup Group Definitions... ( this command does not have a toolbutton ).
On the Cleanup Group Definitions dialogue box, pick the New... button and Name this cleanup group. In the illustration to the right, I show that I have named mine for what I want to remember it by: "Interior_gyp"
Now, OK out and prepare to change your existing interior Gyp. walls. If you haven't drawn them yet, do so now.
Note: if you draw your GYP_05-5 Walls now, you can preset the Cleanup Group to Interior_gyp and not have to edit them as discussed below. To do this, use the Group: drop-down list on the Add Walls dialogue box.
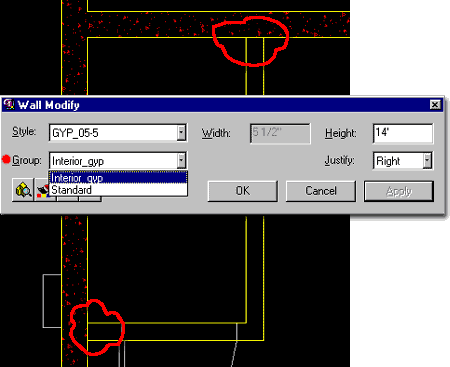
On the Wall Modify dialogue box, change the Group: value to Interior_gyp, as illustrated to the right.
As soon as you make a Group Cleanup change to any existing walls, like this, you should instantly see the change on the screen. Notice within the red clouds in the example to the right, that now the concrete perimeter wall really looks "superior" as it really would be.
Since we are now working with "intelligent" objects, lines won't do the trick; we have to define how we want our wall to look in order to create the right result.
Though I have found a few different ways to solve the following problem, one of the better solutions, if you have the patience, is to use a Wall Modifier to mathematically position a Modifier Style along your wall object.
![]() Use the Wall Modifier
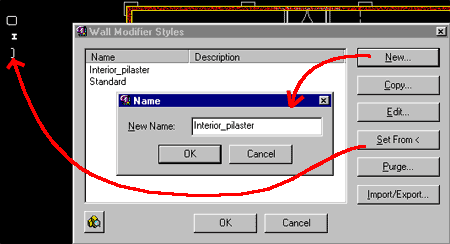
Styles button to bring up the Wall Modifier Styles dialogue box, illustrated to
the right. Pick on the New... button and Name:
the Wall Modifier Style. In this example, I have named the Style "Interior_pilaster"
so I will be able to identify it easily in the future should changes be necessary.
Use the Wall Modifier
Styles button to bring up the Wall Modifier Styles dialogue box, illustrated to
the right. Pick on the New... button and Name:
the Wall Modifier Style. In this example, I have named the Style "Interior_pilaster"
so I will be able to identify it easily in the future should changes be necessary.
Use the Set From < button to select the polyline pilaster shape that has already been drawn in the example exercise for you ( see u-shaped object in upper left corner of your drawing - Layer 0 )
Select the left-hand vertical wall, right-click on your mouse and select Wall Properties... or use the Wall Modify button, select the wall and pick on the properties button on the Wall Modify dialogue box.
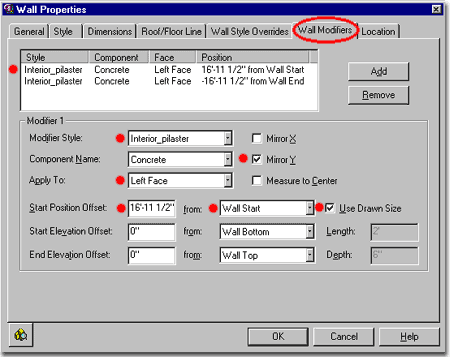
On the Wall Properties dialogue box, pick on the Wall Modifiers tab. Use the Add button to create a new modifier. On the Modifier Style drop-down list, select the "Interior_pilaster" style we just defined.
Apply To: Left Face
Mirror Y
Start Position Offset: 16'-11 1/2" from: Wall Start
Use Drawn Size
Repeat for the other pilaster but set the Start Position Offset: -16'-11 1/2" from: Wall End. Notice that the distance is minus ( - ) 16'-11 1/2".
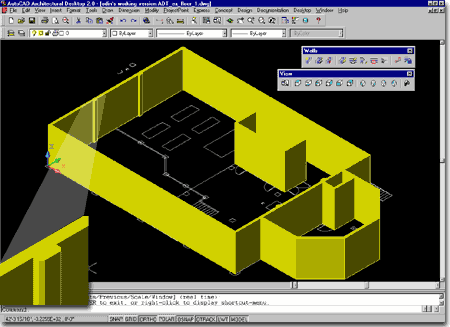
If you have it right, erase the wall on the opposite side and mirror the one we just modified. You can either do this or go through the whole process of modifying the opposite wall.
Though not necessary for this project exercise, you can practice another one of my techniques for solving pilaster needs. On this Xref'd plan, you should notice exterior pilasters that are basically decorative elements and not structural. Instead of going though all of the trouble creating modifier styles and measuring how far out from the edges, I want them, I just use another Wall Style. First though, you will need to define another Wall Cleanup Group as we did for the interior walls.
Once you have Named a new Cleanup Group Definition, you can use the default Wall Style ( standard ), set it to this new Cleanup Group and draw it right on top of the Xref'd plan.
This trick works well and solves a problem quickly but, in plan view, you will have a line between the two objects ( walls ) instead of the cleaner modifier style look.
You should find a rectangular column already drawn in the upper right corner of the exercise drawing (as illustrated to the right), but you can also create your own by using the "Pline" command and trace any of the interior chamfered columns.
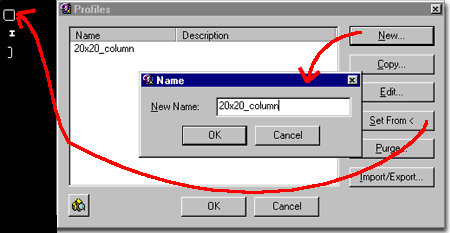
From the Desktop pull-down menu select AEC Profiles > and cascade over to Define AEC Profile... On the Profiles dialogue box, pick the New... button and Name your profile; I show my name for this column, in the illustration to the right, as being "20x20_column".
Once you have Named your profile, highlight the name in the Profiles dialogue box and pick on the Set From < button. Select the 2D closed polyline column outline as illustrated to the right.
OK your way out of the Profiles dialogue box.
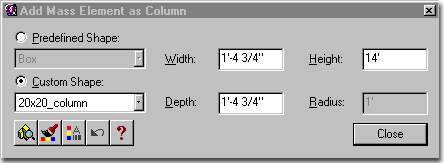
Notice that the Add Columns dialogue box actually refers to something called a Mass Element. This means that there really is no such thing as a Column in ADT; the actual object you are creating is a Mass Element. This is analogous to an AutoCAD Rectangle being nothing more than a closed polyline.
On the Add Mass Element as Column dialogue box, check the Custom Shape: radio button and select the profile Name that we created above, on the Custom Shape drop-down list.
The Width and Depth values should reflect the original size as per the profile dimensions but they could be adjusted here. For Height, we should set it to match the height of our walls; so, set the Height to 14'-0".
Add a single Column off to the side away from the project - see illustration below, right.
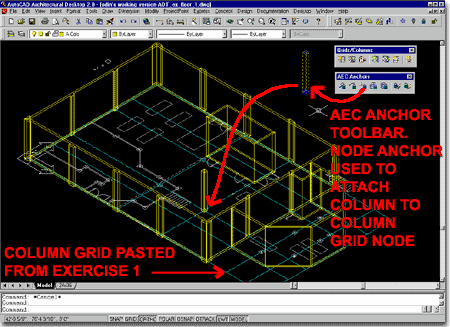
From "Exercise 1 - Foundation Plan", Copy and Paste the Column Grid we created in that exercise into this exercise. Use the Paste to Original Coordinates option to make life easier. If you did not do that exercise, you can download the finished version by picking here and then copy and past from the completed file.
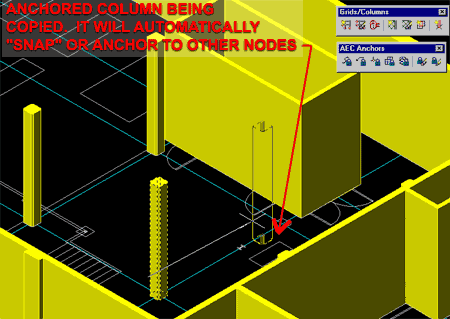
By having a Column Grid in place, we can utilize the AEC Anchor Tools to assist in populating the Grid with Columns.
![]() From the Desktop pull-down
menu, select AEC Anchors >
and cascade down to Node Anchor or use the Node Anchor button on the AEC
Anchor toolbar. Use the Attach object option by typing "A",
select the Column object and then pick
on the Column Grid near the desired Node or intersection where you want a
Column placed.
From the Desktop pull-down
menu, select AEC Anchors >
and cascade down to Node Anchor or use the Node Anchor button on the AEC
Anchor toolbar. Use the Attach object option by typing "A",
select the Column object and then pick
on the Column Grid near the desired Node or intersection where you want a
Column placed.
Here's the Command Line sequence:
Command: _AecNodeAnchor
Node anchor [Attach object/Set node/Copy to each node]: A
Select object to be anchored: < pick Column added earlier off to the side >
Select node on layout tool to anchor to: < pick near desired node on Column
Grid pasted in from other drawing file >
Node anchor [Attach object/Set node/Copy to each node]: < enter >
Command:
Note:
If you are in the mood for more practice, there is another column in this exercise whose
profile is next to the last Column profile; a steel column. Its location is near the
red arrow in the illustration to the right.
Summation:
The Add Column dialogue box provides solutions for Box
and Cylindrical Predefined Shapes, but if you desire something more complicated, you can
use the Profile tool to turn a 2D close polyline into a Custom Shape for a Column Object.
Adding Columns is relatively easy but for large numbers, a Column Grid can be very
beneficial. By Anchoring a Column to a Column Grid, you allow for rapid population
over the Column Grid, rapid re-centering via the Column Grid and automatic shape change
via Profile modification.
![]() From the Design
pull-down menu, select Openings > and cascade over to Add Opening... or use
the Add Opening button on the Doors/Windows/Openings toolbar.
From the Design
pull-down menu, select Openings > and cascade over to Add Opening... or use
the Add Opening button on the Doors/Windows/Openings toolbar.
On the Add Opening dialogue box, set the Predefined Shape radio button and select the Rectangular Shape from the adjacent drop-down list.
Set the Width to 6'-2" .
Set the Height to 8'-0".
In plan view, you should see an "X" form over the Wall before you OSnap the opening into place. Once you OSnap the Opening to one of the horizontal lines on the Xref's file, between the two pilasters leading into the partial octagonal room (see number 1 in image above right), you should see the Wall cut. If you view this Opening from one of the predefined isometric views it should appear as the inset image to the right.
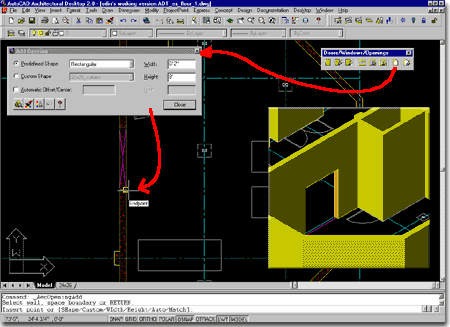
Since this plan has a mezzanine at the entry level, we will move the last two Openings up within the Walls by using the Modify Opening command.
Modifying the Z - Position of an Opening
![]() From
the Design pull-down menu, select Openings > and cascade over
to Modify Opening... or use the Modify Opening button on the
Doors/Windows/Openings toolbar.
From
the Design pull-down menu, select Openings > and cascade over
to Modify Opening... or use the Modify Opening button on the
Doors/Windows/Openings toolbar.
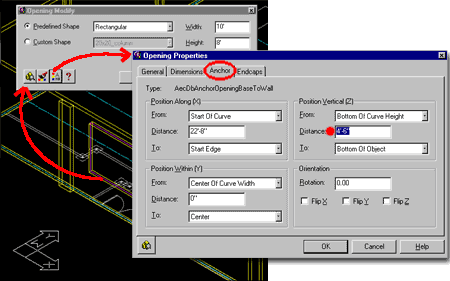
Select the front Opening, as illustrated to the right. On the Opening Modify dialogue box, pick on the Properties button to open the Opening Properties dialogue box. On the Opening Properties dialogue box, pick on the Anchor tab and change the Position Vertical (Z) Distance value to 4'-6".
Repeat this Modification on the Opening at the back of this building.
In this part of the exercise, we are going to do something a bit tricky that works best when done in an isometric or other 3D viewing angle. We are going to Add a wall within the front and rear Openings.
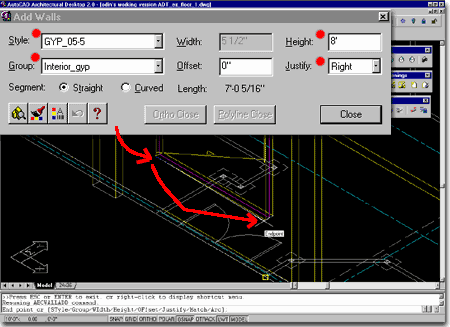
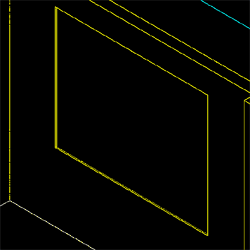 In the interest of time and complexity, we'll just Add
the "GYP_05-5" Wall Style we defined earlier. We'll also
use the "Interior_gyp" Group to keep this new Wall from
attempting to cleanup with the exterior shell wall.
To get this same Wall on the opposite side, you can either draw it in a similar fashion or just Mirror it. In the illustration to the left, I show the completed Wall condition with a 1" offset just to emphasize that there is a new Wall object in that Opening.
![]() From the Design pull-down menu, select Doors >
and cascade down to Door Styles... or use the Door Styles toolbutton.
From the Design pull-down menu, select Doors >
and cascade down to Door Styles... or use the Door Styles toolbutton.
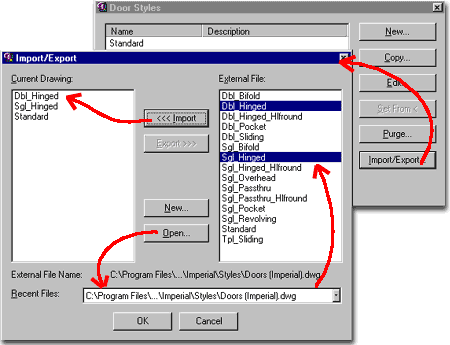
On the Door Styles dialogue box, pick the Import/Export button.
On the Import/Export dialogue box, pick on the Open... button and direct the File to Import From dialogue box to the "..\Content\Imperial\Styles\Doors (Imperial).dwg" file.
The two specific Door Styles that are needed for this project, are "Sgl_Hinged" and "Dbl_Hinged". You select these or more on the External File list and then use the <<<Import button to bring them into the current drawing file.
Note:
Use the Ctrl+pick button on the mouse to select multiple files. Use the pick
button on the mouse and the Shift key to select a whole range of files.
![]() From the Design pull-down menu, select Doors >
and cascade down to Add Door... or use the Add Door toolbutton.
From the Design pull-down menu, select Doors >
and cascade down to Add Door... or use the Add Door toolbutton.
On the Add Doors dialogue box, use the Style: drop-down list to select a "Sgl_Hinged" Door Style and set the Width to 3'-0" and the Height to 7'-0".
You should now be able to select any Wall anywhere and find that the Door object automatically Anchors to the base. And, will follow the cursor (or crosshairs) along any contiguous Walls; i.e. around corners.
In the illustration to the right, I show the addition of a couple of Sgl_Hinged Door Styles to the interior storage structure. If you have difficulty getting the Door objects to "take", if may be because of the Xref'd drawing underneath. There are two solutions for this problem: one is to hold the Ctrl key down while picking until you pick and see the Wall object highlight ( this is called cycling). The other solution is to use the Xref ( type "XR" ) dialogue box to Unload the "e_1_plan".
If the direction of the Door object does not match that of the Xref'd plan, you can just get as close as possible; then use Grips afterwards to make quick and easy adjustments.
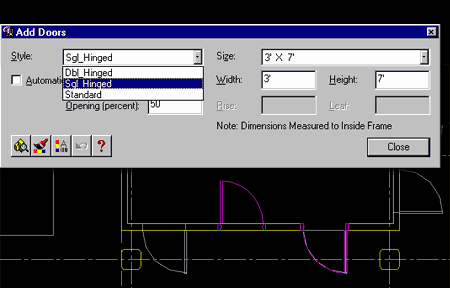
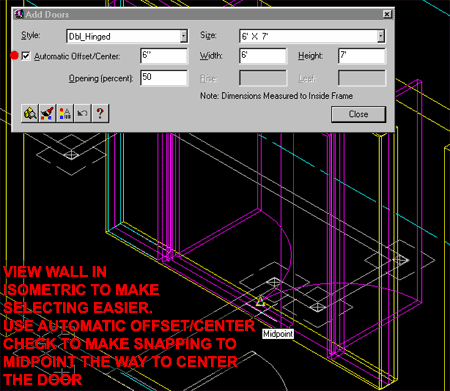
On the Add Doors dialogue box, use the Style: drop-down list to select a "Dbl_Hinged" Door Style and set the Width to 6'-0" and the Height to 7'-0".
Adding double doors will be quite easy as long as we can pick the right Wall object.
First, make sure to set an appropriate Isometric View to allow for easy viewing of the unique wall condition we are working with - as illustrated to the right.
On the Add Doors dialogue box, make sure to check the Automatic Offset/Center check box so the door will be easy to center. Set the Width to 6'-0" and the Height to 7'-0".
Pick on the Wall object within the Opening and then Snap to the midpoint of the Opening, as illustrated. This should put the door right where it should go.
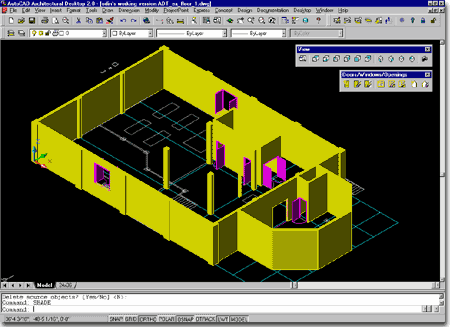
Looking at the Shaded version of all the work achieved thus far, we can see that creating Walls and Adding Doors is quite easy, but since we are now dealing with a 3D program, we must also consider where objects should be placed relative to the Z-axis.
![]() From the Design pull-down menu, select Windows >
and cascade down to Window Styles... or use the Window Styles toolbutton.
From the Design pull-down menu, select Windows >
and cascade down to Window Styles... or use the Window Styles toolbutton.
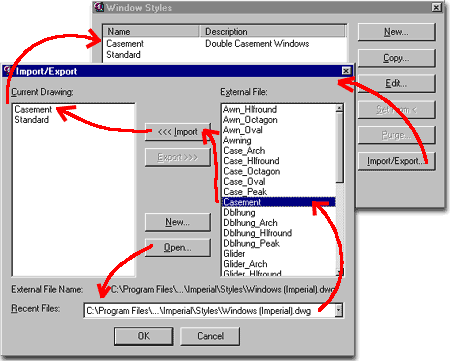
On the Window Styles dialogue box, pick the Import/Export button.
On the Import/Export dialogue box, pick on the Open... button and direct the File to Import From dialogue box to the "..\Content\Imperial\Styles\Windows (Imperial).dwg" file.
For this exercise building, I show that I am selecting the Casement Window Style in the illustration to the right. Use the <<< Import button to transfer the Casement Window Style from the External File list to the Current Drawing list.
![]() From the Design pull-down menu, select Windows >
and cascade down to Add Window... or use the Add Window toolbutton.
From the Design pull-down menu, select Windows >
and cascade down to Add Window... or use the Add Window toolbutton.
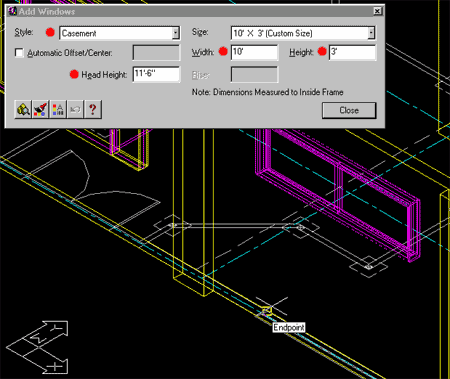
On the Add Windows dialogue box, use the Style: drop-down list to select a "Casement" Window Style and set the Head Height to 11'-6", Width to 10'-0" and the Height to 3'-0".
The Head Height value was derived from the header height of the adjacent double doors at the entry.
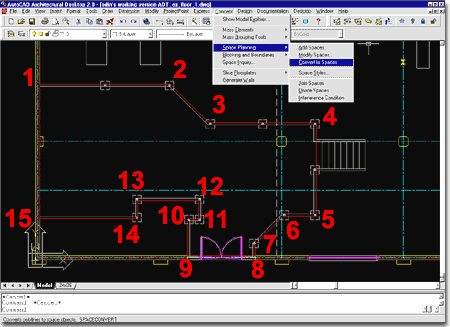
The easiest way to make an irregular shaped Space object, is to use the Convert to Spaces command and then select a closed polyline.
Use the Pline command to Intersect Osnap around the Xref'd mezzanine in plan view; as illustrated to the right ( in other words, trace the shape ). You can follow the red numbers as a guide and remember to use the "Close" option on the polyline command at the end (between point 15 and 1).
![]() From the Concept pull-down menu,
select Space Planning > and cascade down to Convert to Spaces
or use the Convert to Spaces toolbutton.
From the Concept pull-down menu,
select Space Planning > and cascade down to Convert to Spaces
or use the Convert to Spaces toolbutton.
Once you have activated the Convert to Spaces command, select the closed polyline we just created.
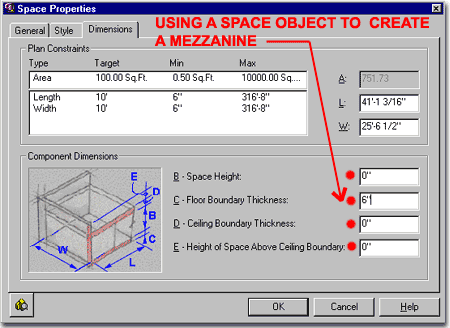
We can skip the General and Style tabs and move right to the Dimensions tab.
On the Dimensions tab of the Space Properties dialogue box, set values B - Space Height, D- Ceiling Boundary Thickness and E- Height of Space Above Ceiling Boundary to zero ( 0" ). Set C- Floor Boundary Thickness to 6". This will create a simple floor space with no ceilings.
Hit the OK button.
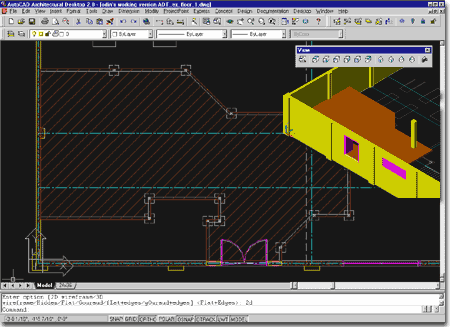
The next task regarding this Mezzanine has to do with its position in elevation. By default, Architectural Desktop will create a Space's Floor Boundary from the base of the Walls down into a negative Z-axis direction. In most cases this is exactly what you would want, a floor below your walls, but in this particular example we want to raise the Floor Boundary up to match the entry doors - as per inserted isometric illustration to the right.
![]() From the Concept pull-down menu, select
Space Planning > and cascade down to Modify Spaces or use the
Modify Space button.
From the Concept pull-down menu, select
Space Planning > and cascade down to Modify Spaces or use the
Modify Space button.
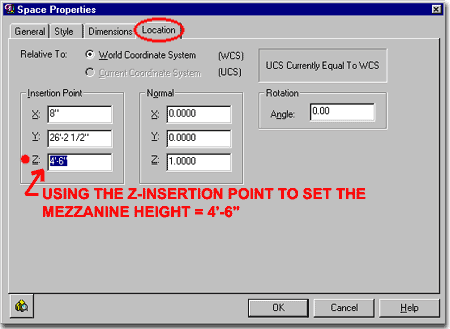
Notice that we are basically back to the same dialogue box we used to create this object, with the exception of a Location tab that can now be used to specify a new Insertion Point for Z: of 4'-6" - as per illustration to the right.
Once you have made this modification to the Z-value, the Space object should match right up against the base of the entry doors and look just like a true Mezzanine.
If you feel the need to finish the job by having the Space object actually recognize the Column object that penetrates it, you can use the Interference Condition routine to Add the Column as an Interference within the Space.
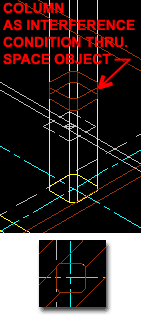 Creating a Space Interference
From the Concept pull-down menu, select Space Planning > and cascade down to Interference Condition ( there is no button for this command ).
Use the Add option <enter>, pick on the Space ( mezzanine ) <enter> and then pick on the Column <enter>.
Command: _AecSpaceInterference
Space interference [Add/Remove]: A
Select spaces: < pick on the Space object >
Select spaces:
Select plines or AEC Entities: < pick on the Column object >
Select plines or AEC Entities:
1 object(s) added to space 604.
Space interference [Add/Remove]: < Enter >
Command:
Summation:
Since ADT offers no obvious floor slab or floor framing
solutions, we improvised by using the next closest thing: a Space object. A Space
basically solves the problem because it is comprised of a Floor and a Ceiling; we just
have to turn off the Ceiling components. We are free to move this object around in
the drawing so positioning it at a mezzanine level is rather easy. Making changes to
a Space is more work than making changes to regular AutoCAD lines or Plines but by using
such tools at Interference, Join and Split changes are not so bad. For rectangular
Spaces, changes are even possible with simple Grip use. Read more about Spaces
in Part 11.
![]() From the Design pull-down menu, select Stairs
> and cascade down to Stair Styles... or use the Stair Styles
button.
From the Design pull-down menu, select Stairs
> and cascade down to Stair Styles... or use the Stair Styles
button.
On the Stair Styles dialogue box, pick the Import/Export button.
On the Import/Export dialogue box, illustrated to the right, use the Open... button to access the Styles folder where you should find the Stairs (Imperial).dwg file.
Once you have Opened the Stairs (Imperial).dwg file, you should see a list of Stair Styles in the External File list. Highlight the WOOD-SADDLE Stair Style and use the <<<Import button to bring the style over to the Current Drawing list.
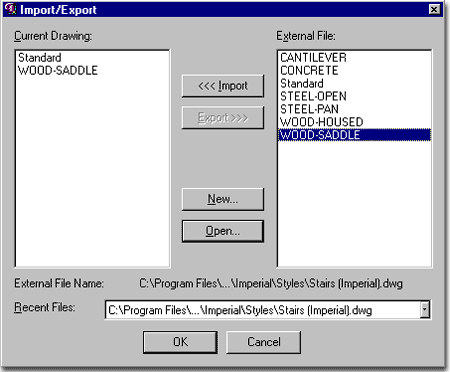
On the Add Stairs dialogue box, illustrated to the right, you should now find that WOOD-SADDLE is available on the Style drop-down list.
To create a simple design for an industrial building, such as this one, check the Open check box so there will be no wood riser.
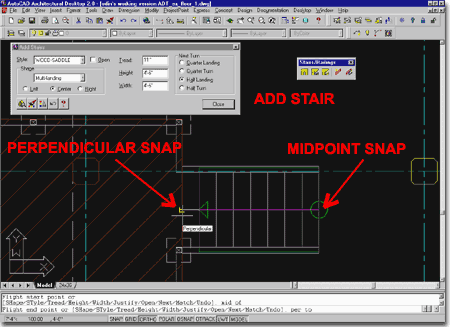
For Shape, we will use the default Multi-landing ( also good for basic stairs ), For justification, we will use Center. Tread: 11", Height: 4'- 6", Width: 4'- 8" and we will leave the Next Turn at the default Half Landing setting.
This should provide a good beginning for our Stair up to the mezzanine level.

 When you place the Stair, you begin the Stair at its base and then provide the
run length and direction - see illustration to the right; midpoint to perpendicular.
When you place the Stair, you begin the Stair at its base and then provide the
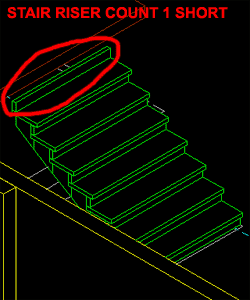
run length and direction - see illustration to the right; midpoint to perpendicular.If you view this stairway from an Isometric View, it should look something like that illustrated to the left.
Since ADT's Stair Styles default to an 11" run over a 7" riser, the number of Risers for the given length could easily be wrong - as in this case.
![]() From
the Design pull-down menu, select Stairs > and
cascade down to Modify Stair... or use the Modify Stair button.
From
the Design pull-down menu, select Stairs > and
cascade down to Modify Stair... or use the Modify Stair button.
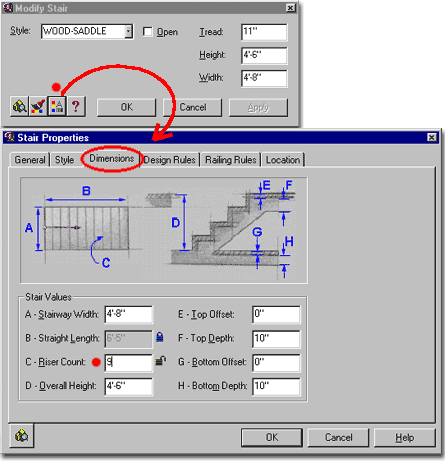
On the Modify Stair dialogue box, illustrated upper right, use the Properties button to access the Stair Properties dialogue box.
On the Stair Properties dialogue box, pick the Dimensions tab and unlock the C-Riser Count field by double-clicking on the lock icon.
Change the C-Riser Count field to 9.
OK
Apply
By doing this, we have over-ridden the default riser/run setting and forced the stair system to calculate the Riser value by number instead of by height-per-riser.
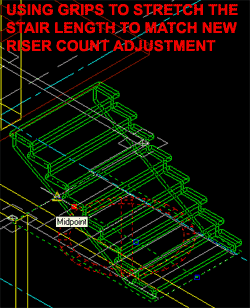 Once you modify the Stair as illustrated above, you can return to the drawing and
find a red error icon over the stairs. To fix this, simply adjust the length of the
run by using a Grip to Stretch the top of the stair to
the true length. Even the slightest increase in run length should show the actual
stair and the subsequent removal of the error icon.
Once you modify the Stair as illustrated above, you can return to the drawing and
find a red error icon over the stairs. To fix this, simply adjust the length of the
run by using a Grip to Stretch the top of the stair to
the true length. Even the slightest increase in run length should show the actual
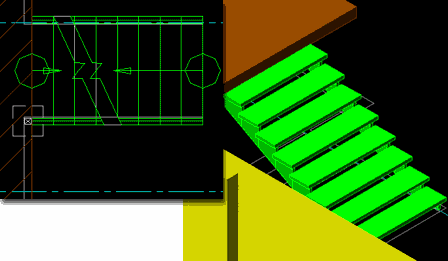
stair and the subsequent removal of the error icon.To the right, I show the finished stair in plan view and shaded isometric view.
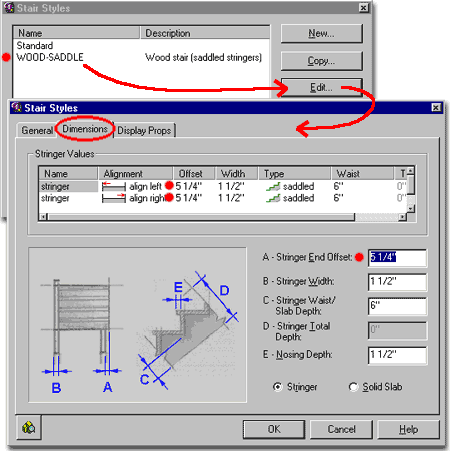
Since the next step will be to add posts and railings, we should modify the default Stringer position to match the intended post and railing design. As I recall, from the site condition of this building, the posts were anchored with Simpson hangers to the outside of the Carriage. To move the Stringers in a bit to accommodate the post, we will use the Stair Styles dialogue box illustrated to the right.
![]() From the Design pull-down menu,
select Stairs > and cascade down to Stair Styles...
or use the Stair Styles button.
From the Design pull-down menu,
select Stairs > and cascade down to Stair Styles...
or use the Stair Styles button.
On the Stair Styles dialogue box, highlight the current Style ( WOOD-SADDLE ) and pick on the Edit.. button.
On the Stair Styles (this dialogue box should read Stair Styles Properties) dialogue box, pick the Dimensions tab and highlight the first stringer in the Stringer Values list.
Change A - Stringer End Offset to 5 - 1/4" for both Stringers
In this exercise, we will design the Railing at the time of Adding it just to save time.
![]() From the Design pull-down menu, select Railings
> and cascade down to Add Railing... or use the Add Railing
button.
From the Design pull-down menu, select Railings
> and cascade down to Add Railing... or use the Add Railing
button.
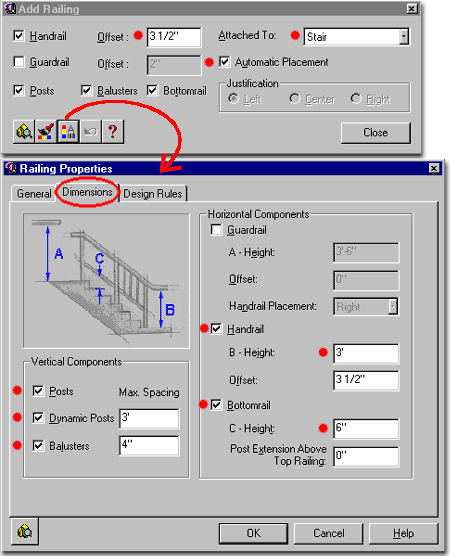
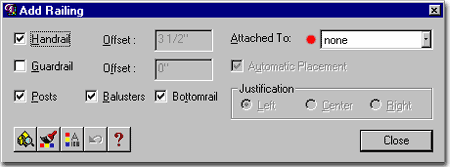
On the Add Railings dialogue box, the default values should match those on the illustration to the upper right except for the Offset value. On the Dimensions tab of the Railing Properties dialogue box, confirm that Handrail is checked, Guardrail is unchecked, Posts are checked, Balusters are checked, Bottomrail is checked, Offset is set to 3- 1/2", Attached To: is set to Stair and Automatic Placement is checked.
Pick on the Properties button as illustrated and set the Railing Properties dialogue box to the Dimensions tab.
Dynamic Posts = 3'-0"
B- Height: = 3'-0"
C-Height: = 6"
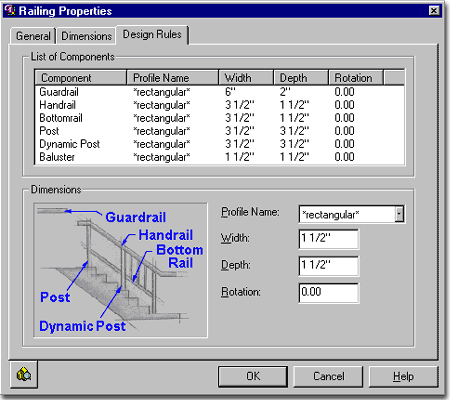
On the Design Rules tab of the Railing Properties dialogue box, illustrated to the right, I show a number of options for this example Railing. You can match those of the illustration or design your own.
The Profile Name: drop-down list offers the option to select a *rectangular* component which is what I used for all of the components.
If you use these values and component settings, you should get a Railing that looks like the one illustrated below right.
OK
When you pick on the Stair object to place the Railing, the side you pick on will determine which side the Railing will automatically get anchored to; i.e, pick on one side and then on the other.
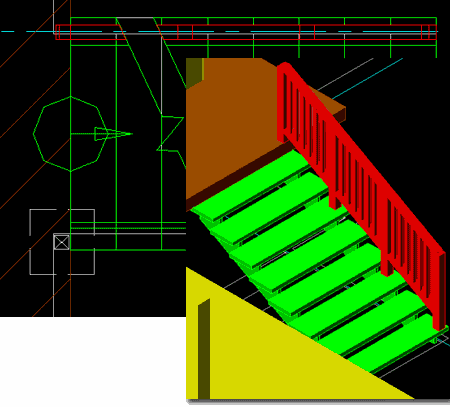
 Getting the Railing Posts to actually drop down thru. the stair Runs and match up
against the Carriage is far more trouble than its worth but could be achieved by releasing
the Railing Anchor and then change the Handrail height to 3'-6", the Bottomrail to
12" and the Z-position to -6".
To Add a Railing to anything other than a Stair object, you will have to set the Attached To: drop-down list to "none" - as illustrated to the right.
Note:
Notice that the Justification options gray out when you set the Attached To: to none.
Unfortunately this means that the Railings will only be drawn based on the
midpoint; making it rather difficult to trace along an edge like the mezzanine in this
exercise.
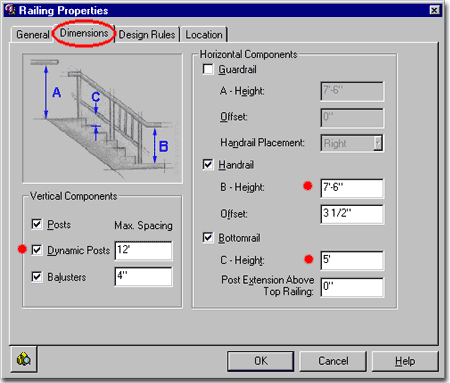
To get posts that will go from the floor all the way up to the handrail, you simply have to add the mezzanine finished floor height to the Railing values that would normally be measured off of the floor. In the illustration to the right, I show the two places where I added the 4'-6" mezzanine floor height and the place where I changed the Railing Post Max. Spacing value to 12'-0".
Dynamic Posts = 12'-0" - this is the spacing.
Handrail B - Height: = 7'-6"
Bottomrail C-Height: = 5'-0"
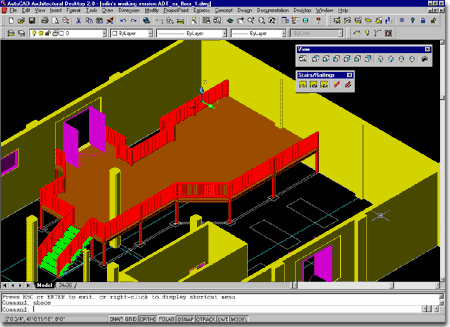
Also, the Railing routine simply cannot recreate the exact column configuration laid out by the 2D Xref'd plan so just that part as a guide only.
Ramps have to be built with other ADT objects such as Space objects, Roofs or Mass Elements.
In the example to the right, I illustrate how to make a simple ramp by using the Add Mass Element dialogue box.
From the Concept pull-down menu, select Mass Elements > and cascade over to Add Mass Element... or use the Box button on the Mass Elements toolbar.
On the Add Mass Elements dialogue box, make sure Shape is set to Box and then specify a Width of 7'-0", a Depth of 16'-0" and a Height of 4".
Place the rectangular box anywhere near the actual ramp location and Close the Add Mass Elements dialogue box.
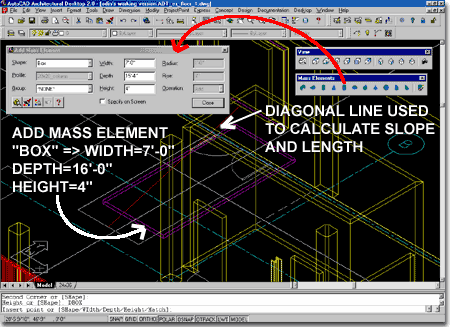
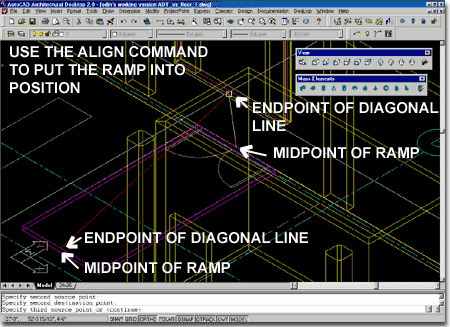
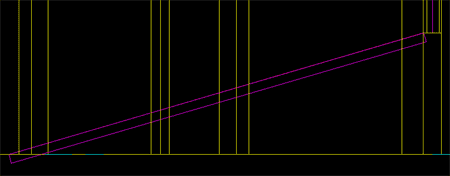
Draw a diagonal line from the Xref'd base of ramp to the 3D midpoint at the double door opening, as illustrated right and above, right as a red line. This is also how you can calculate the length need for a 3D ramp.
Type "align" on the command line and pick at the midpoint of the back top of the ramp and then pick at the endpoint of the diagonal line we just created. Repeat this process for the front top of the ramp and pick at the other endpoint of the diagonal line - see illustration. The Align command works on the premise that you specify a minimum of 4 points in space where you want these four points to align.
The 3D ramp should pop right into place if everything goes well.
Should you get frustrated, you can also use the Rotate or Rotate3D command to achieve the same results.
If you have to have everything perfect, you could create a Pline profile of the exact ramp design and then use a command called Extrude to make a 3D object that is perfect. You can read more about Mass Elements and Solid Modeling in the Architectural Desktop Pre-Design Guide (if you have subscribed to it).
To end, I typically put ramps on the same layer as my stairs.
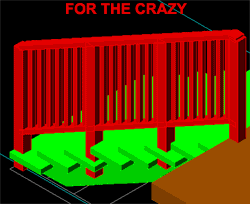
If you are crazy, you can rotate the UCS icon based on 3points and align it with the slope of the ramp and then use the Add Railing dialogue box to add a "Attached to: None" railing.
In Exercise 1 - Creating a Foundation Plan we learned how to do automatic Grid dimensioning which you could cut-n-paste right into this drawing.
Now we will look at two other ways to generate dimensions in ADT:
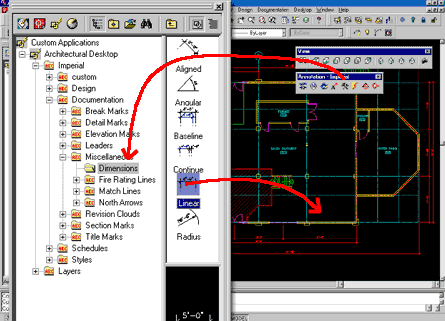
 By using the Annotation toolbar to access the DesignCenter's Miscellaneous folder
for Dimensions, you can drag-n-drop the common dimensions into the active project and use
them as normal AutoCAD dimensions. The reason for using
 ![]() the
DesignCenter really only serves one major function: it automatically layers or
"Keys" the dimension objects so you don't have to worry about that part of the
job.
the
DesignCenter really only serves one major function: it automatically layers or
"Keys" the dimension objects so you don't have to worry about that part of the
job.
See also, Part 9 - Annotation and Documentation.
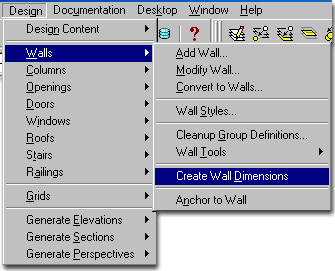
From the Design pull-down menu, select Walls > and cascade down to Create Wall Dimensions. This routine is very much like the QuickDimension or Qdim routine that resides on the default AutoCAD Dimension toolbar. A problem that both routines share, is that they work off of vertexes on an object and thus can easily produce far too many dimension lines but on a simply project this routine is very useful.

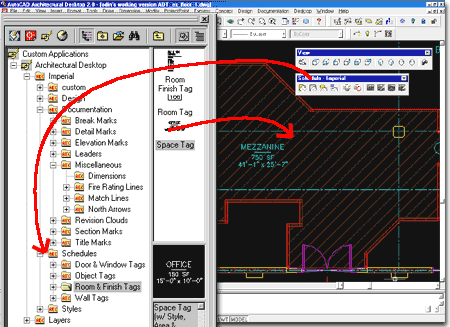
![]() If you
have Space objects, adding a Space Tag is as easy as it can get. From the Schedule
- Imperial or Schedule - Metric toolbar, pick on the Room
and Finish Tags button. This should activate the DesignCenter and take you
to the Room & Finish Tags folder under the Schedules folder, as illustrated to the
right.
If you
have Space objects, adding a Space Tag is as easy as it can get. From the Schedule
- Imperial or Schedule - Metric toolbar, pick on the Room
and Finish Tags button. This should activate the DesignCenter and take you
to the Room & Finish Tags folder under the Schedules folder, as illustrated to the
right.
From the DesignCenter, drag-n-drop the Space Tag object into the active drawing and select your Space object. In the illustration to the right, I show the result of having selected the Mezzanine Space we created earlier. Notice the square footage total and the approximate square dimensions of the Space (okay, in this case that's not so useful).
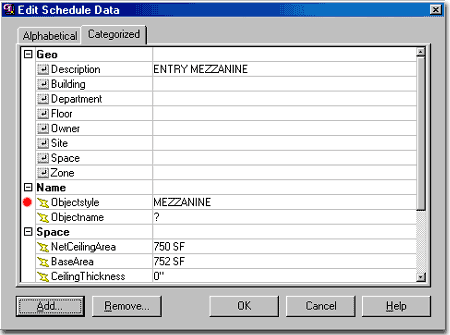
To get a different Name on the Space Tag, go to the Name section of the Edit Schedule Data dialogue box and change the default name to something like MEZZANINE and hit the OK button.
Well, unfortunately the Various Tags with the Room & Finish Tag folder were only designed to work with another object; specifically a Space object. This means that you have to have every single individual little nook and cranny defined by some Space object. This can get frustrating.
Illustrated to the right is one possible work-around but be aware that if you use this technique, the Automatic Display system will no longer work properly on these Tags and you will have to make sure the layers are changed, etc. by the traditional manual means.
So, here goes...
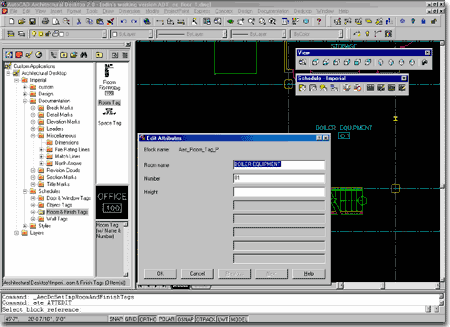
Bring in a Room & Finish Tag and simply associate it with any Space object you have.
Then, Explode it two ( 2 ) times and use the old ATE
( type "ate" on the command line ) or Edit Attribute command to change the
values within it. Illustrated to the right is the result of doing this trick to a
Room Tag. Unfortunately, when you change the Display Representation on this drawing
to an RCP, for example, these Tags do not automatically turn off - that's the best I've
come up with thus far.
From the Documentation
pull-down menu, select Schedule Tags > and cascade over ![]() to Door
and Window Tags... or use the Miscellaneous button on the Annotation toolbar.
to Door
and Window Tags... or use the Miscellaneous button on the Annotation toolbar.
Once you drag-n-drop a single tag in, select the appropriate door or window object and then specify a location either by picking a point or by typing in "c" for Center. After the first symbol has been placed, the Door and Window Symbol routine automatically prompts for the next object to tag and the numbers will automatically be sequential starting with the number "001".
These symbols are necessary to generate an automatic Door or Window Schedule in the future. You can generate the Schedule in this file or create a new drawing file and Xref this drawing into it to generate a schedule. Some architecture firms prefer to have a separate sheet for the schedules, so this Xref approach will prove very useful.
You can read more about Door and Window Tags and Schedules in Part 10 - Schedules.
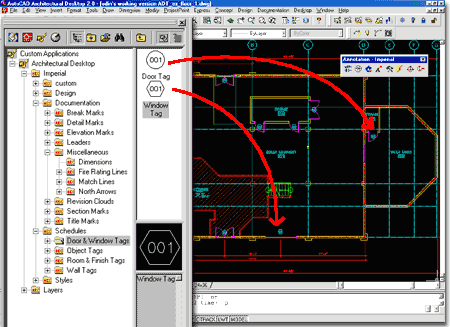
Notice that the drawing looks just like it has been done in AutoCAD 14 or older version; 2D and everything. You can turn off the Space object layer so you don't see the hatch patter across the Mezzanine.
This drawing has a Viewport set up with a 1:48 zoom scale factor and the titleblock is based on an Xref file ( "project_titleblock.dwg" ).
You could easily create another Layout based on this one and set the view up for Isometric inside the Viewport; thus utilizing ADT's 3D capabilities for presentation work and construction documentation at the same time.
