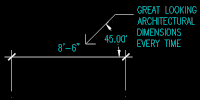
Anatomy of Dimension Styles
Architectural Dimensioning
Anatomy of Dimension
Styles
Comments by: Odin Cary
Creating Dimension Styles is one of the more difficult topics to teach and explain to AutoCAD users. And usually, the problems users have with dimensions lie with how they set their styles.
For those who just want to move through the learning process as fast as possible, I have attempted to show everything you need to do by capturing the dialogue boxes at each step. If you can follow the dialogue boxes, you should be able to go through this example without having to read a single line of text.
Contents:
Creating a Text Style for Dimensions ---- Creating the Parent ----Creating
the Linear Child ---- Creating
the Angular Child ---- Creating
the Leader Child
The first thing to do before creating your dimension style is to create a text style.
1Creating a Text Style for Dimensions
1STEP:
Activate your Text Style dialogue box by getting it from the pull-down menu under Format>>Text Style… or type "DDSTYLE" on the command line.
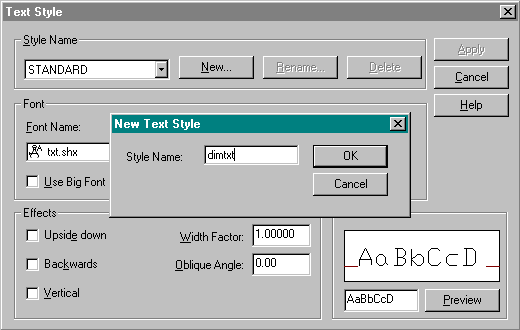
Create a new style name by picking on the New… button and create a name that indicates that you will be using this style for dimensions.
2STEP:
Choose an appropriate font from the drop-down list, leave the Height at 0 and set the rest of the options to your personal preference.
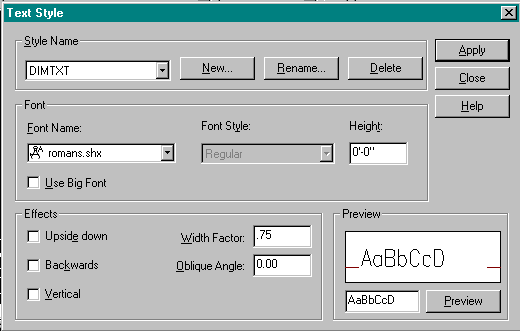
| DISCUSSION: When creating a text style for dimensions, the height should always be set to 0. This point will become more obvious later, but the reason is that inside the Dimension Styles, there is a unique variable that will control the text height; setting it now would be counter productive. In this example you will notice that Romans.shx has been selected. This is because the more attractive TrueType fonts usually have an adverse effect upon system performance (more noticeable on projects with lots of text or slower machines). The Width Factor has also been set to .75 because dimensions tend to be problematic in tight spaces – this setting only helps, it does not eliminate the problem of having dimension text pop outside and away from where you might want it. |
Pick the Apply button and then the Close button.
3STEP:
Activate your Dimension Styles dialogue box by getting it from the pull-down menu under Format>>Dimension Style… or type "DDIM" on the command line.
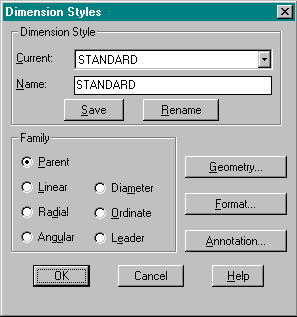
In the Name Text box, type a name for your architectural dimension. A good rule of thumb is to also include the scale for it is designed or anything else that makes it unique from other potential styles.
After you have typed a name in the Name Text box, pick the Save button and the Standard Dimension Style will automatically be copied to your newly named style.
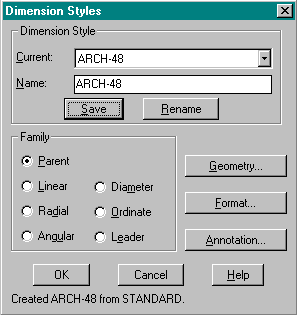
Notice that the radio button for Parent is set by default and thus the following changes will be done to the Parent in this Family.
4STEP:
Pick on the Geometry button and you should see the Geometry dialogue box as shown bellow.
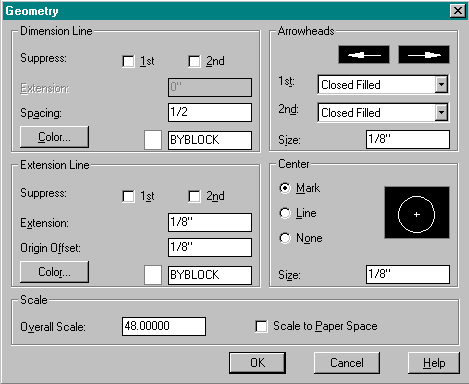
Set the Dimension Line Spacing value if you ever plan on creating baseline dimensions. This is usually more common in mechanical drawings where each consecutive dimension is referenced from the same origin. ½" would be the distance between the consecutive dimension lines.
Set the Extension Line Extension value. This value represents how far you want the extension line to carry past the actual dimension line itself.
Set the Extension Line Origin Offset value. This value represents how far you want the extension line away from the object you are dimensioning.
Set the Arrowheads. This is an obvious one; but in this case, since we are creating the Parent, you should set the arrowheads and size to what you want for default. Consider that you have Radial, Angular, Diameter, etc to consider too. Choosing Architectural Ticks at this point would be a poor choice.
Set Center Mark, Line or None. This is obvious too; except, if you chose Mark then the Size value will be the length of the Mark line and if you choose Line then the Size value will be the length of your centerline measured from the circle’s edge out.
Set the Scale Overall Scale value. This is the single most important value to understand in creating dimensions for architecture. This value is based on your anticipated printing scale. If you plan to print your drawing at ¼" = 1’-0" then this value must be reflected in this text box in order for your dimension to print legibly. The number "48", shown above, comes from taking ¼" = 1’-0" and turning it into a non-fractional ratio: 1" = 4’-0" or 1" = 48". It is all the same really but for AutoCAD, the number must be in the form of a multiplier (as in number-of-times-bigger or number-of-times-smaller). We make everything bigger, in this case, because we plan to print everything smaller.
5STEP:
Skip the Format button.
6STEP:
Pick on the Annotation button.
On the Annotation dialogue box, you should see a Units… button in the upper left-hand corner. Pick on the Units… button and you should see the Annotation - Primary Units dialogue box as shown bellow.
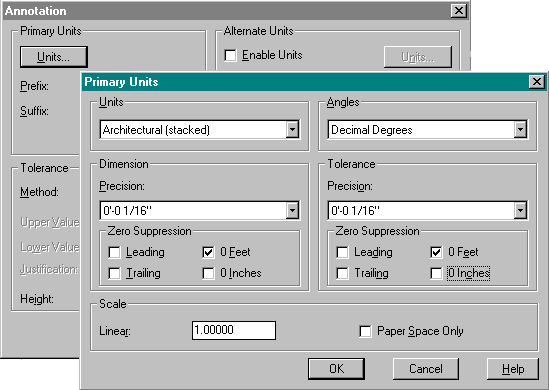
Set the Units value. From the drop-down list, select "Architectural (stacked)".
Set your Dimension Precision value. This value is really your "round-off" value so exercise caution in choosing a value.
Set the Zero Suppression 0 Inches value. This value represents whether or not you wish your architectural dimensions to look like 3’ or 3’-0" and 3" or 0’-3". If the suppression (on) box is checked, you will not see zeros. In this example, a 3’-0" dimension will look like 3’-0" and a 3" dimension will look like 3".
It is a similar concept for Angles. In this example, the last thing changed was the Suppression on 0 Inches for Tolerance.
Skip the Scale Linear and Paper Space Only values.
7STEP:
Back to the Annotation dialogue box.
Skip the rest of Primary Units.
Skip Tolerance.
Skip Alternate Units.
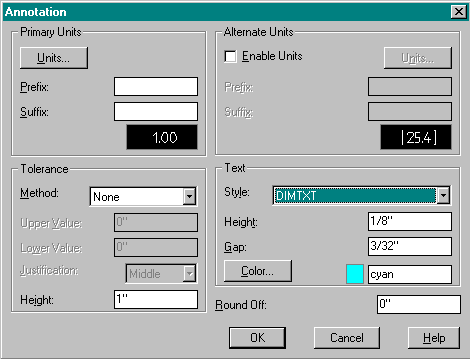
Set the Text Style value. This is where you get to select the Test Style we created in Step 1 and 2. Since we set the height to 0 when we created this style, we can now control the text height here.
Set the Text Height value. In this example you should notice that we used 1/8". Notice that unlike regular annotation, Dtext and Mtext, the height is set as real-world output size and not counter scaled. The truth is that thought you can set the text height to what you really want when you print, this number is actually being multiplied by the Overall Scale set in Step 4.
Set the Text Gap value. On linear dimensions where the text is above the dimension line, this value controls the height of the dimension text above the dimension line. On leaders, this value controls the distance between the leader tail and the leader text.
Set the Text Color value. In this example, the color was set to cyan just to demonstrate how you can have your dimension lines set to one color or line weight and the dimension text at another color or line weight.
Pick on the Okay button.
8STEP:
On the Dimension Styles dialogue box pick the Save button.
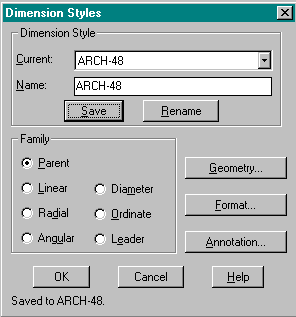
This particular action may seem obvious, but if you pick the OK button without picking the Save button first, the tedious work just completed would not be saved in an obvious way. AutoCAD will create a new temporary style with the same name preceded by a "+" symbol; e.g., +ARCH-48.
9STEP:
On the Dimension Styles dialogue box, shown above, pick on the Linear radio button. This action will now allow you to work on just Linear dimensions and how you want them to look and behave.
Pick on the Geometry button and you should see the dialogue box shown below.
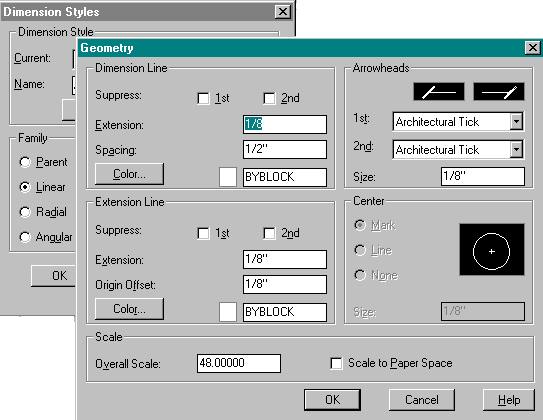
Since we have already set values for the Parent in this Family of dimensions, there are only a few specific changes required to make a linear style appropriate for architectural use.
Set the Dimension Line Extension value. This value represents the amount your dimension line carries out beyond the extension line (the lines coming from your object). This is a common desire in architecture but often creates a CAD user problem due to the extra objects that can accidentally be snapped to. In this example, the value is set to 1/8".
Set the Arrowheads value. You can quickly pass through the list of choices by picking on the black tile. You should encounter two architectural Tick styles; one called Oblique and one called Architectural Tick. The Tick came about in AutoCAD release 14 because the Oblique was too thin for most architects. If you pick on the drop-down list, you should notice that at the very bottom there is a choice for User Arrow… This is where you would type in the name of the block you would like for AutoCAD to use as a custom arrow.
10STEP:
Back on the Dimension Styles dialogue box with the radio button still set to Linear, pick on the Format button.
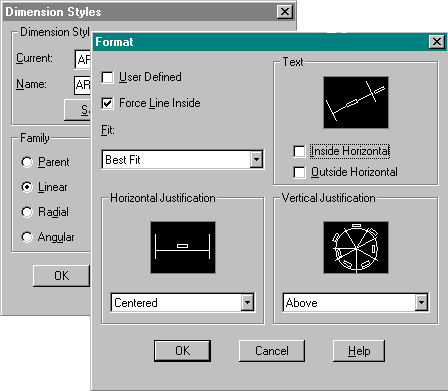
Do not check the User Defined checkbox because that would require you to manually place your text every time you place a dimension line.
Check the Force Line Inside checkbox because this will allows put a line between your extension lines, even if you place the text somewhere away form the dimension line itself.
The default setting for Fit is Best Fit and is probably the best option for most cases but not all.
The default setting for Horizontal Justification is Centered and is appropriate for linear architectural dimensions.
Uncheck or clear the checks for Text Inside Horizontal and Outside Horizontal. If checked,
you would end up with horizontally placed text on vertical and aligned dimensions.
Set the Vertical Justification value to Above. This is an obvious choice on architectural style dimensions; to have the text placed above the dimension line.
DISCUSSION: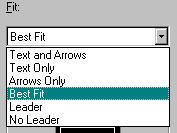 If you are experiencing problems with the placement of the dimension text on a dimension line, it usually has to do with how AutoCAD interprets the length of your text with respect to the distance between the extension lines plus the amount of space your Arrowheads consume. A common complaint is that the text seems to be "kicked out" when there is still room enough to fit it; though admittedly very tightly. Here are some suggestions: For those running Architectural Ticks, use Best Fit for most cases and then use the Properties button to adjust the problem cases. By changing Properties, you can come right to this dialogue box for that particular dimension and make unique changes. If you set the Fit value to No leader and check the box for User Defined, you can put the text anywhere you want. For those running traditional-style arrowheads, you might try Text and Arrows for Fit instead of Best Fit before using the technique described above. |
11STEP:
Back on the Dimension Styles dialogue box with the radio button still set to Linear, pick on the Save button.
Pick on the Angular radio button.
Pick on the Annotation button.
In the Annotation dialogue box, pick on the Units… button and you should see the Annotation - Primary Units dialogue box below.
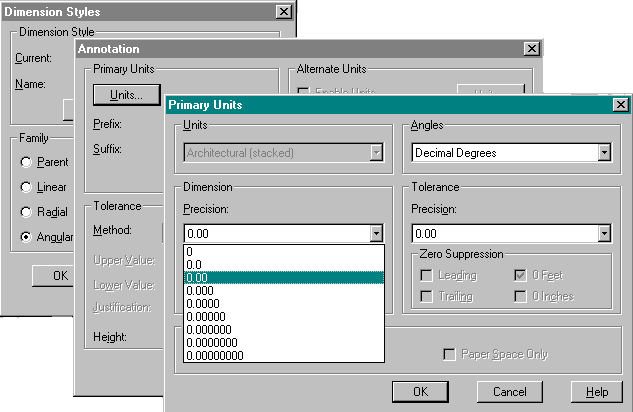
As shown, select the appropriate Precision for Dimension units required in your work. Since this value reflects the number of decimal places reported on angles, rounding off to the unit’s place may be dangerous depending upon the accuracy required on the drawings. Also, if two decimal places create problems on the drawings because of erroneous values, there is a problem with the drawing and not AutoCAD’s dimensions. If errors show up here then there may be error throughout the whole drawing.
12STEP:
Back on the Dimension Styles dialogue box with the radio button still set to Linear, pick on the Save button.
Pick on the Leader radio button.
Pick on the Geometry button and you should see the Geometry dialogue box shown below.
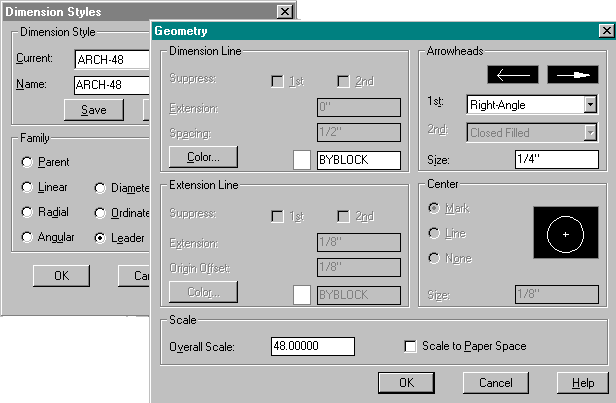
Set the Arrowheads 1st value to an arrow of your choice. In this example the Right-Angle arrow was selected and the size increased to ¼".
Set the Arrowheads Size value. You may want your leader arrows to be a bit larger than 1/8" , especially since AutoCAD has no arrows that have a bold head on them like the new Architectural Tick.
13STEP:
Back on the Dimension Styles dialogue box with the radio button still set to Leader, pick on the Format button.
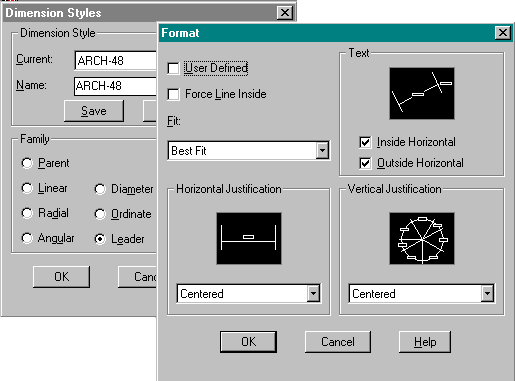
Set the Vertical Justification value to Centered. This value needs to be set to Centered so that the leader line will not appear to underscore the text placed after it. If you experience undesirable angled leader tails when using leaders, see Leader Problems on the Bugs and Problems Menu.
Pick the OK button.
On the Dimension Styles dialogue box pick the Save button and then the last OK button.
Congratulations, that should do it.
If unique problems arise, chances are that you can resolve the dimension problem by working with the 59 + dimension variables. To list and/or change them:
Command: setvar enter
Variable name or ? <CMDDIA>: ? enter
Variable(s) to list <*>: dim* enter
See Help in AutoCAD or other AutoCAD manuals for a complete explanation of each individual variable.