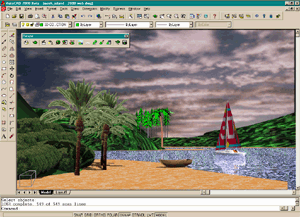
Getting the Basic environmental settings (Part 1 of 3).
Rendering in AutoCAD® 2000 (similar to R14)
Getting the Basic environmental settings (Part 1 of
3).
Contents:
Lighting
and Casting Shadows ---- Background Scenery ---- Mapping Materials to Surfaces - Water
---- Mapping Materials to
Surfaces - Sand and Foliage ---- Coordinate
Mapping a Material to a Surface
Rendering opens up an amazing amount of technical issues as well as subjective preferences. Invariably the majority of time is spent "tweaking" the model's materials and lighting to get just that perfect shot. With time, you come to realize that "that perfect shot" is an illusion - the shot can be improved infinitely. The following tutorial attempts to introduce the basic concepts for rendering 3D models in AutoCAD without focusing on photo-realism. Other than the downloadable model, no special materials or unique objects are employed; just plain vanilla AutoCAD and AutoCAD default materials are necessary to follow this tutorial.
| 1Lighting and Casting Shadows | |
| To follow the exercise as per this page, you
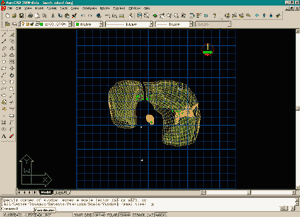
may download the following drawing file from the ARCHIdigm site: MESH_IS.EXE Once you have downloaded this self-extracting file, move it to a project folder of your creation and double click on it to extract the Mesh_island.dwg file, then open the file with AutoCAD. The drawing should look like the image to the right. |
 |
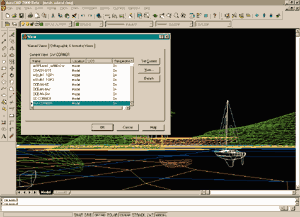
| 1STEP: From the View pull-down menu, select Named Views... and then make "SW_CORNER" Current. This dialogue box can also be activated by typing "V" or "DDVIEW" on the command line. This will provide us with a basic point of reference from which we can observe the changes that we will be making to our 3D environment. |
 |
| 2STEP: From the View pull-down menu, select Render and then on the cascading menu, select Render again. This will bring up the Render Dialogue box (as shown in the figure to the right). Pick on the Render button on the Render Dialogue box and let AutoCAD render this scene in complete default mode. This will allow us to see what this scene looks like without any changes. |
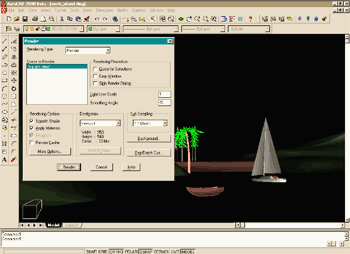 |
| 3STEP: The Render Dialogue box has numerous settings, but we can focus on the basics for now. There are 3 Levels of rendering quality that you can chose from the Rendering Type drop-down list. The bottom choice in this list, Photo Raytrace, is the most sophisticated mathematically and thus takes the most amount of time to produce a result. Where this rendering is displayed or output, depends on the Destination drop-down list which also has 3 settings. |
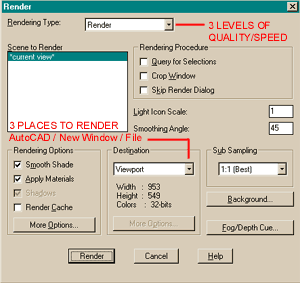 |
| Since we have not created any lighting for our
environment, the results of each of the Rendering Types will be the same. Photo
Raytrace, the most exciting option, can produce shadows but a source of light is required
to calculate the shadows. In the next step, we will create a source of light. |
|
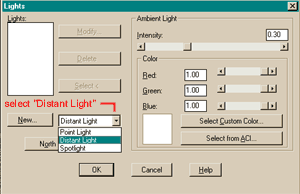
| 4STEP: From the View pull-down menu select Render and then select Light. On the Lights Dialogue box select a "Distant Light" from the New.. Light drop-down list. Then, pick on the New... button A Distant Light is basically a source of light that projects a parallel beam of light much like how we experience the Sun's light on Earth. |
 |
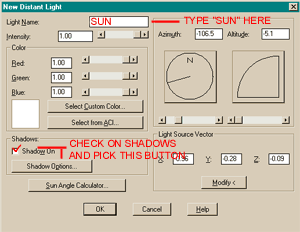
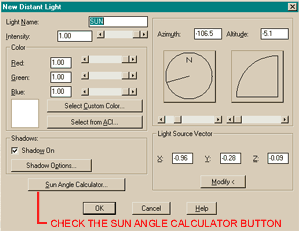
| 5STEP: On the New Distant Light Dialogue box, type "SUN" in the Light Name text box. You can type any name you like, but since we are creating the sun, you might as well name it that. Some people will have several Suns for different light settings; turning them on and off light light bulbs. Check the Shadows On check box and pick on the Shadow Options button.
|
 |
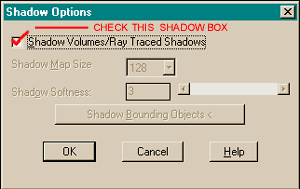
| 6STEP: On the Shadow Options Dialogue box, check the Shadow Volumes/Ray Traced Shadows check box. This will produce the most intense type of shadows often associated with computer renderings; these are also more accurate than the Shadow Map ones and thus take longer to generate. |
 |
| 7STEP: Back on the New Distant Light Dialogue box, pick on the Sun Angle Calculator... button just bellow the previously select button (Shadow Options). |
 |
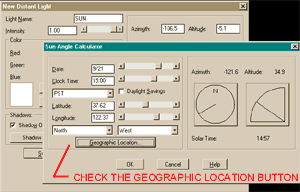
| 8STEP: On the Sun Angle Calculator Dialogue box, pick the Geographic Location button. |
 |
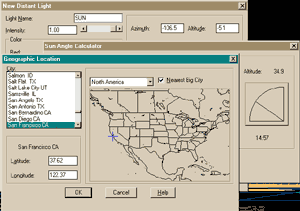
| 9STEP: On the Geographic Location Dialogue box, select a city and geographic location that you like. In this example, the default location, North America, and the default city, San Francisco, have been chosen. If you decide to try another set of options, remember how to get back to this dialogue box because you may want to change these settings to get a better looking rendering. Some geographic locations will produce a sun location, relative to this Island model, that will make your view look dark; by virtue of being in the shadow of everything in the environment. Keep in mind that this demonstration project uses the default AutoCAD value for North (90 degrees). |
 |
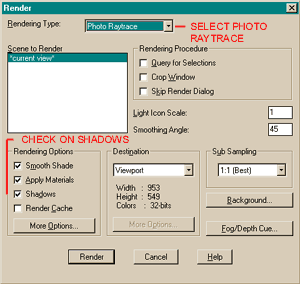
| 10STEP: Once you have "OK' ed" your way out of all those dialogue boxes, go back to the Render Dialogue box. On the Render Dialogue box, select Photo Raytrace from the Rendering Type drop-down list. In the Rendering Options category, check the Shadows check box. Verify that the Destination drop-down list is set to Viewport and then pick the Render button.
|
 |
| ...and this should be the result of all those settings. | 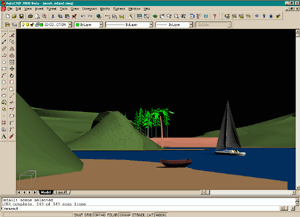 |
| 2Background Scenery | |
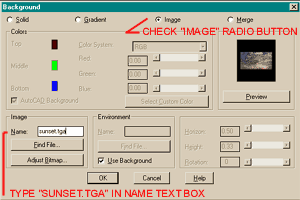
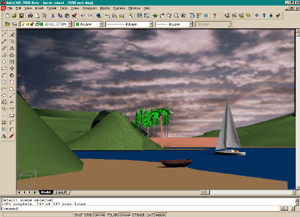
| 11STEP: From the View pull-down menu, select Render and then select Background. On the Background Dialogue box check the radio button for Image and then type "sunset.tga" in the Name: text box under the Image category.
|
 |
| If you have trouble getting AutoCAD to accept "sunset.tga" try picking on the Find File button. On the Background Image Dialogue box make sure you are looking at your AutoCAD root folder (directory) and then open the Textures folder. | 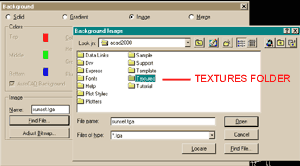 |
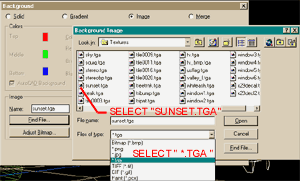
| In the Textures Folder, set File of Type drop-down list to *.TGA. this will allow you to see all of the default AutoCAD textures and image maps. And, you should now be able to select "Sunset.tga". If you still don't see the "sunset.tga" file, chances are that your AutoCAD textures were not loaded and you will need to do a "Full" install of AutoCAD. |
 |
| 12STEP: Once you have "OK'd" your way out of all these dialogue boxes, go back to the View pull-down menu and select Render and then Select Render again. On the Render Dialogue box, make sure you have the appropriate settings as described in Step 10. AutoCAD also comes with a "Sky.tga" image that you can try for a background image.
|
 |
| 3Mapping Materials to Surfaces - Water | |
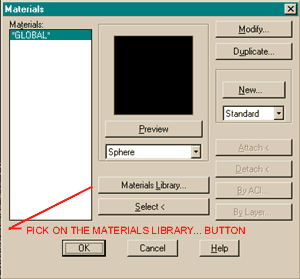
| 13STEP: In this Chapter we will focus on creating the illusion of water and then apply the same concept to making sand and vegetation. From the View pull-down menu, select Render and then select Materials. On the Materials Dialogue box, pick on the "Materials Library..." button. |
 |
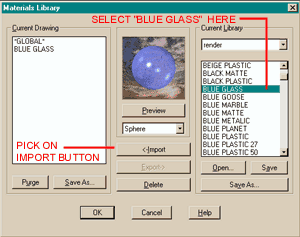
| 14STEP: On the Materials Library Dialogue box, select "Blue Glass" under the Current Library Category scroll list and then pick on the "<-Import" button. Pick on the "OK" button. We are basically importing an image into our current drawing. Notice though, that the images come via the render library and not by simply selecting any image on the computer. Materials must come through a library unless you build your own material and/or material library. |
 |
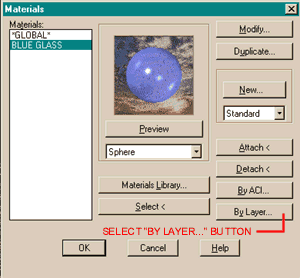
| 15STEP: Back on the Materials Dialogue box, you should now see "Blue Glass" in the Materials List. We will now attach this material to the water in our scene by picking on the By Layer... button. |
 |
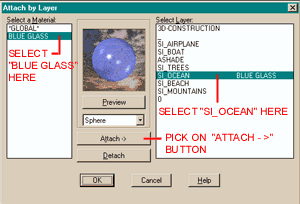
| 16STEP: On the Attach by Layer Dialogue box, select "Blue Glass" on the Select a Material List and then Select "SI_OCEAN" on the Select Layer List. Once you have those two definitions selects, you will need to pick on the Attach -> button to attach the "Blue Glass" material to the SI_OCEAN layer. Now everything on the SI_OCEAN layer will have the "Blue Glass" material. Materials can be assigned or Attached by directly picking on specific objects or by Color as well, but By Layer... is a very simply way to keep track of your materials and what they are associated with. Organizing your 3D work by layers is also a good way to prepare your work for exporting into 3D Studio Max/Viz. Pick the "OK" button and return to the previous dialogue box. |
 |
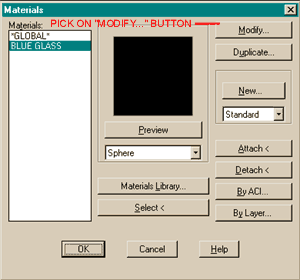
| 17STEP: Back on the Materials Dialogue box, pick on the Modify... button.
|
 |
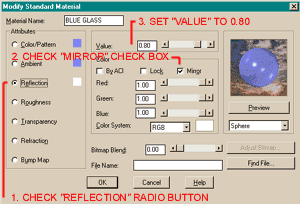
| 18STEP: On the Modify Standard Material Dialogue box, check the Reflection radio button and then check the Mirror check box. Now set the Value text box to 0.80. What we have just accomplished, is an 80% mirror reflection in our "Blue Glass" material which of course will become our water material. Once you have rendered your scene, you may want to come back to this dialogue box and increase or decrease the amount of reflection. |
 |
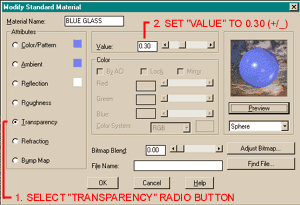
| 19STEP: On the same Modify Standard Material Dialogue box, check the Transparency radio button and then set the Value text box to 0.30. Again, you may want to come back and change this value too. 30% transparency will not look like much in our scene but then we don't have much to see under the ocean and thus a higher transparency might prove unappealing. |
 |
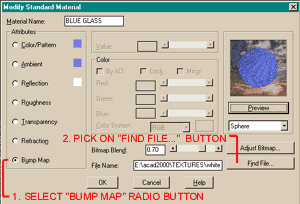
| 20STEP: On the same Modify Standard Material Dialogue box, check the Bump Map radio button and then use the Find File... button to locate "whiteash.tga". |
 |
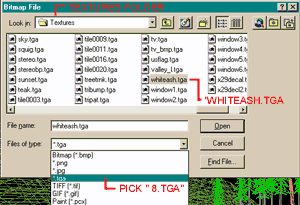
| Here is the Bitmap File Dialogue box to help
you find your "whiteash.tga" image file. Whiteash.tga is really meant to be used as a map for wood but since we are attempting to create water, we need a little bit of disturbance in the water material to make it look "alive". And, since AutoCAD does not come with default water materials, we can use the texture of wood grain to make the "Blue Glass" material appear bumpy or rough.
|
 |
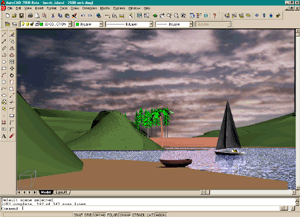
| 21STEP: Once you have "OK'd" your way out of all those dialogue boxes, go back to Render and test the water. |
 |
| 4Mapping Materials to Surfaces - Sand and Foliage | |
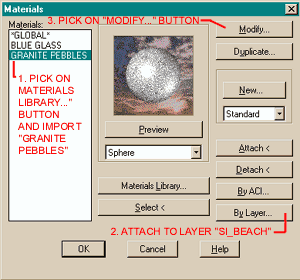
| 22STEP: This time we will attempt to modify a default AutoCAD material so that it will look like sand. On the Materials Dialogue box, go to the Materials Library... button and find the "Granite Pebbles.tga" material and then <-Import it. Go back to Step 13 if you get lost. Now, make sure you have "Granite Pebbles" highlighted in the Materials: List and then use the By Layer... button to Attach -> this material to the SI_BEACH layer. Go back to Step 15 if you get lost. After you have Attached this material to the SI_BEACH layer, go to the Modify... button on the Materials Dialogue box and we will make some changes to this material. |
 |
| 23STEP: On the Modify Granite Material Dialogue box, change the First Color by picking on the color box for the Color Systems option. On the Color Dialogue box, select a light sand color and pick on the OK button. Now change each of the remaining Color Attributes in the same way. If you use the Gray scale from Granite as a guide to choosing Sand color shades you will probably have fairly good results on the first go at this. This is a rather tricky matter and one of personal taste. And since AutoCAD only supports 256 colors, you may simply be unable to create the color you want.
|
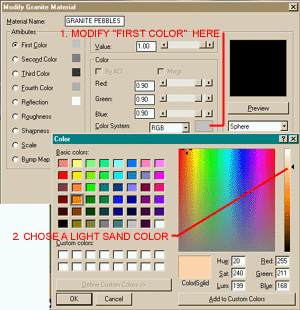 |
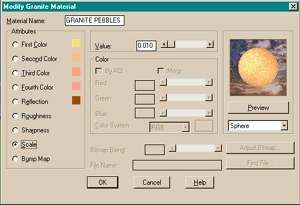
| 24STEP: Notice that in the screen capture, the the right, the Reflection Color has been changed to a darker sand color. Also, the Scale Value has been set to 0.010. This will make the mottled mix of colors appear more tight, like grains, rather than large blankets of color. |
 |
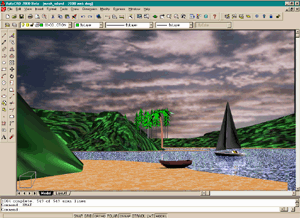
| 25STEP: In the screen capture, to the right, you should see the results of the sand changes made above. It is a bit too golden but a good place to start. For the Foliage on the mountains, you can use the same techniques described above to <- Import and then <-Attach the "Green Vines" material to the "SI_MOUNTAINS" layer. |
 |
| 5Coordinate Mapping a Material to a Surface | |
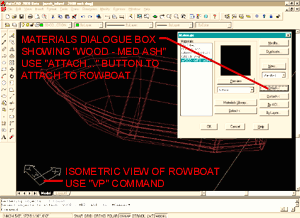
| 26STEP: In this example, we will attach a material specifically to a 3D object rather than attach it by layer. Before you proceed, make sure the "SI_BOATS" layer is unlocked. Change the view to an isometric one and zoom in on the rowboat. On the Materials Dialogue box, chose a wood material to map to the rowboat. In this example, we will use "WOOD - MED. ASH" because it is fairly light and has grain. In our rendering, we may not see much of this material due to the distance away from the rowboat and the size of the rowboat. Once you have the "Wood - Med.Ash' material in your Materials Dialogue box, pick on the Attach button and select the brown rowboat. Pick the "OK" button |
 |
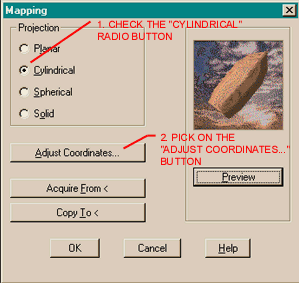
| 27STEP: Now comes the tricky part. What we want is for AutoCAD to understand how that material is supposed to be wrapped around the rowboat; and this was why we needed to view the rowboat from an isometric view point - to allow for snapping points on the object itself. On the View pull-down menu, select Render and then select Mapping... Select the Rowboat as the object to be mapped and then the Mapping Dialogue box should appear (as shown to the right). On the Mapping Dialogue box, select the Cylindrical radio button and then pick on the Adjust Coordinates... button.
|
 |
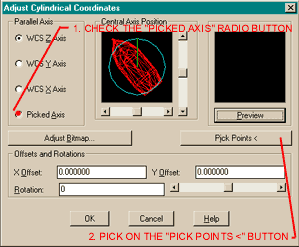
| 28STEP: On the Adjust Cylindrical Coordinates Dialogue box select the Picked Axis radio button and then pick on the "Pick Points<" button. Side note: Notice the Central Axis Position display icon and how the current mapping would read the boat from the top down; i.e., the wood material would be mapped around the rowboat as if it were a cylinder on the outside edges. What we are about to do, is to change the direction of the mapping so that the cylinder is based on the back end (bow) with edges curving as true to this object. |
 |
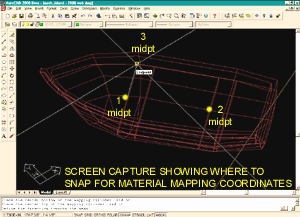
| 29STEP: When queried to "Place the center bottom of the mapping cylinder:", Snap to the midpoint of the top of the front seat (as shown to the right - 1). When queried to "Place the center top of the mapping cylinder:", Snap to the midpoint of the top of the back seat (as shown to the right - 2 ). When queried to "Define the direction towards the seam:", Snap to the endpoint of the back edge of the front seat (as shown to the right - 3 ). |
 |
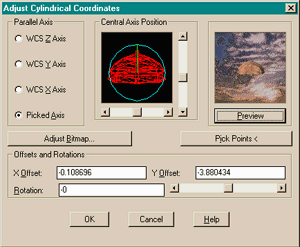
| 30STEP: Once you have successfully input the new mapping coordinates for this material, you should end up back on the Adjust Cylindrical Coordinates Dialogue box where you can Preview the mapping. Pick the "OK" button. |
 |
| 31STEP: Rendering the scene in the isometric view should provide an image similar to that illustrated to the right. The "Wood - Med. Ash" Material should now be parallel to the length of the rowboat and follow a curve contour. Since the rowboat is actually made up of flat edges, in some places, the mapping will not be perfect. Also, the Sand and the Water material may now look different because these materials were adjusted for the previous perspective shot. Close ups, such as this one, would require new adjustments to the materials but then may not look right for the larger shots - this can be a tricky matter. |
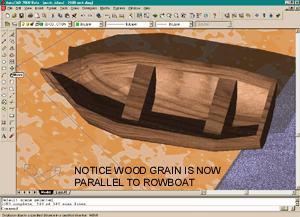 |
| The technique we just employed can be used to
align any material with a 3D object. Some objects can be more geometrically complex
than what a simple Planar, Cylindrical, Spherical or Solid mapping can solve. In
such cases, breaking the 3D model up into separate mapping styles (by actually breaking
the model up) usually does the trick. Maps can also be manipulated via the "Adjust Bitmap..." button on the Dialogue box shown in step 28. Map adjustments can be scalar and/or coordinate based (like center point of map). This means, for example, that you can change the size of the wood grain on the rowboat and where the grain lands with respect to bitmap centering.
|
|
| If you play around with materials
for the Sailboat, you can use the same techniques described in the last chapter to
continue working with this project. In the illustration to the right, the Sailboat has been given a white semi-gloss color for its exterior, glass for the windows, a silver color for the masts, wood for the doorway and a default AutoCAD "3D" logo material for the sails. The Trees and Bushes have been placed with AutoCAD's default Landscape Objects - for help on this subject matter, look for an article in the near future. |
 |
Part 2 =>