| 1Designing a custom Layer Standard |
. |
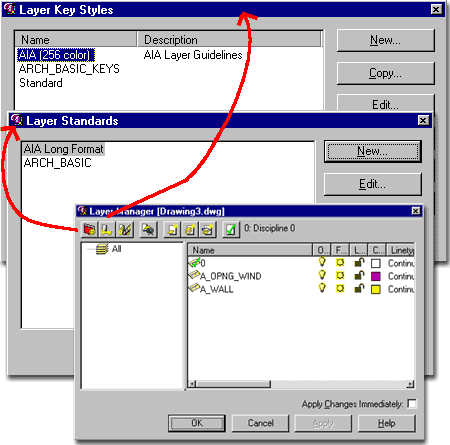
| The first thing
that you have to know about is what ADT uses to manage Layers in your drawings. Illustrated to the right is one of the two primary control points
for layer management.
The Layer Manager dialogue box, below
right, offers an easy way to access the Layer Standards dialogue box and the Layer Key
Styles dialogue box. These two dialogue boxes provide access to the files that
contain the data information for how your layers are supposed to work.
The Layer Standards are a set of rules by
which you want your layers designed. Think of the number of characters and
delimiters you might want in your standard, for example. "A_WALL_ABOV" can be
defined by a set of rules; the first character is "A" followed by an underscore
"_" followed by four letters and so on.
The Layer Key Styles are the actual layers
used in your drawing. The term key should connote the concept of taking an object
and associating it automatically to a specific layer. Layer Keys should abide by the
rules set forth by the Layer Standard but do offer the ability to make specific design
changes, like color, linetype, lineweight, printing or non-printing and so on. |
 |
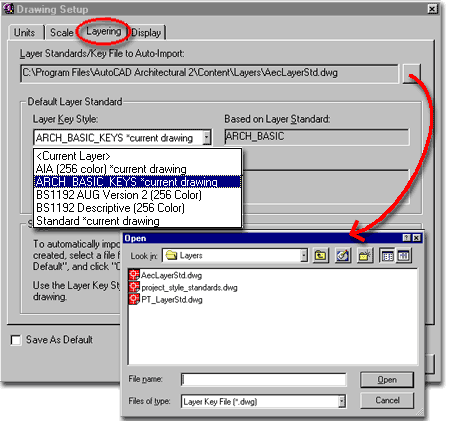
| The second primary
control point for layer management in ADT, is the Drawing Setup dialogue
box, illustrated to the right. On the Layering
tab of the Drawing Setup dialogue box, you set the actual Layering Standard and Layer Key
Style.
If you don't set the Standard and Key Style correctly, you
won't have anything but the default settings.
To me, the most interesting aspect of getting these various
pieces of data to work correctly lie in comprehending that it is data and the data lives
like a block in a drawing file. In the illustration to the right, I show the Open
dialogue box for selecting a new Layer Standard/Key File to Auto-Import because, as you
can see, it looks for a drawing file. The drawing file holds both the Layer Standard
and the Layer Keys and can in fact hold as many of these as you care to have stuffed into
one file.
If you create a new Layer Standard and/or Layer Key Style,
you can add them to a new drawing file or the default AecLayerStd.dwg by using the
Import/Export... button on the Layer Standard dialogue box or the Layer Key Styles
dialogue box - illustrated above right. |
 |
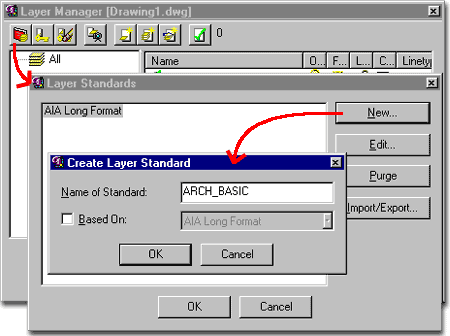
| Let's build a
custom Layer Standard and Layer Keys. Start a
drawing from scratch.
Use Layer Manager ( _AecLayerManager <-
this one, not the bonus one ) and go to Layer Standards.
Create New…
Provide a name like "ARCH_BASIC"
Do NOT use BASED ON, we want as basic a layer
standard as possible.
Make sure this new Layer Standard is highlighted and pick Edit... |
 |
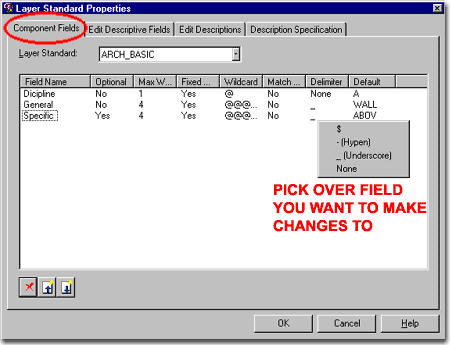
Component Fields
Tab
Editing a new Layer Standard in the Layer Standard Properties Dialogue Box.On the Component Field Tab, change the Default Value text
field to "Discipline"
Set Optional to "NO"
Set Max Width to "1"
Set Fixed Width to "YES"
Set Wildcard to " @
"
Set Match Description to "NO"
Set Delimiter to "None"
Set Default to "A"
|
 |
| Now on to the
actual layers: In the Layer Standard Properties Dialogue
Box, click on Add Below the selected Item (the one we just created) and
create a new Field Name: call it "General"
Set Optional to "NO"
Set Max Width to "4"
Set Fixed Width to "YES"
Set Wildcard to " @@@@
"
Set Match Description to "NO"
Set Delimiter to "None"
Set Default to "WALL"
Next Layer Field -> |
In the Layer Standard Properties Dialogue
Box, click on Add Below the selected Item and create a new Field Name: call it
"Specific"
Set Optional to "YES"
Set Max Width to "4"
Set Fixed Width to "YES"
Set Wildcard to " @@@@
"
Set Match Description to
"NO"
Set Delimiter to "_"
I use the underscore. This has been a computing standard for as long as I can
remember and the AIA use of a (-) dash is typically reserved for denoting ranges;
i.e., 1-5
Set Default to "ABOV
" |
| Edit Descriptive
Fields Tab On the Edit Descriptive
Field Tab, create Field names that match your Layer Field names; i.e., "Discipline",
"General" and "Specific".
Right-click on Component 1
for each of these Filed Names and pick on the matching Layer Field Name. In other words,
two columns with matching names. |
 |
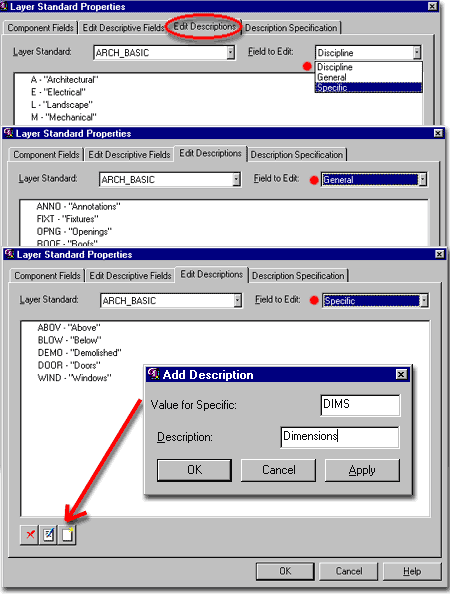
| Edit Descriptions Tab On the Edit Descriptions Tab, from the Field to Edit pull-down
list, select "GENERAL" and add new basic architectural layer
categories such as "STAR", "ROOF", "OPNG", "ANNO",
etc. For each category, you will need to provide a generic description like
"Stairs", "Roofs", etc.
On the Edit Descriptions Tab, from the Field
to Edit pull-down list, select "SPECIFIC" and add new
specific architectural layer sub-categories such as "RAIL", "DOOR",
"WIND", "GNOT", "BLOW", etc. As with the last set, you will
need to provide generic descriptions. |
 |
| Description
Specification Tab We can Skip
the Description Specification tab.
OK your way out and you
should find yourself bak on the Layer Manager dialogue box. |
|
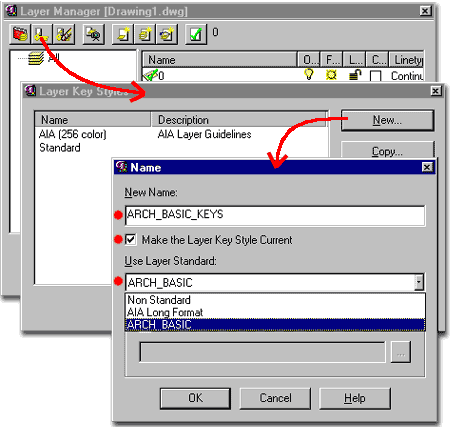
| Layer Manager Back on the Layer Manager,
we can now pick on the Layer Keys button.
On the Layer Keys Styles
Dialogue Box, pick the NEW… button.
Type a name for your Layer Keys like "ARCH_BASIC_KEYS".
Check the "Make the Layer Key
Style Current" box so this will be current when we exit.
On the Use Layer Standard
Drop-down list, pick the Layer Standard we just created - "ARCH_BASIC".
Do NOT check the Load From LY
file: |
 |
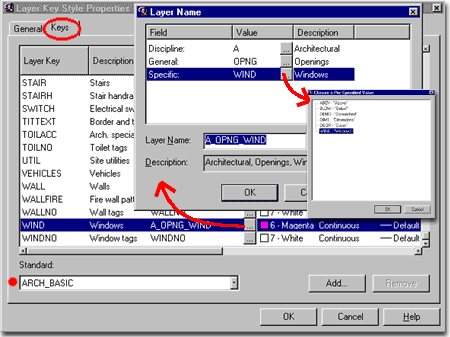
| Layer Keys
Styles Back on the Layer Keys
Styles Dialogue Box, highlight your newly created Layer Key Style ("ARCH_BASIC_KEYS")
and pick the Edit button.
On the Layer Key Style Properties
Dialogue Box, pick the Keys tab.
These are your basic object layers; the
default set.
Scroll down to the "WALL"
Layer Key and Description and pick on the area that has three dots " …
" next to it (under the Layer Column).
You should now see a "Layer Name"
dialogue box with the three fields that we designed earlier. Value and Description should
be blank for our "WALL" layer on every Field. In the "Discipline"
row, pick on the three dots ". . ." next to the Value column
and assign it a discipline letter (like "A"). In the
"General" row, use the same technique to set the "Value"
text field to "WALL". And, in the "Specific"
row, you will probably want to leave this Value field blank but this is where you could
add _ABOV or _BLOW.
Repeat this process for as many layers as you
wish to play with. For the "DOOR" Layer Key, you can make the
"General" text field "OPNG" and the "Specific" text field
"DOOR". For windows: "OPNG" and "WIND", etc. ---Or go by
your own creations. |
 |
| Making Sure ADT
is using the new Layer Standard You can verify
things by using the Desktop pull-down menu to Layer Management to Select Layer
Standard… Under Layer Key Style, you should see "ARCH_BASIC_KEYS *current
drawing".
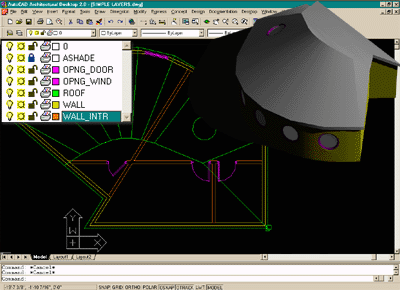
If you draw a Wall, Door, Window, Stair or other object you
should see that they land on the newly created layers. If you're getting good results that
you want to keep, you will need to export the Layer Standards into a new .dwg file and
then Export the Layer Keys into that very same .dwg file.
Now on to the second problem in this article: |
|
| Getting walls to
land on the "A_WALL_INTR" layer. Since
Wall Objects are one type of object, it seems unreasonable to assume that you can
get them to reside on two different layers from the Layer Standards and Layer Keys
(automatically, that is). Yes, I could create a Layer Key that has a
"A_WALL_INTR" layer but how would my single smart object, Wall, know when to be
on one layer versus the other. We can switch layers or use Overrides but what I really
want is a wall type that knows it belongs on the "A_WALL_INTR" layer every time
it is used.
Here’s what I have done:
Create a new Layer called
"A_WALL_INTR" with the regular layer command and give it a unique color.
Use Wall Styles… to create a NEW…
wall, name it something like "INTR_GYP_04" and then set the appropriate
Components. I made one Component, for example, named it "GYP", set the Priority
to 60, Edge Offset… to "0" and Width… to "4".
On the Display Props Tab,
make sure PLAN is selected in the drop-down list. Then, highlight the
"Wall Style" Property Field and Attach Override.
Pick the Edit Display Props…
and on the Layer/Color/Linetype Tab pick on Layer 0 for the Shrink
Wrap, set to the "A_WALL_INTR" layer we created earlier. For
Boundary 1 (GYP) row; you may also want to set this to the "A_WALL_INTR" layer
so you don't accidentally end up with Boundary lines turned on when you turn off
"A_WALL_INTR" layer. Set the Color to "bylayed" for both changes and
OK your way out.
If you draw "INTR_GYP_04" walls now, they
will land on the "A_WALL_INTR" layer and have the color of that layer. You can
turn off the interior walls by turning off the "A_WALL_INTR" layer or by turning
off the Layer Key "WALL". In this way, "WALL" is actually the object
layer and "A_WALL_INTR" simply a property layer. And, to support my methodology
here, if you work with the Wall Styles that come with ADT 2.0, you will see that that is
how they work as well (try a concrete wall, for example).
If you export this wall style and import it into a new
drawing, it will create the "A_WALL_INTR" layer and layer color. I find this
similar to creating a block on a given layer with a given color that is inserted on yet
another layer that acts as the insertion layer. |
|
| The Override
Technique If you also want doors and
other objects to be specific to the interior, I think that using a Layer Override is
probably a better solution. To do this, first create a new Layer Standard Description by
using the Layer Manger and pick on the Layer Standard Properties button; go to Edit
Descriptions Tab and set the Field to Edit drop-down list to "Specific"; now
create a new text field called "INTR". OK your way out. – Confused?, see
top of article and Edit Descriptions Tab.
Now, from the Desktop pull-down menu to Layer
Management to Layer Key Overrides. Set the "Specific" key to "INTR"
and make sure to check the Enable Overrides check box. From this point on, everything you
create will be on a "General" layer with a new "Specific" override of
"INTR". |
|
| |
|
| |
|
| |
|
| |
|
| |
|
| |
|
| |
|
| |
lll |
 starts with a solid
foundation. After having written two e-BOOKs on ADT and dealing with numerous
complaints about the confusing aspects of ADT's Layering System, I have decided to revisit
this story and try to make is easier for those struggling to comprehend it.
starts with a solid
foundation. After having written two e-BOOKs on ADT and dealing with numerous
complaints about the confusing aspects of ADT's Layering System, I have decided to revisit
this story and try to make is easier for those struggling to comprehend it.