PART 8
ADVANCED TEMPLATE FILES FOR ARCHITECTURAL DESKTOPContents:
Advanced Template Files - Overview ---- Basic Object Display Configuration ---- The Display System ---- The Object Style System
| Architectural
Desktop 3 - Deployment eGuide PART 8 ADVANCED TEMPLATE FILES FOR ARCHITECTURAL DESKTOPContents: Advanced Template Files - Overview ---- Basic Object Display Configuration ---- The Display System ---- The Object Style System |
| 1Advanced Template Files - Overview | 1-8 ADVANCED TEMPLATE FILES | ||||||||||
| Architectural
Desktop Template Files In Part 7 we looked at the general concept of how template files affect the tools used in Architectural Desktop but now we will look at expanding the use of template files for greater productivity and faster output. The template files included with Architectural Desktop were designed to demonstrate potential rather than a plug-n-play solution for the architectural practice. Keeping this in mind, be careful about using them as the basis for building your own office standards since many of the concepts incorporated with them are a bit unproductive and will only irritate and frustrate your user base. I suggest that you use them as guides and examples for building your own. One of the first template files I created for ARCHIdigm, was created by taking the "AEC Arch (Imperial - Intl).dwt" template file and purging as much of the excess as I could figure out how to do. Once I reduced the "fat" by 50 to 75%, the template file became a lot easier to use and learn from. Having nearly a dozen Layout Tabs, for example, is just crazy. I have found that most hardcore users prefer to do all of their work in Model Space and only visit the Layout Tabs when getting ready to Print so why have Layout Tabs that won't be used. The Display Configuration List is another example of excessive "fat" that can easily be trimmed down to something pallateable. Not only can you rename them to more logical terms like "Floor Plan", "Section", "RCP" and so on, you can Purge those that you do not wish to keep around. With such a philosophy in mind, my approach is to build simplicity first and then add complexity later. In the downloads section of this guide, Part X - Appendix, you will find examples of simple template files. You may want to download these and use them as other examples of how template files can be set up for Architectural Desktop. |
I do not advise attempting to create one template file to solve all the needs of Architectural Desktop because you will end up with one file full of too much information. Instead, break the template files up into the logical categories of how your office organizes and presents work. If you are not sure how to break things up yet, consider how work has been organized with plain AutoCAD and elaborate on that system. I recommend, at minimum, breaking the template files into the following categories: 1) Pre-design for Massing Studies and simple Presentation. 2) Development - Plans - for all Plan work from Floors to Roofs. 3) Development - Sections and Elevations - for all Cross Sections, Interior and Exterior Elevations. 4) Presentation - for all 3D Illustrative work ( I also use this file as a master composite to check how everything is coming together ). 5) Other - for solutions that require unique template files such as schedules, details and so forth. |
||||||||||
| 2Basic Object Display Configuration | 2-8 ADVANCED TEMPLATE FILES | ||||||||||
Overview of the Display System
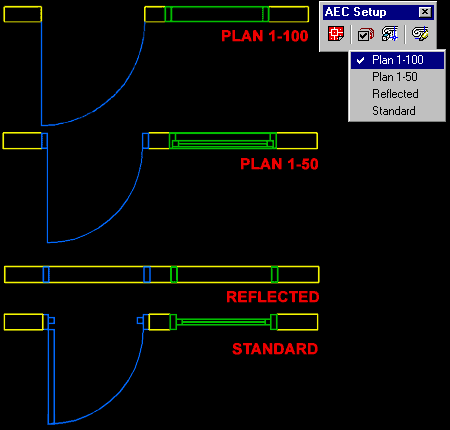
In Part 7 we looked at options for importing object styles from other files but many of these predefined styles may not produce the results your office expects. Generally speaking, offices differ in how they prefer to have objects like Walls, Doors, Windows and Stairs graphically illustrated for such Construction Documentation needs as Plans, Elevations and Sections. To accommodate the "display" requirements for various offices, objects can be configured to display different components in unique ways and these unique configurations can be stored within a template file. Illustrated to the right I show how four different Display Configurations can be used to produce four different graphical representations of the same objects. Within each object style, resides the ability to control basic component characteristics so that you can create and manage your own graphical results according to the needs of your office. |
 |
||||||||||
Configuring
Walls as an example of creating unique graphical results
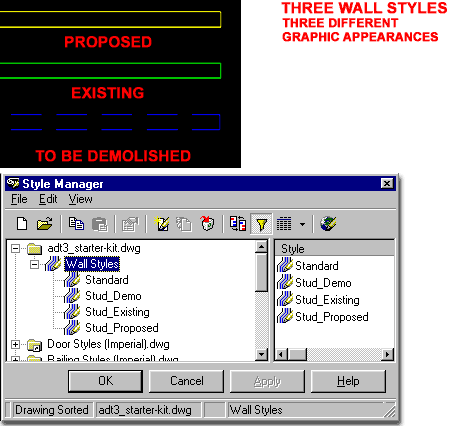
Illustrated to the right I show the three common Wall Styles often used in Residential Architecture: Existing, To Be Demolished and Proposed. However you design the component structure of these Wall Styles (stud, gyp, concrete, brick, etc.), each type should be represented differently in the construction documents so they are easy to distinguish. In one scenario, you may want existing walls to appear light, demolished walls to appear dashed and proposed walls to appear dark (sometimes with a light pocheŽ inside the lines as well). To produce the display characteristics described above, you will have to determine which Display Configuration(s) should activate these unique appearances and then adjust each Wall Style (one for each type) so that its Display Properties will produce the desired look under the appropriate Display Configuration. In the example illustrated to the right, I have three simple Wall Styles that use only two lines and these lines can either represent finished dimensions or rough stud dimensions. The Wall Styles do not have a fixed with so users can change the width to accommodate all sorts of design needs. This solution has been employed by many of my residential architecture clients because of the simplicity it offers. You can, of course, create more complex Wall Styles that use the techniques described below. Though one Wall Object could be changed by a use to have any of these unique display characteristics, it is far more tedious to employ such a technique than to simply work with different styles. Another great feature of using three styles is that each style can be set to use a unique Cleanup Group so Existing Walls, for example, do not cleanup with Proposed or Demolished Walls. |
 |
||||||||||
Overriding
Object Style Display Properties
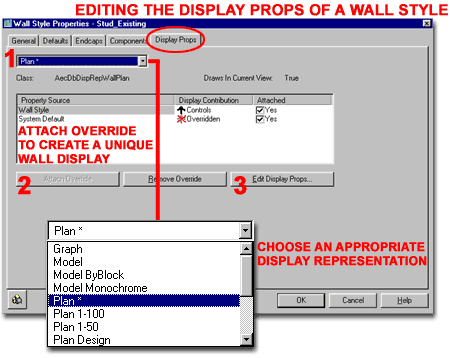
To create one Wall Style that produces a graphic display that is different from other Wall Styles, you can use the Display Props tab of the Wall Style Properties dialog box as illustrated to the right. 1. The first step in working with Object Display Properties is to decide which Display Representation should be affected (see step 1, right ). In the example illustrated to the right I show that I have selected to edit the Display Properties of my Wall Style for the "Plan" Display Representation. This means that the changes I am going to make will not appear for Plan 1-100 or any of the other Display Representation. 2. The second step in working with Object Display Properties is to decide on whether the changes you wish to make are for all similar objects ( like all Walls ) or if these changes are only for this particular object style ( like this "Existing" Wall ). In the example to the right, I show that I have decided to use the Attach Override option for this Wall Style so that only this particular Wall Style will be changed. I have chosen to use this option because I do not want my Proposed and Demolished Wall Styles to look the same as my Existing Walls. 3. The Third step is to use the Edit Display Props... button to access the Entity Properties dialog box, illustrate below and make the required changes. |
 |
||||||||||
Editing
Display Properties of Object Components
Nearly every Object in Architectural Desktop has a list of Components for their Entity Properties which can be thought of as internal Layers that are unique to the object. For most objects, you will find that by selecting one of them, right-clicking on your mouse and looking for the Entity Properties.. option on the Object-Specific pop-up menu, you will be able to access the two dialog boxes discussed here and above directly ( this allows for more rapid display changes ). Illustrated to the right I show that I have changed the Layer name for the Boundary Component of my example "Existing" Wall Style to "A-Wall-Exst". In order to change the Layer name, you must first create it in the Layer Manager. In addition to changing the Layer name, I have also changed the Color for this Component to "ByLayer" so the A-Wall-Exst Layer will now control the Color of this Wall Style. By doing this, I allow the user to have some of the more traditional control over the object that many older AutoCAD users are familiar with and expect to be able to change. You could also change the Linetype to ByLayer for a similar solution on linetype control. This would make more sense for a Demolition Wall Style ( or it could be set to Dashed directly ).
|
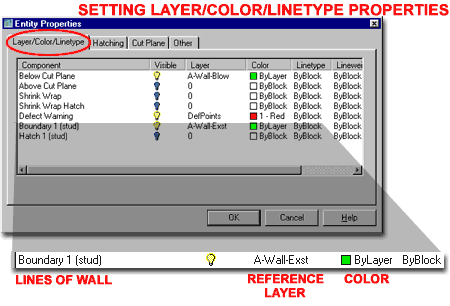 As a CAD and IT Manager, you should know that though you can change the Layer name of a Component, the Layer is really only a Reference Layer and not the true Layer on which the object resides. The reason this is the case, is that an object is really just one entity and that entity, much like a Block, can only reside on one Layer. Wall objects are all automatically keyed to one layer as determined by the Layer Standard so no matter what layers you assign for the components, the Wall will always be keyed to the Wall layer ( even if none of the components display on that layer - weird, isn't it ). If this is confusing, just think in terms of how Blocks work in AutoCAD and compare this to a block that has been created on a specific layer. When inserted, the Block can be assigned to other layers but if you Freeze the original insertion layer, the block will be frozen. Unlike Blocks, however, Wall objects can be assigned to other layers by manually changing their property after creation or by using a Layer Key Override. |
||||||||||
Adding an
Object Style and checking the Display Properties
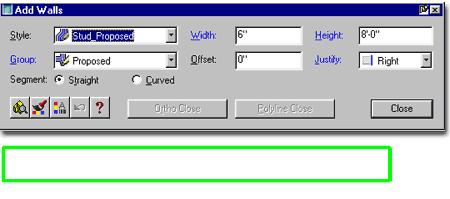
Once you have completed the task of changing the Display Properties of your object, run a test by Adding that Object Style to your current drawing and verify that the graphic display is coming out as expected. If you do not find that the results are any different then make sure you have set the right Display Configuration. Remember that in this set of steps we only changed the Display Properties for the "Plan" Display Representation and this is only used by the "Standard" and "Work" Display Configurations; not by the Reflected or Model Display Configurations ( or possibly any others that you may currently have active ). |
 |
||||||||||
| 3The Display System | 3-8 ADVANCED TEMPLATE FILES | ||||||||||
| Custom
Display Configurations In Section 2 of this Part, discussed above, we looked at how one Wall Style can be modified to graphically appear different from all other Wall Styles. This was achieved by editing the Display Properties of the Wall Style but we only edited the Display Properties for one Display Representation: "Plan". In this Section we will look at how you can create and modify the whole Object Display System to expand on what we just learned. |
In the case of the three Walls, many offices like to poche Proposed Walls so they read more definitively on Presentation and Construction Documents. Though you could just add the Poche to the "Plan" Display Representation and have this graphic feature on by default, we can also create a unique Display Representation, Set and Configuration to allow users to turn the Poche on or off by a simple click on the mouse. By going through these steps, you will find that you can program an amazing amount of graphical control into your office template files. |
||||||||||
Creating
a Display Configuration for an Object
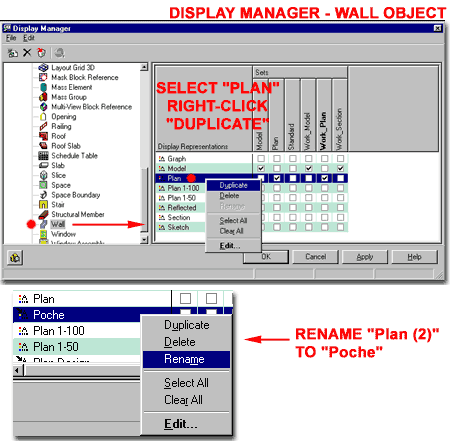
Illustrated to the right I show that I have isolated the Wall object in the Representation by Object folder of the Display Manager and am in the process of creating a Duplicate ( Copy ) of the "Plan" Display Representation. To avoid getting into another area of subject matter, I show how to select an existing Display Representation and right-click in order to select the Duplicate option. By using this technique, you will get a full copy of the Display Representation and thus may not need to make any changes to it at all. Once you have created this duplicate, Rename it to "Poche". Later, we will go to the "Proposed" Wall Style and add Solid Fill for this new Poche Display Representation.
|
 |
||||||||||
| Creating a
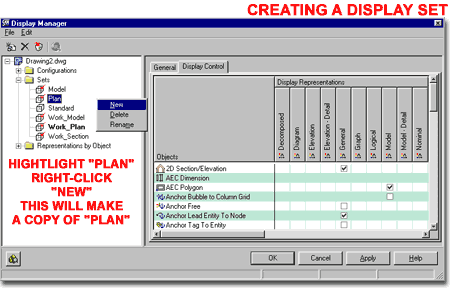
Display Configuration for an Object Once you have created a unique Display Representation for one or more objects, you can create a Display Set where you select each Display Representation you want for each Object into one collection. These Sets or collections, as I am calling them, can be used to create such combinations as a Plot Set with Poche for Proposed Walls and a Plot Set without any Poched Walls. Illustrated to the right I show that by highlighting an existing Display Set, such as "Plan", you right-click on your mouse and select the New option to create a Copy of this Set. By using this technique to create a Copy, you can save a lot of time and energy because in this particular example all we want to do is change the Wall Display Representation to "Poche". Once you have created a New Display Set, Rename it something like "Plot" or "Plot with Poched Walls". |
 |
||||||||||
| Creating a
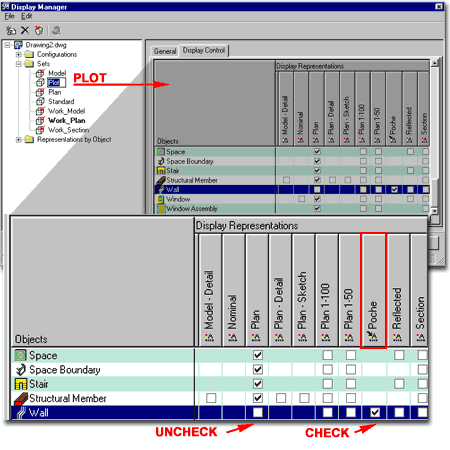
Display Configuration for an Object Once you have created a New Display Set and Renamed it, highlight this Set and scroll down to Wall in the right pane under the Display Control tab. Since we copied the "Plan" Display Set in the previous step, the Wall Object will show "Plan" as the active Display Representation. Uncheck "Plan" for the Wall object and check Poche as the new active Display Representation - as illustrated to the right.
|
 |
||||||||||
| Creating a
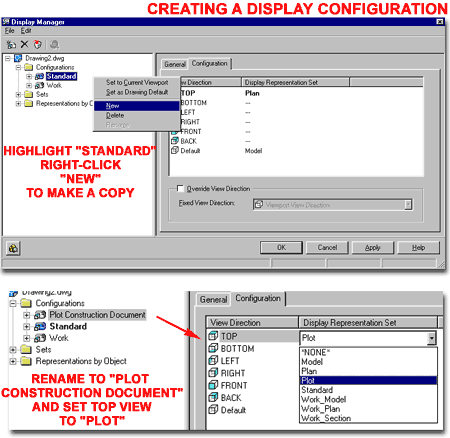
Display Configuration for an Object Once you have configured your custom Display Set as discussed above, you will need to assign it to a Display Configuration so it can be switched On via the Set Current Display Configuration button ( see below, left ). In many ways you could argue that this step is somewhat redundant and that you should simply be able to make the switch to a Display Set but what the Display Configuration adds is the ability to automatically change Display Sets when View orientations are changed; e.g. from Top to Front.
Note: Use the Set Current Display Configuration button to verify that you have successfully create a new custom Display Configuration. Do not expect any objects to change since that part has yet to be done. |
 |
||||||||||
| Setting the
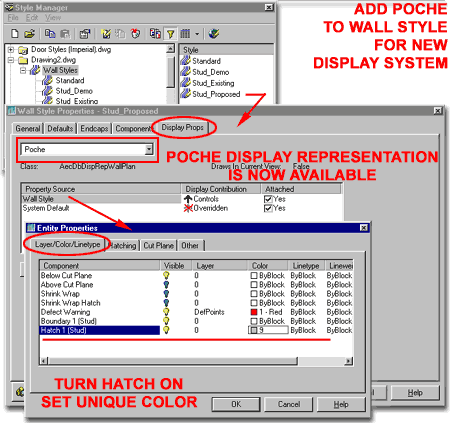
Display Props of an Object for a new Display Representation Assuming that all of the steps outlined above made sense to you and that everything is working okay, you can now use this New Wall Object Display Representation as part of any Wall Style Property. Illustrated to the right I show that I have gone back to the Style Manager filtered for Walls, selected the "Proposed" Wall Style, accessed it's Display Props tab on the Wall Style Properties dialog box and set the Display Representation to "Poche" ( the one we created above ). If you set the Property Source to System Default, you can actually make all of the Wall Style display with a Solid Hatch Poche in them but usually an Override makes more sense. Illustrated in the lower right I show that I have highlighted the Wall Style Property Source and used the Attach Override button to Edit this Wall Style's Entity Properties dialog box. On the Layer/Color/Linetype tab of the Entity Properties dialog box, you should find a "Hatch 1" component for any Wall Style. Turn this Component On and change the Color to a preferred Color when printing Poched Walls ( a Color that prints light ). Note: |
 |
||||||||||
Adding a
Hatch Pattern as a new Display Feature
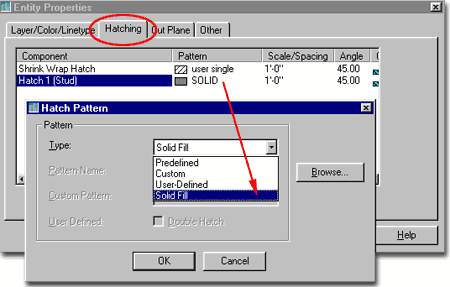
On the Hatching tab of the Entity Properties dialog box, find the matching Component Name for the Hatch we just turned on ( "Hatch 1" ) and pick in the user single box under the Pattern Column to activate the Hatch Pattern dialog box. On the Hatch Pattern dialog box, scroll down to the bottom of the Type list to select the Solid Fill option or use any of the Predefined patterns that you may prefer when Hatching. In the case of the Solid, do not use the Solid offered in the Predefined section because there are known bugs with this pattern ( that's why there is a unique one listed under Type ). Also, be aware that using Predefined patterns, such as "AR-CONC" will slow your system down and may be prone to erratic patterns because of the MaxHatch system setting. |
 |
||||||||||
| Checking
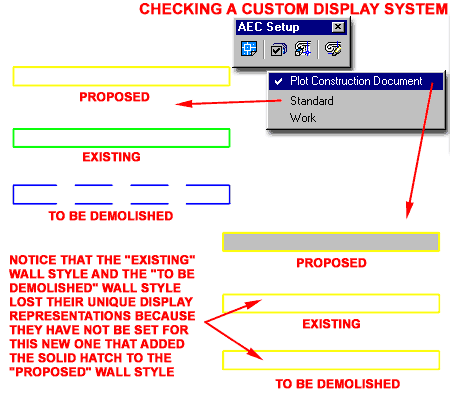
all that hard work Once you have completed the numerous steps outlined above, you should be ready to test the work as illustrated to the right. If you toggle between the Display Configurations, the new "Plot Construction Document" should produce a Solid Hatch Poche effect on the "Proposed" Wall Style but not on any of the other Wall Styles. Unfortunately, you may also notice that the other Wall Styles lose their unique Display Properties because those Display Properties were only set for one Display Representation: "Plan" and now must be reset for "Poche". This exercise demonstrates the incredible power the Display System offers over the graphic illustration of Architectural Desktop's objects but also demonstrates how complicated the steps are to achieve these results. I feel the the results of a well designed Display System pays for itself in a short time but a poorly designed one only aggravates the users to a point where they will just abandon using it. The other factor that this exercise demonstrates is how troublesome Object Display Property Overrides can be; when using them, make sure to account for all Display Representations!
|
 |
||||||||||
| Wrap Up I have found that the more you simplify this whole structure of Object Display, the better the integration by users. In other words, don't spend months engineering a hundred Display Configurations to solve every conceivable printing need because that many options and configurations will only confuse your user base and be a nightmare to manage as changes are required. I recommend that every CAD and IT Manager look upon this as an evolutionary process in which improvements are added as users and projects dictate the need. I chose to use this simple three wall scenario because many CAD and IT Managers end up creating sophisticated multi-component Wall Styles that create so many basic problems for the users that eventually they all figure out that two lines are far better than a dozen ( just think about the OSNAP and Dimension potential for errors ). In general, I feel that the first integration task should be to reproduce the work an office is already capable of with AutoCAD and then investigate improvements. Most of my clients have found that simplicity is the key to being productive with this program. |
The steps discussed above can be used on most of Architectural Desktop's objects and it is just a matter of experience and time to figure just what is needed to produce the graphic requirements of your office. The options are staggering if you think about it because every object comes with default Display Representations that can be copied and these can all be collected into Sets of similar Display Representations to create subtle or dramatic display changes. |
||||||||||
| 4The Object Style System | 4-8 ADVANCED TEMPLATE FILES | ||||||||||
Object Style Manager
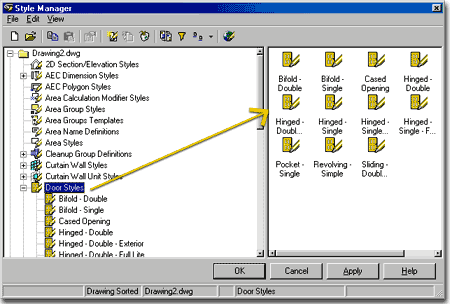
The Style Manager System works on the principal of object families and can be accessed through numerous paths: on the Object Family Level ( illustrated to the right ), on the Object Style Level ( such as a Door Style ) and on the Object Entity Level ( such as a single Door Object ). The Style Manager Window, illustrated to the right, provides direct access to all of the families and thus also provides a full overview of all the objects that are currently defined in Architectural Desktop. At first glance you may be surprised to discover that there really are not that many families. In the case of Doors, for example, you can have nearly an unlimited number of Styles. These Styles are all based on a hard-coded set of Door Types that range from Single to Revolving. Each Type can be customized in many pre-defined ways and you can even use custom shapes ( called Profiles ). The full Door Family (Object Family Level ) can be controlled at the Style Level (Global) as long as no Style Member has Overrides Attached to them. In most cases, you will find it just about impossible to not use Style Overrides so the likelihood of managing Style Families on a Global Level is rather low. These changes, if possible, only apply to the Display Properties and not to physical dimensions or proportions which can only be managed on the Style Level. A Door Style ( Object Style Level ), however, is far easier to manage on a Global Level much like a set of Blocks with the same name. This means that if you intend to have something Interior and Exterior Doors, you should plan on having at least two Style for this function. Exterior Doors can then be controlled through one Style and you can achieve such display changes as Threshold dimensions for all Exterior Doors just by working with one Style. Given that the other two control methods only affect a portion of a Style, the Display Properties, this is the most effective and normal way to work with Objects. A Door Object ( Object Entity Level ) can also be controlled, to some degree, on an individual level by use of Display Property Overrides and though this can be a fantastic option, it can also be a managerial nightmare because once an Override has been executed at this level, there is no way to change it on a higher level. These changes only apply to the Display Properties and not to physical dimensions and proportions which can only be managed on the Style Level. |
 |
||||||||||
| Style Manager Toolbar Remember that you also have right-click menus for tasks such as New, Copy and Paste but also Send... for sending a Style via e-mail to someone else. New Drawing - actually Creates a New Drawing just like you would create a new drawing in ADT. The concept is based on the way Styles work in ADT: if you want a set of unique styles, they can be saved in a drawing file. In fact, that is how styles are managed; in drawing files. Open Drawing - allows you to either open a Style drawing file or any drawing that contains styles that you might want access to. This is how you access and import Styles from one file to another. Copy and Paste - work like any copy and past in that you find a style you want from one drawing and paste it another. As I understand it, the process actually uses AutoCAD's block process to transfer the data. Edit - allows you to change the data within a style. Double-clicking on a style does the same thing. Create a New Style - allows you to start with a blank of default settings for a particular Object Style; i.e., you can't create a completely original style nor a style for a non-existing object. Often it is far faster and easier to Copy, Paste and Edit. Set From - allows you to define elements or components of a Style by selecting an object on the screen. A Wall Endcap Style, for example, can be defined by using Set From to select a polyline object as the shape. Not all Styles can use this option even though it seems available ( this is a reported defect in the program ). Purge Style - allows you to remove unused styles in a drawing file. Toggle View - sorts the Tree View (left column) by Drawing or by Style (see Status bar for which type you have). This actually has three features depending on what you have selected in the left pane. If you have a style selected and toggle, you will either see a list of styles or a list of drawings and the current style types - this is really useful if you want to go back and forth between drawings and work with the same Style types (like Doors). If you select a drawing file and toggle, you should see a table of drawing files in the right pane; now pick a Style type and the right pane should display a table of that particular Style type for all currently open drawings. This is really useful when doing comparisons between files. |
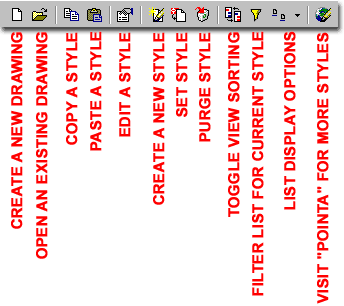
Filter - is what happens automatically when you use the Style button on any object toolbar: it's filtered for that object style only, leaving the other object styles closed and un-viewable until you turn off the filter. List - this is just like the list options for Explorer. Large icons and Details are probably the best options - too bad the large icons don't actually show an image of what the object style looks like, that would be really cool. PointA - this will hook you up to Autodesk's PointA website where they plan to offer Object Styles, among other things, for a fee. At the time of this writing, the site offered next to nothing, though free and displayed a message about how it will be free for VIP subscribers in the near future. |
||||||||||
© Copyright 2002 ARCHIdigm. All rights reserved.
spell checked on Oct. 19, 2002 (gr)