PART 5
OPTIONS DIALOG BOX - PROFILES AND DESKTOP ICONSContents:
Profiles - Overview ---- Profiles ---- Desktop Icons ---- Deployment by Desktop Icon
| Architectural
Desktop 3 - Deployment eGuide PART 5 OPTIONS DIALOG BOX - PROFILES AND DESKTOP ICONSContents: Profiles - Overview ---- Profiles ---- Desktop Icons ---- Deployment by Desktop Icon |
| 1Profiles - Overview | 1-5 PROFILES AND DESKTOP ICONS | |||||||
| AutoCAD and
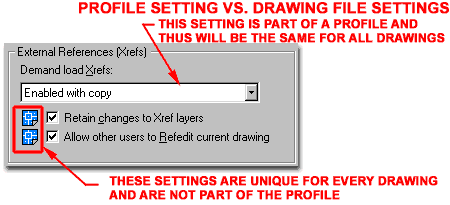
Architectural Desktop Profiles Much like the Windows Operating System has Profiles that can be used to manage different users in an office, AutoCAD and Architectural Desktop has Profiles that can be used to manage and store special settings. Beyond the use discussed in this eGuide, many savvy users quickly discover that using Profiles can be a tremendous time saver when switching between tasks such as general drafting and presentation work because many settings and toolbars are different for these two types of tasks. An AutoCAD and Architectural Desktop Profile not only saves most of the settings of the Options dialog box but it also saves menus and toolbars. Be aware that Profiles do not save settings in the Options dialog box that have a drawing icon next to them. Typically, the settings that have a drawing icon next to them would be settings that are addressed in Template files. |
 The discussion below will focus on saving Profiles for Network Deployment and not for user based customization, but the process is very similar and a user could easily employ the same basic concepts to create their own personal Profiles that load via desktop icons. |
|||||||
| 2Profiles | 2-5 PROFILES AND DESKTOP ICONS | |||||||
Profiles tab
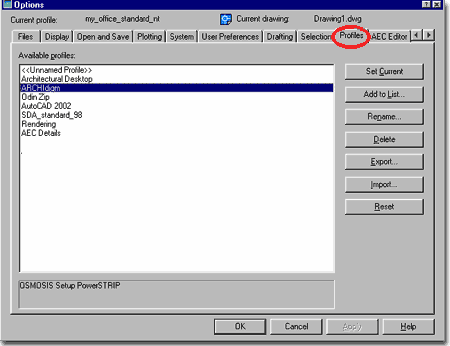
The Profiles tab holds the secret to making the life of a CAD and IT Manager's life relatively easy because all of the settings that have been carefully massaged on one workstation can now be Exported and Imported to other workstations; turning what might take hours and hours into something that almost anyone could do. In fact, we are going to look at a way to make the process of configuring AutoCAD and Architectural Desktop a 2 minute operation. Be aware that you will need to create a New Profile Name and Set it Current before making custom configuration settings for this Profile. If you have already made configuration changes, they will now automatically be a part of the current Profile Name which you can Rename if you made a mistake. Profiles are stored in the System Registry of the computer they are created on or imported on and once there they will not be updated from another source (using the same name ) unless replaced or deleted. In other words, just because we will program a desktop icon to call on a profile from the server does not mean it will recall it each time a person used the icon ( I wish this were the case ). Set Current - use this button to set the selected Profile Name current. You can also double-pick on the Profile Name to make it current. Look to the top of the Options dialog box for the Current profile: statement to see which one is active. You can also type "Cprofile" on the command line to check which profile is current but there is no command line option for setting a profile. Add to List... - use this button to add a new Profile Name to the list. This new Profile will not become Current by default so you will need to make it current after creating it. |
 Rename... - use this button to rename a Profile Name. Delete - use this button to delete any profile that is not current.
Reset - use this button to Reset a Profile to the default profile configuration as per settings upon installation. This is like resetting to factory specifications but keep in mind what a Profile stores before using. In other words, this won't fix weird menu changes or missing express tools and so forth. |
|||||||
Profiles - Export and Management
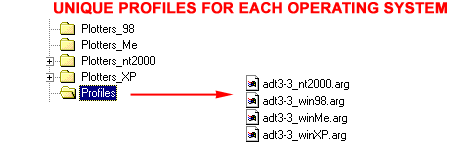
By adding a Folder for custom office Profiles to the Server you can manage all of the various profiles you may need for an entire office from one central point. You may wonder why I allude to "various" profiles as if there should be more than one; that's because if you have different Operating Systems you will most likely need a slightly different profile for each of these OS's. Of course, your office might be even more complex to deal with where you have to manage this and different versions of AutoCAD and/or Architectural Desktop so there may quite a lot of profiles to deal with. |
 Exporting
your custom Profile settings: |
|||||||
| 3Desktop Icons | 3-5 PROFILES AND DESKTOP ICONS | |||||||
| Desktop
Icon Overview
By holding the Ctrl key down while dragging the default AutoCAD or Architectural Desktop desktop icon, you can create a quick copy of it. Keep the original around incase you need the original Target information. Copying it to the Server is also a good idea so you will have it for future reference Rename the new Desktop icon to match the Target Profile so you can keep track of the desktop icons and profiles even when not in the office. Good organization that makes sense to others really pays off. I manage several offices by phone and can instruct most users to get themselves out of CAD or IT management problems by using all of the techniques discussed in this eGuide. |
For your reference, I have listed the default Target statement below and a custom one from my office so you have something to compare to and refer back to if you make a mistake somewhere. Default Setting: Custom Setting: |
|||||||
| Profiles
- Desktop Icon - Template Switch Use the Properties dialog box, illustrated to the right, for the new desktop icon to set a new Target statement that will find the matching Profile Name created earlier and Exported to the Server ( Profiles folder ). In order to confirm that everything is set correctly, it never hurts to read the whole Target statement from left the right. For the actual execution of AutoCAD or Architectural Desktop, the first statement should read something like this: "C:\Program Files\Autodesk Architectural Desktop 3\acad.exe" The Drive letter may be different but generally what you want to confirm is that the acad.exe is located correctly and that the whole statement is blocked in by quotation marks on either side. Even if you are configuring Architectural Desktop, the executable is acad.exe. After this statement, there should be a space followed by "/t" and then a statement regarding the template file to be used. For Architectural Desktop this is a huge deal but for AutoCAD, you don't even need this statement unless you are using a custom template file ( highly recommended). Since we moved the template folder in Part 1, we must alter a portion of this statement to match the new path to the server. Below is the default statement for Architectural Desktop: /t "Aec Arch (Imperial - Intl).dwt" Below is an example of an altered statement that calls the same template file but from the Server folder: /t "x:\adt_standards\templates\"Aec Arch (Imperial - Intl).dwt" Later, you will need to return to this portion of the Target statement and change the template file name to a custom one |
Note: |
|||||||
Profiles -
Desktop Icon - Template Switch - Custom Template File
Once you have a custom office template file to use for the startup process, return to the Target statement on your custom desktop icon, as discussed above, and change the default template file name to your template file name. Below is an example of an altered statement that calls a custom office template file instead of the default one. /t "x:\adt_standards\templates\AEC ARCHIdigm Standard.dwt" The AEC ARCHIdigm Standard.dwt would obviously be the name of your personal company default template filename. |
||||||||
Desktop
Icon - Profile Switch
After this statement, there should be a space followed by "/p" and then a statement regarding the profile file to be used. Should this statement be missing, a default profile will be created and used and the user may not even notice that something is wrong. As discussed above, the profile stores all of the setting and toolbar positions ( among other things) so this will be the place we specify that we want all this hard labor to be loaded. Below is the default statement for Architectural Desktop: /p "c:\Program Files\Autodesk Architectural Desktop 3\adt.arg" Below is an example of an altered statement that calls a custom profile name from the server location as discussed in earlier portions of this eGuide. /p "x:\adt_standards\profiles\adt3-3_nt2000.arg" After the /p statement, use a space and then type in the full path for the location and name of of the custom profile name (.arg ) and block this full statement in with quotation marks on either side. If you have a mapped drive for the location of the custom standards (highly recommended), you can type in the full path starting with the quotation mark which is used to cover situations where spaces have been used ( typically I avoid using spaces whenever possible and substitute them with an underscore ). If you have an unmapped drive, you can use the double slash syntax followed by the server name or IP address; e.g., "\\server\adt_standards\profiles\adt3-3_nt2000.arg". |
||||||||
Desktop Icon - Copy to Server
Once you have created one or more Desktop Icons, you can copy them to a Folder on the Server ( probably within the Configuration Folders ) for a backup and for deployment to other workstations. Notice that only one icon will appear to be correct since the others were created on other Operating Systems. |
Note: |
|||||||
| 3Deployment by desktop icon | 3-5 PROFILES AND DESKTOP ICONS | |||||||
Configuring
Consecutive Workstations
Once the first workstation has been setup and configured correctly one could Ghost the whole system to other workstations and be done with the whole operation but that would be in a perfect world and that's a rare place. If you copied the carefully crafted desktop icon to the Server folder for your custom desktop icons, you can now install AutoCAD or Architectural Desktop on another machine and when complete, copy this desktop icon over from the Server. Once you execute AutoCAD or Architectural Desktop with the custom desktop icon, all of the custom Profile settings will be imported automatically and, unless there are some odd system problems, the job is done and you can move on to the next workstation. For workstations that have a different Operating Systems than the one used to create the first custom desktop icon and custom profile, you will still have a bit of work cut out for you because a number of settings on the Options dialog box may not work; particularly the paths listed under the Printer Support File Path. Actually, the paths should function correctly but it's the drivers that do not and thus you will need to go through the whole process of configuring new .pc3's as discussed earlier. These new .pc3's will have to be saved in a unique folder for each OS because the names have to be identical to the other .pc3's. It sounds messy but trust me, it's worth the extra effort because printing settings will not bounce around as the files move from OS to OS. |
So before you get started on the new Profile Name and settings, you might try to save some time by using all of the work done for the first workstation, including the desktop icon and profile name. Once loaded, despite any errors, Rename it to match the new OS (something like "A2K2_98" or "ADT3-3_XP" ). When you launch AutoCAD or Architectural Desktop with this custom desktop icon created on another OS, you might notice an error message the first time you try to Plot ( you can get one about Plot Device not found and/or one about the Plotter Wizard not found ). To correct these errors, you will need to recreate the .pc3's from the system printer drivers, save and path these .pc3's to a new folder within the standards folder on the server (something like "plotters_98" or "plotters_XP" ). Once you have fixed the .pc3's, pathed and saved this information, you can Export the new Profile Name to the same folder where you keep the other Profiles ( since the name should be different ). And finally, you will now need to Rename and adjust the desktop icon to pull through the right Profile Name. Then, you can copy this desktop icon to the server location where you keep the other desktop icons so you can copy this out for any other workstations that have the same OS. |
|||||||
Altering
Consecutive Workstations
Sooner or later changes will occur and you will need to update the Profile settings made on one AutoCAD or Architectural Desktop to the other stations. One might expect that once the Profile has been Exported to overwrite the old one on the Server, that all the workstations will automatically pull it through upon the next launch. Unfortunately it isn't quite that simple because the Profiles are written into the System Registry of each workstation and then managed locally. However, all that is needed is for you to Delete the custom Profile within AutoCAD or Architectural Desktop; Profiles tab of the Options dialog box. Once the program is restarted, the new profile will be pulled through and the system will be updated. |
||||||||
| 4Other information | 4-5 PROFILES AND DESKTOP ICONS | |||||||
| XX
|
© Copyright 2002 ARCHIdigm. All rights reserved.
spell checked on Oct. 19, 2002 (gr)