File Linking: (See Fig. 1)
in VIZ at the Top Menu Bar, select File, then in the drop-down select File Link Manager. when This is selected there are 4 Tabs:
Attach, Files, Presets, Rendering:
Attach:
allows you to Browse to find File(s) to Attach. This usually starts off in the default directory meshes. after Selecting a File, the other Options are: Preset (Last Used Settings), Exclude Objects by Layer..., Rescale, with its own File Units input box. Attach this File and then Last and Least the Close button at lower right corner of Main dialog Box.
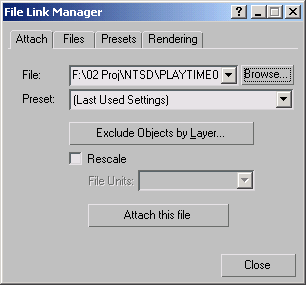
Fig. 1
select the previously Linked File(s).
Reload:
if you do not select Show Reload Options then the File is automatically reloaded. otherwise, if you do select Show Reload Options, then another dialog box, File Link Settings: DWGS Files shows up. The current FileName will be displayed across the Top, then there are two Tabs. Basic, and Advanced:
Basic, has the following Options to select from: (See Fig. 3)
Weld, Auto-smooth, Unify Normals, Cap Closed Objects.
Weld:
if selected Weld has a further option of adjusting the Weld Threshold, which by default is set to "0.1".
Auto-smooth:
Auto-smooth is selected by default and its Smooth-angle is set to "30.0" by default. This number can be adjusted.
Unify Normals:
Is selected by default.
Cap Closed Objects:
Is not selected by default.
Curve Steps:
Curve Steps is set to "10" by default. This is an important option to look out for. if you are Linking curved surfaces and they look "less" than smooth, then this is the value that you may need to adjust.
ACIS Surface Deviation:
ACIS Surface Deviation is set to "1.0" by default. This also, is an important option to look out for. if you are Linking curved surfaces and they look "less" than smooth, then this is the value that you may need to adjust.
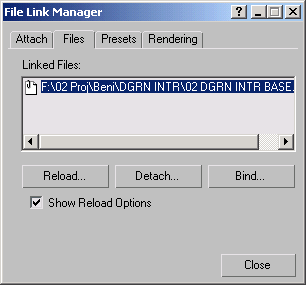
Fig. 2

Fig. 3
Reload..
There are 3 further options at this point. (See Fig. 3)
All, which will re-load All Objects in the linked File.
Selected in Scene, which will re-load the Objects selected in The Scene.
Selected in List, which has a pop-up dialog box,
Select Linked Objects, (See Fig. 4)
to select from the List of Linked Objects. This Select Linked Objects dialog box has several Options,
All, None, Invert, which allows you to chose the Linked Objects that you wish to re-link.
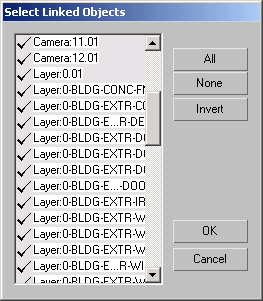
Fig. 4
Advanced, has additional Options. (See Fig. 5)
Resolve External References (xrefs), Skip Hatches and Points both of which are selected by default.
Attach Options, Combine by: Layer is greyed out
Reload Options, has additional Options. Exclude Objects by Layer, (See Fig. 6)
which brings up a dialog box Select Layers This dialog box shows All the Layers in the linked File and shows
the On/Off, Thaw/Freeze Locked/unLocked Layer Status. This dialog is "similar but different" to the above mentioned
Basic, Select Linked Objects.
Reset Autocad Object Thickness
Resolve all Xref Paths Again
Detach,
as soon as you select This Option, a dialog box pops-up with the following
File Link Question. Detaching the selected linked file(s) will remove all objects associted with the file(s). Do you want to proceed?"
This reminds of r14 Hatching, "Do you really, really, really want to do This?".
ok, you got two choices, yes/no.
Bind,
brings up the following dialog box,
File Link Question - "Binding the selected linked file(s) will sever the link(s) between them and this VIZ scene. The objects
associated with the file(s) will be retained. Do you want to proceed?".
ok, you got two choices, yes/no.
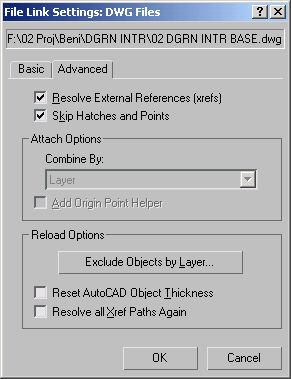
Fig. 5
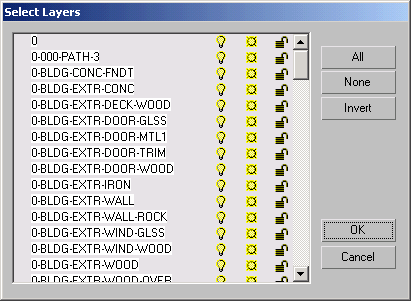 Fig. 6
has a Linked File Settings and Named Presets: list.
If no AutoCAD Drawings are selected the default is set to
(Last Used Settings) with only the Option New available. if you selected
(Last Used Setting) the Options Modify, Copy and Delete are now available.
selecting the Option Modify brings up the File Link Settings DWG Files dialog box.
Rendering (See Fig. 8)
has further Options for
Shape Rendering (Lines & Splines). Viewport, and Renderer.
The default is set to Renderer which has the following adjustments:
Thickness; set to "1.0" by default,
Sides; set to "12" by default.
Angles; which is set to "0.0" by default.
There are a few more Options which are unselected by default,
Renderable, Generate Mapping Coordinates, Display Render Mesh.
selecting Display Render Mesh makes the next Option Use Viewport Settings active.
selecting Update in Viewports will do exactly That.
This is just a brief overview of the File Link Manager.
Type in the keyword File Link to find This Information.
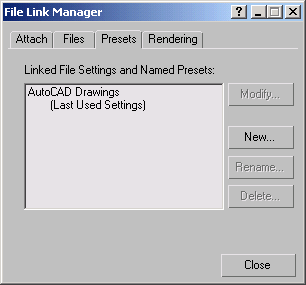
Fig. 7
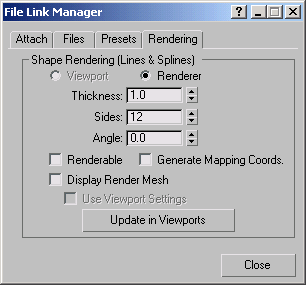
Fig. 8