AutoCAD 2000i and Architectural Desktop 2.0i come with a Web Publishing Wizard that was designed to help CAD users quickly format and output their drawings in Web format. Beginning with AutoCAD R14, the Web viewable format called, Whip became available and you can still download the simple Whip viewer from Autodesk's site. At this time we were also introduced to a new AutoCAD output file that had the 3 letter extension ".dwf" for drawing in web format. The problem was that many CAD users have little HTML knowledge or the need to know how to set up a Website with proper formatting and hyperlinking to make these cool .dwf files viewable in an organized way.
Now, with the Web Publishing Wizard, you can basically output an entire project of drawings in Web viewable format, fully organized in a logical manner, without knowing any HTML code.
![]() From
the Tools pull-down menu, select Wizards > and
cascade over to Publish to Web... or use the Publish to Web button on the
Standard Toolbar.
From
the Tools pull-down menu, select Wizards > and
cascade over to Publish to Web... or use the Publish to Web button on the
Standard Toolbar.
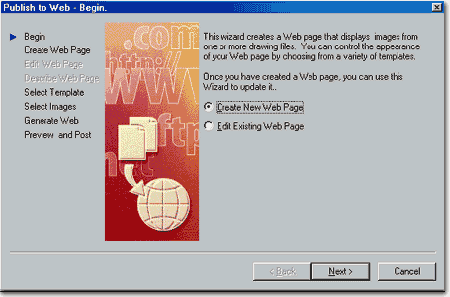
In this exercise we will begin by making a Project Web Page from scratch, so select the Create New Web Page radio button as illustrated to the right.
Pick Next>
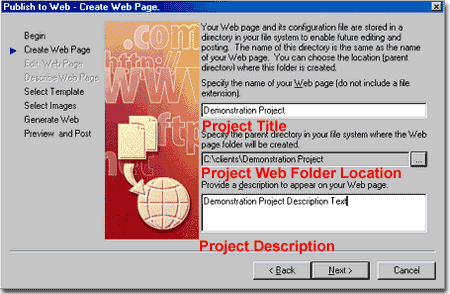
On the Create Web Page option of the Publish to Web dialogue box to the right, we have the option to provide a Project Tile for our Project Web Page ( see final product below ).
After typing in a Project Title, you will need to provide a path and folder name for the location of your Project Web Page files. You can use the "..." button to Browse for another location than the default one this Wizard produces.
The last option on this dialogue box allows you to type in a description of the Project Web Page ( see final product below ).
Pick Next>
On this dialogue box, you currently have three choices but only one offers the .dwf format. Though I really like the Thumbnail format and method for organizing work, I don't care for the large files in .jpg (JPEG) format because they become large and still don't offer anything near the quality of the .dwf files which are vector based. What would have been the best choice, would have been to allow for either .gif or .jpg thumbnails that link to .dwf files. Personally, I prefer to use .gif for thumbnails because I can compress them down to near nothing when I eliminate colors.
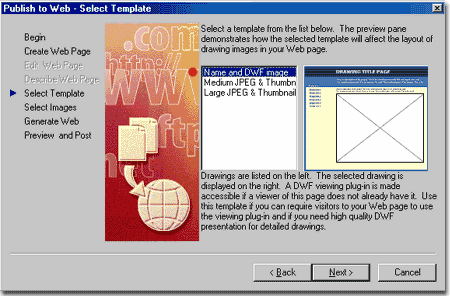
On the Select Template option of the Publish to Web dialogue box to the right, I show the "Name and DWF image" highlighted as the choice for this exercise.
Pick Next>
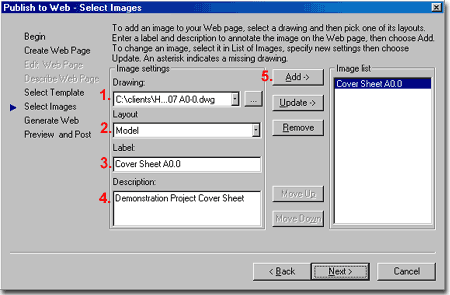
On the Select Images option of the Publish to Web dialogue box to the right, you have several tasks to perform.
1. Select currently open or previously used drawing files from the Drawing: drop-down list or use the "..." button to Browse for any other AutoCAD drawing files that are not currently open.
2. For the selected Drawing file in Step 1, choose a Layout from the Layout drop-down list. Every drawing will of course have the Model Layout but other options could be Layout 1, Layout 2, etc.
3. For the selected Drawing file in Step 1 and the selected Layout in Step 2, provide a Hyperlink Description in the Label text box. This is the where users will read the table of Contents portion of your Project Website and pick to see the image.
4. For the selected Drawing file, Layout and Label, provide a Description. This text will be placed with the image file and is not necessary unless you want to add further information to the image file.
5. Once you have gone through Steps 1 through 4, you can use the Add-> button to add this information to the current Contents list. Notice that you can control the organization later with the Move Up or Move Down buttons. You can thus go through Steps 1 through 4 all over for the very same drawing file but use a different Layout, Label and Description and Add-> this to the Image list.
Pick Next>
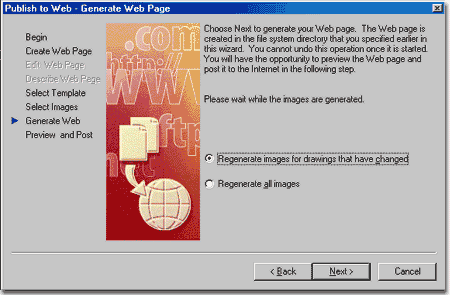
On the Generate Web option of the Publish to Web dialogue box, you can choose to produce just the images that have changed; which in this case is any that we have just selected to publish. Or, you can choose to produce all images regardless of apparent changes. Obviously both options have more to do with editing an existing Project Web Page than producing the first one.
Since this is an example of the first go through this process, I show "Regenerate images for drawings that have changed" selected.
Pick Next>
Note: Once you pick the Next > button the printer dialogue box should appear and begin output into the Web format. On numerous occasions, I have had my ADT 2.0i (pre-service pack) lock up at this point when working with files that have numerous viewports, xref's and/or are older files. At this point I am not exactly sure what cause the lock up but it has been consistent with older files so if you experience long printing times on this next step, it may be a lock up. The output time shouldn't take much longer than a normal print or plot output.
After printing your files to Web Format in the previous step, the Preview and Post option comes up on the Publish to Web dialogue box.
Preview basically just opens your Web Browser and shows you what you Project Web Page looks like.
Post Now actually attempts to upload your Project Web Page to a Web Server. Posting is a very misleading concept here. Usually, posting involves sending or copying all of these Project Web Pages to a company Website. If the Website is hosted by an ISP, chances are that you will need to use another form of software to upload these files to the company Website. Some ISP's provide on-line login and password based utilities that allow you to upload to your website if you don't have any software like WS_FTP Pro that lets you do it with drag-n-drop ease. If you have Web building software, like Adobe GoLive or FrontPage, then you can use these programs to upload the Project Web Page.

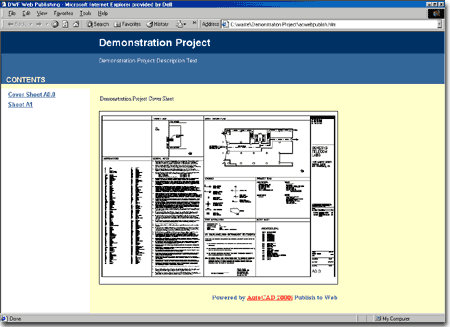
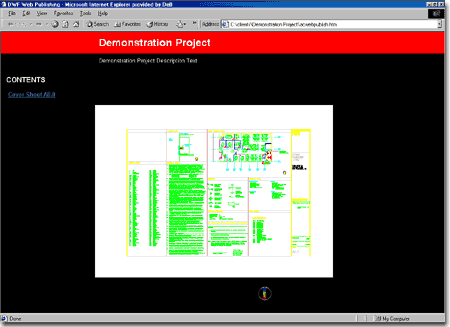
To the right, I show what the default Web Page will look like based on the various options that we went through in the steps above.
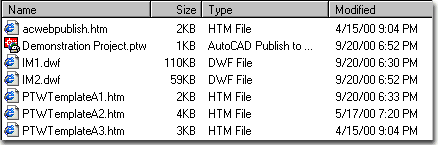
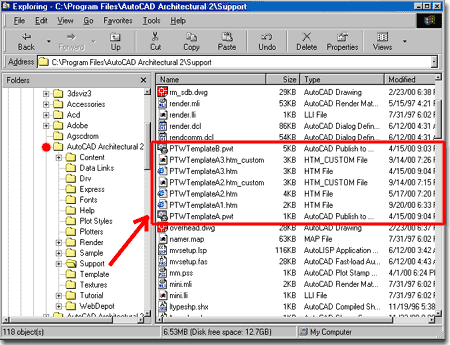
Illustrated to the right, are the files from the exercise in Part 1. When you create a Project Web Folder these are the files that the Web Publishing Wizard will put in that folder.
acwebpublish.htm - the formatting page which is the actual page of information to be viewed only it contains frames with links to the other three sources of web page information; PTWTemplateA1.htm, PTWTemplateA2.htm and PTWTemplateA3.htm.
Demonstration Project.ptw - this is a data file for the Web Publishing Wizard so it knows what's currently in your Project Web Page. The name of the .ptw file is obviously different for different Project Web Pages.
IM1.dwf - the IM1, IM2 and so on files are the automatically named Web viewable versions of your drawing files.
PTWTemplateA1.htm - this is the Contents portion of your Web Page.
PTWTemplateA2.htm - this is the Body (or image area) of your Web Page.
PTWTemplateA3.htm - this is the Header portion of your Web Page.
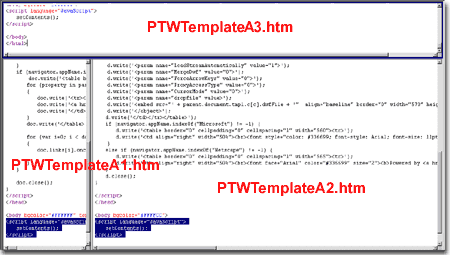
Illustrated to the right is what the Whip (.dwf) based Web Page looks like in an html editor. Notice that it is broken up into 3 logical parts that are managed by 3 separate .htm pages.
The top, referred to as the "banner", is actually the PTWTemplateA3.htm page. The left side, refereed to as the "contents", is actually the PTWTemplateA1.htm page. The right side, referred to as the "main", is actually the PTWTemplateA2.htm page.
Thus, one page is really just a control page that organizes the location and position of other pages via "Frames". This is much like using AutoCAD Xref's in a Layout with viewports.
When you first publish your Web Project Page, AutoCAD uses either the PTWTemplateA.htm or PTWTemplateB.htm to create the project specific formatting page: acwebpublish.htm
All of these files come from the AutoCAD2000i or ADT2.0i Support directory, as described below.
Note: PTWTemplateA.htm is for the Whip based Page - illustrated, and PTWTemplateB.htm is used to generate the Thumbnail JPEG based Pages.
Under the AutoCAD 2000i or Architectural Desktop 2.0i Support directory, you should find a list of .htm template files identical in name to those we looked at above under your Project Web Page directory.
So, if you follow the logic, the Web Publishing Wizard simply copies the template files over to your Project Web Page directory every time you publish and then modifies them according to the information stored in the .ptw file for that project.
This means that if we modify the .htm files in the Support directory, we should be able to change to output.
Warning!
Before proceeding with the following exercise, you should make a complete back up of the following files:
PTWTemplateB.pwt
PTWTemplateA.pwt
PTWTemplateA1.htm
PTWTemplateA2.htm
PTWTemplateA3.htm
We are not going to change the .pwt files but I just want to make sure no one ends up blowing out the whole Wizard functionality. Basically, with some simple HTML code, you can make significant changes to the look of you output with something as simple as Windows' Notepad. You may notice that in the screen capture to the right, I have my modified pages labeled with "_custom" at the end so I can switch back and forth between the default output and my custom output by renaming these files.
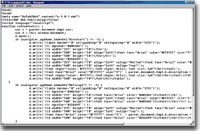
Illustrated to the right is all of the html and java code from the banner (top) portion of the Whip based Web Page from the Support directory- as discussed above.
One of the simplest things to change is color, so that is what we will do.
Before we get started, you should know that the code is redundant on these templates because it was written to work in both Microsoft's Internet Explorer and Netscape's Navigator.
The first color reference in this code ("bgcolor"), reading from top to bottom has to do with the Web Page Title background color so if you change it you will control to top band of color. The second reference to "bgcolor" is for the portion of the top "banner" that has to do with the Web Page Project Description and the last reference to "bgcolor" has to do with the remaining body of the page that isn't part of the other two cells. Thus, to make all of the banner background black, you will need to change all of the "bgcolor" references to " #000000 ".
The other references to "color" have to do with the font. Working with all of these color options, you can make some easy and dramatic changes.
Below is a chart of some of the basic primary colors and their respective HTML codes. If you want the code for any other colors, you simply have to view the source code of any Web Page that has the color codes you are looking to duplicate.
| red | #FF0000 |
| yellow | #FFF000 |
| green | #00FF00 |
| cyan | #00FFFF |
| blue | #0000FF |
| white | #FFFFFF |
| black | #000000 |
<html>
<head>
<meta name="AcPub2Web" content="v-1-0-1-dwf">
<title>DWF Web Publishing</title>
<script language="JavaScript">
function setContents() {
var c = parent.document.tmpl.cur;
var d = this.window.document;
d.open();
if (navigator.appName.indexOf("Microsoft") != -1) {
d.write('<table border="0"
cellpadding="0" cellspacing="0" width="1225">');
d.write('<tr bgcolor="#003366">');
d.write('<th width="225"
height="50"></th>');
d.write('<th width="500"
height="50" align="left"><font face="Arial"
color="#FFFFFF" size="5"><b>' + parent.document.tmpl.h.banner
+ '</b></font></th>');
d.write('<th width="500"
height="50"></th></tr>');
d.write('<tr bgcolor="#336699">');
d.write('<td width="225"
height="70" align="left" valign="Bottom"><font
face="Arial"
color="#FFFFCC"><b> CONTENTS</b></font></td>');
d.write('<td width="500"
height="70" align="left" valign="top">');
d.write('<font style="color: #FFFFFF; font-style: Arial; font-size:
5pt"><br></font>');
d.write('<font face="Arial"
color="#FFFFFF"
size="2">' + parent.document.tmpl.h.description + '</font>');
d.write('<font style="color: #FFFFFF; font-style: Arial; font-size:
5pt"><br><br></font></td>');
d.write('<td width="500"
height="70"></td></tr></table>');
}
if (navigator.appName.indexOf("Netscape") != -1) {
d.write('<table border="0"
cellpadding="0" cellspacing="0" width="1215">');
d.write('<tr bgcolor="#003366">');
d.write('<th width="215"
height="50"><font face="Arial"
color="#003366">i</font></th>');
d.write('<th width="500"
height="50" align="left"><font face="Arial"
color="#FFFFFF"
size="5"><b>' + parent.document.tmpl.h.banner +
'</b></font></th>');
d.write('<th width="500"
height="50"><font face="Arial"
color="#003366">i</font></th></tr>');
d.write('<tr bgcolor="#336699" >');
d.write('<td width="215"
height="70" align="left" valign="Bottom"><font
face="Arial" color="#FFFFCC"><b> CONTENTS</b></font></td>');
d.write('<td width="500"
height="70" align="left" valign="top">');
d.write('<font face="Arial"
color="#FFFFFF"
size="2">' + parent.document.tmpl.h.description +
'</font></td>');
d.write('<td width="500"
height="70"><font face="Arial" color="#336699">i</font></td></tr></table>');
}
d.close();
}
</script>
</head>
<body bgcolor="#FFFFCC">
<script language="JavaScript">
setContents();
</script>
</body>
</html>
Illustrated to the right, is an example of what some simply color changes can do to the default output.
You may notice that I have also removed the advertising from Autodesk and replaced it with my company logo; something more appropriate for a project managed by us as opposed to someone else.
Illustrated to the right, is the bottom portion of the PTWTemplateA2.htm page from the support directory with my personal modifications highlighted in red.
If you are publishing to a company website the path is usually a little different than if you are publishing for an intranet use. The "scr="../Navtools/logo-movie4.gif" statement to the right refers to the animated ARCHIdigm logo and where this .gif file resides on the ARCHIdigm.com website. The "../" indicated that I am referring to a subdirectory off of the root directory much the same way DOS works. For an intranet use, it's just a straight path statement like "G:\companywebsite\companylogo" or similar.
[ Bottom of PTWTemplateA2.htm ]
</script>
</head>
<body bgcolor="#000000" text="#FFFF00" topmargin="0"
leftmargin="0">
<script language="JavaScript">
setContents();
</script>
<p align="center"><img
src="../Navtools/logo-movie4.gif"
width="32"
height="32" alt="ARCHIdigm"></p>
</body>
</html>
target="_self"><img src="../Navtools/logo-movie4.gif"
width="32" height="32" alt="ARCHIdigm" border="0"></a></p>
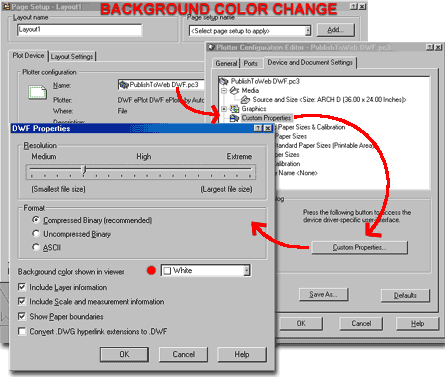
The WebWizard uses either the PublishToWebDWF.pc3 or PublishToWebJPG.pc3 plotter configurations to output your work in Web format. By using the Properties button to make changes to either of these two pc3 files, you can set the background color to something other than the default white.
Illustrated to the right, I show the PublishToWebDWF.pc3 Plotter Configuration being changed. On the Plotter Configuration Editor, highlight the Custom Properties item and pick on the Custom Properties... button. This should open the DWF Properties dialogue box, as illustrated to the right providing access to the Background color shown in viewer drop-down list (see red dot ).