The other day I caught myself drawing a simple rectangle in AutoCAD, to show a parking space in a garage, exactly the same way I have been drawing rectangles in AutoCAD since 1984. I thought for a second and decided to improve this process by working on a "smart" rectangle; here's what I have come up with so far.
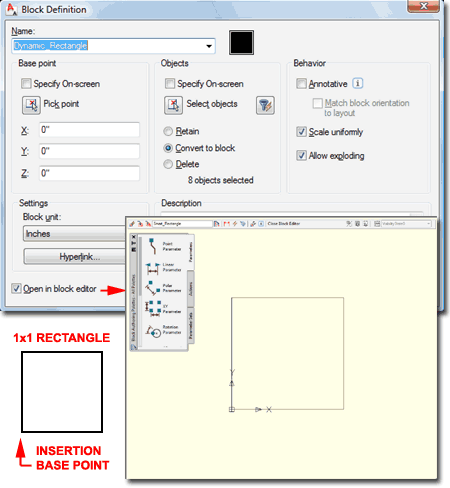
The way I started my work on building a smarter rectangle was to draw one that measured 1 unit by 1 unit. I then turned that rectangle into a Block with an Insertion Base Point set to the lower left corner. the "smart" part comes from using the "Open in block editor" option which activates the Dynamic Block editor once the OK button has been selected.
Note:
I chose not to make this Block "Annotative" but that might be an interesting
option to explore at another time.
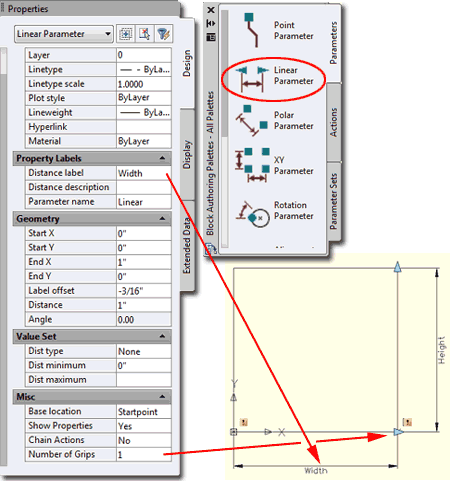
In the illustration to the right I show that I have my 1x1 rectangle in the Dynamic Block editor and I have used the Linear Parameter tool to add a Width and Height Parameter. By default these are named "Distance" and "Distance1" but I renamed them using the Distance Label property (see right).
When I added the Width Linear Parameter, I added it much like a dimension and picked the second point as the one I wanted to keep. Then, I set the "Number of Grips" property to 1 (see right). My intent is to have one Grip for Width and one for Height.
Because I would prefer my Grips to sit along the middle of the rectangle's edges, I Select each Grip and Grip Stretched them to the Midpoint of the adjacent edge.
To may a Dynamic Block Stretch, you have to use a Stretch Action that is tied to a "stretchable" Parameter. In the illustration to the right, I show that I have used the Stretch Action tool, associated it with the Width Parameter, set the Parameter Point in the lower right corner, created a Stretch Rectangle around the objects I want to Stretch and Selected the Rectangle.
This work has to be repeated for the Height Parameter and for this I suggest placing the Parameter Point in the upper right corner.
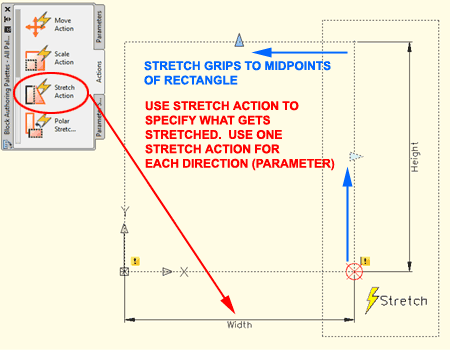
Now because I had to go and move those original Stretch Grips to the midpoints of the Rectangle's edges, I have to use more Action tools to keep them at that midpoint position as the edges get longer or shorter.
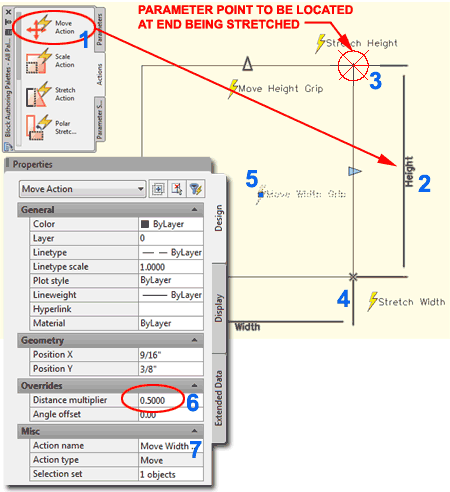
In the illustration to the right I show that I have selected the Move Action tool, associated it with the Height Parameter, picked the upper right corner as the Parameter Point and selected the Width Parameter (yep, that's right, I selected a Parameter as the Object to be Acted upon). On the Properties Palette for this Move Action, I renamed it to "Move Width Grip" and set the Distance multiplier to 0.5. By using the Move Action and its corresponding multiplier variable, I can move the Grip by 50% of the total Stretch value which in turn keeps the Grip at the exact midpoint of the edge it reside on.
This work has to be repeated for the Height Grip. The Move Action for this Grip is associated with the Width Parameter and the Parameter Point should be located in the lower right corner.
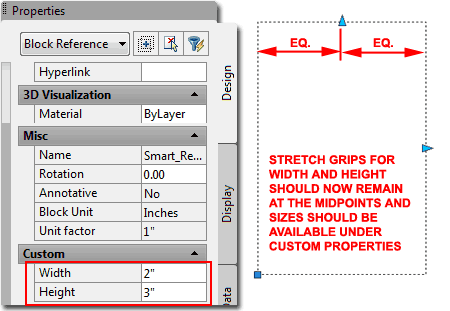
At this point in the process of creating a new Dynamic Block, I recommend testing it to make sure everything works as expected.
In the illustration to the right I show that my smart rectangle now allows me to input a Width and Height on the Properties Palette. I can also control the Width and Height by Grips that reside at the midpoint of their corresponding edges and as I Stretch the rectangle, these Grips adjust to the new midpoints.
Note:
You can use "ResetBlock" to set a Dynamic Block back to it's default values
and to make sure any changes you may have made are reflected in the working
block.
Use "Bedit" to return to the Dynamic Block editor.
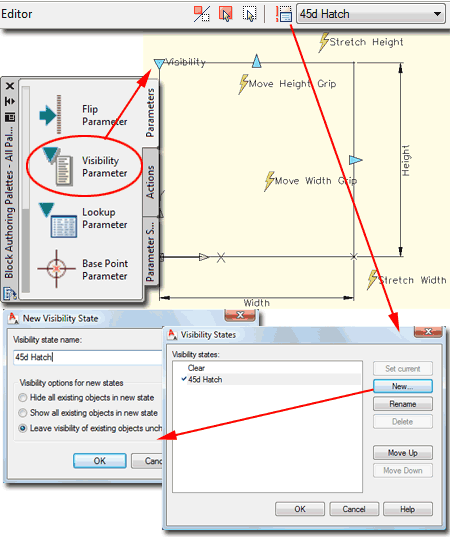
One of the graphical enhancements I often do to emphasize my 2D rectangles, such as those for parking spaces, is to add a Hatch Pattern. So, to make my smart rectangle "smarter", I will create the option to include a Hatch Pattern.
In the illustration to the right I show that I used the Visibility Parameter tool to add a Visibility Grip in the upper left corner. Once this Grip has been added, the Visibility State tools activate on the top toolbar (see right). By using the Visibility States Manager button, I show the I Renamed the default one to "Clear" and created a New one that I named "45d Hatch". Notice that I used the "Leave visibility of existing objects unchanged in new state" option on the "New Visibility State" dialog box. This keeps all of the linework and Grips for the new Visibility State.
Note:
Don't forget to Modify the "Stretch Height" Action by Adding the Visibility
Parameter so it get's Stretched (moved) as the rectangle increases or
decreases in height.
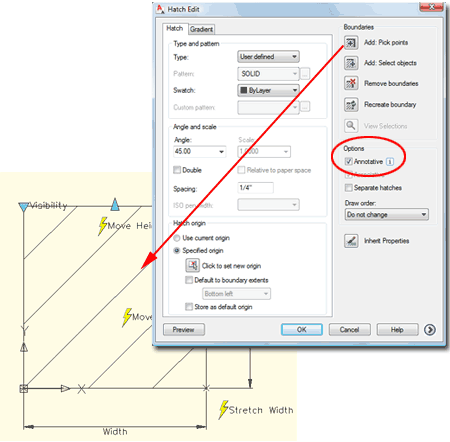
For the new "45d Hatch" Visibility State, I show that I added a "User Defined" Hatch Type set to 45 degrees with a Spacing of 1/4". Since this is going to be a "smart rectangle" I show that I used the "Annotative" Option for this Hatch. This means that as I change the Annotation Scale for the drawing, the Hatch Pattern adjust to give me that 1/4" spacing in the final print; e.g. at 1:48, the spacing will be 1/4" x 48 = 12".
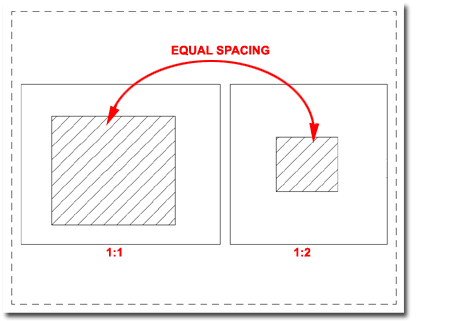
In the illustration to the right I show the final product of all this work and how the Hatch Pattern, set to Annotative, uses the same spacing at two different scales.
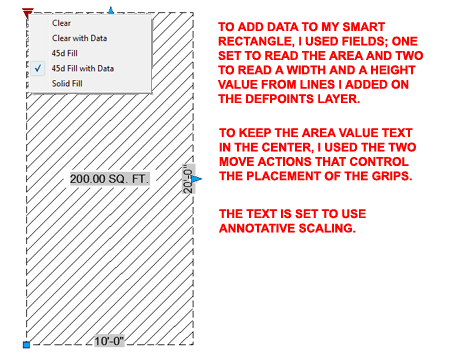
In the illustration to the right I show an example of how I added more features to my smart rectangle buy creating new Visibility States that offer Data. The Data comes from Fields set to read the rectangles Area, Width and Height. Because the rectangle is truly a rectangle, getting a Field to report the Object's Area is easy but getting a Field the read the Width and Height is another matter. In order to get a Field to report a Width, for example, I had to add a regular Line along that edge of the rectangle which I placed on the Defpoints Layer.
What would you add?
