Architectural Desktop users are familiar with a tool called the "Detail Component Manager" which was designed to help create 2D details by using Blocks that have dynamic properties. This sounds a lot like Dynamic Blocks doesn't it?
In this article I cover some really basic steps in the Dynamic Block Editor that you can use to create your own Detail Tools if you don't have Architectural Desktop. By creating a Dynamic Block for insulation you should find that you can take these concepts and expand upon them for all sorts of amazing detailing tools.
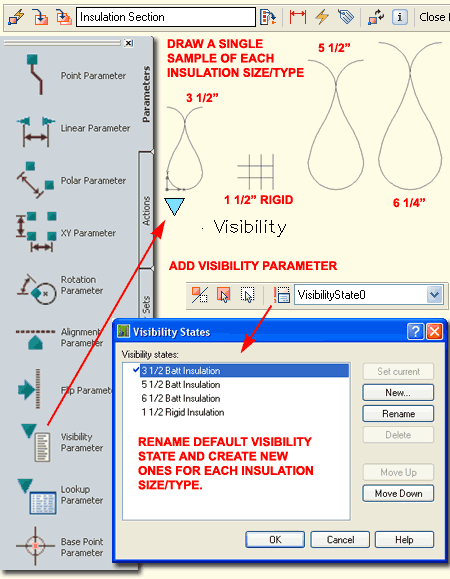
In a blank AutoCAD drawing, activate the Dynamic Block Editor and draw a single batt insulation form as illustrated to the right. Off to the side, draw similar shapes for other batt insulation forms of different sizes. In the illustration to the right I show an example of 1 1/2" rigid insulation to demonstrate how you can pretty much draw whatever you want as long as you keep in mind that this linework will be Arrayed.
Once you have drawn two or more insulation forms, go to the Parameters tab on the Authoring Palette and Add a single Visibility Parameter. Place this Parameter near but not on top of the UCS icon. If you place a Visibility Parameter on top of the Insertion Base Pont, it will not work properly unless you replace the Insertion Base Point with a Base Point Parameter.
Once you have added a Visibility Parameter, you should find a default name has been set on the Visibility States drop-down list. Use the Manage Visibility States button to access the Visibility States dialog and Rename the default name to something more logical like "3 1/2" Batt Insulation". While in the Visibility States dialog, create New... Visibility States for each insulation size or type you have created. You can think of these as Layers.
Use "Leave visibility of existing objects unchanged in new state" for each new Visibility State you create.
Next to the Visibility States drop-down list you should see buttons for "Make Invisible", "Make Visible" and "Visibility Mode".
Set the Visibility State to the first insulation size or type in your list and then use the "Make Invisible" button to Select all of the linework you don't want to see for this particular item. If the Selected objects disappear, use the "Visibility Mode" button to toggle the visibility of invisible items On (does that sentence make sense?).
In the illustration to the right I show that only my 3 1/2" Batt Insulation object is Visible but by using the "Visibility Mode" toggle button, I can still see the Invisible linework in a dark or screened form.
Once you get the hang of this system, use the Visibility drop-down list to set another Insulation size or type active and then make all other linework Invisible. Repeat this process for each Visibility State in your List.

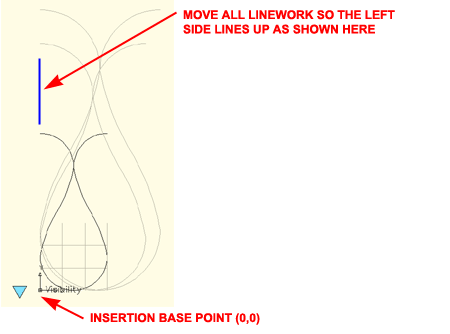
When you have completed the Visibility State work, move all of the insulation linework into an aligned position as illustrated to the right. Because each item will be Arrayed to the right, you will want the left sides to line up based on the lower left corner which is also the Base Insertion Point.
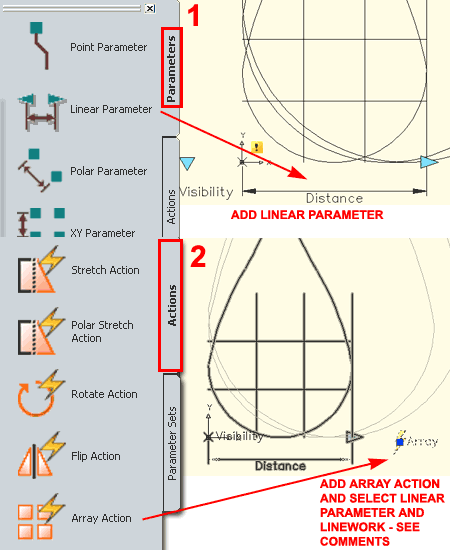
Back on the Parameters tab, Add a Linear Parameter that starts at the Base Insertion Point and goes to the right side of your smallest insulation form. In this example my smallest insulation form is 1 1/2" wide so that is the length of my Linear Parameter. Make sure your Linear Parameter is linear and not at some arbitrary angle created by bad Osnap work. In truth, the second position of the Linear Parameter is not that important as long as it is level but the position of the grip can be irritating if poorly placed in a Dynamic Block.
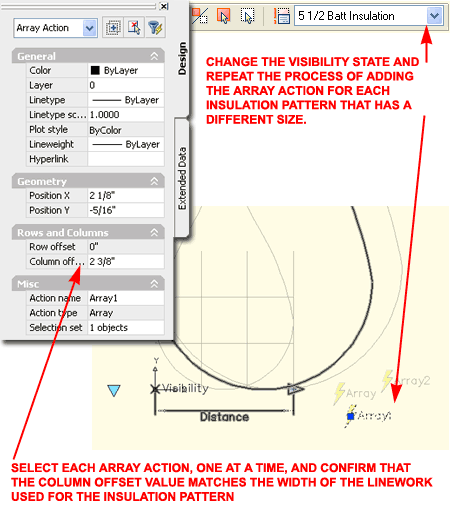
After Adding the Linear Parameter, go to the Actions tab and Add one Array Action. Place the Array Action icon in a logical but relatively arbitrary location as shown to the right. When the Array Action has been placed, you will need to Select the Parameter and Objects it will be associated with.
In my example to the right I show that I associated my first Array Action with the Linear Parameter and then Selected my 3 1/2" Batt Insulation form and my 1 1/2" Rigid Insulation form that was drawn 3 1/2" wide; i..e, I am Arraying Objects belonging to two different Visibility States at the same time.
Note:
For the Linear Parameter, I set the Number of Grips Property to one (1).
You will find this option on the Properties Palette.
For the next Insulation Form, set another Visibility State active and then Add another Array Action. For the next Array Action, use the same Linear Parameter as before but only Select those object that are truly Visible for this Visibility State.
Repeat these steps for all remaining insulation forms using different Visibility States.
The final step is to confirm that each Array Action uses a Column Offset value that matches the width of each insulation form that it is associated with. To confirm this, Select one Array icon and check the Properties Palette to read the Column Offset value as illustrated to the right.
Use the Close Block Editor button to exit from the Dynamic Block Editor Interface. At this point you have a choice about how you want to proceed with the testing and final use of your work. If you save the current drawing file it will become the Dynamic Block when inserted into other drawing files despite the fact that you current don't see anything in the drawing. By using the DesignCenter you can locate this file and drag the it to the Tool Palette to make a new Tool of your Dynamic Block. The other option is that you can insert the current drawing file into a library file where other Dynamic Blocks will be kept. That way you can have an example of the Dynamic Block in Model Space that you can Select for testing and further development.
Whatever path you take to save your Dynamic Block, the test results should prove to inspire you to continue the work and expand upon these concepts using things like CMU Blocks, Studs, Joists, Anchor Bolts and so forth.
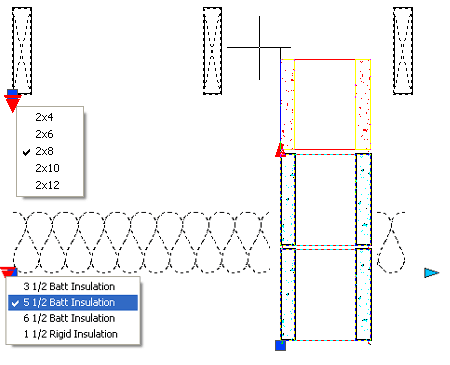
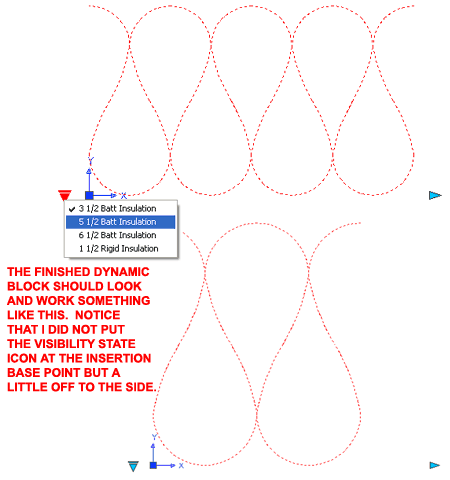
In the illustration to the right I show how my example Insulation Dynamic Block has a Visibility drop-down list that changes the size and/or type of my insulation and a Stretch Grip that allows me to lengthen or shorten the insulation.
By using the same information outlined for the Insulation Dynamic Block discusses above, I created a Framing Ends Block that Arrays each at 16" on center.
