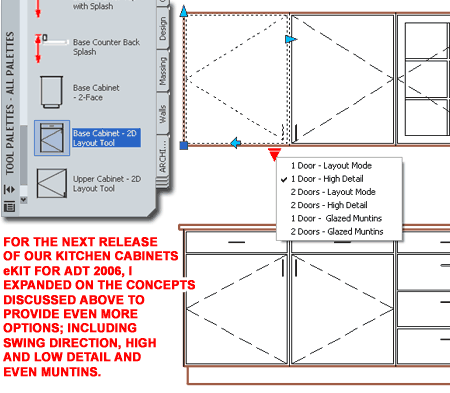
If you work in architecture you have probably come across the scenario illustrated to the right more times than you care to think about. Whether it is the cabinets for a kitchen, bathroom, media room, pantry or any number of other places, the general layout task always comes across as unnecessarily laborious.
In the example exercise outlined below, it should be noted that this only represents one way to go about creating this particular solution. I have attempted to make it as simple as I can in an effort to help others get started with Dynamic Blocks in AutoCAD and Architectural Desktop 2006.
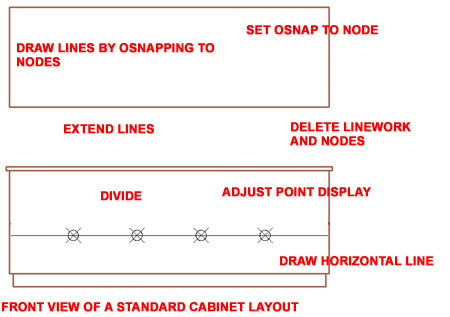
Illustrated to the right I show a typical kitchen cabinet front and the most basic lines that are usually required to illustrate how a cabinet might be divided up into door and drawer units. I have drawn three vertical lines to match the height from the base to just under the counter top. I have also drawn one line to represent the common drawer position. In an effort to make the mathematics easier later on, I have used a value of 1 unit or 1 inch as the horizontal spacing between the three horizontal lines. When done, this work will represent a layout of 2 equal divisions with two drawers above.
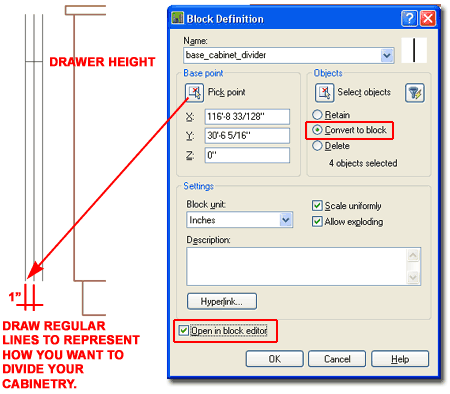
Once you have drawn the four lines as illustrated, use the Block or "B" command to activate the Block Definition dialog. Set a name for your Dynamic Block, Select a logical Base Point, Select the four lines, Set the Convert to Block radio button and make sure to set the "Open in Block Editor" checkbox.
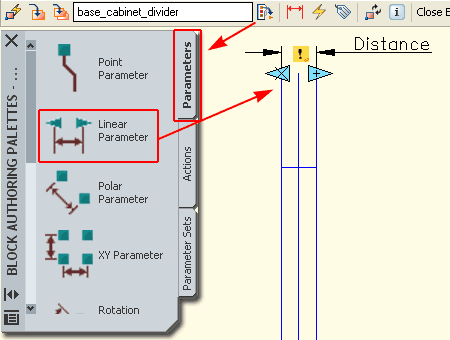
Under the Dynamic Block Editor mode, look for the Block Authoring Palette if it is not already active. On the Parameters tab of the Block Authoring Palette, use the "Linear Parameter" tool and Osnap from Left to Right on the two top outer lines as illustrated to the right. Think of this action like Dimensioning the Distance between these two points.
If you make a mistake you can simply Delete the Parameter Object and start again. This Object represents the greatest distance between the cabinet ends and is a mathematical reference for Actions set later on. You will see the Grip Points for this Parameter on your Dynamic Block later on.
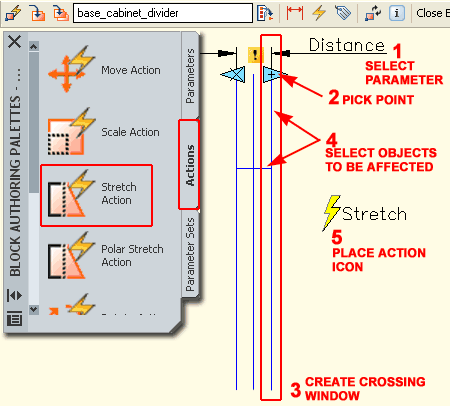
On the Actions tab of the Block Authoring Palette, use the "Stretch Action" tool and observe how you will be queried to pick or select items in a certain order.
The Stretch Action will use the Linear (or "Distance" as it is labeled on the screen) Parameter to determine length and direction for stretching. Next, the Stretch Action needs to be associated with a base point relative to the Distance Parameter. In my example, I show that I expect to Stretch to the right so I have associated the Stretch Action with the right-side base point on my Distance Parameter.
For the third step of configuring the Stretch Action, you will need to Select the region or area that will be affected. This is very similar to the work you do when you use the Stretch command in AutoCAD and you will find that the Crossing Window Selection Method is the default option. For this work I typically turn Osnap Off and simply create a rectangular area that crosses through the Objects that I expect to Stretch.
For the fourth step of configuring the Stretch Action, you will need to Select the specific Objects that you want to affect and in this example I show that I want to Stretch the horizontal Line representing the top drawer and the vertical line representing the far right cabinet edge.
For the final step (#5) you simply need to place the Stretch Action icon so you can access its settings in the future.
You might think that the previous work completed the Dynamic Block but if you review the Stretch Action Selection set, you will notice that I did not Select the middle cabinet line. If we Stretched the middle line along with the cabinet, the distance would not remain 1/2 or 50% of the total between the left and right cabinet edges; i.e., the right cabinet side would simply remain as it is while the left division would grow.
To make the middle line continue to represent a middle division between the other two lines, we need to use another Action tool. For this work you can either use the Stretch Action tool again or follow my example and use the Move Action tool. We will need to use a second tool because these Action tools only store one set of variables.
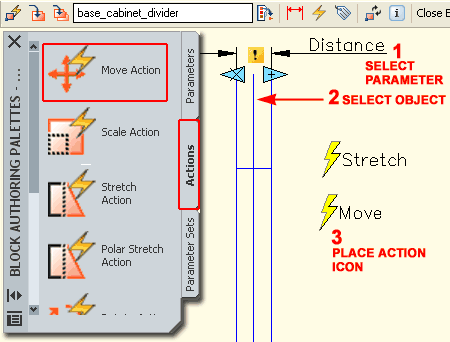
On the Actions tab of the Block Authoring Palette, use the "Move Action" tool and observe how you will be queried to pick or select items in a certain order.
The Move Action will use the Linear (or Distance as it is labeled on the screen) Parameter to determine length and direction for Moving. Next, you will need to Select the Object(s) for this Action to affect. And finally, you simply need to place the Move Action icon as illustrated to the right.
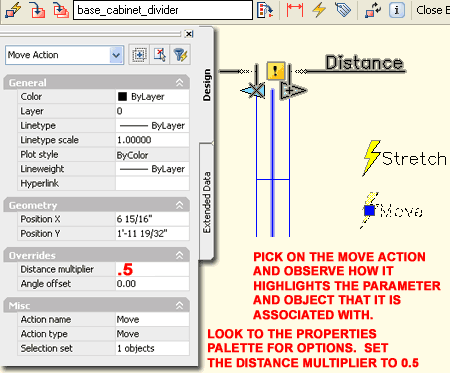
After setting the Move Action as described above, Select the Move Action icon and look at your Properties Palette for a series of unique Properties.
Under the Overrides section, change the value for the Distance Multiplier from 1.000 to 0.5. This setting will now calculate and Distance value you create by Grip Stretching the Dynamic Block and multiply it by 0.5; resulting in a Move of 1/2 the total Distance.
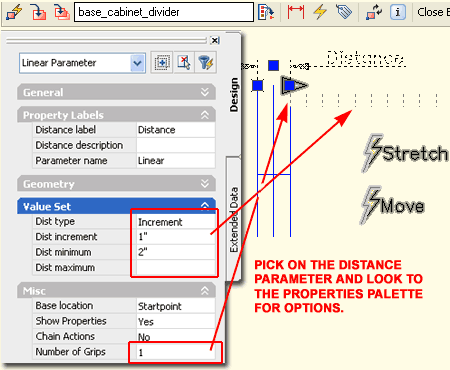
While I have your attention about unique Properties for Dynamic Block Icons, Select the Distance Parameter Icon and notice that you can lock the unit of "increment" to a value that will guarantee accuracy in your work. The way this works is that you set the Dist (short for Distance) Type to "Increment" which then allows you to specify an increment amount, a maximum and a minimum overall distance. This will become very clear in the next step.
I also highlighted the option to work with the "Number of Grips". For this example, when you are only going to Stretch the Dynamic Block in one direction, it doesn't make sense to offer a Grip pointing to the Left.
If you used the "Convert to Block" option when creating your Dynamic Block, you should now be able to play with the new Dynamic Block features. If you did not use that option, use the Insert command and insert your new Dynamic Blocks just as you would with a regular AutoCAD Block.
If all went as planned, you should have a lower left insertion point and an upper right Grip marker that you can now use to Stretch with. As you Stretch to the right, you should find that the middle cabinet line is always 1/2 the total distance. If you used the Increment options discussed above, you should also find that you can only Stretch by specific increments.
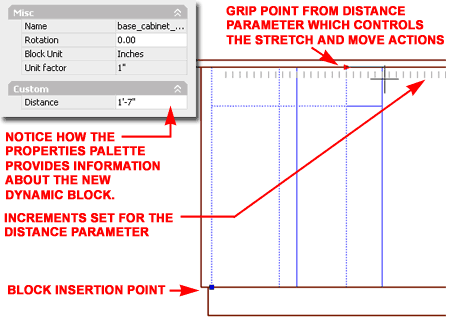
To make this basic cabinet face layout tool a little more interesting you may want to add a variety of division numbers. The one you have now only divides a distance into two equal parts but you may want three, four, five or more equal parts.
You can return to the Dynamic Block Editing mode of your Block by using the Block Editor context menu option or by Selecting the Block and Typing "BE" ( you can also type "BE" and Select the Block on a list).
On the Parameters tab of the Block Authoring Palette, Select the "Visibility Parameter" tool and position the Icon in a logical location for accessing a menu on your Block; like a lower right or left corner.
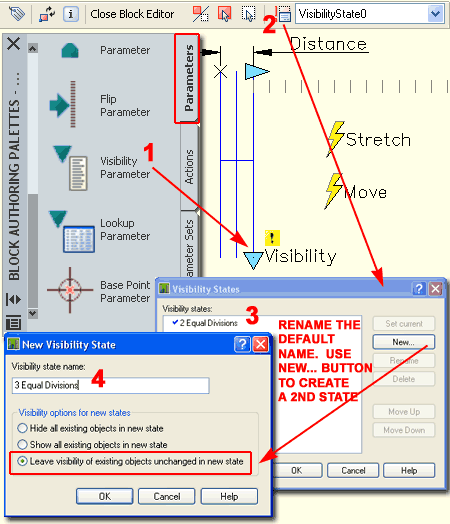
When you have placed the Visibility Parameter Icon, notice that a bunch of options automatically display on the Dynamic Block toolbar. Since the Default Name for the first Visibility State is "VisibilityState0", let's change that using the Visibility States dialog box - see illustration, right.
After Renaming the current Visibility State to something like "2 Equal Divisions", use the New... button to create a second Visibility State named something like "3 Equal Divisions". When creating the second Visibility State, I recommend that you set the radio button to "Leave Visibility of Existing Objects Unchanged in New State" so you basically create a copy of what you already have.
Visibility States are analogous to AutoCAD Layers specifically designed to work inside Dynamic Blocks. For ADT users, these "States" are also analogous to Display Representations.
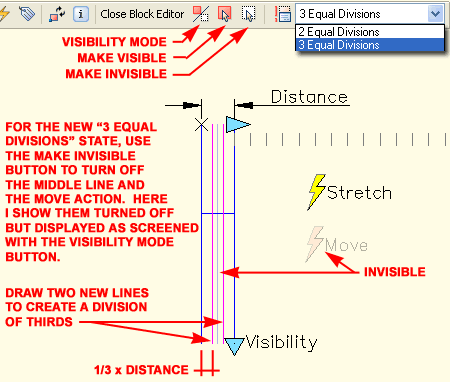
For the new "3 Equal Divisions" Visibility State, confirm that it is the current one by using the Visibility States drop-down list. Use the "Make Invisible" button to turn off the Move Action icon and the middle line as illustrated to the right. By making these two items Invisible or Off, they will not display when the Dynamic Block is set to this particular Visibility State. By using the "Visibility Mode" button you can see Invisible Objects to make them Visible again or simply to use them as references for new work.
To make 3 equal divisions, two new vertical lines need to be drawn as illustrated to the right in magenta. The two new lines should be drawn at a point 1/3 of the total distance between the two outer cabinet edges.
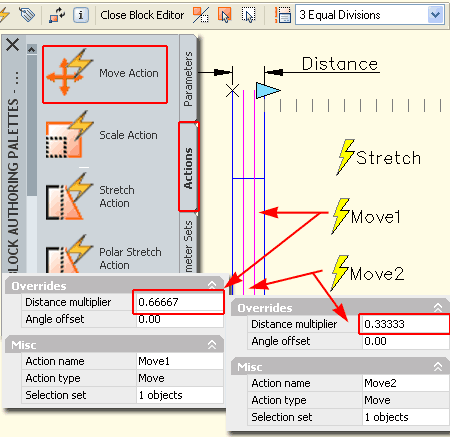
For the new "3 Equal Divisions" Visibility State, new Actions need to be set for the new lines and though they are similar to the Move Action originally set for the middle line, these will require new "Distance Multipliers".
Illustrated to the right I show that I have added two new Move Action icons; each used the Distance Parameter. One Move Action controls the movement of one of the new lines while the other controls the second vertical line. For the line closest to the right, I show that I used a Distance Multiplier value of 2/3 or 0.6667 and for the line closest to the left, I show that I used a Distance Multiplier value of 1/3 or 0.3333.
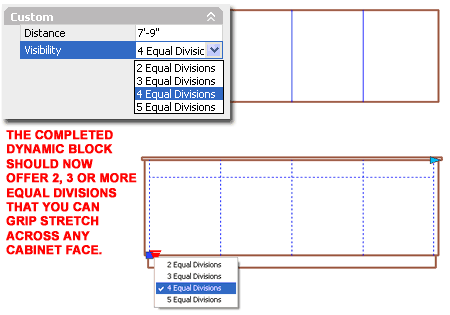
If your brain has caught on to the system employed here, you can probably imagine the work required to make 4, 5, 6 or more equal divisions now.
After Closing the Block Editor and Saving the changes, test the results and see if they come close to the illustration to the right.
To the right I show that I have placed my new Dynamic Block for base cabinet layouts over a basic cabinet outline. By using the Distance Parameter Grip tied to the Stretch Action, I show that I have Stretched the Block all of the way to the opposite side of my cabinet outline (allowing a little distance for fillers on either side) and used the Visibility States menu to set one of several division options I designed based on the discussion above.
Hopefully the information and example I shared in this article has inspired you to create some really cool tools with Dynamic Blocks. You can expand on what I started here and probably take the work to places I have not considered.
For the Kitchen Cabinets 6 eKit, soon to be released for ADT 2006, I have created some Dynamic Block tools that take this example a bit further by offering swing lines, flipping, high and low detail, cabinet variations and even muntins.
