Most architects and designers realize that a dimension value is not always enough to cut the mustard for actual field work and often find that they need to add or modify AutoCAD's Dimension Text. I find it truly unfortunate that when you double-click on a dimension, you get the Properties Dialog or Palette instead of the more obvious need: the Mtext Editor. Since modifying the default double-click response can be a bit of work and since getting the Mtext Editor only forces you to type the same text over and over, we can get a little smarter about the problem and develop a fast solution that I am sure you will love.
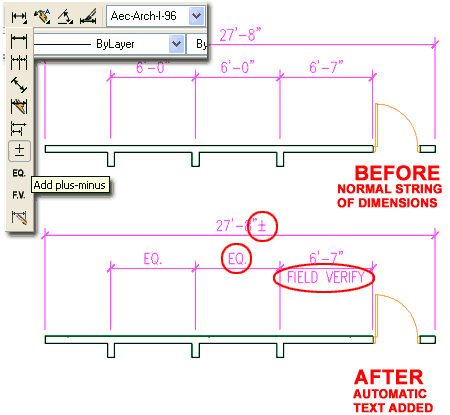
Illustrated to the right I show a snipped of ARCHIdigm's latest PowerSTRIP 4.0 for ADT 2004 where users will now find four new dimension buttons offering automatic "+/-", "EQ.", "Field Verify" and the option to Clear any of these changes. In our beta testing, users have informed us that these are great so we decided to teach all of our readers how to create these for your own use.
Also illustrated to the right are examples of what these new commands can do to typical AutoCAD dimension strings. As you may notice, two add text and one replaces all of the text. You might also notice that the "Field Verify" statement is automatically inserted below the dimension line without breaking it - read further to learn how this is achieved.

The fact of the matter is that it is quite easy to add Prefixes and Suffixes to AutoCAD Dimension Text inside and outside the Dimension Style; as part of the Style or as an Override. The problem, however, is that we don't always want the same Suffix or Prefix and sometimes we need to change or remove the text that was added. Because of this need to have a more dynamic relationship with the text, most simply use the Mtext Editor to Add, Remove or Change text on a Dimension but this is really really frustrating when you have fifty or more "EQ"'s or "Field Verify"'s to add to a drawing.
The first step in getting smarter about making this process easier to deal with is to look at AutoCAD options for working with Dimension Text: namely, the "DimEdit" command.
If you type "Dimedit" on the command line, you will be prompted to select one of the following options: "Home, New, Rotate or Oblique". To change text, you would use the New option to get this prompt: "Dimension text <"<>">".
As many users have learned by accident, if you take away the "<>" for dimension text, you loose the value so in most cases you will probably want to keep the value and simply add a suffix or prefix to it. In order to achieve this effect, simply keep the brackets in the new text statement; something like "<>&&P". The "%%P" is a Unicode String for the "+/-" symbol.
Another example of text might be: "<> - Typ. U.O.N.". When you write this text in for the New Text prompt on the command line, don't add the quotation marks that I show here.
Once you have specified what you want for the New Text, hit the <Enter> key and you will now be prompted to Select one or more Dimension Strings to Change. Isn't that pretty cool!

The next step in making this process even easier is to write some very basic LISP code that automatically inserts common text statements and then you'll really be flying.
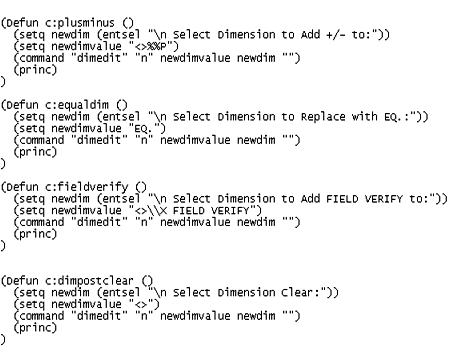
Illustrated to the right is the actual Lisp code from our PowerSTRIP 4.0 menu that you can highlight, copy and paste into your custom lisp file or .mnl file.
If you aren't sure about how to load a lisp file, you can copy the text, paste it into a blank Notepad file and save this file with the extension of ".lsp" to some logical folder on your computer. In AutoCAD, you can then use the "AppLoad" command to load this file and use the routines. Each routine is activated by typing the name following the "c:" statement; e.g., plusminus, equaldim, etc.
If you are completely Lisp Challenged, fear not; here's what you can do: copy a portion of one routine and paste it into a new button on your toolbar. Here's what you copy, for example:
For the first routine, the "plusminus" one, just copy this:
(setq newdim (entsel "\n Select Dimension to Add +/-
to:"))
(setq newdimvalue "<>%%P")
(command "dimedit" "n" newdimvalue newdim "")
(princ)
)
After you paste this information into a custom button, you will be able to pick on that button to activate the routine and viola. The big difference is that when you don't use a button, you actually have a defined command so you can type "plusminus", for example, to activate the routine.
(Defun
c:plusminus ()
(setq newdim (entsel "\n Select Dimension to Add +/- to:"))
(setq newdimvalue "<>%%P")
(command "dimedit" "n" newdimvalue newdim "")
(princ)
)
(Defun c:equaldim ()
(setq newdim (entsel "\n Select Dimension to Replace with EQ.:"))
(setq newdimvalue "EQ.")
(command "dimedit" "n" newdimvalue newdim "")
(princ)
)
(Defun c:fieldverify ()
(setq newdim (entsel "\n Select Dimension to Add FIELD VERIFY to:"))
(setq newdimvalue "<>\\X FIELD VERIFY")
(command "dimedit" "n" newdimvalue newdim "")
(princ)
)
(Defun c:dimpostclear ()
(setq newdim (entsel "\n Select Dimension Clear:"))
(setq newdimvalue "<>")
(command "dimedit" "n" newdimvalue newdim "")
(princ)
)
If you comprehend the basic logic of each Lisp routine, you'll soon realize that you can copy and modify one to create all sorts of quick routines to work with Dimension Text.