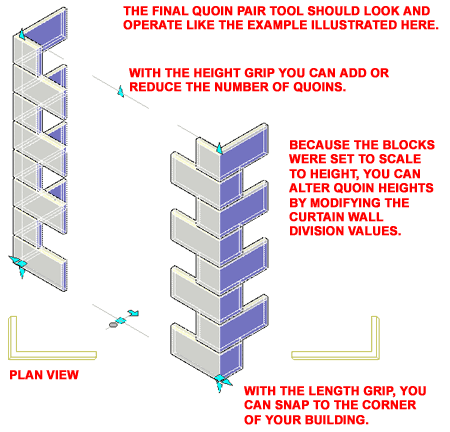
How do you make quoins in AutoCAD Architecture?
The answer is that it depends on a variety of factors including the knowledge of the person working with the customized solution. I remember way back in ADT 3 days making due with solid model forms, manually stacked, but I think just about anyone can improve on that method. For this article I am going to discuss the steps involved in using a Curtain Wall Style to create a two-sided quoin tool (or quoin pair tool, as I like to call it). You can, however, use a Structural Member as many do but that will only create a single column of quoins.
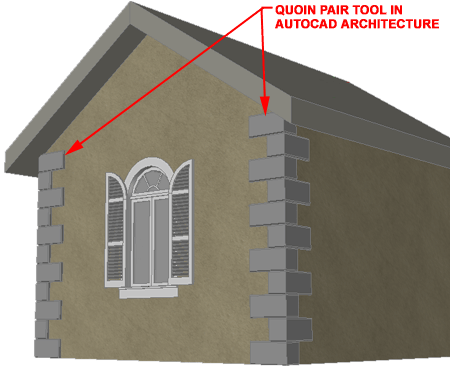
Though you could create the 3D quoin models at the end of this exercise, you might as well start with the most exciting part of the work.
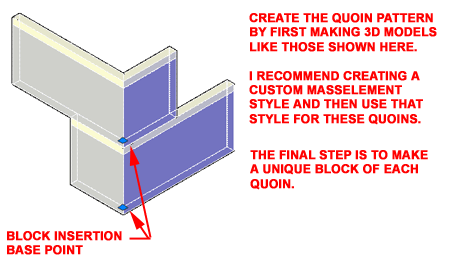
Illustrated to the right I show that I used Solid Modeling commands in AutoCAD Architecture to create a single corner quoin in the shape of an "L" with chamfered outer edges. I also created a new "MassElementStyle", named it "Quoins" and used the "MassElementConvert" command to change the Solid into a Mass Element.
When I completed the first quoin, I Copied, Mirrored and Rotated it to create the second one. For this exercise I will use two identical quoins but you can have more variety if you need it.
The last step is to use the "Block" command to make two unique Blocks with two unique Names using the inside bottom corners as the Insertion Base Points.
Note:
My example quoins are 12Wx24Lx12Hx2D. The Height is particularly
relevant in the
numbers used for this example exercise.
Now that the fun part is over, we have to create a custom Curtain Wall Style that will manage the quoin Blocks.
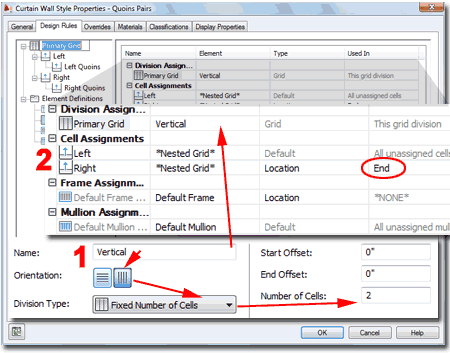
1 Illustrated to the right I show that I created a new Curtain Wall Style that I named "Quoin Pairs". For the Primary Grid I used the default "Vertical Division" (somehow the "Division" part of the name was removed in my illustration) but changed it to "Fixed Number of Cells" and set the Number of Cells to "2". This creates a pair of Cells: one for the Left and one for the Right.
2 Under Cell Assignments, I changed the default name to "Left" and created a new Cell Assignment that I named "Right". I set each to a "*Nested Grid*" which will create new sub-divisions. Notice that I set the Location for the "Right" Cell to "End" under the "Used In" column - this is very important because the quoin Blocks on the Left will have to be flipped when used on the Right side.
Note:
Notice that I have set the Frame Assignment
to a Location of "*NONE*"
and repeated this for all other Divisions so no Frames are used. I
also set the Default Mullion
Width to
0" so no Mullions will
appear.
Now we'll work on the Left Cell Assignment.
1 Illustrated to the right I show that I selected the Cell Assignment labeled "Left" and created a new Division Assignment that I named, "Two Quoin Division". You can use the default "Horizontal Division" but you might want to rename it to make it easier to follow along with this exercise. The "Two Quoin Division" has been set to use the "Horizontal" Orientation with a Fixed Cell Dimension of "2'-0" (24"). This Division represents the space both quoins use and I based the value on two equal sized quoins that are 12" high.
2 Under Cell Assignments, I changed the name of the default Cell Assignment to "Left Quoins" and set it to "*Nested Grid*". This allows me to define what happens within the 2'-0" of Horizontal space that I just created.
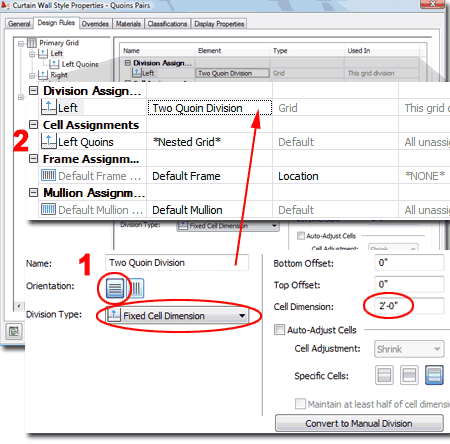
Now we'll work on the Left Quoins Cell Assignments.
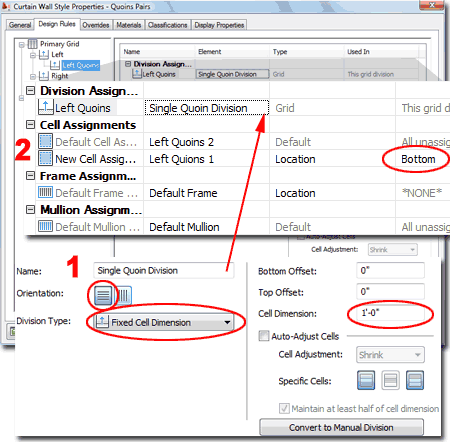
1 Illustrated to the right I show that I selected the Cell Assignment labeled "Left Quoin" and created a new Division Assignment that I named, "Single Quoin Division". This Division has been set to use the "Horizontal" Orientation with a Fixed Cell Dimension of "1'-0" (12"). It represents the space each quoin will use and the value is based on two equal sized quoins that are 12" high.
2 Under Cell Assignments, I left the "Default Cell Assignment" name alone but set the Element to a New Infill that I named "Left Quoins 2". I then created a second Cell Assignment, left its name alone but set the Element to a New Infill that I named "Left Quoins 1" with a Location of "Bottom". These two Infills are actually place-holders for the quoin Blocks. It is important to keep track of all four quoins used in this exercise; one for left bottom, one for left top, one for right bottom and one for right top.
Repeat the work outlined here and in the discussion immediately above for the Right Division. For the Right, use the same "Two Quoin Division", create a new Cell Assignment name it "Right Quoins" and set it to a "*Nested Grid*". For this Division, use the same "Single Quoin Division" and use two Cell Assignments but create two new Infills named "Right Quoins 2" and "Right Quoins 1" (for "Bottom").
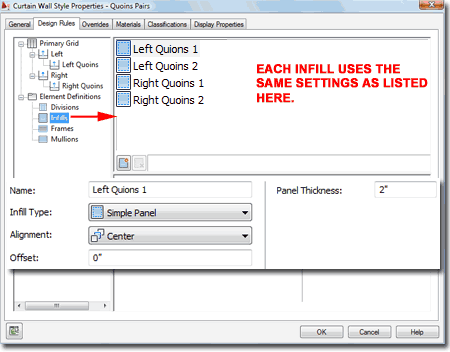
Illustrated to the right I show that I am reviewing the collection of Infills used as quoins in this Curtain Wall Style. For each Infill, the Panel Thickness has been set to match that of the quoin but this value doesn't matter since you cannot use the "Scale To Fit" Depth value on a Block that is "L" shaped. You could, however, use it if your quoins don't wrap around a corner but are just flat.
The Center Alignment works as the Block Insertion Point because there is no Frame Assignment (basically equivalent to a zero width Frame).
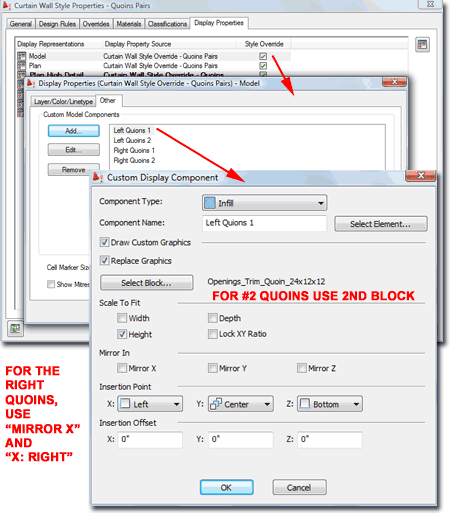
Illustrated to the right I show that I have gone to the "Display Properties" tab for my "Quoin Paris" Curtain Wall Style and placed a Style Override for the "Model" Display Representation. In fact, I have actually placed a Style Override on all of the Display Representations because I want this Style to show my quoin Blocks under every Display Rep.
For the Model Display Representation Style Override, I show that I have gone to the "Other" tab and used the Add... button to access the "Custom Display Component" dialog box. For the first quoin, I set the Component Type to "Infill" and used the "Select Element..." button to pick the one I named "Left Quoins 1" (this is the bottom one). I checked the "Draw Custom Graphics", "Replace Graphics", selected the Block and checked the "Height" box under the Scale To Fit section. The Insertion Point is Left, Center, Bottom with no Insertion Offset values.
Repeat this work for the upper left quoin by using the Component Name, "Left Quoins 2" and the second Block name. All other settings are the same.
Repeat this work for the right quoins. Use the Mirror X checkbox and set the X - Insertion Point to "Right". All other settings should match the previous two.
After all the hard work, you should find that you have a pretty slick quoin pair tool. You will probably want the quoins in all of your Model and Elevation Display Representations but you can tinker with Plan Display Representations to produce, for example, a Low and High Detail look. In this example I just used the bottom quoin Blocks for my Plan Display Representation Overrides and set the Cut Plane to 6" (lazy me).
This example is now available to customers who have an eKit account to our OSMOSIS website. You can get a year of access to this website by purchasing any of our eKits (not eParts).
