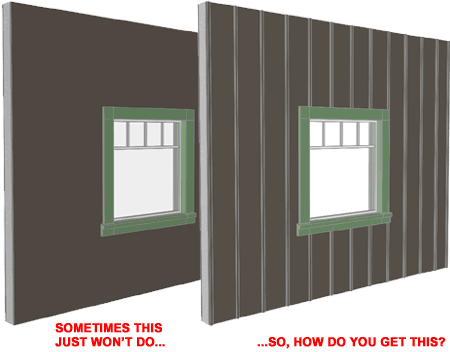
Well, I guess there really isn't a problem but there are times when it would be nice to have the seams of standing seam materials or wooden battens display correctly in all views as opposed to relying on a combination of 2D hatch patterns and bump maps.
In the illustration to the right I show a shaded view of a Wall Panel with vertical seams or battens and I think it makes quite a difference; particularly when presenting images to a client.
In this article I will go through the primary steps involved in using Body Modifiers to Add seams to Objects like Walls and Roof Slabs. I don't recommend that you make this a common practice since the work is tedious and somewhat static but if the need calls for it, you may want to explore this solution.
If you have been reading my articles over the past few years you may have noticed that I am fairly fond of the Curtain Wall Object in AutoCAD Architecture. So, naturally I chose it to create a "Seam Tool" but you could try this trick with other Object Styles. Basically, all you want is something that repeats an extruded shape at the intervals that match your material.
In the illustration to the right I show that I have created a custom Curtain Wall Style that I have named "Standing Seams". I removed the default Nest Grid, set the Default Infill to a Thickness of 0" and removed the Top and Bottom locations for the Default Frame.
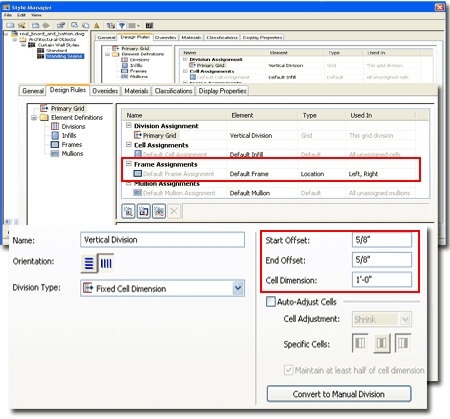
I set the Primary Grid to "Vertical Division", set it to a "Fixed Cell Dimension" and then I set the Cell Dimension to 1'-0". If you look at my illustration to the right, you should notice that I have set a Start and End Offset value to 5/8". I did this to compensate for the Width I intend to set for the Frames and Mullions (see below). This value is 1/2 the Width because Curtain Walls, by default, measure the first and last Division from the outside of the Frames.
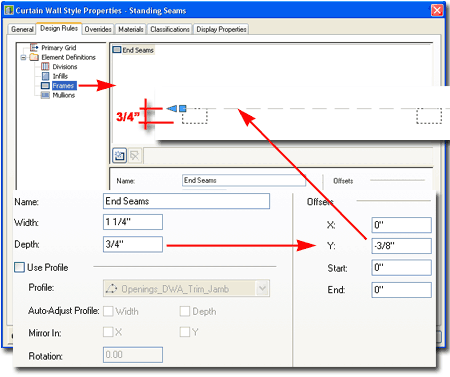
In the illustration to the right I show that I have changed the Default Frame name to "End Seams" and set the Width to 1 1/4", the Depth to 3/4" and the Y Offset value to -3/8". The -3/8" is 1/2 the Depth and negative because I want to be able to draw these seams from the back of the Curtain Wall Style.
You will need to repeat these settings for the Mullions.
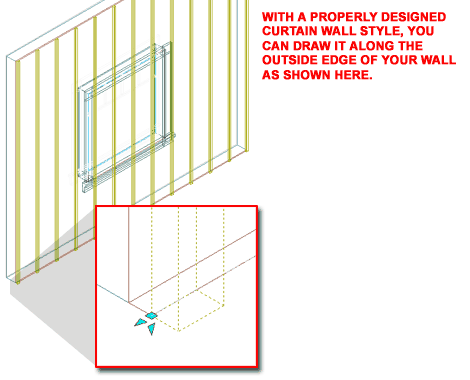
In the illustration to the right I show an existing Wall Object that already has a Window located in it. I also show that I have drawn my custom "Standing Seams" Curtain Wall along the outside edge of this Wall.
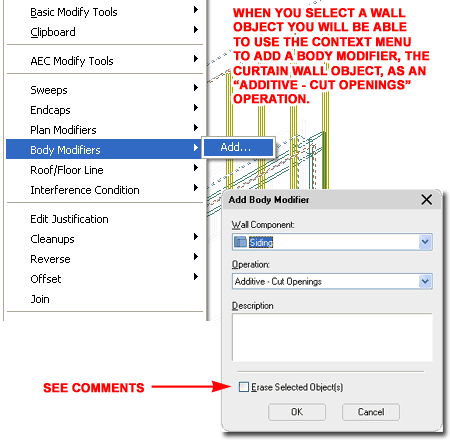
Once the "Standing Seams" Curtain Wall Object is in place, you can Select the Wall Object, right click and use the Body Modifiers fly-out to access the Add... context menu option.
In the illustration to the right I show that I have Added my custom Curtain Wall to my existing Wall as an "Additive - Cut Openings" Body Modifier. Also note that because my Wall Style uses multiple Wall Components, I selected the appropriate exterior component. The "...Cut Openings" option is important because you will want Doors and Windows to cut through this Modifier: that's the whole point of taking all of these steps.
Though you can choose to use the "Erase Selected Object(s)" option, it really isn't a good idea because you are likely to want the original Curtain Wall Object if changes occur to the Wall. The better solution is to put this custom Curtain Wall on a Layer that is non-printing and Off for the majority of the time.
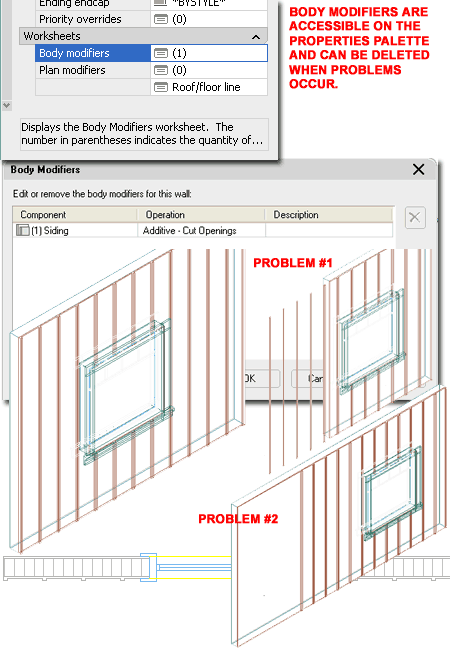
In the illustration to the right I show how a successful implementation of this trick should create a Wall Object that is pretty realistic. I also show a couple of examples of why this trick is not one you want to use very often.
The main problem with Body Modifiers is that they are static. When a Modifier is introduced to a Body in AutoCAD Architecture, it becomes a fixed imprint and thus when you Lengthen a Wall, for example, the original imprint remains as it was. Even when you Shorten a Wall, for example, the original imprint remains leaving things out in space.
Because of these problems, I suggest keeping the original Curtain Wall Object around and then reuse it when needed. By going to the Properties Palette, you can locate a Body Modifier and Delete it. Then, you can adjust the Curtain Wall Object to match the Wall Object and Add it as a new Body Modifier - I know, what a pain but it's the best trick I have come up with so far (Interference Conditions don't work).
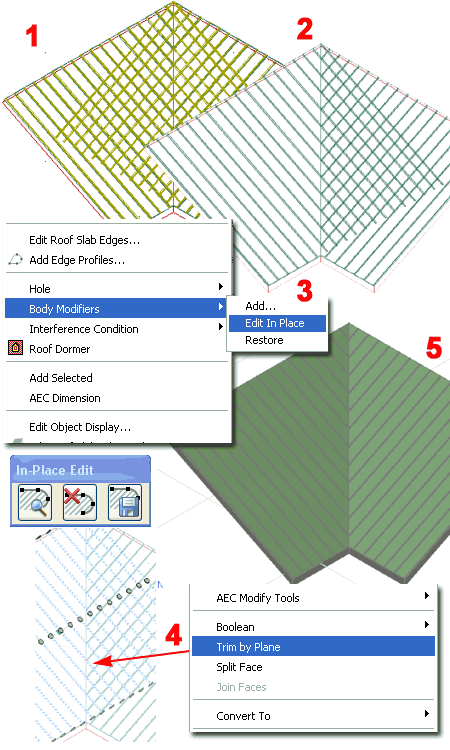
You can apply the trick discussed above on Slab Objects to create realistic looking standing seam metal roofs. To do this, requires a bit of dexterity with the UCS or the Align command because you will need to lay the Curtain Wall Object along the top surface of your Roof Slab Object.
In the illustration to the right I show that I have placed two Curtain Wall Objects on two Roof Planes that form a Valley.
By using the Body Modifiers fly-out, I Added the Curtain Wall to the Roof Slab just as described for the Wall Object above. Then, because the Slab Object has a 45 degree miter, I show that I had to go back to the Body Modifiers fly-out and use the "Edit in Place" option to "Trim by Plane" (use the 3 point option) the unwanted seams (which are actually Mass Elements now) at the same angle as the Valley.
If you added a Valley Flashing component I think this roof would be pretty impressive as long as the design doesn't change.