| Wall Surface
Modifications You can use numerous techniques to modify the surface of an ADT Wall object. There are elegant Wall Modifier Styles where you tediously massage a polyline shape into position and hard-core Massing solutions where you literally force a wall to accept another element as an interference object. The examples below on scratch the surface (pun intended). You can also work with endcaps and Wall components to modify the surface of a Wall object.
|
 |
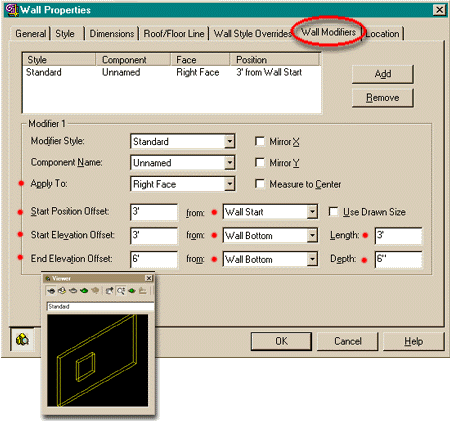
| A Basic Wall Modifier - Protrusion To start, you will need to create a simple ADT wall. My example is based on a Right Justified Standard wall, 6" wide, 8' high and drawn from left to right. Once you have a wall drawn, pick on it and then right-click on your mouse. This should bring up a pop-up menu with Wall Properties... as an option near the bottom. You can also type "WALLPROPS" on the command line to get the same command. On the Wall Properties dialogue box, pick the Wall Modifiers tab. On the Wall Modifiers tab section, set the following values: Modifier Style: Standard <default value> Start Position Offset: 3' <this value is directly related to the from: value
which I show set to Wall Start. This means that my protrusion will be 3' from the
Right Lower Corner of the Wall> Start Elevation Offset: 3' <this value is
directly related to the from: value which I show set to Wall Bottom. This means that
my protrusion will be 3' from the bottom of the Wall> End Elevation Offset: 6' <this value is
directly related to the from: value which I show set to Wall Bottom. This means that
my protrusion will stop at 6' from the bottom of the Wall> Length: 3' <this value will make my protrusion 3' long along the wall length> Depth: 6" <this value will make my protrusion 6" out from the right face of the wall>
|
 |
| A Basic Wall Modifier - Intrusion (niche) A generous reader contributed this solution. If you use the exact same values from the example above and then change only two parts, you will be able to invert the protrusion. Check Mirror Y and set a Depth value to anything less than the actual thickness of your wall. When I first tried this simple trick it failed because I did not realize that the depth must be less than your total wall thickness. This also means that you cannot use this technique to punch a hole through a wall even if your wall is made up of multiple walls or walls with cavities between them. |
 |
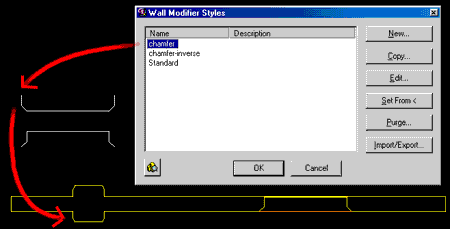
| A Named Wall Modifier For more flexibility in wall modifications, you can use Wall Modifier Styles to define a plan view shape that you can use to make a protrusion or intrusion. The trick is to use a non-closed polyline object, as illustrated to the right (white objects). From the Design pull-down menu, select Walls >. Go to Wall Tools > and select Wall Modifier Styles... or use the Wall Modifier Styles button on the Wall toolbar. You can also type: On the Wall Modifier Styles dialogue box, pick the New button and Name your modifier. Use the Set From < button to assign your non-closed polyline object as the modifier. |
 |
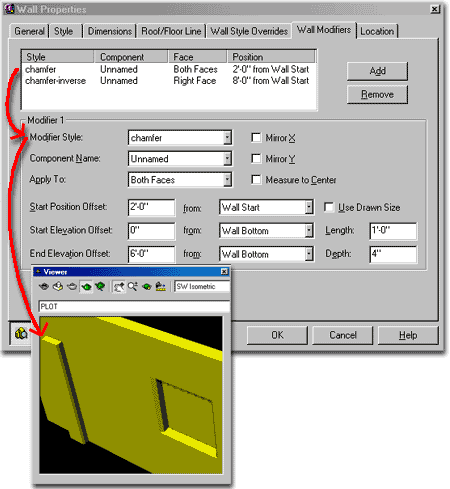
| Notice that I have two different orientations
on my example above. This is because the modifier's orientation actually plays a
role in how it affects your wall. You can also invert a modifier as discussed above,
so even if you create one that wants to be a protrusion, you can mirror it. Unfortunately, Wall Modifier Styles only affect the left and right sides of a wall and not the top and bottom; i.e., it is an extrusion on the surface of a wall object. So, if you attempt to create a chamfered edge for a protrusion or niche, only the left and right sides will have the chamfer. Of course there are other solutions and you can read about them below. |
 |
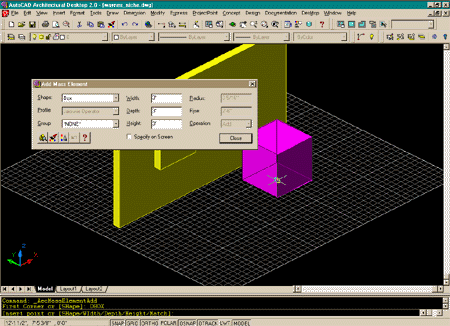
| Mass Elements as Wall Niches To start, you will need to create a simple ADT Mass Element. In my example, right, I created a 3' (three foot) cube with with the Box Shape. Once you have your Mass Element, move it so that it crosses through the wall; as illustrated below, right. |
 |
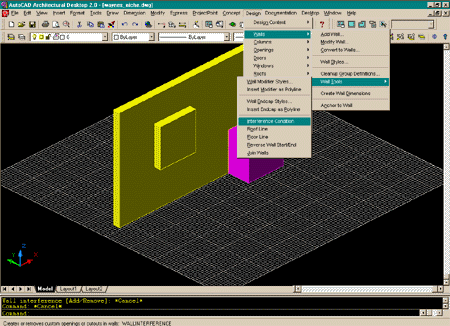
| Making a Mass Element a Wall
Interference Condition From the Design pull-down menu, pick Walls > and cascade down to Wall Tools > and then cascade down to Interference Condition. You can also type " _AecWallInterference". Now select your wall and then the Mass element and finish the command sequence as outlined below:
|
 |
| Just a test to see what we achieved
above... Just so you can see the results of the last step, I show to the right what the interference routine has done. I moved the Mass Element up and out of the wall leaving approximately 3" of recess. I then turned off the A-Mass layer.
|
 |
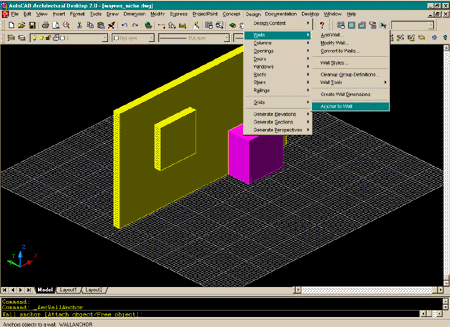
| Anchoring the Mass Element to the
Wall From the Design pull-down menu, pick Walls > and then pick Anchor to Wall. You can also type "_AecWallAnchor". Command: _AecWallAnchor This will anchor the Mass Element to the Wall object so that it will travel with the wall if you change the Wall's angle/direction or simply move the whole wall. |
 |
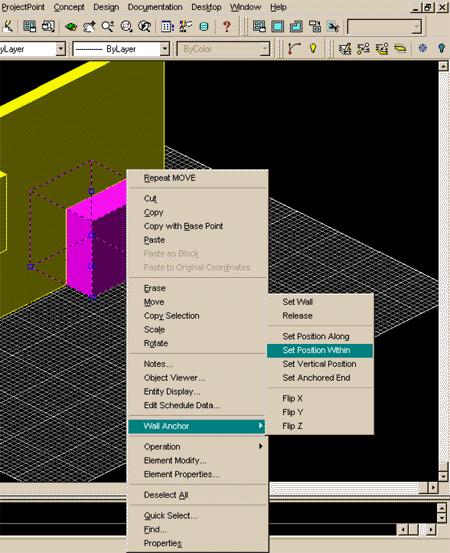
| Setting the Position of the Mass
Element Unfortunately, the result of anchoring forces us to use a special command to reposition it within the Y position of the wall. Try it, you can move the Mass Element in the Z-direction and the X-direction (along the length of the wall), but you won't be able to move it's center out so that only a niche is left. Strange, isn't it? So, pick on the Mass Element and the right-click on your mouse to get the pop-up menu shown, right. From the Wall Anchor > option, cascade over to Set Position Within and use the command sequence, below, as a guide: Command: CurveAnchorSetPositionY This can be a bit tricky and I must admit that I am still a little confused by how the positioning works. It appears that when you anchor a Mass Element to a Wall object, the Mass Element automatically gets centered on the base of the wall; i.e, the Mass Element X-Y plane's center is matched to the Wall Object's X or Y center (depending upon direction of the wall). So, when you attempt to Y adjust (Set Position Within) the Mass Element, the "Distance from point perpendicular to curve" value is really based on the center Y-center position; i.e, you're adjusting position from the center out. In my example, I specified a "Distance from point perpendicular to curve" value of 2" which moved my Mass Element 2" from the center of the wall's Y-axis toward the back (or left) side; leaving 1" of thickness on the back side of my wall. Notice that I specified a "Measure to" value of Inner edge. Notice that once you make this adjustment, you can only Grip Stretch the Mass Element in one direction from the wall. |
 |
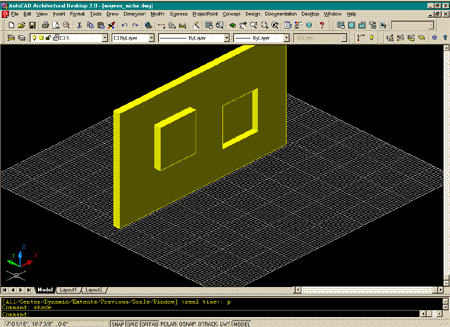
| Checking the labor and looking for a
Niche If you move your Mass Element up in the Z-axis within the wall and then turn off the Mass Element's layer (A-Mass, by default), you should see a niche similar to the one shown, right. Now, if you Grip the wall and change its direction you will discover why we went through all of the trouble to anchor and position the Mass Element. If you don't anchor and position it, it won't travel with the wall when you edit it. |
 |