...around doors, windows and openings.
Wall Display in
Plan View
...around
doors, windows and openings.
Comments by: Odin Cary
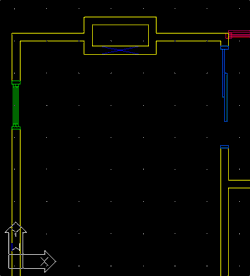
Architectural firms generally have their own style when it comes to how doors, windows and openings should look in plan view. Some prefer the wall lines to be displayed ( one or both ) and others prefer neither wall lines to be displayed in plan view.
ADT, by default using its "standard" walls, will display something like what is shown in the adjacent image; windows have walls going through them (marked "NO") and doorways are cleanly cut (marked "YES").
If you wish to change this mode of
wall representation, one quick solution is to simply modify the
wall style.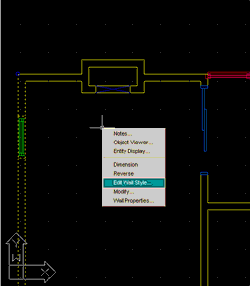
Pick on any wall and then right-click away from the wall and you should see a pop-up menu with Edit Wall Style... as an option.
Pick on Edit Wall Style... and you should see the Wall Style Properties dialogue box.
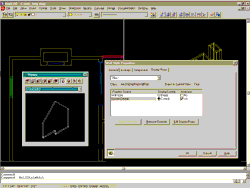
Pick on the Tab marked Display Props and you should see a button with Edit Display Props marked on it.
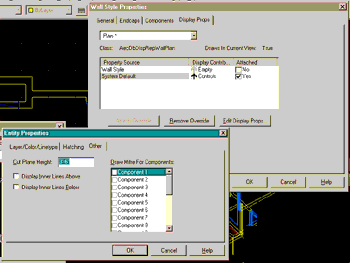
Pick on Edit Display Props and you should see the Entity Properties Dialogue box.
Pick on the Tab marked Other and you should see the Cut Plane Height text box. This value is obviously the altitude or height of where your plan view is cut.
You should also see two check boxes for control of inner and outer wall display. Check these, and you will always see the wall lines above.
Pick on the Tab marked Layer/Color/Linetype
and you should see, at the top of the list, Below cut
Plan and Above Cut Plan. Turn
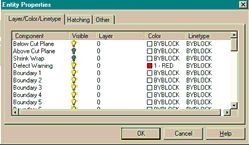 either of
these layer off any you will remove the display of lines above or
below the cut plane (as described above)
either of
these layer off any you will remove the display of lines above or
below the cut plane (as described above)
Knowing all of this, to get the walls to display in the way I consider the "traditional way", I verified my Cut Plane Height to be 3'-6" +/- and verified that both check boxes for inner and outer display were off. Then, on the Layer/Color/Linetype Tab, I turned off both the Below cut Plan and Above Cut Plan layers.