In ADT 3 - 3.3 Stairs can prove to be a frustrating and confusing display issue because while they span across multiple floors, ADT does not. This is not an isolated problem causing problems with Stairs alone, but actually just one part of the whole multiple floor problem in ADT. Most users employ the Xref system from AutoCAD to manage the multiple floor problem in ADT and though it leaves a lot to be desired, it also works rather well if you work with the limits intelligently. In this article we'll look at some options for dealing with Stairs as they are displayed from floor to floor of multi-floor structures.
To define the problem as simplistically as I can, the problem with stairs lies with the display system and how it relates to Xref's. If all stairs were live objects across all floors as might be the case in a Single Building Model, you could simply select any of them and Attach an Override for a "Down" Display or employ other similar Display Representation solutions but when Stairs come through as Xref'd objects, the options become more limited.
If you break down a display representation for an ADT object, you will see that there are basically three offerings: one for the object, one for the object Style and one for all objects in a family ( listed as "System Default" ). With this set of offerings, you can certainly design a set of stair objects to be the up stairs and others to be the down stairs but stairs tend to be drawn running a full flight, from landing to landing. When you draw a flight on one floor you typically want that flight showing the "UP" direction but when you show the next floor, that same flight is typically displayed in the "DOWN" direction. Switching a set of Stairs from Up to Down is actually rather simple and we'll look at that below but there is one more problem here. With multiple floors, stairs tend to go up and down and thus there is a need to have some stairs display as "UP" and others, even identical styles, display as "DOWN". This is where the problem really starts to get ugly, partly because there's no built-in solution and because you don't want to create a totally wacky solution that no users want to follow. Ideally, you want a solution so elegant that it just works and no one thinks there's really a problem. I wish I had that answer but we do have a fairly powerful option that is relatively painless to implement.
Before I elaborate on our most sophisticated option for dealing with this problem, I will outline two other options in progressive stages of complexity since not all users have the same issues nor the same level of patience and technical skill.
This is obviously the least sophisticated solution but does the job if you simply can't figure out any other way of solving how to get your 1st Floor Stairs to display as "DOWN" on the 2nd Floor Plan. With the Cut-n-Paste technique, you create the Stairs on the 1st Floor and configure them to display correctly for an "UP" Stair and then Copy them, Paste to Original Coordinates and configure this 2nd Floor Stair to display correctly for a "DOWN" Stair. After Pasting in Place, confirm Z-axis position to ensure that you have them at the right height relative to the 1st and 2nd Floor.
The biggest problem with this solution is that if you change the design in either plan, you will either need to repeat the whole process of Copying and Pasting or repeat the changes.
Under duress I have used this solution on simple residential projects and it hasn't been a problem but I don't recommend using it since far better options exist.
Below I will elaborate on how you make the display of Stairs change from "UP" to "DOWN". If you look at the illustration to the right, I show how you can Select a Stair Object, right-click on your mouse and access the object-specific pop-up menu. On this menu, you will find two paths to modifying an objects Display Representation: Entity Display... and Edit Stair Style. If you choose the Entity Display... option, you will go to the Display options directly and find one extra Property Source: one for the object selected.
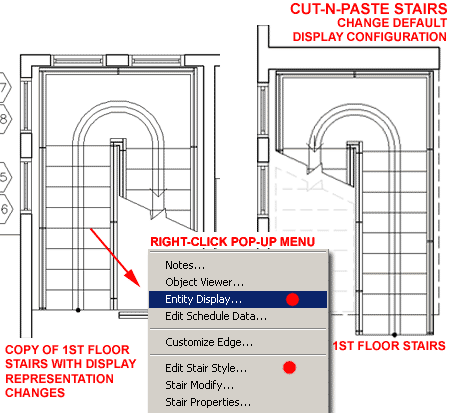
Illustrated to the right I show the Entity Display dialog box acquired by using the Entity Display menu option discussed above. On this dialog box, you should notice that there are three Property Sources instead of the normal two that you will find when accessing this dialog box through the Styles dialog. Because only one object has been select, the Entity Display dialog can offer the option to modify a single object ( in this case, the Stair ). Overall, what this means to you is that you can now Select any Stair object and make a decision about how you want to solve your "UP" and "DOWN" display needs.
If you Modify the System Default Property Source, then all Stairs that don't have Overrides Attached to them will change. If you Modify the Stair Style Property Source, then all Stairs of this Style ( that don't have Overrides Attached ) will change. If you Select the Stair Property Source, then only the selected Stair object will change.
In the illustration to the right, I show how I have Selected the Stair I Cut and Pasted earlier and Attached an Override on the Stair Property Source so only this Stair will be changed to a "DOWN" stair. The only benefit of this option is that it allows me to draw other stairs of the same style on the 2nd Floor as "UP" stairs. Occasionally we have the need for such a setup because of minor floor level changes, mezzanines and so forth ( not floor levels as in a 3rd floor ).
The fastest option is to modify the System Default and then all Stairs that don't have Override Attached, will change.
Hopefully this makes sense and sets you on your way to going to the next level of comprehension. As you can probably discern, it would make a lot more sense to have the 1st Floor Stairs pop in from the 1st Floor rather than work with a Copy of them - That's the next step.

This solution is limited because all we are modifying is the "Plan" Display Representation so that 1st Floor Stairs display as "DOWN" when Xref'd into a 2nd Floor Plan. This also means that any Stairs drawn on the 2nd Floor will also display as "Down" so this option is limited to 2-story structures.
If you need to add Stairs to the 2nd Floor that display as "UP" but not to an entire new floor, you can use a Stair Style or Stair Object Override to make one or more Stairs display as "UP" even though the default Display is set to 'DOWN".
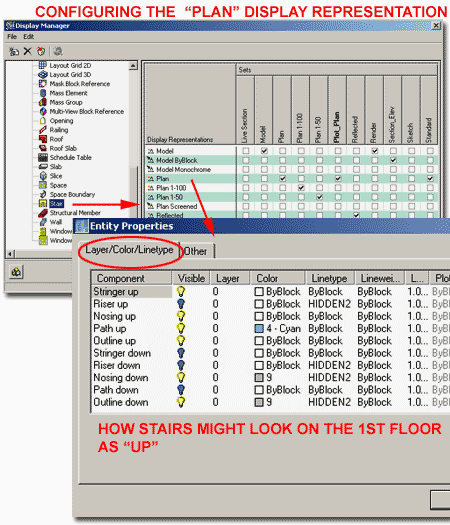
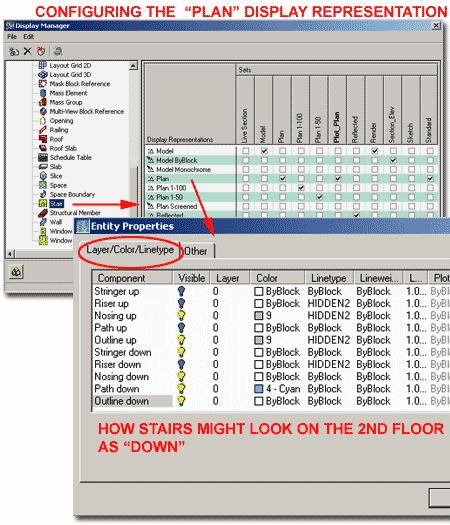
Illustrated to the right I show how you can use the Display Manager to access the "Plan" Display Representation for All Stairs in a given drawing file. This is similar to using the Entity Display... and Edit Stair Style options discussed above but doesn't require that you actually have any Stair objects drawn yet. In other words, this is the way you set things up in a Template File ( more on this later ).
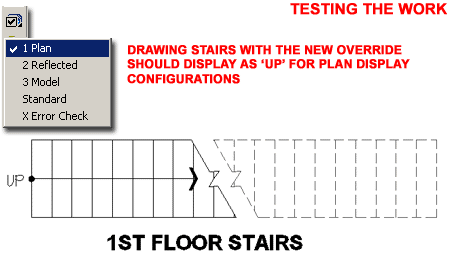
When you Edit the Plan Display Representation for Stairs, you will need to configure your Entity Properties so they display as you would like as a default for the 1st Floor. Illustrated to the right I show one example of how we often display our "UP" Stairs. Keep in mind that you can also use the "Other" tab to make more display modifications for things like the Cut Plane height, the Arrows and even the Break Mark. You can all of the information on this stuff in our Architectural Desktop Development eGuide.
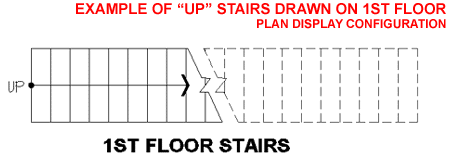
Illustrated to the right I show what the 1st Floor "UP" Stairs might look like in your drawing. The next step is to get these same stairs to display as "DOWN" when they are Xref'd into the 2nd Floor Plan.
Note:
Since "UP" Stairs are now the default in the 1st Floor Plan, you may
still need to draw some that display as "DOWN". Typically we always draw
"UP" Stairs and add any "DOWN" stairs for a 1st Floor, to the Basement
or Foundation Plan. If this is not an option for you, you can Attach an Override to
a single Stair object as discussed in Part 2 above.
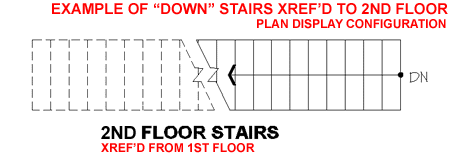
Once you have your 2nd Floor Plan ready to accept an Xref of the 1st Floor Plan, go ahead and Xref the 1st Floor drawing file into the 2nd Floor and Freeze all of the Xref layers except the Stair ("XrefName|A-Flor-Strs"). The 1st Floor Stairs should display as either "UP" Stairs as they were set for the 1st Floor or, depending upon your template file, as the default "UP and DOWN" stairs that ADT likes to display.
To change the Xref'd 1st Floor Stairs to display correctly on a 2nd Floor Plan, you will need to revisit the Display Manager as discussed earlier and change the "Plan" Display Representation for Stairs to display as "DOWN".
Illustrated to the right I show one example of how we often display our "DOWN" Stairs. Keep in mind that you can also use the "Other" tab to make more display modifications for things like the Cut Plane height, the Arrows and even the Break Mark. Yes, this means that you can either invert the settings you had for the "UP" display or use very different "DOWN" display settings for those same stairs ( a really handy option ).
Note:
The drawback is that all stairs drawn on the 2nd Floor will now display as
"DOWN" unless you employ an Override. But again, this solution was meant
for two story structures and thus should work well for you if that's what you do. If
you make these display changes in template files ( one for the 1st floor and one for the
2nd floor ), there won't be much to think about on the next project.
Illustrated to the right I show what the 1st Floor "UP" Stairs might look like once Xref'd into the 2nd Floor and after the "Plan" Display Representation has been modified as discussed above. Now any stairs drawn on the 1st Floor will automatically change to "DOWN" stairs in the 2nd Floor Plan.
| Download | stair_ex1.zip |
If you have come this far in this article, then get ready for some fun with ADT logic. The following option simply expands on the options discussed above but it also relies on some trickery.
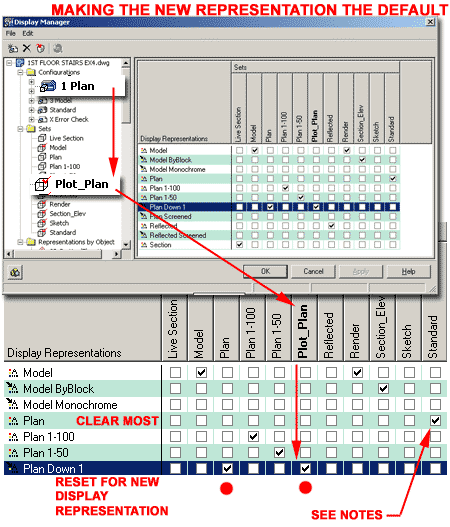
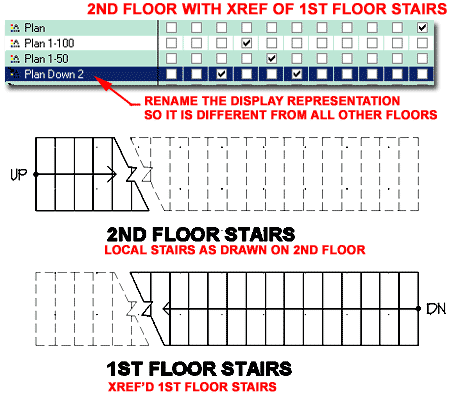
Illustrated to the right I show how you can create a new and unique Display Representation for Stairs using the Display Manager. To make this new Display Representation, highlight the Plan Display Representation, right-click and use the Duplicate option on the pop-up menu. Once you have created the Duplicate, Rename it to something indicative of the current floor level ( such as Plan Down 1" ). I have used the term "Down" in the name to indicate what the Display does to the Stairs. The number is very important here so make sure you include that in the name because we are going to change that number for each floor.

For the new Stair Display Representation we just created, double-left-click to open the Entity Properties dialog as illustrated to the right. Configure your Stair Display for the way you want your "DOWN" Stairs to appear.
Illustrated to the right I show how we generally set our "DOWN" Stairs but you can of course alter the settings to meet your preference.

For this next step, we want to make the new Stair Display Representation the Default by Unchecking All or Most of the Display Sets where "Plan" is used and setting them to "Plan Down 1" instead. Basically, we are just using our own custom Display Representation instead of the default "Plan" and the reason for this will become more obvious further along.
Note:
In the illustration to the right I show that I have left "Plan" checked for the
"Standard" Display Set and you can do something similar if you want a way to see
your Stairs in the default Display Representation.
If you draw a Stair in your current drawing right now, it should Display as a "DOWN" stair. This is the Display we will want for all other floors but not for this floor so we will need to Attach Overrides for any stairs that need to be displayed as "UP". This may seem like a lot of work but it isn't that bad and once you have made all of these settings to one Template File, you will be set for All Floors on all future projects.
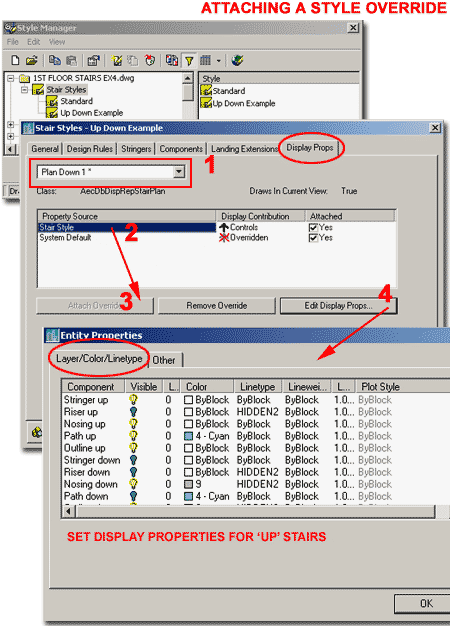
Illustrated to the right I show how you can use the Style Manager, filtered for Stairs, to create new or modify existing Stair objects. For any stair that you want to display as "UP", you will need to use the Display Props tab of the Stair Styles dialog and follow the steps outlined to the right.
1 ) Make sure that you are Modifying the Display Representation for the New Stair Display and not "Plan" or any of the other Display Representations. This should be the current Display Representation and if it isn't, there might be something wrong in your file.
2) Highlight the Stair Style Proper Source and use the Attach Override button and then use the Edit Display Props... button to access the Entity Propertied dialog.
3) On the Entity Properties dialog box, modify all settings for your "UP" Stairs.
If you've followed everything correctly as outlined above, you should now see any Stair Style that has the Override Attached, as "UP" and these will automatically display as "DOWN" in all other drawings.
Save this file as your 1st Floor.dwg and then Save it again As your 2nd Floor.dwg. This process will keep all of the unique Stair settings that we just created so you will have them for all other floors. Once you have tested this system and gotten everything to work just the way you want, these settings should be added to your typical Architectural Desktop Template File. And, in that template file you will need to have your basic set of Stair Styles set to use the Override discussed above.
In the 2nd Floor.dwg drawing that we just saved, you can Erase or Move the 1st Floor Stairs. If you Move them, you can think of them as 2nd Floor Stairs that go up to the 3rd Floor. Use the Xref command to bring in the 1st Floor.dwg drawing and you should notice that the Stairs display as "UP". To fix this display problem, simply go to the Display Manager and Rename the custom Display we created earlier ("Plan Down 1") to something like "Plan Down 2" for second floor. If you recall, when I first discussed this custom Display Representation, I suggested naming it "Plan Down 1" and it is this little renaming trick that creates the magical results. As soon as you have renamed the Display Representation, you should see the 1st Floor Stairs display as "DOWN" while the non-Xref'd Stairs will continue to display as "UP".
If you repeat this process over and over for as many floors as you want and Rename the custom Stair Display Representation for each floor, you will have a system that displays all Stairs below as "DOWN" and all new Stairs in the active drawing as "UP".
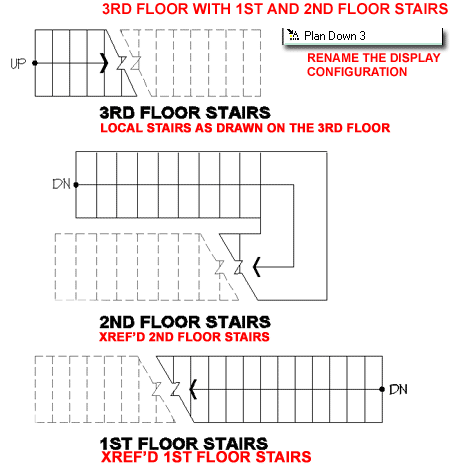
Illustrated to the right I show a 3rd Floor.dwg example where I have used the Display Manager to Rename the custom Stair Display Representation to match the Floor Number: "Plan Down 3".
For your template file, the only thing that a user will need to remember is that they have to rename the custom Stair Display Representation to match the Floor Number.
How and Why:
This trick works the way it does because of two factors: we are using a unique Display
Representation and we are confusing ADT by renaming it in each Floor File. Since the
default "Plan" Display Representation cannot be renamed, it cannot be used to
achieve this result and that's why we created a new one that acts like a copy of
"Plan". If we don't rename it for each floor, the Stairs will display
according to their Override for that Display ( as "UP" ) but since we Rename the
Display Representation the Override cannot function and the Stair Display reverts to using
the Current Display Representation ( which is set as "DOWN").
This is a great trick to know about for two reasons: one, you can employ it to your advantage and two, it explains a lot about why some display representations don't come through with Xref's. In other words, be careful about creating custom Display Representations because they can certainly bite you unless you transfer them to all of the files in a project set.
| Download | stair_ex2.zip |
The last solution in this discussion uses a technique that appears to be the most popular among the "gurus". In simplistic terms, this solution reduces most of the automation in Display Representations back down to AutoCAD Layer Management issues ( like a Block ) by dividing the "UP" components from the "DOWN" components into Layers. To alleviate redundancy and potential for error, this solution also separates Stairs into their own File so they can be Xref'd to the plans that need them ( typically the two floors the the stairs span ).
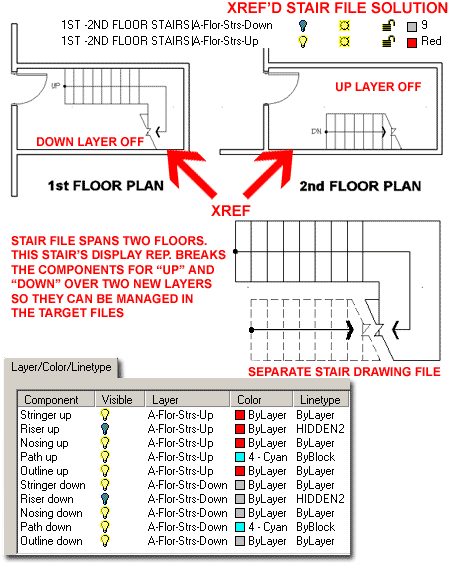
Illustrated to the right I show an example of a 1st Floor Plan and a 2nd Floor Plan that both need to show the same Stair Flight. By drawing the Stair in a 3rd File, just for the Stairs, it can be Xref'd into the two Floor Plan files so both plans use the same Stair Object. In order to have the Stair Display as "UP" in the 1st Floor Plan and "DOWN" in the 2nd Floor Plan, you Modify the Stair Style Display Representation so that the "UP" Components are controlled by an "UP" Layer and the "DOWN" Components are controlled by a "DOWN" Layer. When Xref'd in, these Layers can be adjusted ( turned On, Off, Frozen or even Changed ) to display as "UP" or "DOWN" ( see illustration to the right ).
Here are the basic steps:
1) Draw the Stairs in the 1st Floor Plan as you need them.
2) WBlock the Stairs to create a New File using a 0,0 insertion Point and Delete the original.
3) Open the new Stair File and Add two New Layers: one for "UP" and one for "DOWN". Illustrated to the right, I show "A-Flor-Strs-Up" and "A-Flor-Strs-Down". You need two layers because A-Flor-Strs is the insertion Layer and if you Freeze it, all of the Components disappear.
4) Modify the Display Representation for the Stair Style or System Default so the Components for "UP" are controlled by the "UP" Layer and the Components for "DOWN" are controlled by the "DOWN" Layer ( see illustration, lower right ). Make sure to set the Color controls to "ByLayer" for any of the Components that you may want to control by Layer. This, for example, would allow you to show the "UP" or the "DOWN" as gray screened dashed lines if desired.
5) Xref the Stair file into the 1st Floor Plan using 0,0 as the Insertion Point and Turn Off or Freeze the Xref-Down Layers ( such as "1st-2nd FLOOR STAIRS|A-Flor-Strs-Down", for example where 1st-2nd FLOOR STAIRS is the name of the Stair drawing file.
6) Xref the Stair file into the 2nd Floor Plan using 0,0 as the Insertion Point and repeat similar steps as outlined in step 5.
7) Repeat all of this work for each set of Stairs for each pair of floors using separate Stair drawing files named for the floor levels they span.
If Spanning Stairs across multiple floors has been and continues to be a battle for you, try working with the options outlined in Parts 5 and 6. I have included a downloadable set of files that demonstrate how to work with the solution outlined in Part 5 and hope that you find it as good as we do. Though the solution outlined in Part 6 has the popular vote, we don't find it as practical as the one in Part 5 because it keeps the stairs out and away from the inner workings of our buildings and makes it more difficult to make Stairs and other objects interact. Depending on what your needs are, you may end up employing both solutions.
Ultimately, I hope that by discussing these different solutions your eyes will be open to more options and possibilities so you can make the best out of something that stinks. Architectural Desktop 4 shows dramatic promise for improving the Xref relationship in multiple floor files but the Stair display has yet to be resolved and thus your creativity is required. I hope that one of these solutions improves your situation.