"What's the big deal", you say, "it's only a pier block?"
I guess it's not that simple because I've seen a number of wacky solutions by Architectural Desktop users or this simple object and thus I have decided to go over structural member shapes once again while adding some information about the use of Anchors.

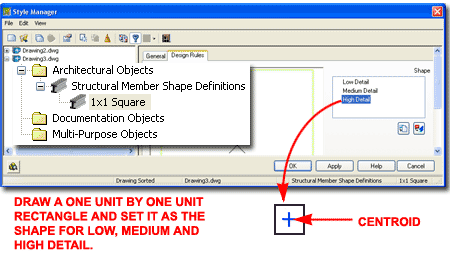
Every ADT user should have one basic custom MemberShape in their library: a one-by-one square. With a single one unit square, you can create all of the square shapes you want.
Illustrated to the right I show that I have used the "Rectang" command to create a one inch square. Using the "MemberShape" command I activated the Style Manager where I have to Select and specify the base point of my custom shape for the Low, Medium and High Detail Display Representations.
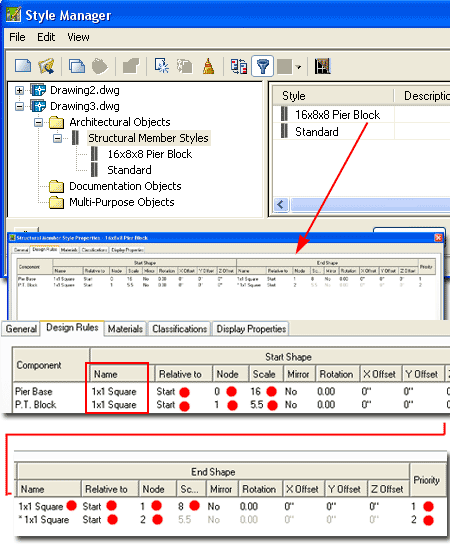
Once you have created a custom 1x1 Member Shape, use the "MemberStyle" command to activate the Style Manager as illustrated to the right.
In the illustration to the right I show that I have created a new member style name of "16x8x8 Pier Block" and activated the "Structural Member Style Properties dialog". This dialog is really wide so I had to break it up into two parts.
Under the Design Rules tab I show that I created two Components that I named "Pier Base" and "P.T. Block". You could add more Components, such as Column and/or Footing.
The Start Shape of the Pier Base uses the 1x1 Square created above from the Start of Node 0 with a Scale of 16. Because the square is 1 unit by 1 unit, the Scale of 16 makes it 16"x16". For the End Shape portion of the Pier Base, change the "*1x1 Square" to "1x1 Square"; the difference is the asterisk and the change frees up the End Shape settings. Because a standard precast pier block is tapered, the End Shape will be smaller as it is at the top of a pier block. Set the Relative to value to "Start", the Node to 1 and the Scale to 8. The Priority can remain at 1.
Pier Blocks typically have a block of redwood or pressure treated lumber, for toe-nailing, embedded down into the concrete but I won't bother using offsets to make that excessive realistic effect. For this Component, I used the 1x1 Square again set it to Start Relative to Node 1 with a Scale of 5.5. For the End Shape, notice that I have left the "*1x1 Square" Name because there is no need to change the Scale value. I have, however, set the Relative to value to "Start" of "Node" 2 and used a Priority value of 2. The Priority values are different so the shapes don't attempt to merge as one uniform shape
Once you have created a custom Member Style using your custom Member Shape, you can test the results of your efforts as illustrated to the right.
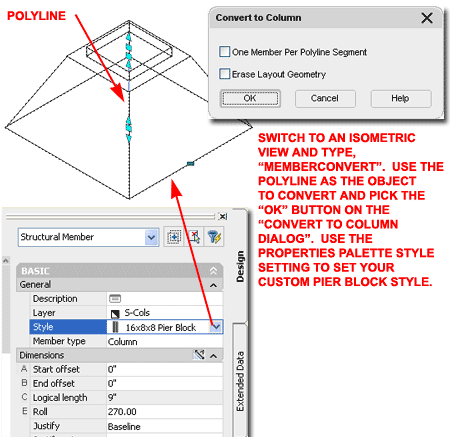
Illustrated to the right is where my solution for this problem differs greatly from what I have seen by other ADT users. In an Elevation View draw a Polyline vertically to represent the height of each Component defined in the Member Style. Though this may seem cumbersome, the reason behind this type of solution is that it offers greater flexibility for design changes.
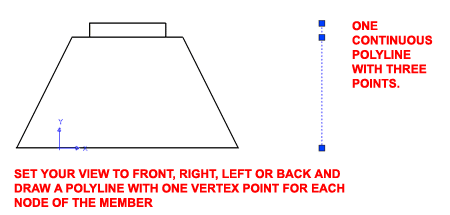
Once you have drawn a vertical Polyline as discussed above, use the "ColumnConvert" command to Select the Polyline and create a Column from it. You may want to use the "Erase Layout Geometry" checkbox to Delete the Polyline but I typically don't on the first run because I may have mistake.
 The
Conversion will automatically use the "Standard" Member Style so you
will need to change this value on the Properties Palette.
The
Conversion will automatically use the "Standard" Member Style so you
will need to change this value on the Properties Palette.
If your work produces the dreaded circle of death, go back and check the MemberStyle Properties and confirm that you used a different Priority value for each Component. The other potential for this type of error lies with the Polyline; so confirm that it was drawn correctly.
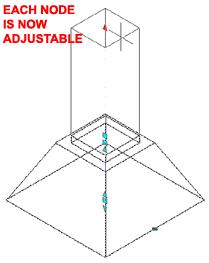
Illustrated to the left I show that each vertex or Node is now independently adjustable with Grips offering all sorts design flexibility. If you need different widths, you can use the "Copy Member Style and Assign..". context menu option to create a Copy where you can change the Scale value as you see fit.
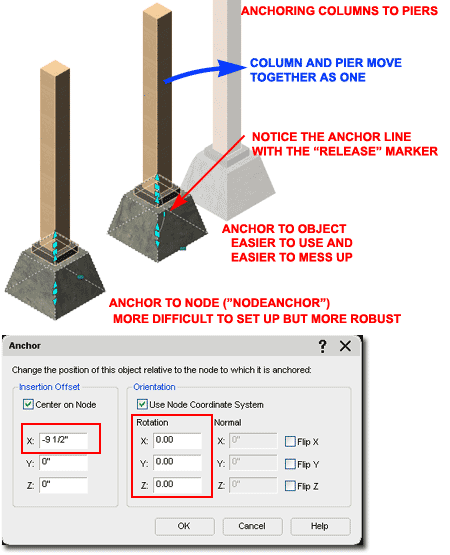
Structural Members can be Anchored together by Node or by Object and the choice you make will probably have more to do with your level of experience with ADT than anything else.
Illustrated to the right I show how I used the Object Anchor and the Node Anchor to Attach a column to a pier block.
To use the Object Anchor, type "Anchor", then "O" and follow the command line instructions. This Anchor will tie two Aec Objects together with an invisible leader but it does not care about the relative position each has to the other so you will be able to manage that independently. If you Anchor the pier to the column, then you will find that moving the column also moves the pier but not vise-versa.
To use the Node Anchor, type "NodeAnchor", then "A" and follow the command line instructions. This Anchor tie the two structural members together by their Nodes but you may find that the Normals do not align without some tweaking on the Anchor dialog found via the Properties Palette (see lower right). I prefer this solution because it is more robust; you cannot move the pier away from the column.
Note:1
With both Anchor examples illustrated here, be careful about using the Copy
command because you may create unwanted results. If you Copy a pier
that has been Object-Anchored to a column, the Copy will also be Anchored
(interesting). If you Copy a pier that has been Node-Anchored to a
column, the Copy will end up in the exact same location as the original and
you will not know that a Copy has actually been made (this is awful).
Note:2
If you regularly use pier blocks with columns, you can avoid the Anchor
option altogether by creating a "membershape" that has the column component
built in. I have shown the Anchor option to illustrate the power of
Anchors and to provide a way for people to tag a column as a column and not
as a pier; i.e., they can be tagged separately.