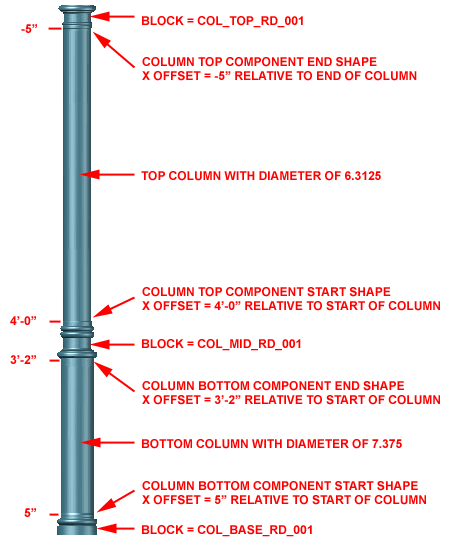
One of our customers sent an e-mail with numerous great custom Structural Member Styles designed for use as columns with ornamental details similar to the one illustrated to the right. The reason for the e-mail was that this customer had gotten stuck trying to create a three part round column that had two different shaft dimensions.
At first glance I told myself that this was a no-brainer but when I assembled the Blocks and attempted to create the column, I realized that I had been down this path before. The problem lies with how ACA reads multi-vertex structural members when it comes to attaching Blocks. You see, ideally, you would set a vertex for the column middle so a designer would have the freedom to move the decorative component up or down with a Grip. This concept will work as long as no Blocks are attached but it's when the Blocks come into play that problems appear.
In this article I will discuss the steps required to create the Structural Member Style illustrated to the right.
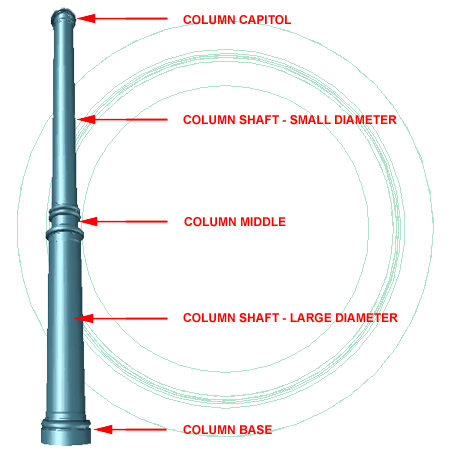
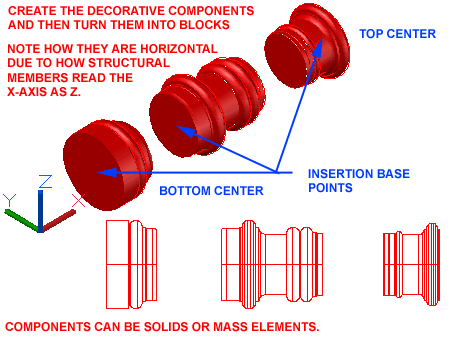
Though you can do a lot of amazing things using Structural Member Profiles, it is a lot easier to create detailed column components using basic 3D modeling techniques. In the illustration to the right, the three decorative column components were created using the Solid "Revolve" command. You can convert Solids into Mass Elements if you find it necessary but in this example I will just leave the three components as Solids.
Each of the three decorative components have to be turned into Blocks so they can be attached to a custom Structural Member Style Definition. In the illustration to the right I show that my decorative components have been rotated to use the Global X-axis as the column center. The Normals for Structural Members read the X-axis of the World UCS as the Z-axis. Also, make note of the insertion base points I have illustrated to the right. You can use whatever insertion base points make sense to you but the ones I show correspond to work I will discuss below.
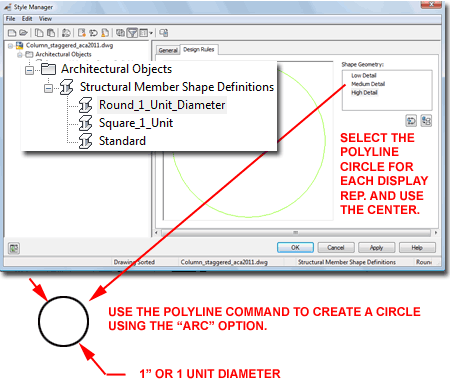
To create a round column it helps to have a round shape and the best way to create a round shape for a custom Structural Member Style is to draw a circle using two Pline Arcs with a diameter of one. The reason for this extra work is that you cannot use a Circle and if you use a Polygon, you will end up with a fixed number of facets.
In the illustration to the right I show that I have drawn my Polyline circle using two Arcs with a diameter of one unit. Then, I show that I have activated the Style Manager with the "MemberShape" command so that I can define a new shape and center point for "Low, Medium and High Detail" Display Representations.
To create the custom column, use the "MemberStyle" command and create a new Structural Member Style definition as illustrated to the right.
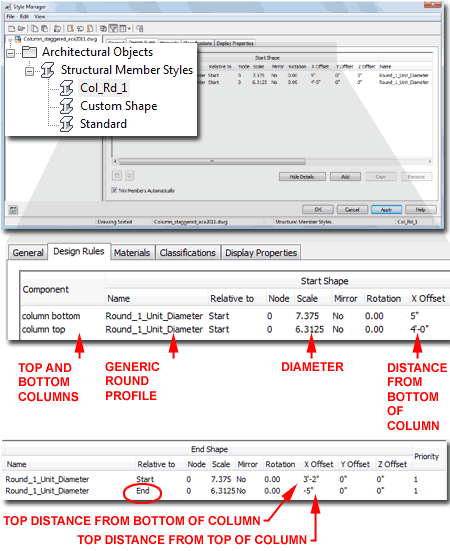
Illustrated to the right I show that I have created a new custom Structural Member Style definition that I named, "Col_Rd_1". For this Style I show the Design Rules tab which is so long that I had to break it into two halves; one for the Start Shape and one for the End Shape.
Because the custom column has two different diameter columns, I created two Components. Under the Name section, I set the Structural Member Shape created in the previous step. The shape was set as one unit so under the Scale section, you can now specify the full diameter and here I show that I made my bottom column 7.375 inches in diameter and my top column 6.3125 inches in diameter. Under the X Offset section, I show that I moved the bottom of my bottom column up 5" to correspond with the height of my column base Block. I set the top column X Offset to 4'-0" to correspond with the top of my middle column Block.
For the End Shape values of the same two components notice that I kept the Scale values the same but I reselected them from the drop-down lists to allow for other setting changes. For the bottom column I set the X Offset to 3'-2" so my column middle Block will insert at that position. For the top column I set the X Offset value to -5" relative to the "End" of the entire column. I chose this method so that the top of the top column will always be 5" below the column top Block and the Block will always reside in a position relative to the end of the column.
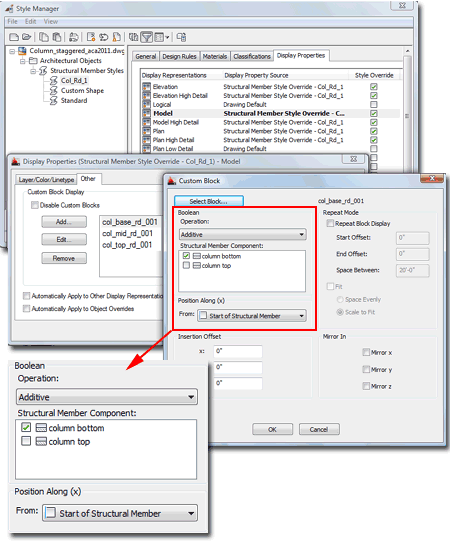
After designing the column, you will need to Attach the Custom Blocks under the Display Properties tab of this custom Structural Member Style definition.
In the illustration to the right I show that I have gone to the Model Display Representation for my custom Structural Member Style and set a Style Override to allow me to attach my three custom Blocks for this Style only.
On the Other tab of the Display Properties Style Override dialog I show that I have used the Add... button to add my three custom Blocks created earlier. For the base Block notice that I use the Boolean Operation "Additive" and set the Structural Member Component to "column bottom". This will merge the Solid in the Block with the column so it will read as one contiguous entity. This may or may not be something you desire but is good to know about. For the base Block I set the Position Along (x) to "Start of Structural Member".
I repeated these steps for the middle and top Blocks. For the middle Block I used the "column bottom" component and the Position Along (x) as the "Start of the Structural Member" with an X Insertion Offset of 3'-2". You would think that I could just have use the "End of the Structural Member" as my Position Along (x) but the position only refers to the entire member despite what the Component list shows (a design flaw, if you ask me).
For the top Block, I used a top center Insertion Base Point so I just set it to the End of Structural Member for Position Along (x) but used the "column top" Structural Member Component.
In the illustration to the right I show the competed example column created from the custom Structural Member Style outlined above.
Though you cannot use a Grip to adjust the height of the middle decorative component, you can modify the Structural Member Style's X Offset Values and the Attached Block Insertion Point value to move it up or down; not ideal but at least it can be done.
Autodesk needs to address the Position Along (x) option with respect to the Structural Member Components and then there would be a lot more users could do with the tricks discussed here.
