Yea, it is a Structural Member!
Due to the fact that Material Definitions can only be applied to native ADT Objects, I continue to look for ways to turn native Objects into Content that I need in ADT. The ability to use Material Definitions allows for unique Display options but it also makes the process of creating Renderings in VizRender a lot faster.
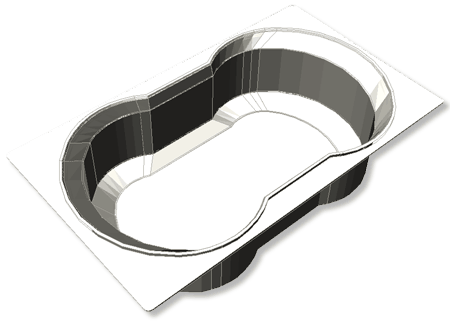
In the illustration to the right I show an example of how I used the "MemberShape" command to capture a variety of Profiles for a common sunken bathtub. The process is similar to creating a contour map by draping a surface over contour lines. Theoretically, you could use the Drape command in ADT but I find that what it produces is generally difficult to work with, huge in memory consumption and fraught with interpretation errors.
Below I will outline how I created new exhaust hoods for the Kitchen Cabinets 6 eKit using Structural Members.
Illustrated to the right I show that I have drawn closed Polyline forms in Plan View for each of the transition points for a simple exhaust hood design. The parts consist of a frame, a hood, a fixed chimney and a chimney extension (adjustable).
To make this example hood more realistic, I used the Offset command to create a material thickness for both the hood and the chimney.
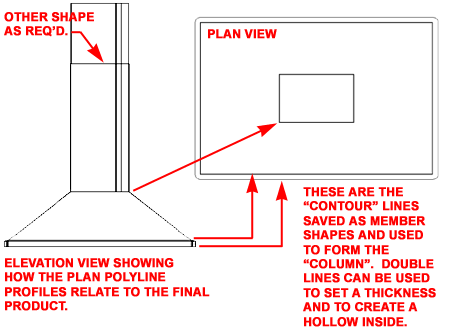
By using the "MemberShape" (or "-membershapedefine" command) you can define and store one or more of the polyline shapes discussed above.
In the illustration to the right I show that I have created a number of new Member Shape definitions that I will combine into one custom Structural Member Style later on. For the hood frame, I show that on the Design Rules tab I used the "Specify..." button to Select the "rings" or "elements" that define this Object. In the case of the frame, I Selected the outer polyline shape I drew in Plan View and one of the inner rings that will also be used to define the hood shape. The result of using two shapes produces a hollow space inside which is how the hood actually appears. The unfortunate aspect of using this technique is that you have to repeat these steps for each of the Display Representations for every shape you define - ugh (surely a tool could be created to make this a lot easier and faster).
For the base of the hood, I used one polyline drawn a bit inside of the frame and the same polyline I used to define the inside of the frame itself. These two lines should only be offset by the thickness of the metal used to form the hood. Because the hood tapers towards the chimney connection, you will need another definition for the top. Depending on the design of your hood, you could get away with about two or three basic shapes but I made my example a little fancy by adding some transitional forms; the adjustable chimney, for example, mounts to the inside of the fixed chimney so it uses another shape.
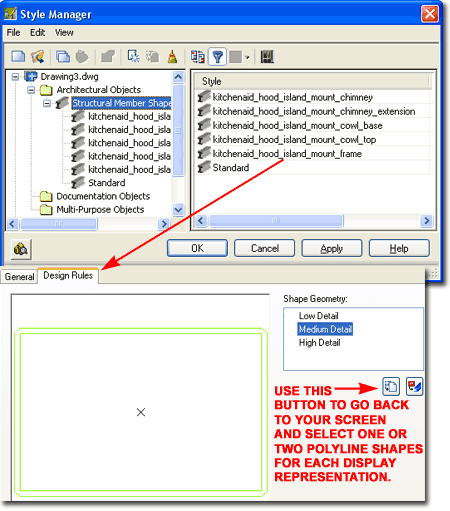
Another cool aspect of using member shapes is that you can add a Scale factor to them for tapers and such but I find it is easier to draw and define each shape rather than attempt to calculate the scale ratio needed to produce specific results. You should experiment.
Once you have a few Member Shapes defined, you can use them in a Structural Member Style.
Illustrated to the right I show that I created a new custom "MemberStyle" that I named to match the intended use. On the Design Rules tab of this custom Structural Member, I show where the magic occurs; by Adding Components, I assigned each to a Member Shape (look for the drop-down list ).
For the frame of my example hood, I named the first Component, "Base" and set it to use my frame member shape. This shape is set to Start Relative to the Start of Node 0 or the first point of a Column (to be drawn later). For each Component, there is a long list of options as they relate to the "Start Shape" and "End Shape". Be sure to use the "Show Details" button in order to see all of these options. One Component always has a start shape and Node and an end shape and Node.
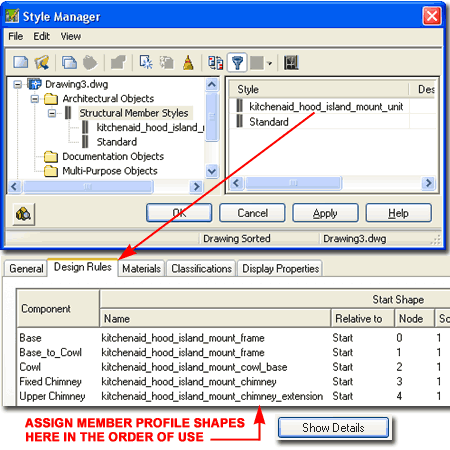
In the illustration to the right I show that I have mapped my Components, Shapes and Nodes to produce a very unique result that will be evident later on. The "Base" uses the frame shape at Node 0 and continues to use the same shape at the Start of Node 1. The asterisk (" * ") indicates that the exact same shape and scale is being used. If you Select the same shape, removing the asterisk, you can change the Scale.
In order to create a chamfered effect from the top of the frame over to the base of my hood cowl, I added a Component that I named "Base_to_Cowl" and though it starts with the same frame shape at Node 1, it morphs to the shape of the base of the cowl at the Start of Node 2. If you can follow the logic of this step, you have the fundamentals of how powerful this feature is for creating forms in ADT.
For the third Component, I show that I have used the shape for the base of my cowl at the Start of Node 3 but used the top shape for the cowl as the End Shape at the Start of Node 4.
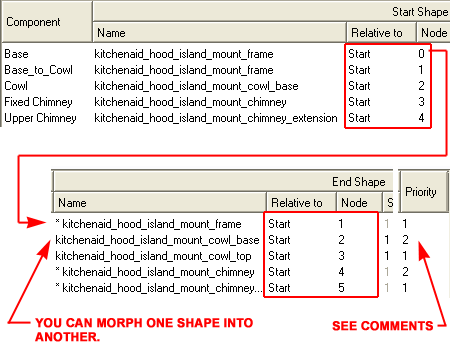
Note:
For best results always use "Start" as the Relative to setting, track your
use of the Node Numbers carefully ( see example, right) and if you find the
results don't behave properly, you may need to alter the Priority Rating to
avoid conflicts ( higher numbers have less priority just like Component
Cleanup Priorities in Wall Styles.
Once you have a custom Structural Member Style that uses your custom Member Shapes, you are ready to test it. The odd thing about this whole system is that you can only create multi-noded Structural Members by Converting Polylines. It seems to me that you ought to be able to draw multi-noded Structural Members simply by picking multiple points.
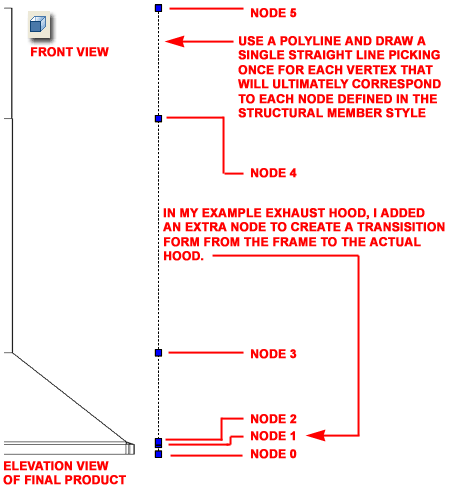
In the illustration to the right I show how I have changed my View to Front so I can draw a multi-segmented Polyline in Elevation. By drawing from the base of my hood and up, picking points along the way that represent the lengths of each Component, I define the contour heights. Make sure to match the number of segments (vertex points) with the number of Nodes.
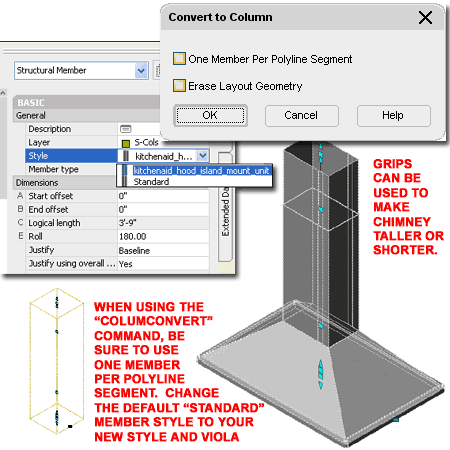
In any View, like Isometric, use the "ColumnConvert" command to create a Column from the multi-segmented Polyline as illustrated to the right. The default Style will always be "Standard" so you will want to change the Style to the new custom one.
Notice that when you convert the Polyline, a dialog box appears with options for "One Member Per Polyline Segment" and "Erase Layout Geometry". Because the whole point of this exercise is to take advantage of the different shapes used in one Structural Member, be sure to uncheck the "One Member Per Polyline Segment" or you won't get the results shown here. I tend to keep the Geometry until I have a finished product that is perfect and that never happens on the first attempt.
If you see the dreaded circle of death, chances are that something is wrong with the Components and Nodes of the custom Structural Member Style so go back and review that work. If all the shapes and Node numbers look okay and if all use the Relative to "Start" settings, you may need to use some Priority numbers.
If you get all of this to work, go back to the custom Structural Member Style and take advantage of the Material assignments and Display Representations.
On this subject, I'd like to recommend that the programmer(s) working on this feature enhance the option to Add custom Blocks by being able to control which Node values the Blocks are attached to. As it stands, we only have Start, Middle and End and that stinks. I think Structural Members have a lot of untapped potential. What if I could Edit-in-Place each of the MemberShape definitions?
Illustrated to the right is the example exhaust hood discussed above using the 3D feature of ADT 2006's .dwf publishing tool. If you have the .dwf viewer you should find that you can use the View tool to set an Isometric View and then use the Orbit tool to spin around the object.