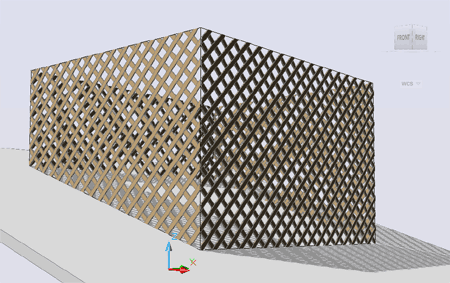
On a recent project I wanted to show some decorative cedar lattice in my elevations and 3D Model so I decided that I wanted to create it as a true 3D Object. Most AutoCAD Architecture users would likely use some 3D Faced Object that would show a Hatch Pattern for linework and a lattice render material for Renderings - a sound solution but I hate it when you cut an elevation and lines are not trimmed where they should be. On the other hand, making everything 3D can put a serious toll on your system performance so I wouldn't recommend this solution for large projects.
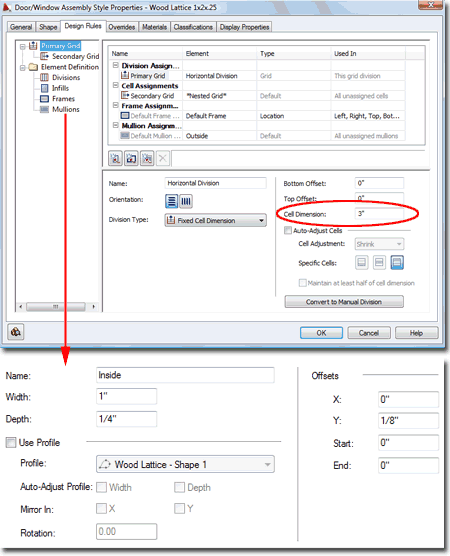
The first thing you will need to do is create a custom Door/Window Assembly Style with a Horizontal Division set to a Fixed Cell Dimension of 3" or more (center to center of lattice). For the Secondary Grid, use a Vertical Division set to the same Fixed Cell Dimension.
For the Primary Frame Assignments, either uncheck all of the Locations or set the Frame width to 0" so there is no Frame.
For the Primary Mullion Assignments, you can use the same Mullion for the Horizontal and Vertical Lattice pieces or create one for the Outside and one for the Inside as I have illustrated to the right. The reason I created two Mullion Assignments is that I felt it would look better if I used the Y Offset on the inside pieces since, in reality, they are stapled to the inside. I assigned my Outside Mullions to the Primary Grid and the Inside Mullions to the Secondary Grid.
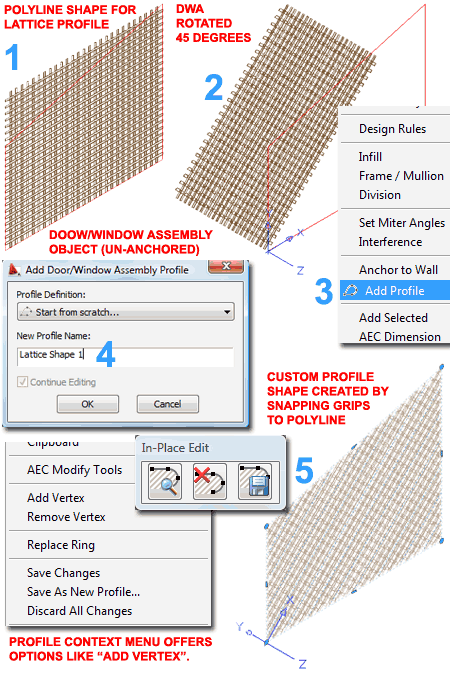
1In the illustration to the right I show that I have drawn a Polyline shape, in red, that I am using as a guide for my Door/Window Assembly Object that I have created in the discussion above. When you add a DWA, you can hit "Enter" on your keyboard to get past the "Select Wall..." query on the command line.
2To create a lattice that has 45 degree components, I Rotated the DWA Object from one corner. Notice that I rotated my UCS icon to help me Rotate this Object as shown.
3I Selected the Rotated DWA, right-clicked, and used the "Add Profile" context menu option to create a "New Profile Name" from "...scratch..." If you have four or more of these on a project, you'll want to keep track of each unique shape.
4Once the Profile name has been applied, you should find that you can modify the default Profile under the "Edit in Place" mode. In the illustration to the right I show that I have used Grips to OSNAP each corner of the default Profile to the corners of my Polyline. Notice that you can use the context menu to Add or Remove Vertex points allowing you to build a Profile shape by OSNAPPING to Objects on your building.
5After Saving the Edit In Place work, one custom 3D 45d lattice has been completed. To make more, using different Profile Shapes, you will need to create Copies of the DWA Style because each DWA Style can only use one Profile; i.e., you will end up with one DWA Style and one custom Profile for every unique lattice shape.